- Inspiration

Peacock designs

Express yourself with a custom peacock design created just for you by a professional designer. Need ideas? We’ve collected some amazing examples of peacock images from our global community of designers. Get inspired and start planning the perfect peacock design today.

Illustration for Premium Wine Label of "Corte Pavone" Wine Estate in Montalcino, Toscana.
Highly detailed, botnical illustration created with the purpose of being the main graphic of a premium wine label. Each element of this intricate and sophisticated design is linked to the place where the wine is crafted: Montalcino, Toscana.

Peacock Callagen

Brand Refresh for a 130 Year Old Company

Handdrawn logo
Handdrawn regal logo

Creative logo for marijuana delivery.
Nice guys medical marijuana delivery.

Arizona Living Group
The Arizona Living Group offers clients real feedback and passionate local Arizona living expertise. Based out of Phoenix, Arizona, the team is lead by a passionate female with a heart for giving back to the community.

Logo Design for Kiaaron Collection

Elegant logo for women's accessories, jewelry and home décor boutique

Create a young and hip design for a highly creative Film Festival
the singapore and myanmar film festival association.

logo with sensual look for tantra practitioner
logo design with a watercolor illustration based on client suggestions

Strange Lane Retail Logo

Logo for Peacock Design Wedding & Event Stylist

Envelope Design

Art for Scarf
We were encouraged to make arty designs for a high end fashion scarves. Contest holder was interested in my watercolor style...

BRABANT EXCLUSIEF

Peacock Logo
A live streaming marketplace to feature beautiful artisanal created products directly from India.

Bold Amazon Logo
The client reached out by invitation , which is awesome and we ended up going for a luxurious looking peacock. After a few iterations we discovered they loved the watercolo style and proceeded to create this very organic design and keep it in vector format.

Peacock Esquire Logo Design
Unique and professional logo design for a lifestyle blog

Wizz Financial
cartoon peacock for mobile banking app

Animated Email Signature for Printing Company

Logo for Beauty product in paris
Innovative French Skincare company creating premium luxury skincare products and high tech beauty tools.they target are educated customer, mainly women, looking for high quality & innovation into their beauty products.

Logo concept for a coaching and consulting business
This is a coaching and consulting business that helps people achieve the full measure of their potential by focusing on their body, mind, spirit, and message.

Animals illustrations for use on notebooks
Animals illustrations for use on notebooks. The series is to include a bird holding a flower in its mouth, a dragonfly, a peacock, an elephant, a fox, and a bumblebee.

An award-winning book with original colorful illustrations on the cover. The book, divided into nine chapters, has art in each opening, pacing, and interacting with the text.

abstract logo for man tie brand

peacock logo design

Peacock logo concept - Golden Ratio

Logo for colored stone jewelry manufacturer

Logo design for a B&B for nature and horse lovers
They are starting a B&b in the heart of the largest nature forest of the Netherlands. I want to combine a horse head with the emblem of the town and community they live in is the white peacock.

Logo design for a Indo-Japanese firm
This design is a abstract combination of a Peacock's wings, sun and sunrays. Peacock is the national bird of India and it represents India Beautifully with it diverse spectrum of colors and beauty. The peacock being a bird communicates guidance and vision,which are the values synonymous with marketing portal. Japan is commonly known as land of rising sun and also the national flag of Japan represents Sun. The Sun and its rays are present in the negative white space of the design. By this a potential client can relate to japan and also know what you are offering. The colors are changing from orangish red to green.This conveys progress from Japan to India ( east to west ) or vice-versa.

Book Cover: Novel
Book cover for a novel set in postcolonial Bangladesh and Britain. It is a history of a nation that is trying to find itself, in the midst of violence, sexual intrigue, and identity crises. I used the colors of the Bangladesh flag with the shape of a peacock and kaleidoscope.

Peacock Illustration for Envelope Design
One of a series of illustrations for the design of envelopes commissioned by Parkland Direct https://www.parklanddirect.com/

Proposed logo for Modishhh

Logo design
Logo designed for a Jewelry. The client asked for an elegant, yet bold and classy logo. Also, to include few elements like birds, flora, and similar. This is one of my first ideas for it.

logo for interior designer
The client wanted a peacock in a henna style. So this is what I got for her. You will surely be amazed by my creativity and there is more to come ahead.

Professional Die Cast Pin Design for Anniversary of Youth Basketball League
1.5" die cast pin celebrating 5-year anniversary of Palos Verdes, a Youth Basketball League

The idea was to illustrate vintage, humanized animals. Peacock Madam in this case.

logo for hemp supplements

Professional Salon, Beauty, Spa, and Nail Service out of Thailand

Krishana Pleasant
Krishana Pleasant is a real estate consultant and mentor with over 12 years of experience; helping busy professionals create passive income by acquiring and developing real estate in urban centers with an aim to help communities and their residents flourish.

Logo design that will be used as a contemporary “family crest” for a private residence.

Distributor of promotional products
The idea was to create a logo for Distributor of promotional products.

A live streaming marketplace to feature beautiful artisanal created products directly from India. We have included some Inspo pics below which we like . The peacock is standing out to us as the app will have many vendors and the feathers represent many vendors. The name Sundar means 'beautiful' in Hindi.

Logo for a network firm.
A logo for a communications app. Initial letter R contains a peacock in the central space. The peacock's crown has three networking circles. Curved colours suggest feathers/wings.

Help Relena with a new logo
Simple & clean design

Thin, elegant logo for Indian Restaurant My Masala
Star Anise, Cloves, Coriander and a Peacock creates a Mandala.

Contemporary "Family Crest"
peacock design

Peacock Law

A Comprehensive Guide to Understanding Dementia, The Stages of Cognitive Impairment and Managing the Challenges.

Illustration of organic peacock.

An abstract logo for perfume brand, Pure Essence by Jamal Neal
The symbol is inspired by Peacock feather, combine with serif font and also gold on dark background for the color, it gives a more luxurious feel. Thank you for visiting. Have a nice day.

Create a captivating logo and website for a marketing company, BluPlume
I took an idea from a peacock symbol and it is make different and unique looks. Finally, the client is happy :)

LUXURY PEACOCK
LOGO contest from Winter Park Social.

Logo concept for Fine Gifts and Home Decor
combination of pagoda and peacock feather

Brabant Exclusief logo
Brabant Exclusief is a luxury (dutch) platform in which suppliers of exclusive living related products and services are presented (Houses, Interior & Exterior Designers, Exclusive Wallpaper, Lamps, Home Cinema, Swimming Pools, Carpets etc.). Target audience of the platform is the high-end market for luxury living. Brabant refers to the region 'Noord-Brabant' in the South of the Netherlands. the client wanted a unique concept of a peacock, and I made the peacock with the concept of a peacock and water :). which it shows on each feather like water and forms a geometric peacock's wings beautifully in every part :)

Wedding service firm in France

Logo and business card for AANYA - bohemian-chic apparel and accessories store
1-1 project

Peacock logo

Marijuana leaf with peacock symbol

logo design for Irish songwriting family girl band, Saffyre
For this design, I had the idea of breaking down the treble clef to make it into a letter "s" mark. I then added the same letter style to a similarly tapered word mark. Using the negative space from the top of the monogram, I created the peacock feather. I made a brush out of the shape in order to style the laurel and wreath. Finally I added a gold gradient overlay, and several sapphire shades. I added digital asset for website, marketing and merch usage.

3D peacock illustration

Saffyre logo music merch mockup

Peacock Orchards, LLC
A small business which will be selling pecans grown at family's orchards.

Create a Fun logo for Wedding Industry Entertainment

logo design for fashion designer.

Narcissist Abuse Recovery
Book Cover about Narcissist Abuse Recovery

Peacock Line Logo
Legacy is a printing company. So i have idea to make a peacock icon because i think peacock is a beautiful bird that can show colorful fur. So it's can represent of good quality printing. I use line style to make the logo looks clean and modern.

peacock logo

the teal peacock foundation

Book Cover For Anxiety Attachment Recovery

Cartoon character for the mobile app

Your friend the peacock
It is as if your pocket animal came to collect taxes :)

logo concept for travel agency

Create a collection of Pattern Designs for a high end baby swaddle blanket

Geometric Peackok
The idea was to create a geometric peacock in an easy way just with lines and can stand out without a wordmark.

Design and illustrate a mermaid banner for a jewellery website
I wanted to create a gorgeous illustration that represents the beautiful jewellery and the reason behind it.

Peacock heart logo

welcome to Rio banner

A Peacock as Tattoo on my Arm
Peacock tatoo design

Penguins & Peacocks
Negative space used for a penguin huging a peacock

Peacock Based App Icon for 'Pavo'
App icon representing a peacock designed in the shape of 'P'.

House of yas

SMILE & FACES
in this design I made a design of a peacock., here I made it in the style you like, using a line structure. here I made the details of the peacock's tail in bloom and also the peacock's body in the middle. I use the Monserrat font with aesthetic placement and spacing, of course, as you include in the logo text. for the color I used turquoise blue and gave it a gold look. for more details please see the entry. thanks.

Unused concept for luxury cabins for rent

Vintage Tshirt Design

peacock logo with line art or monoline concept

peacock app logo

Artistic logo

peacock feather logo concept
peacock logo concept

Logo for Heera

Peacock designs not a good fit? Try something else:
How to create your design.
If you want an amazing peacock design that stands out from the competition, work with a professional designer. Find and hire a designer to make your vision come to life, or host a design contest and get ideas from designers around the world.
Start a contest
Designers from around the world pitch you ideas. You provide feedback, hone your favorites and choose a winner.
Start a project
Find the perfect designer to match your style and budget. Then collaborate one-on-one to create a custom design.

4.8 average from 37,581 customer reviews
What makes a good peacock design?
A great design shows the world what you stand for, tells a story and makes people remember your brand. Graphic design communicates all of that through color, shape and other design elements. Learn how to make your peacock design tell your brand’s story.

Graphic design trends Discover stunning trends and find out what's new in the world of graphic design… Keep reading
The 7 principles of design Graphic design adheres to rules that work beneath the surface of any great artwork. Learn all about them here… Keep reading
Fundamentals of color theory Color can have an immense power - if you know how to use it. Learn all about the fundamentals of color theory here… Keep reading
- Images home
- Editorial home
- Editorial video
- Premium collections
- Entertainment
- Premium images
- AI generated images
- Curated collections
- Animals/Wildlife
- Backgrounds/Textures
- Beauty/Fashion
- Buildings/Landmarks
- Business/Finance
- Celebrities
- Food and Drink
- Healthcare/Medical
- Illustrations/Clip-Art
- Miscellaneous
- Parks/Outdoor
- Signs/Symbols
- Sports/Recreation
- Transportation
- All categories
- Shutterstock Select
- Shutterstock Elements
- Health Care
- Sound effects
PremiumBeat
- PixelSquid 3D objects
- Templates Home
- Instagram all
- Highlight covers
- Facebook all
- Carousel ads
- Cover photos
- Event covers
- Youtube all
- Channel Art
- Etsy big banner
- Etsy mini banner
- Etsy shop icon
- Pinterest all
- Pinterest pins
- Twitter All
- Twitter Banner
- Infographics
- Zoom backgrounds
- Announcements
- Certificates
- Gift Certificates
- Real Estate Flyer
- Travel Brochures
- Anniversary
- Baby Shower
- Mother's Day
- Thanksgiving
- All Invitations
- Party invitations
- Wedding invitations
- Book Covers
- About Creative Flow
- Start a design
AI image generator
- Photo editor
- Background remover
- Collage maker
- Resize image
- Color palettes
Color palette generator
- Image converter
- Creative AI
- Design tips
- Custom plans
- Request quote
- Shutterstock Studios
- Data licensing
You currently have 0 credits
See all plans

Image plans
With access to 400M+ photos, vectors, illustrations, and more. Includes AI generated images!

Video plans
A library of 28 million high quality video clips. Choose between packs and subscription.

Music plans
Download tracks one at a time, or get a subscription with unlimited downloads.
Editorial plans
Instant access to over 50 million images and videos for news, sports, and entertainment.
Includes templates, design tools, AI-powered recommendations, and much more.
Peacock Design royalty-free images
140,710 peacock design stock photos, vectors, and illustrations are available royalty-free for download..

Our company
Press/Media
Investor relations
Shutterstock Blog
Popular searches
Stock Photos and Videos
Stock photos
Stock videos
Stock vectors
Editorial images
Featured photo collections
Sell your content
Affiliate/Reseller
International reseller
Live assignments
Rights and clearance
Website Terms of Use
Terms of Service
Privacy policy
Modern Slavery Statement
Cookie Preferences
Shutterstock.AI
AI style types
Shutterstock mobile app
Android app
© 2003-2024 Shutterstock, Inc.
We’re sorry, but Freepik doesn’t work properly without JavaScript enabled. FAQ Contact
- Notifications
- Go back Remove
- No notifications to show yet You’ll see useful information here soon. Stay tuned!
- Downloads 0/60 What is this?
- My collections
- My subscription
Find out what’s new on Freepik and get notified about the latest content updates and feature releases.
- Peacock colors
- Peacock feather
- Peacock background
- Peacock feather background
- Peacock feather wallpaper
- Peacock feather art
- Peacock painting
- Peacock tail
Peacock Design Images

- Add to collection
- Save to Pinterest
- peacock pattern
- feather pattern

- hand drawn bird
- bird drawing

- watercolor water
- colorful watercolor

- animal card
- animal collection

- peacock background
- tropical birds

- diwali background
- Diwali lights

- watercolor bird
- bird flower

- colorful colors

- peacock invitation
- wedding date
- engagement ceremony

- janmasthami
- krishna janmashtami

- ashoka chakra
- independence day

- wedding invitation peacock

Side Edge Cards

Learn how to make fun side edge cards with some cardstock, glue, and foam adhesive.
- Several Sheets of 8.5" x 11" or 12" x 12" 65 lb. Cardstock (various colors)
- One (1) Sheet of 8.5" x 11" or 12" x 12" 65 lb. White Cardstock
- One (1) Sheet of 8.5" x 11" or 12" x 12" White Glitter Cardstock (optional for snowflakes)
- One (1) Sheet of 8.5" x 11" or 12" x 12" Blue Metallic Cardstock (optional for peacock card liner)
- One (1) 3” x 2” Piece of Permanent Vinyl (optional for sentiment)
- One (1) 3” x 2” Piece of StandardGrip Transfer Tape (optional for sentiment)
- Gel Pens (optional for sentiment)
- Design #564 (My free SVG/PDF/DXF design files are available in my free resource library - get the password by filling out the form at the bottom of this page)
- A way to cut your materials - I’m using the Cricut Maker 3, but you can also use the Cricut Maker, a Cricut Explore Series machine, the Cricut Venture, or even the Cricut Joy Xtra.
- Cricut Green StandardGrip Machine Mat 12" x 12"
- Scoring Stylus (optional for files with score lines) -OR-
- Single Scoring Wheel (optional for files with score lines)
- Craft Glue (I used Bearly Art Precision Glue )
- Adhesive Foam Squares
- Weeding Tool
- Tweezers (optional)
Instructions
Step 1: get my free side edge cards designs.
First, download my Side Edge Cards SVG/PDF/DXF files from my free library -- look for Design #564 . Alternatively, you can use the Save This Project form near the top of this post and the design link will be emailed to you.
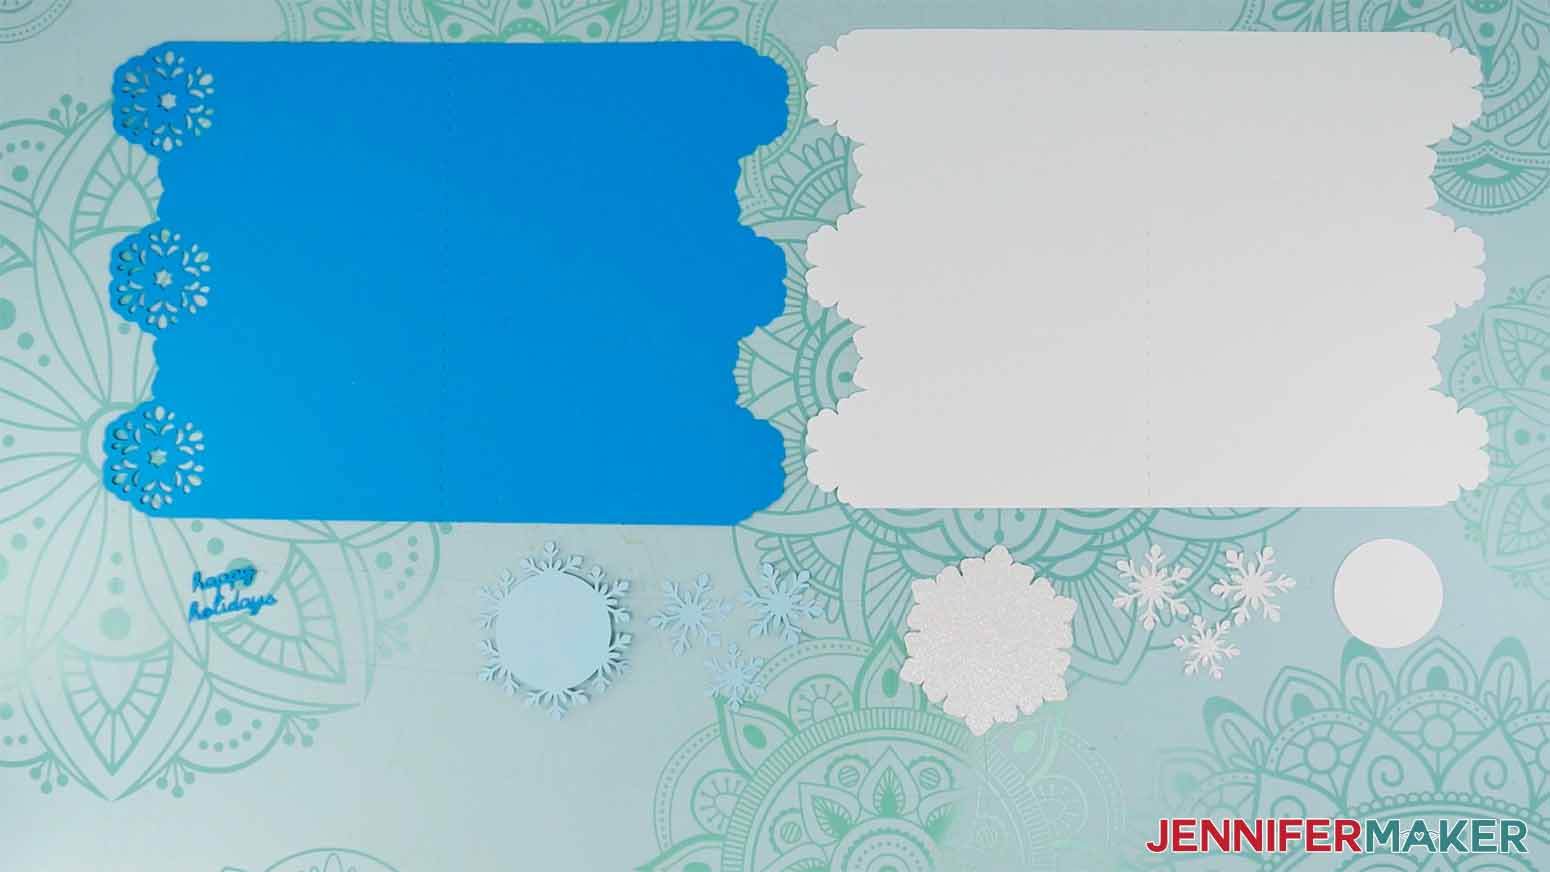
There are four designs in the folder: butterflies, leaves, a peacock, and snowflakes. There are score and no-score versions of each design.
In this tutorial, I will show you how to prepare and assemble the no-score snowflakes card, but you can also follow these steps to make the other card designs. I’ll also show you how to make your own custom leaves design from scratch in Cricut Design Space. Upload your chosen SVG file to Design Space to get started.
TIP: If you’re not sure how to upload, go to jennifermaker.com/svgs to learn how to unzip and upload SVG files.
PROJECT 1: SNOWFLAKES SIDE EDGE CARD
Step 2: prepare your design.
CRICUT DESIGN SPACE
1. Open Cricut Design Space and click “New Project.”
2. Click “Upload” and then “Upload Image.”
3. Click “Browse.”
4. Select the SVG file.
5. On the Prepare to Upload screen, it will say “Cut image” with the design preview.
6. Click “Upload.”
7. Find your design in Recent Uploads and add it to the Canvas.
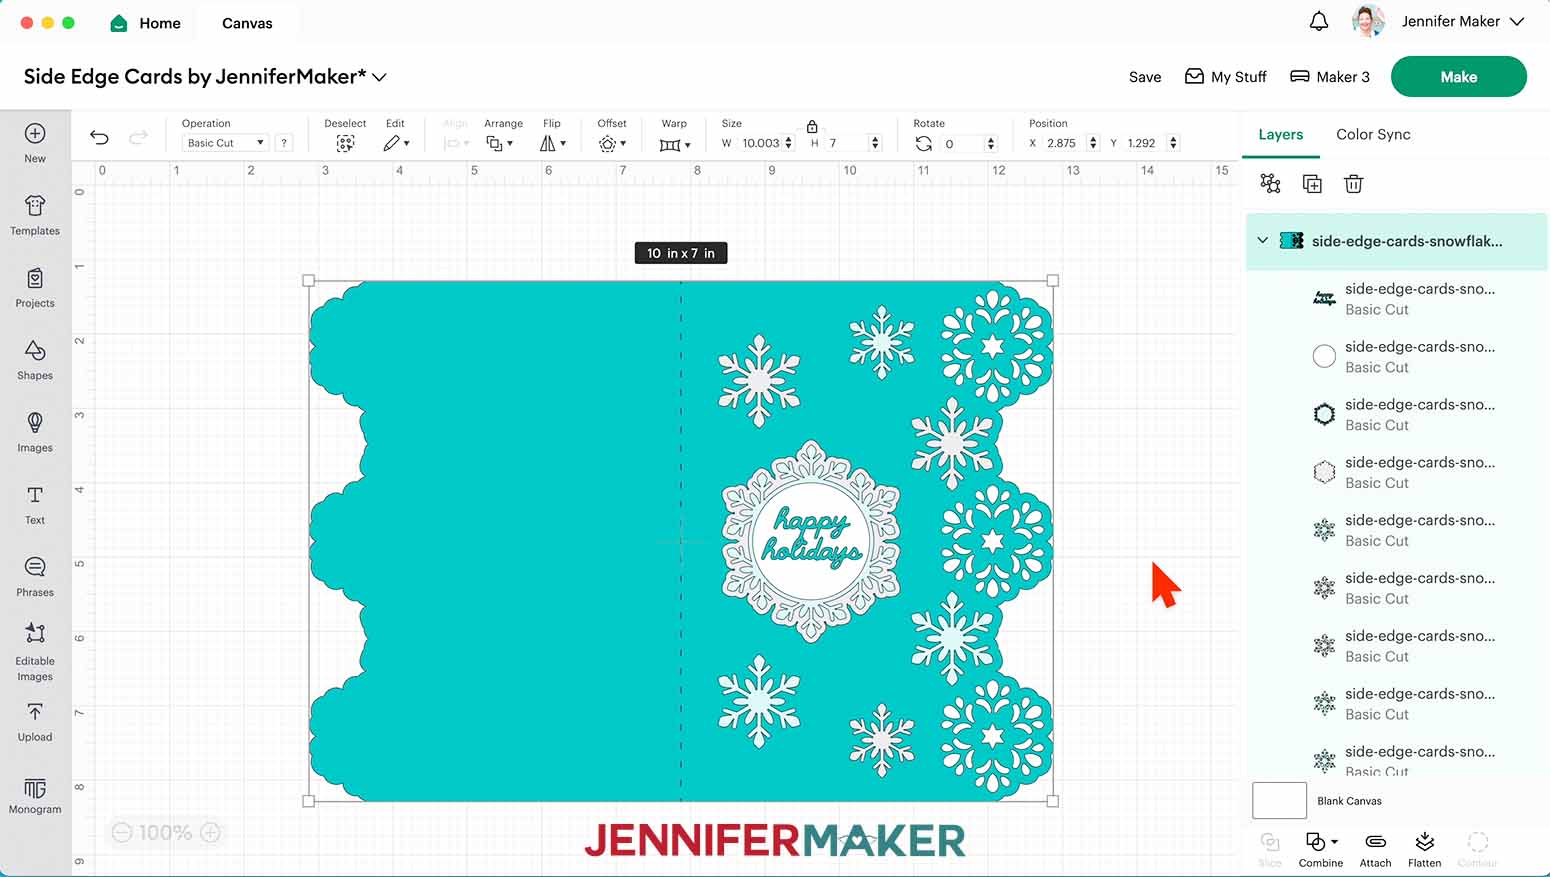
8. With the design selected, click the “Ungroup” icon above the Layers Panel.
9. If you’d like to change the color of any elements, click on them and select a new color swatch from the top menu.
TIP: If you’d like to cut the “happy holidays” sentiment out of permanent vinyl instead of cardstock, change it to a new color not used in the design so it will cut on a separate mat.
10. The snowflakes design has two layers for the card base - a teal front layer and a white back layer for easier writing on the inside of the card. If you’d like to remove the extra white layer, select it in the Layers Panel and click the “Delete” icon.
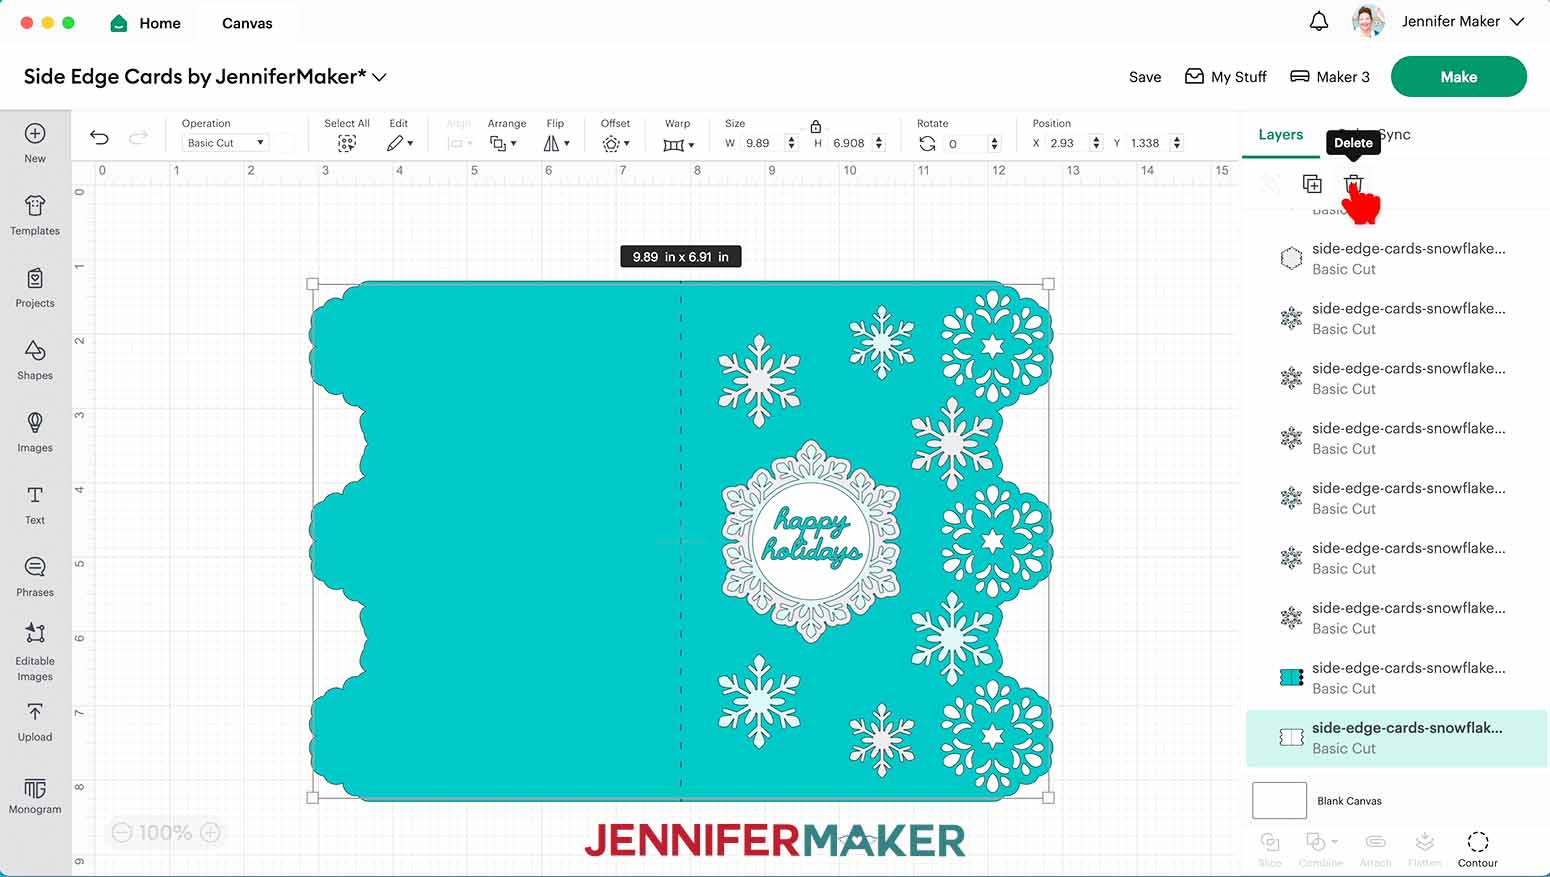
11. Your layers are ready to cut!
12. Make sure the correct machine is selected in the top right.
13. Click “Make.”
14. If prompted, click "On Mat," choose your mat size, and click “Confirm.”
15. On the Prepare Screen, you should have four mats for the snowflakes side edge card - 1 white, 1 gray (I used white glitter cardstock for this), 1 dark teal, and 1 light teal.
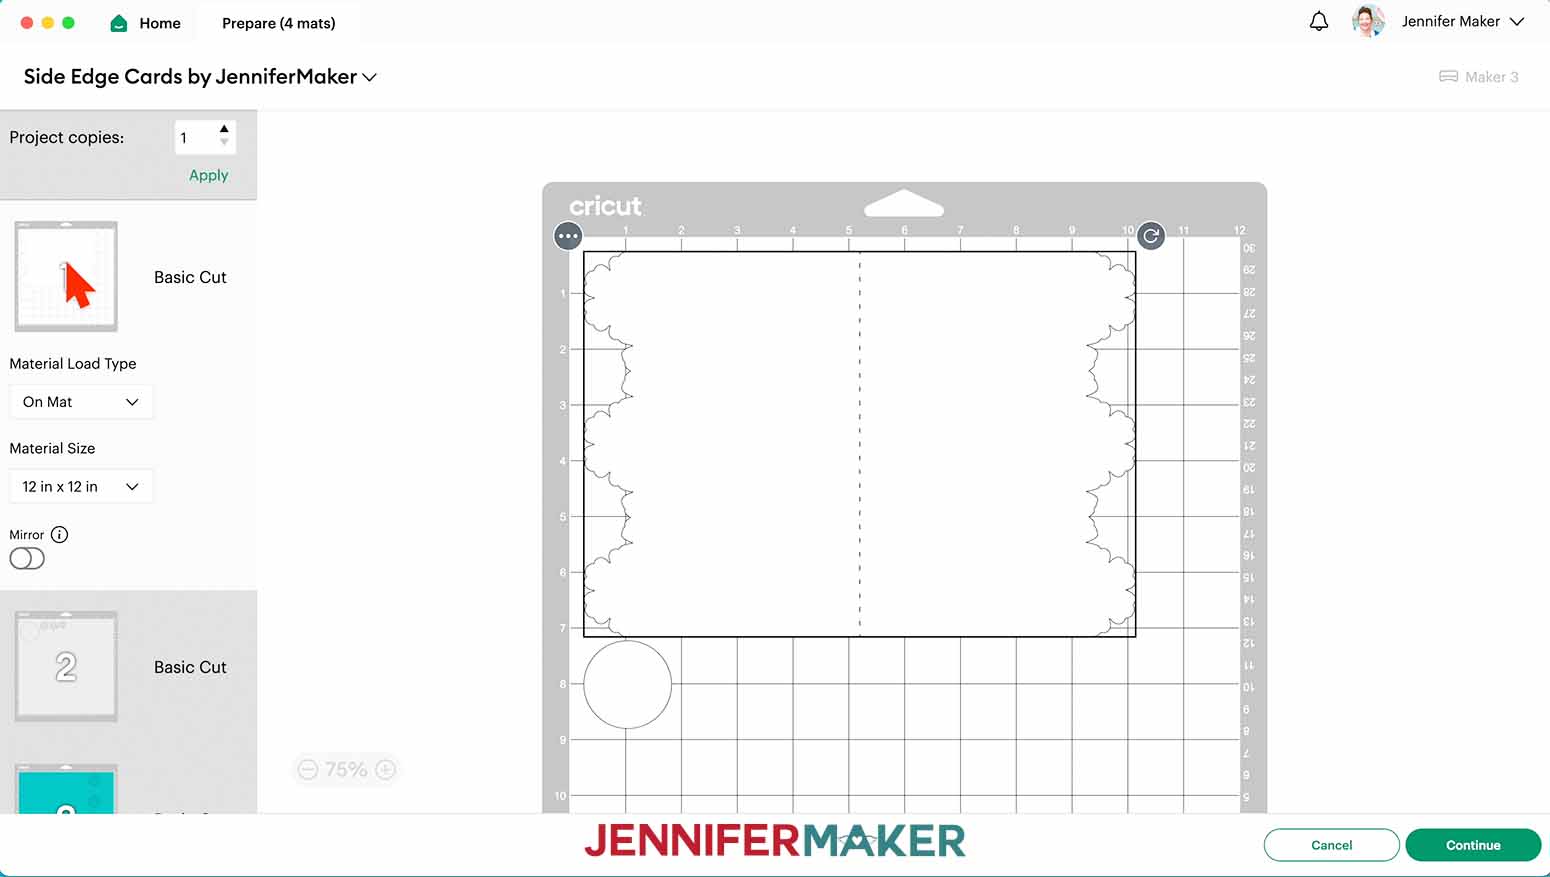
16. If needed, change the Material Size to match each paper you’re using.
17. Select the first mat again and click “Continue.”
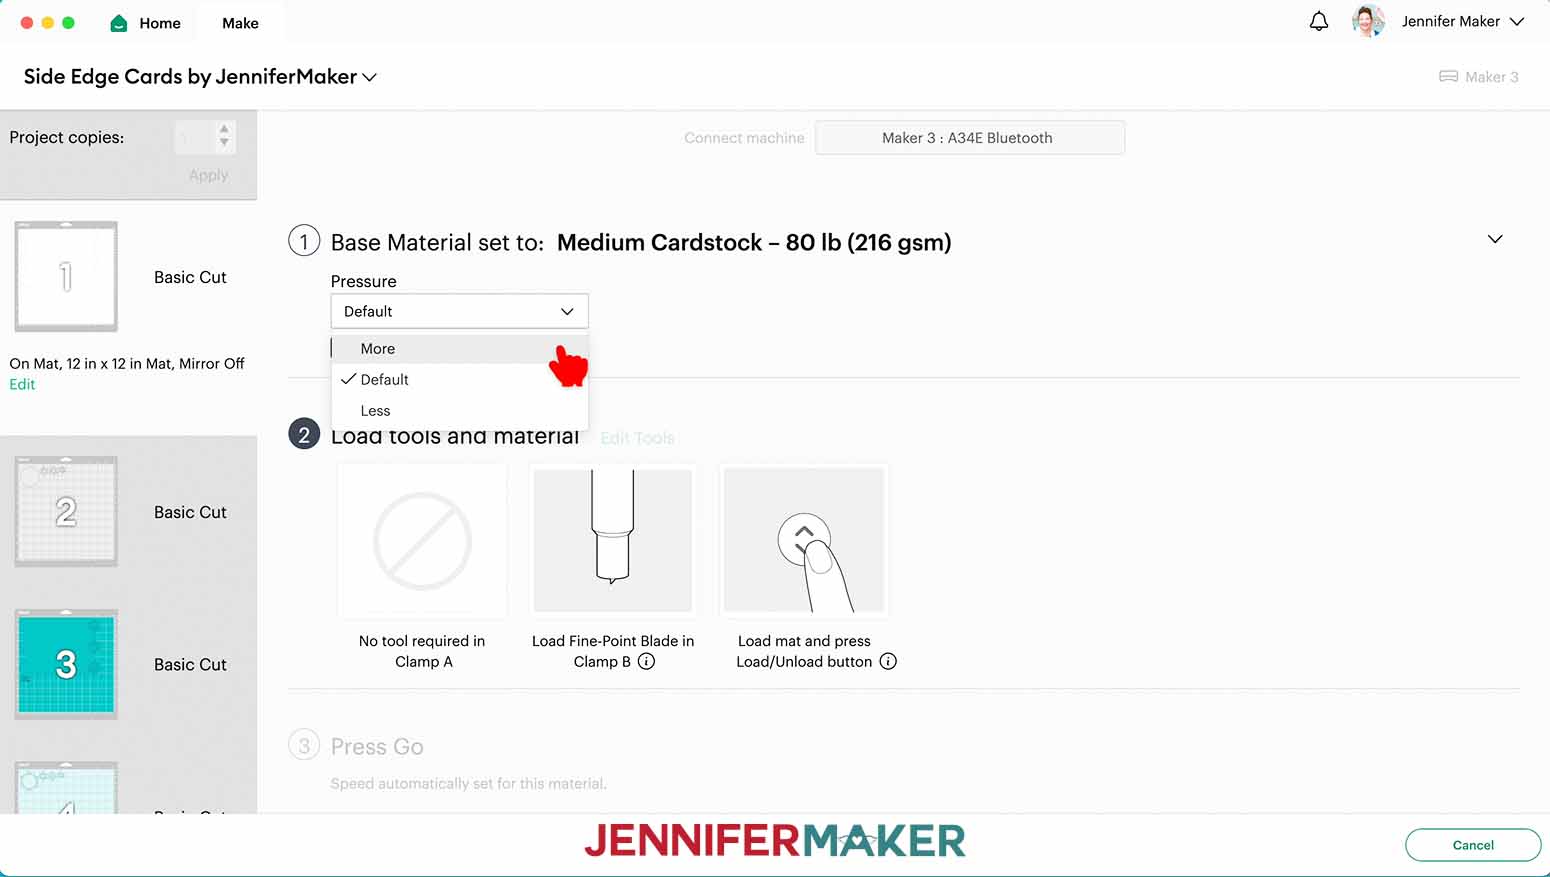
1. On the Make Screen, click “Browse All Materials.”
2. Search for and select the settings needed for the materials you’re using. I used 65 lb. cardstock for the white and teal mats and glitter cardstock for the gray mat. You can also use permanent vinyl for the sentiment piece. These are the settings you can use for each material:
- 65 lb. Cardstock - “Medium Cardstock - 80 lb (216 gsm)” Setting with More Pressure
- Glitter Cardstock - “Glitter Cardstock” Setting with More Pressure
- Permanent Vinyl - “Premium Vinyl - Permanent Glossy” Setting with More Pressure
3. Place your paper face up on a StandardGrip machine mat and use a brayer to make sure it’s fully adhered.
TIP: Refer to your Design Space screen to make sure you’re loading the correct color and type of paper for the current mat.
4. Check that your Fine-Point Blade is clean and in the clamp.
5. Press the flashing “Load/Unload” button to load the prepared mat into your Cricut.
6. Press the flashing “Go” button to begin cutting.
7. When it has finished cutting, unload the mat, flip it over onto your work surface, and roll it back to release the paper.
8. Follow steps 2-7 to cut and remove your remaining pieces.
TIP: Be careful when removing intricate pieces like the “happy holidays” sentiment. Use a spatula to carefully remove any intricate parts and a weeding tool to pop out any small pieces. If you have trouble with any of your cuts, check out my Cricut Tips & Tricks for Cleaner Cuts .
9. Here are what my cut pieces for the snowflakes side edge card look like.
STEP 3: ASSEMBLE YOUR SNOWFLAKES SIDE EDGE CARD
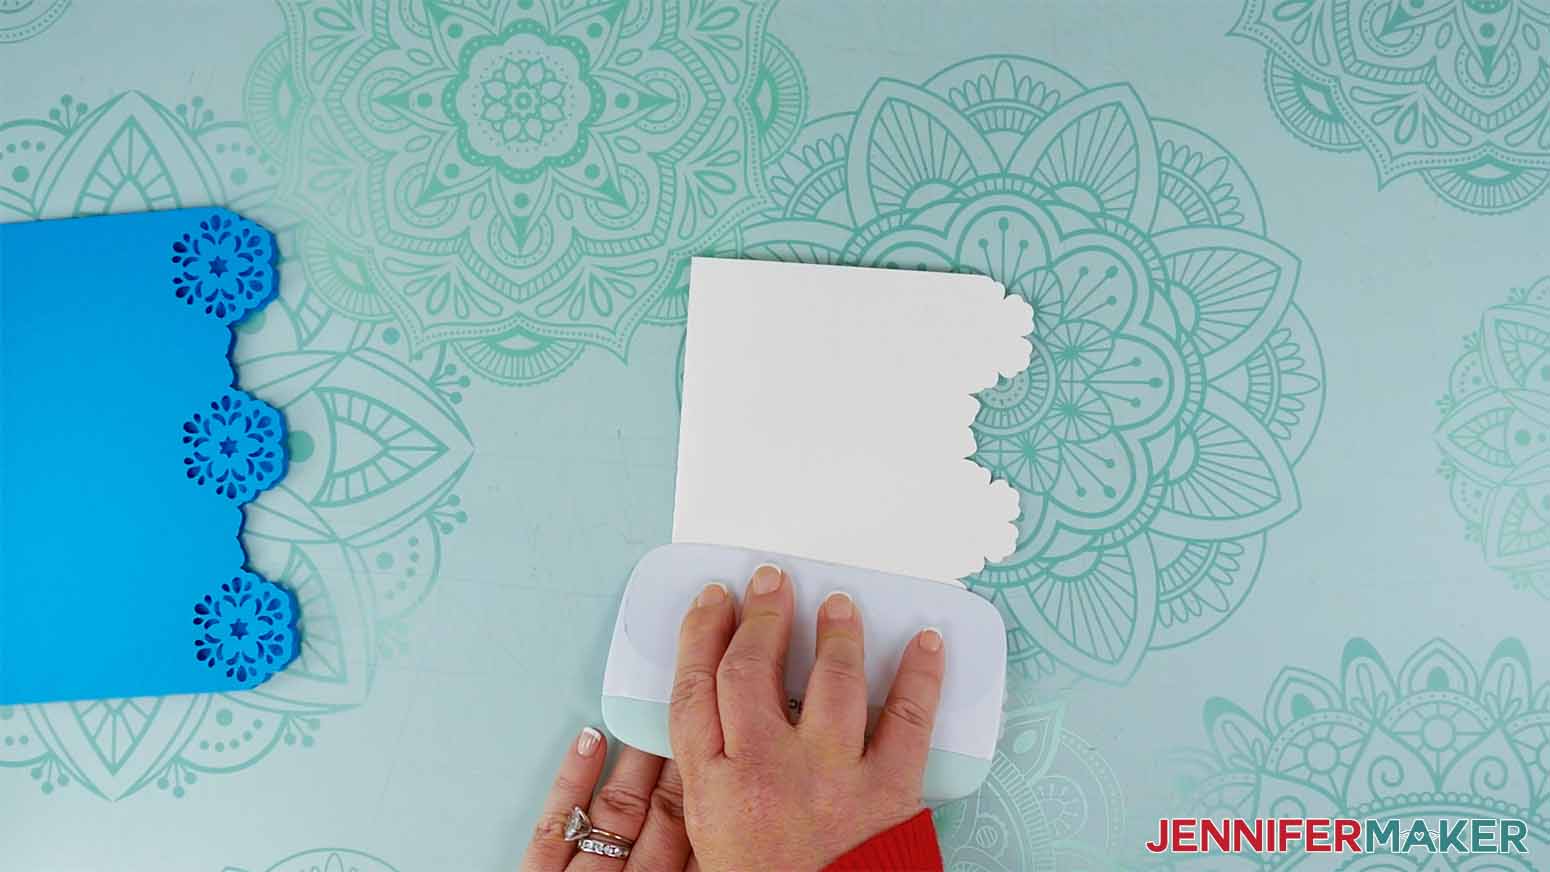
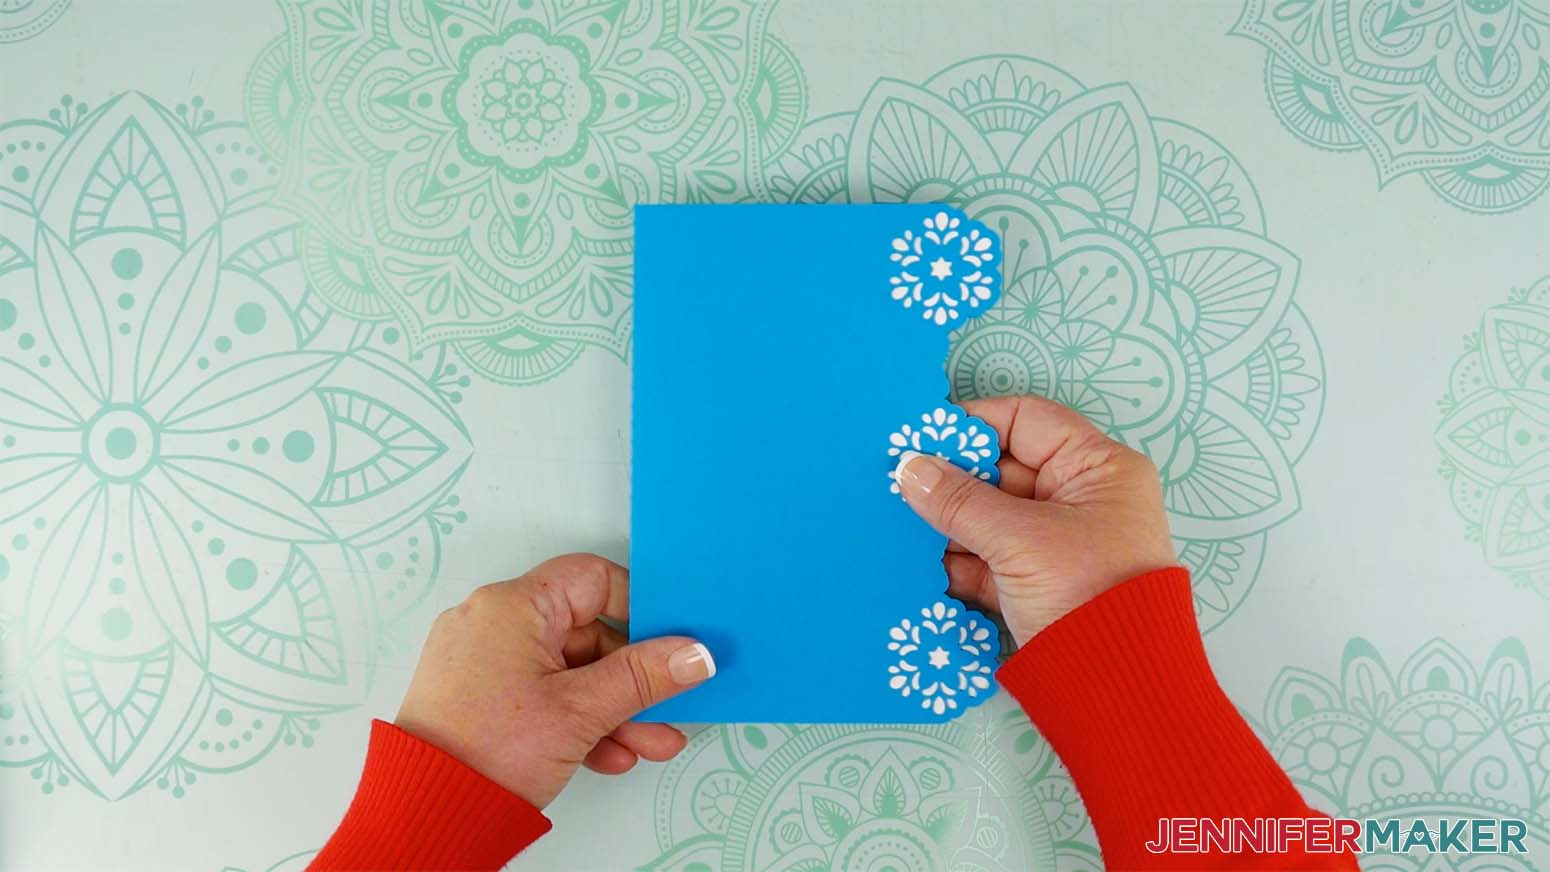
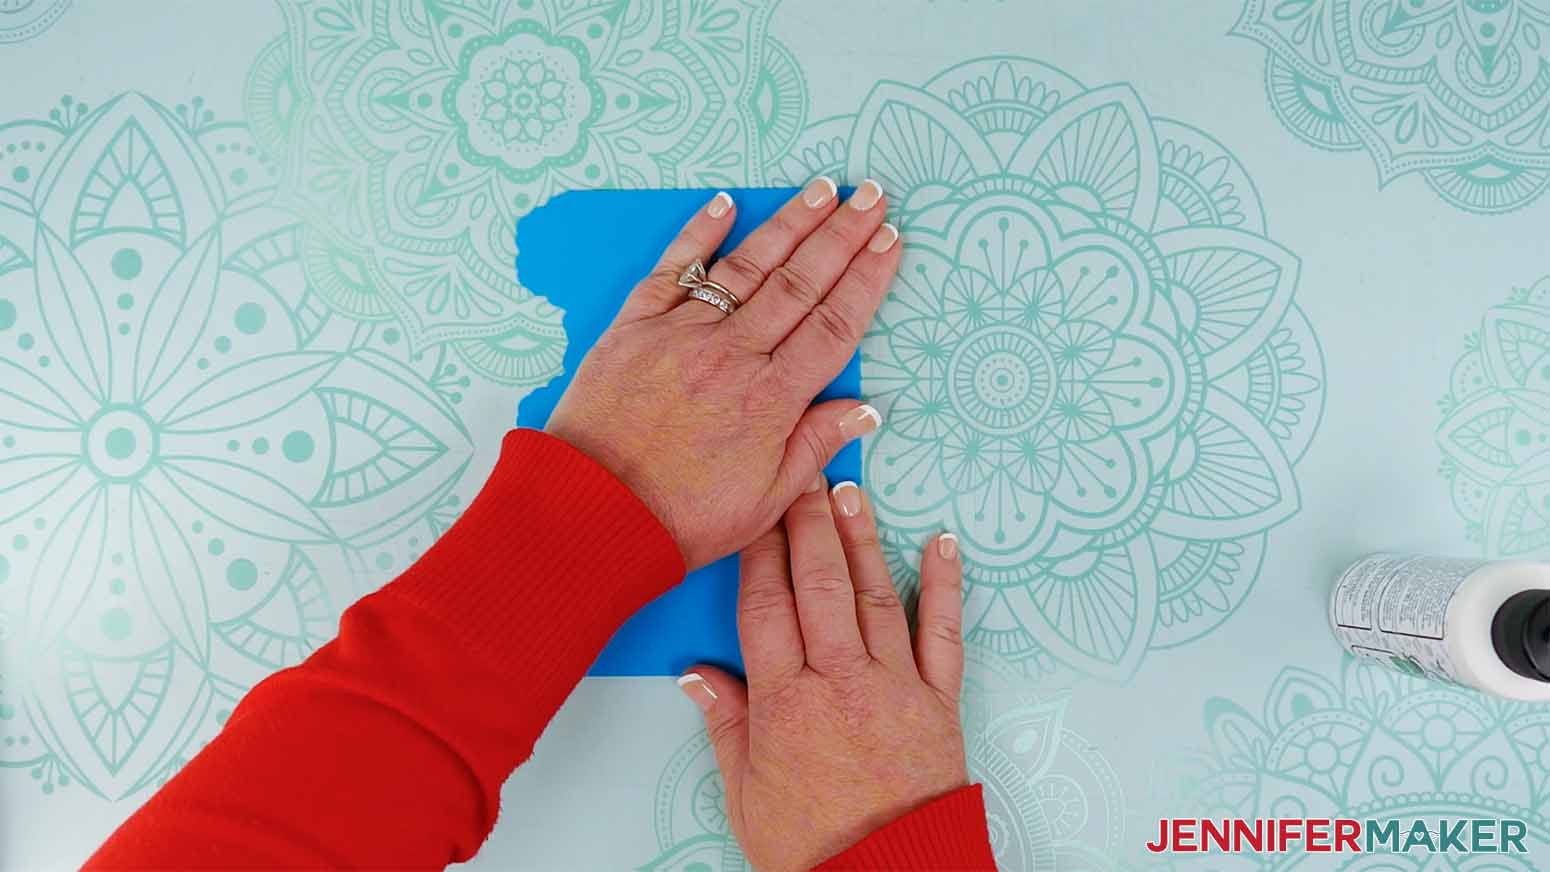
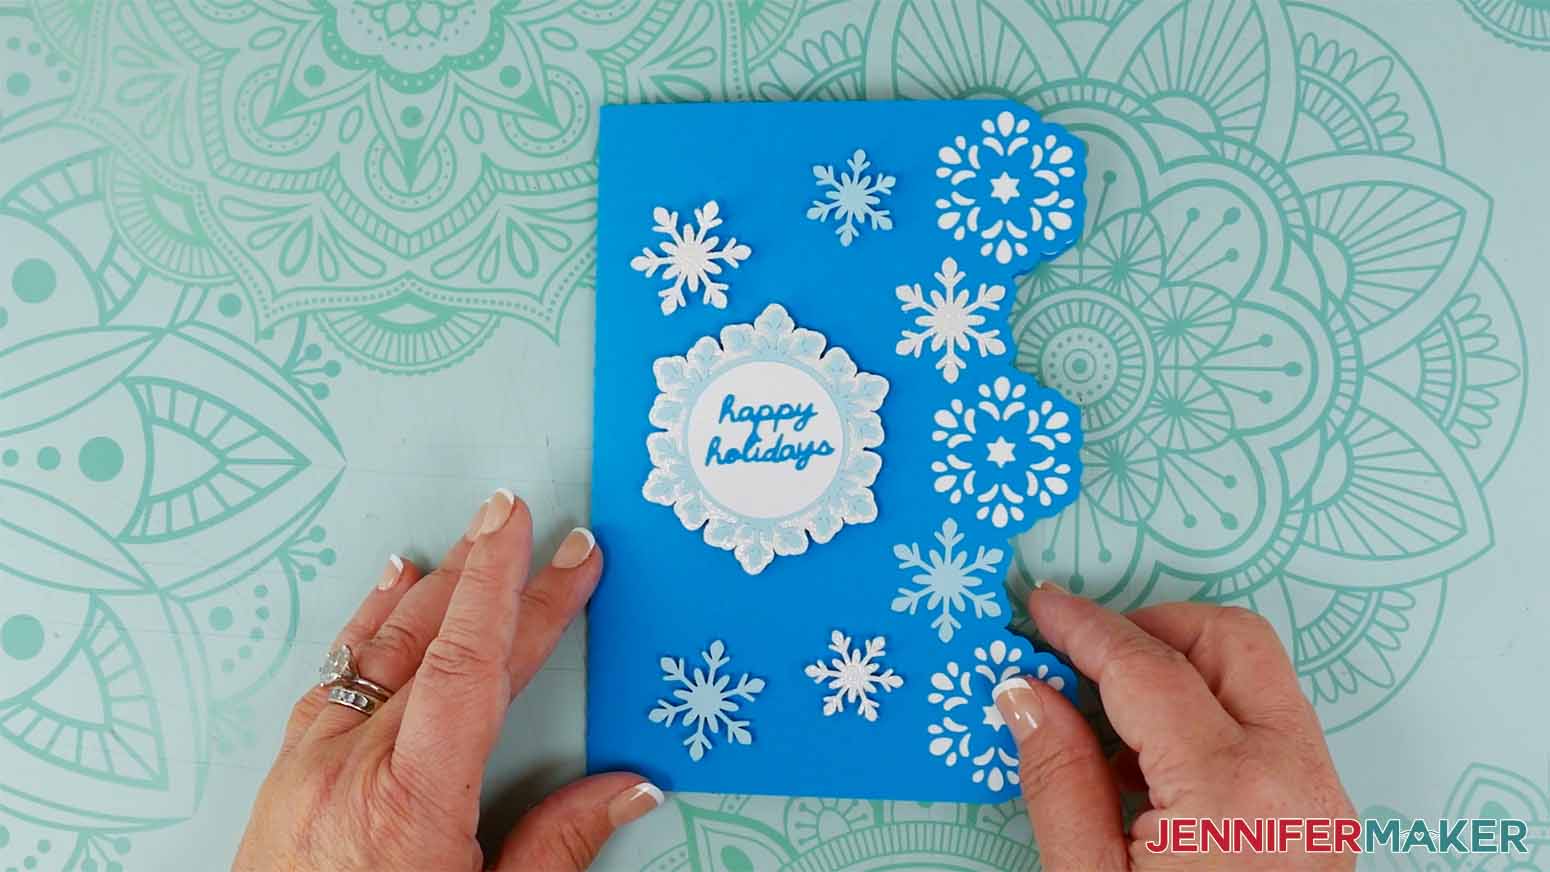
1. Fold the teal and white card base pieces in half along the dashed or scored lines. Make sure the snowflake cutouts on the teal piece are on the front of the card.
TIP: Use a scraper for sharp creases.
2. Place the white liner piece inside the teal card and line up their edges. Fold both pieces closed, making sure the folds are aligned and the liner is nestled snugly into the inside of the card.
NOTE: If you’re not adding the white liner piece, skip to step 8.
3. Place the closed card face down on a flat surface.
4. Without fully opening the card, lift up the white liner from the front side and add glue to the inside of the teal card underneath. Avoid the cutouts but make sure to add glue to the very edges.
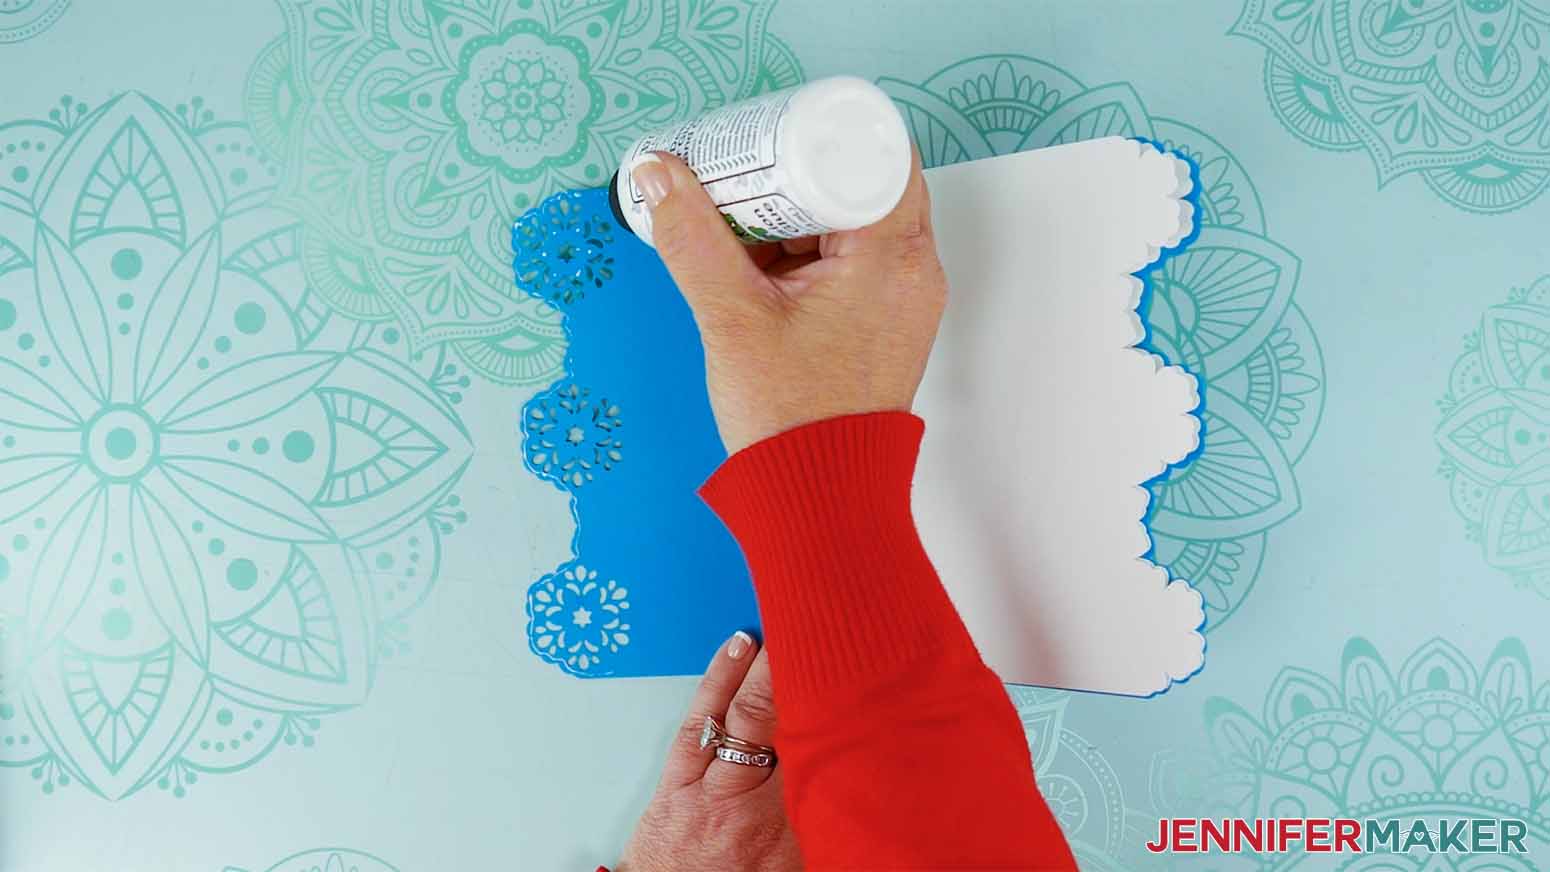
5. Close the card and press down against the glued area. Make sure no white can be seen around the outside edges of the card when viewing it from the outside.
6. Wipe away any excess glue with your finger before it dries.
7. Follow steps 4-6 above to attach the back half of the white liner to the other side of the card. Make sure the card folds nicely and doesn’t bunch up or wrinkle near the fold.
TIP: If any glue seeps out on the inside of the card, make sure to wipe it away quickly so the card doesn’t get glued closed.
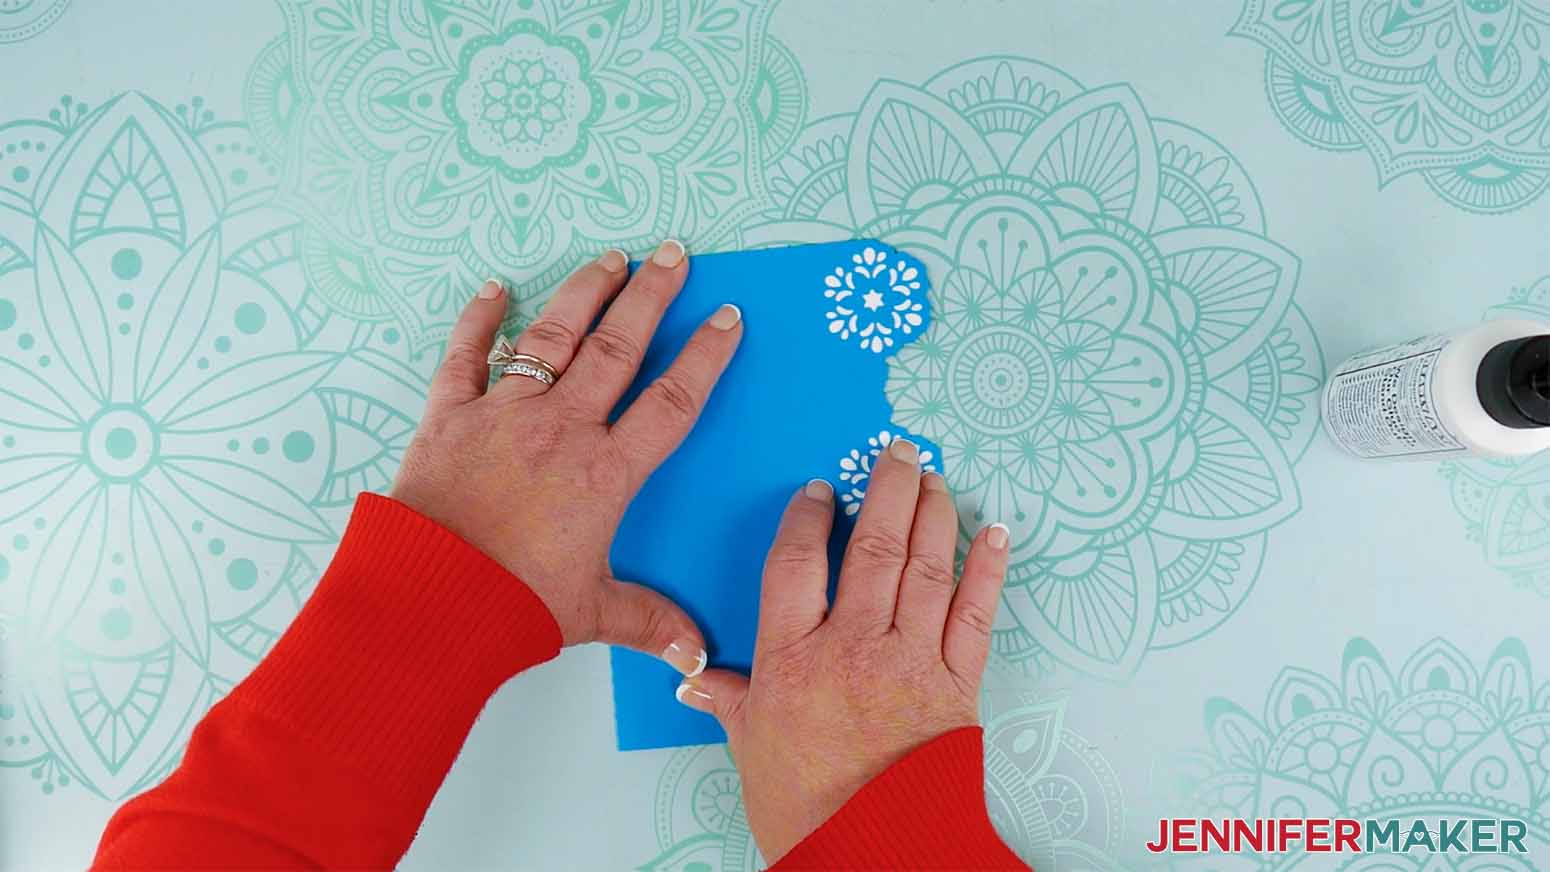
8. Grab two of the larger snowflakes (I used one white glitter and one light teal snowflake).
9. Add a small amount of glue to the back side of one.
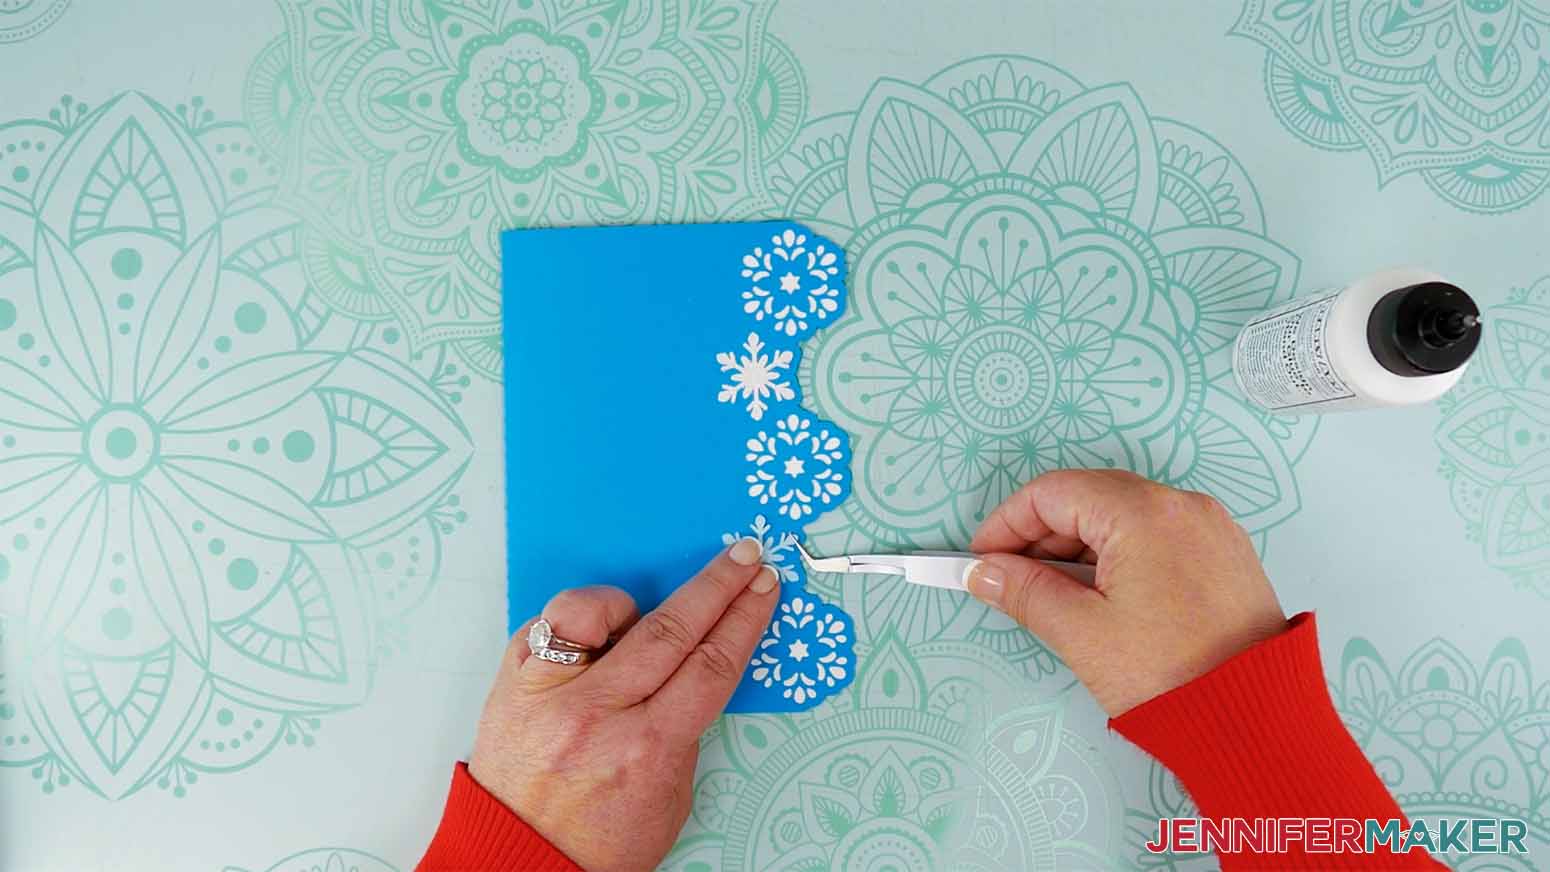
10. Attach it to the front of the card, along the right edge between the top and middle snowflake cutouts. Align two of the snowflake’s arms with the two offset “bumps” in between the snowflake cutouts.
TIP: Refer to your Design Space Canvas if you need help determining where to place the piece.
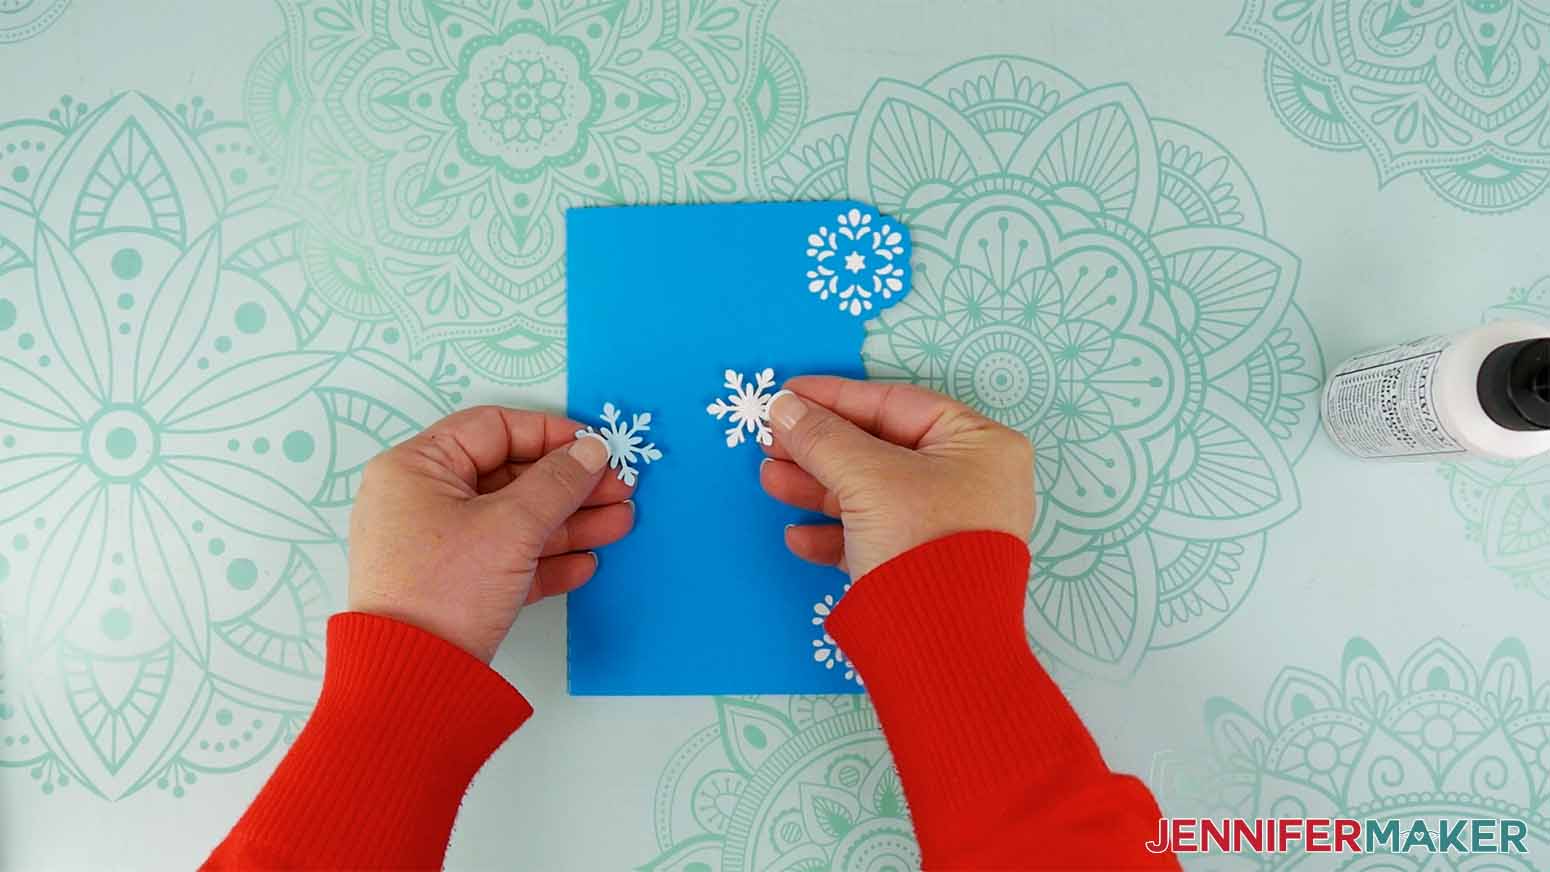
11. Repeat steps 9-10 to attach the other larger snowflake between the middle and bottom snowflake cutouts.
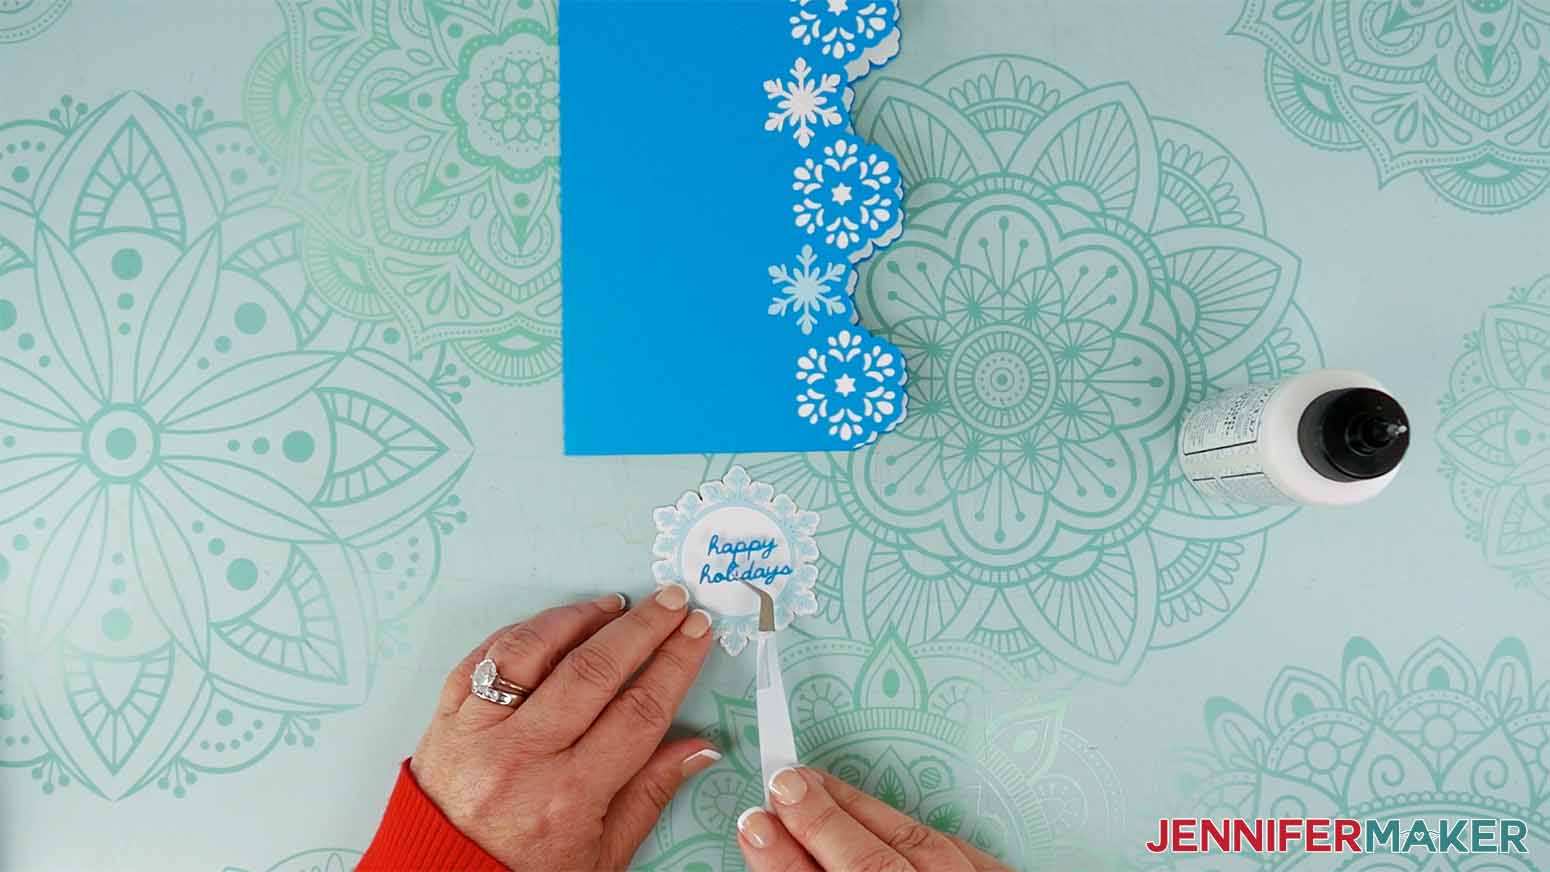
12. Grab the pieces for the sentiment - you should have a “happy holidays” piece, a white circle, a light teal circle with snowflake edges, and a white glitter circle with snowflake offset edges.
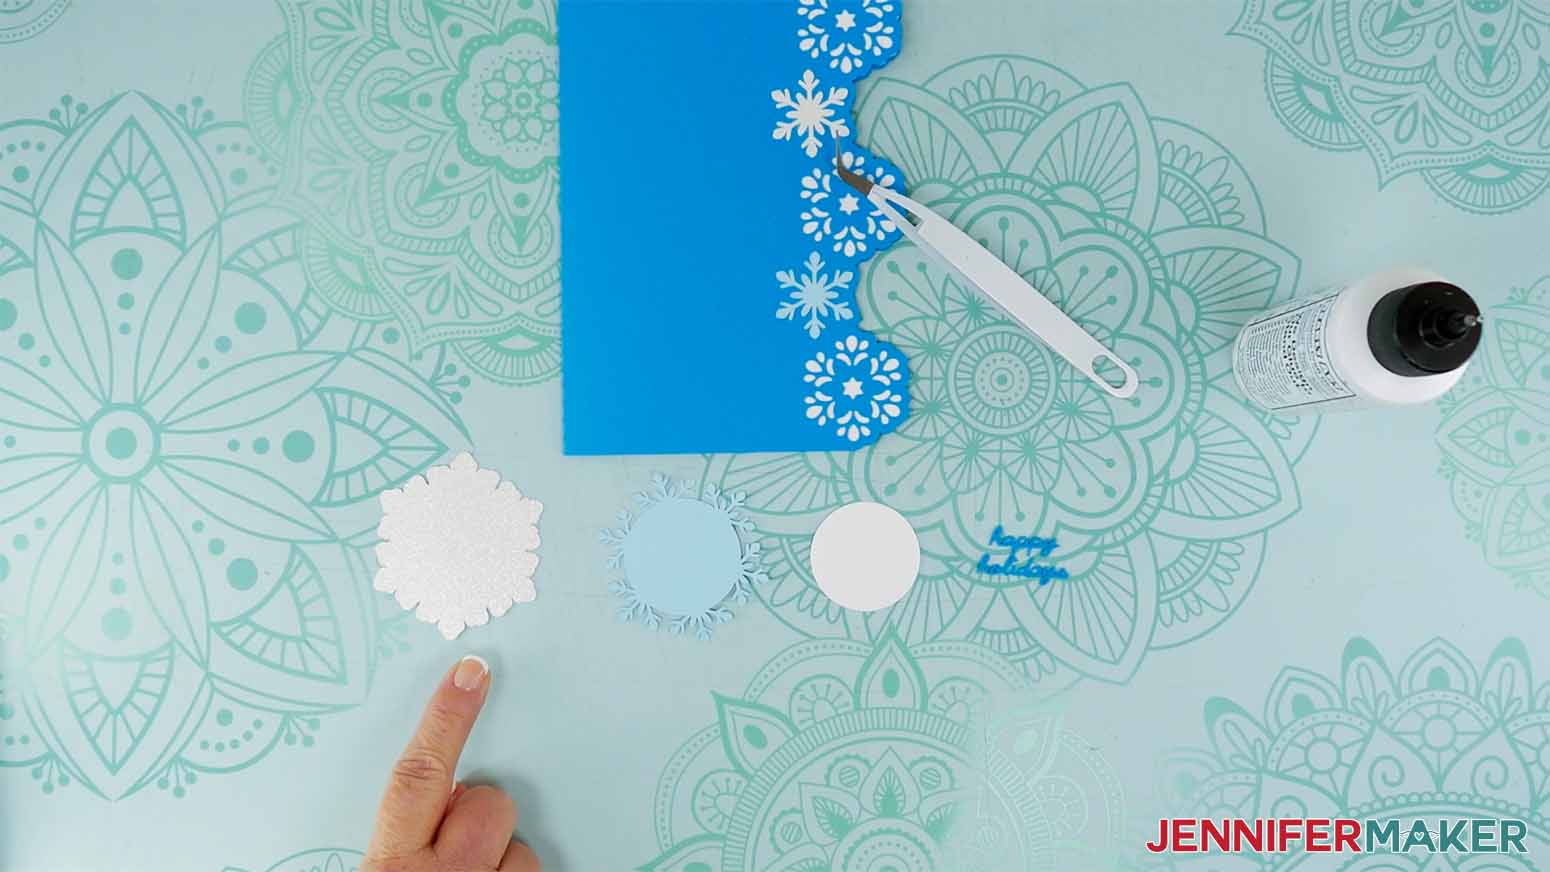
13. Add glue to the back of the light teal snowflake circle and attach it to the front of the white glitter snowflake offset, making sure to center them with each other.
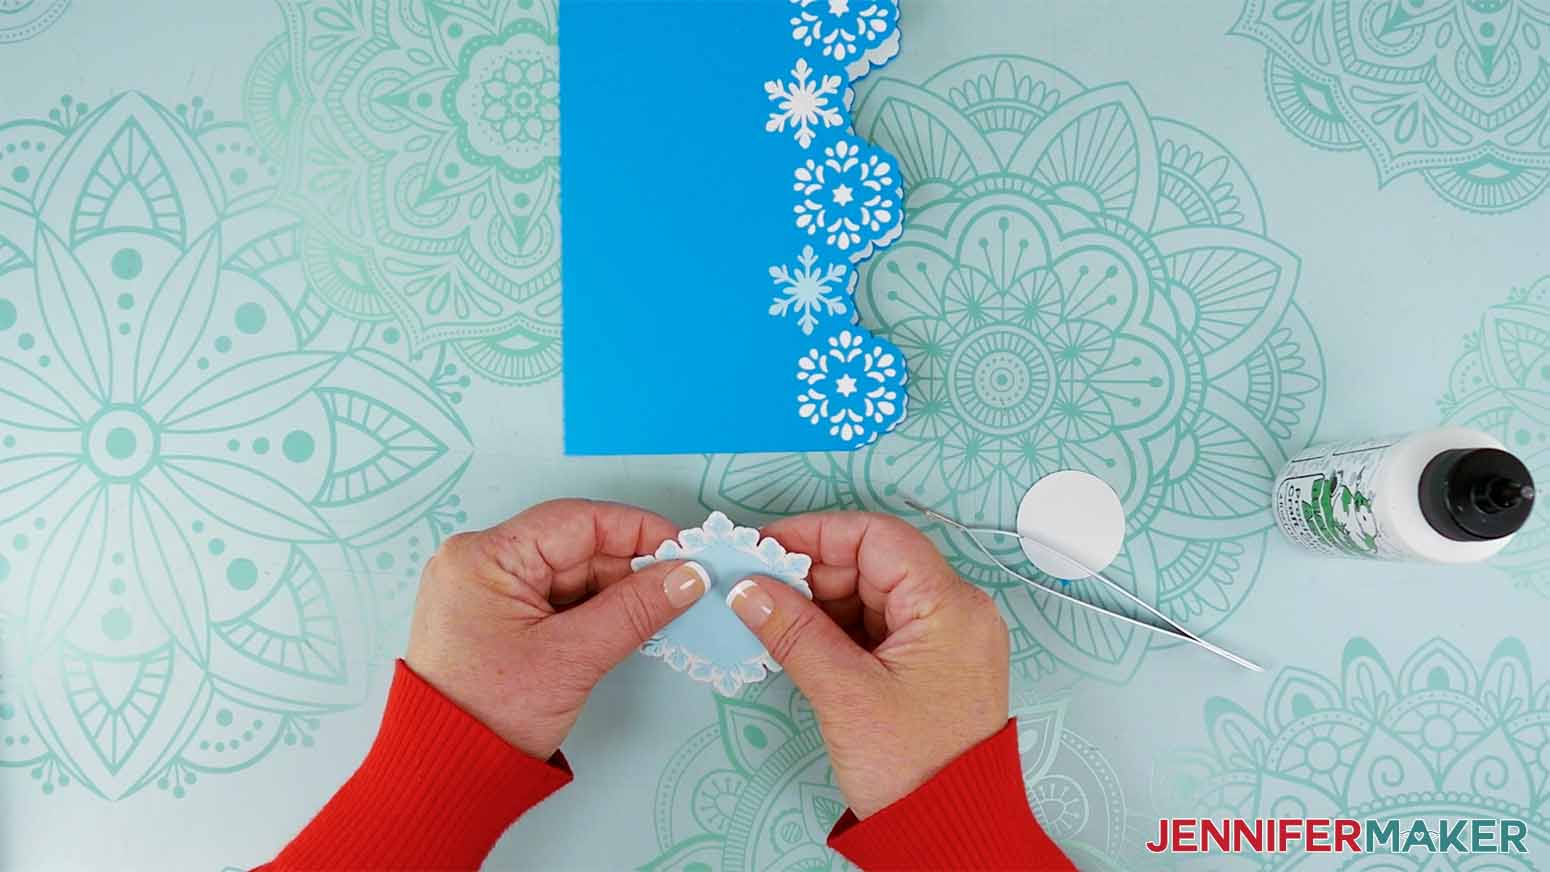
14. Add glue to the back of the white circle and attach it to the center of the light teal layer.
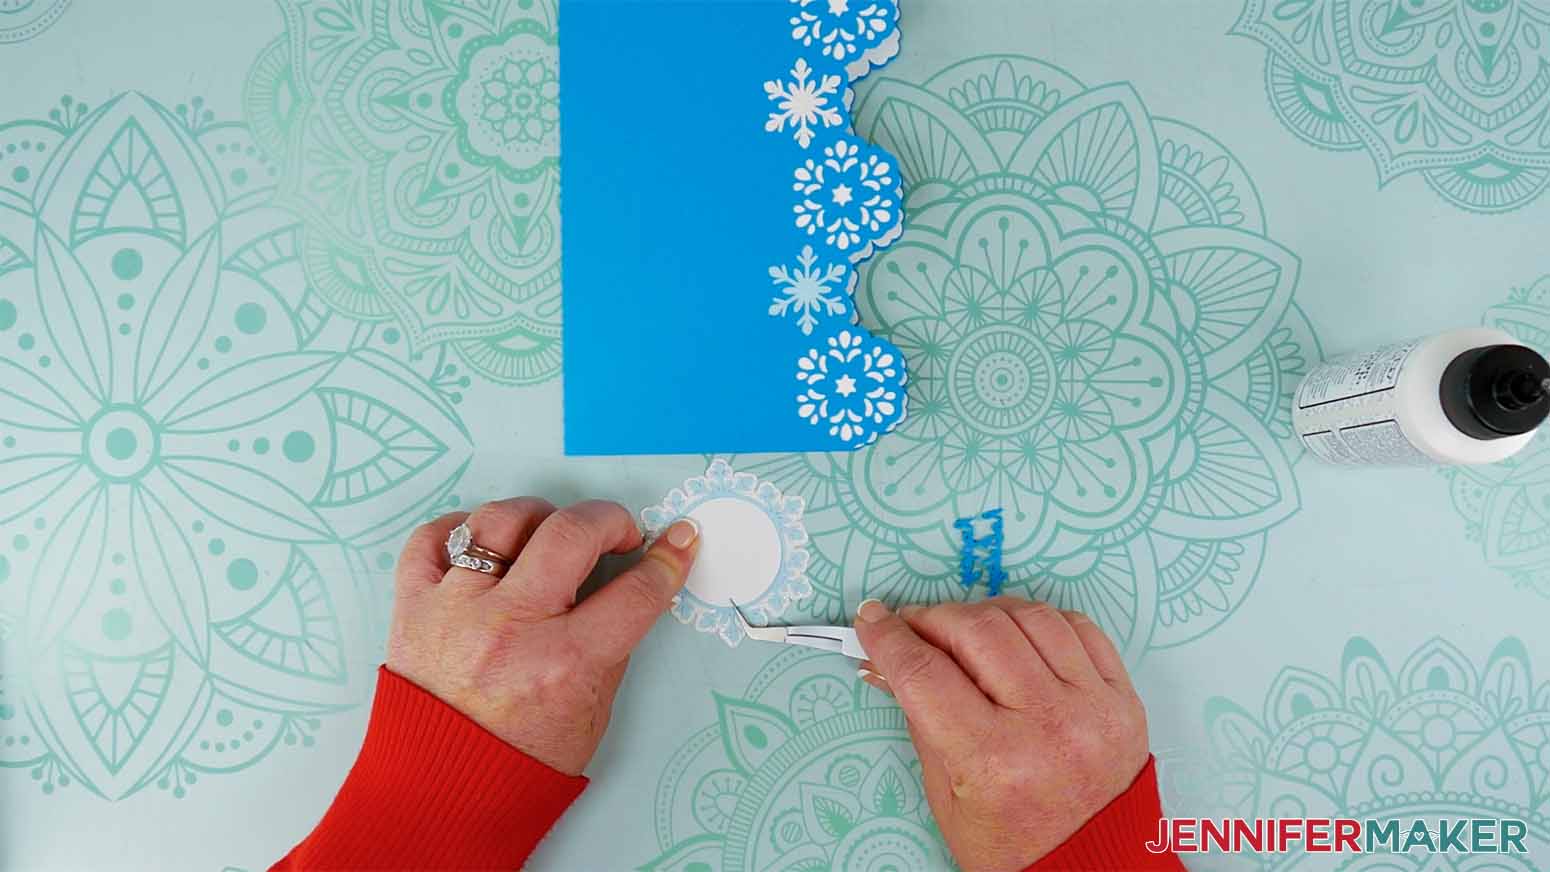
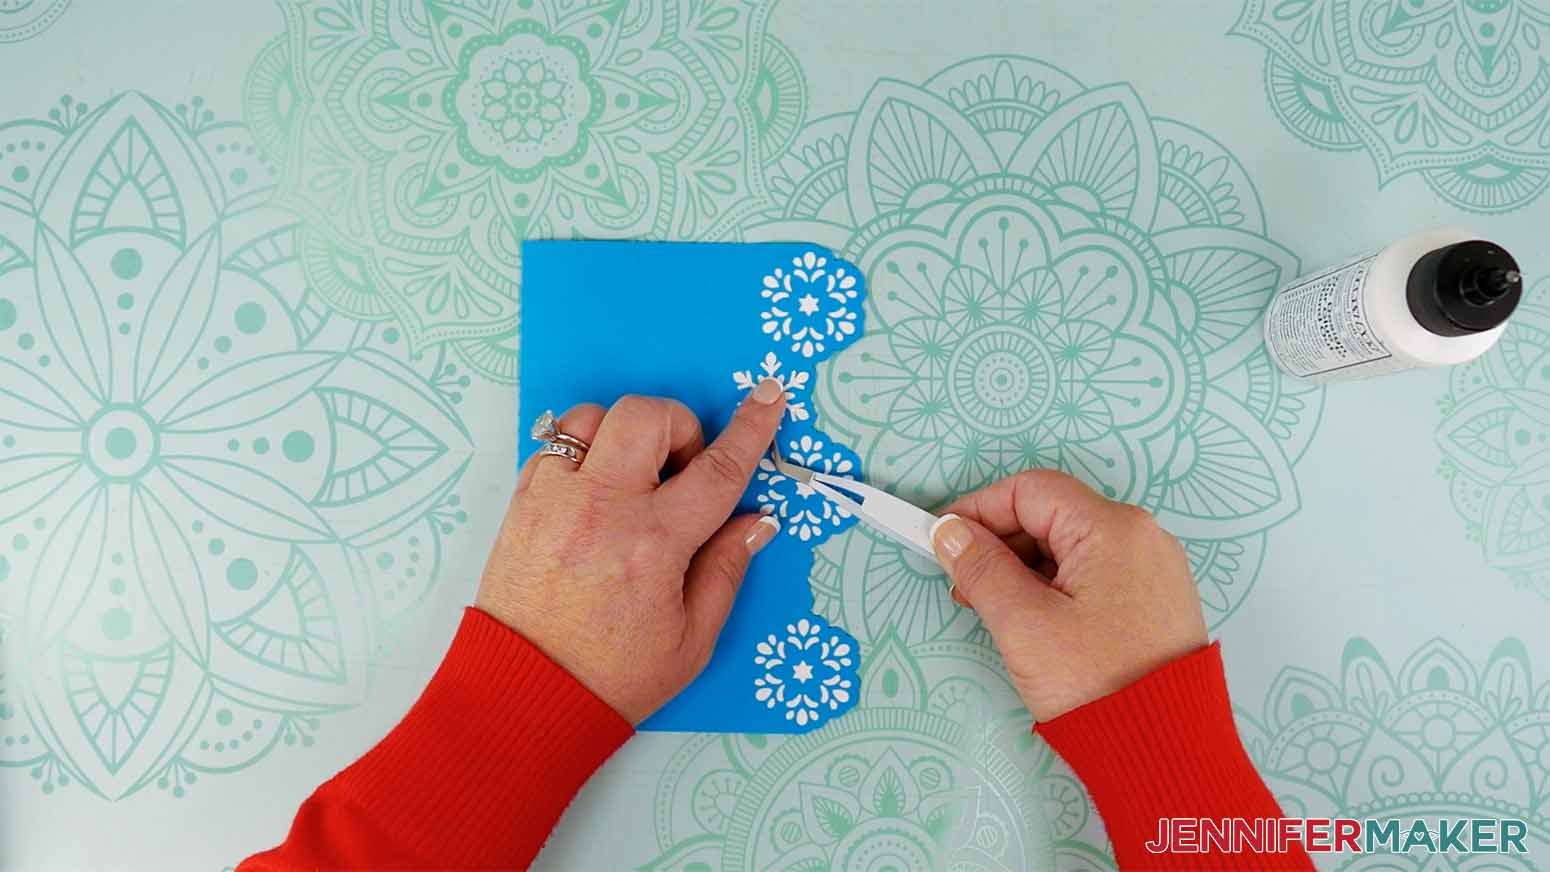
15. Add glue to the back of the “happy holidays” sentiment and attach it to the center of the white circle. Be careful not to rip or bend the delicate letters, and wipe away any excess glue before it dries.
NOTE: If you cut your sentiment from permanent vinyl, weed out the excess pieces of vinyl and then use a piece of StandardGrip transfer tape slightly larger than the sentiment to transfer the words to the white circle.
16. Attach four foam adhesive squares to the back of the assembled sentiment piece, spacing them evenly around the outside edge.

17. Place the sentiment on the front of the card, making sure it’s centered from top to bottom, and press down to adhere it.
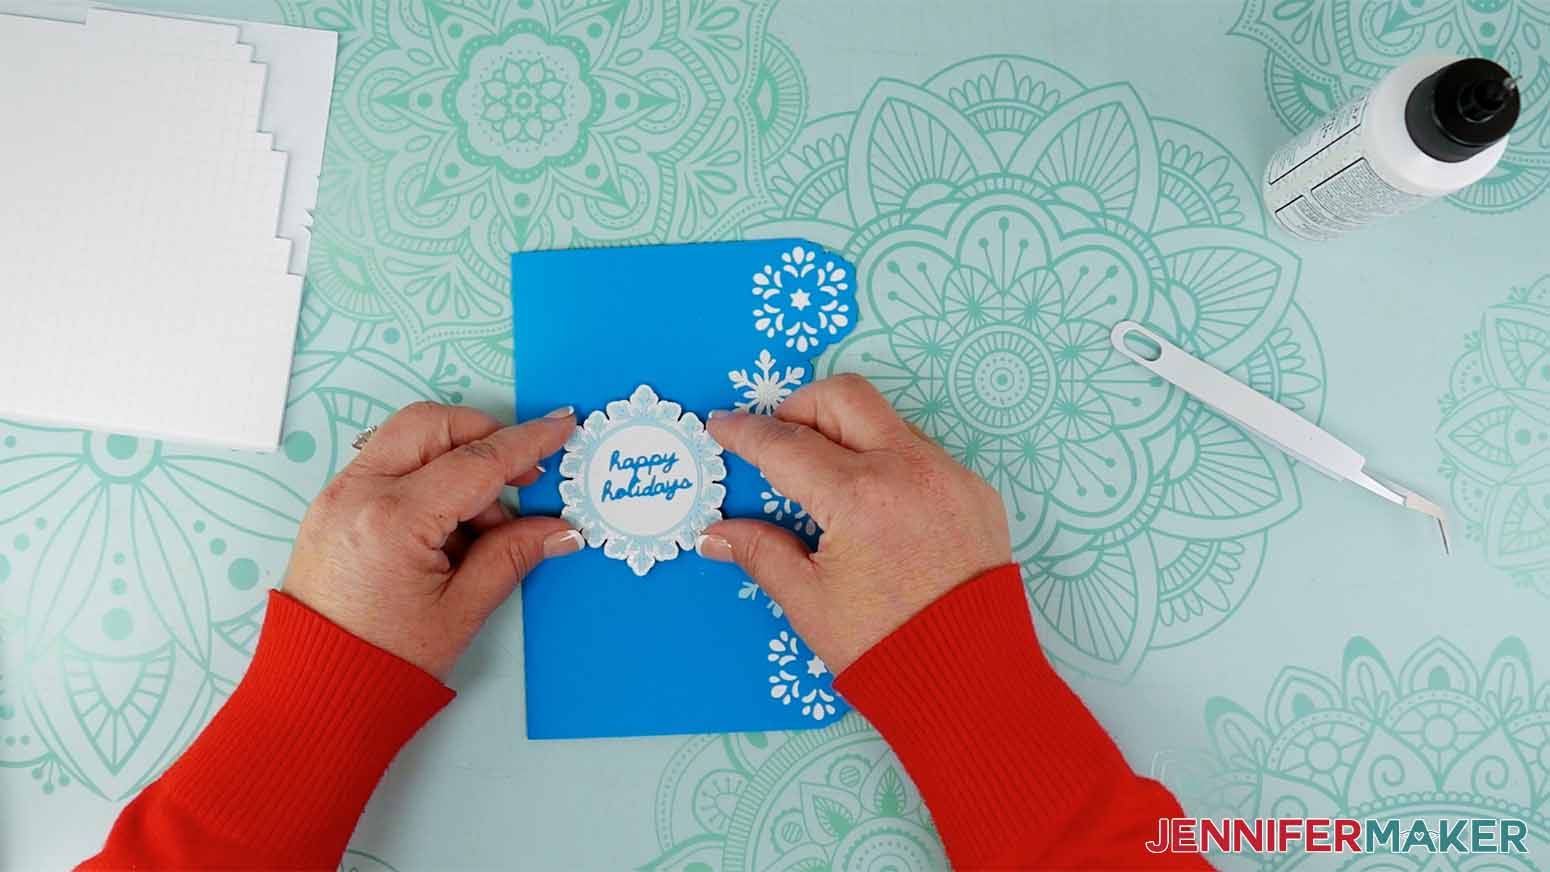
18. Attach one foam adhesive square to the back of each of the remaining snowflakes, and attach them to the front of the card wherever you’d like.

PROJECT 2: CUSTOMIZED LEAVES SIDE EDGE CARD
Step 2: prepare your custom design.
2. If you’d like to add elements to your design from an existing SVG, click “Upload” and then “Upload Image.”
4. Select the SVG file. I’ll use “side-edge-cards-leaves-no-score-jennifermaker-SVG.”

NOTE: You can also choose elements to use from Cricut Design Space images. Just click “Browse All Images” and select these filters to find images that will work for your side edge card:
- Under Operation Type: Cut Only
- Under Layers: Single
9. Select and move any elements you’d like to use on your custom card off to the side.
10. Drag a bounding box around the remaining pieces and click the “Group” icon at the top of the Layers Panel.
11. With the group selected, click the eye icon next to the group in the Layers Panel to hide it or the “Delete” icon at the top of the Panel to delete it.
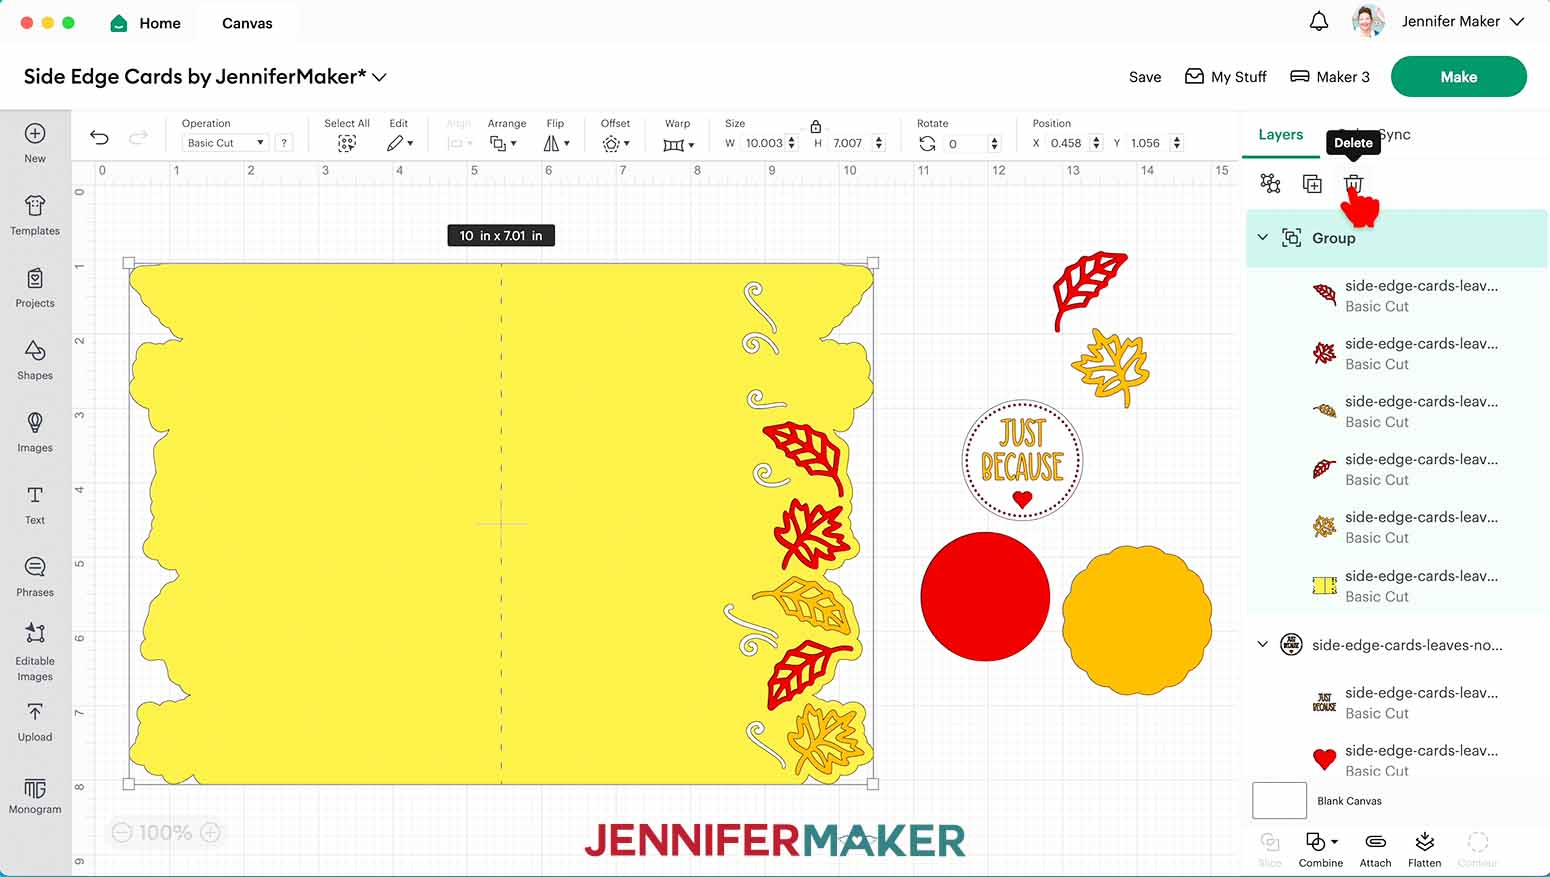
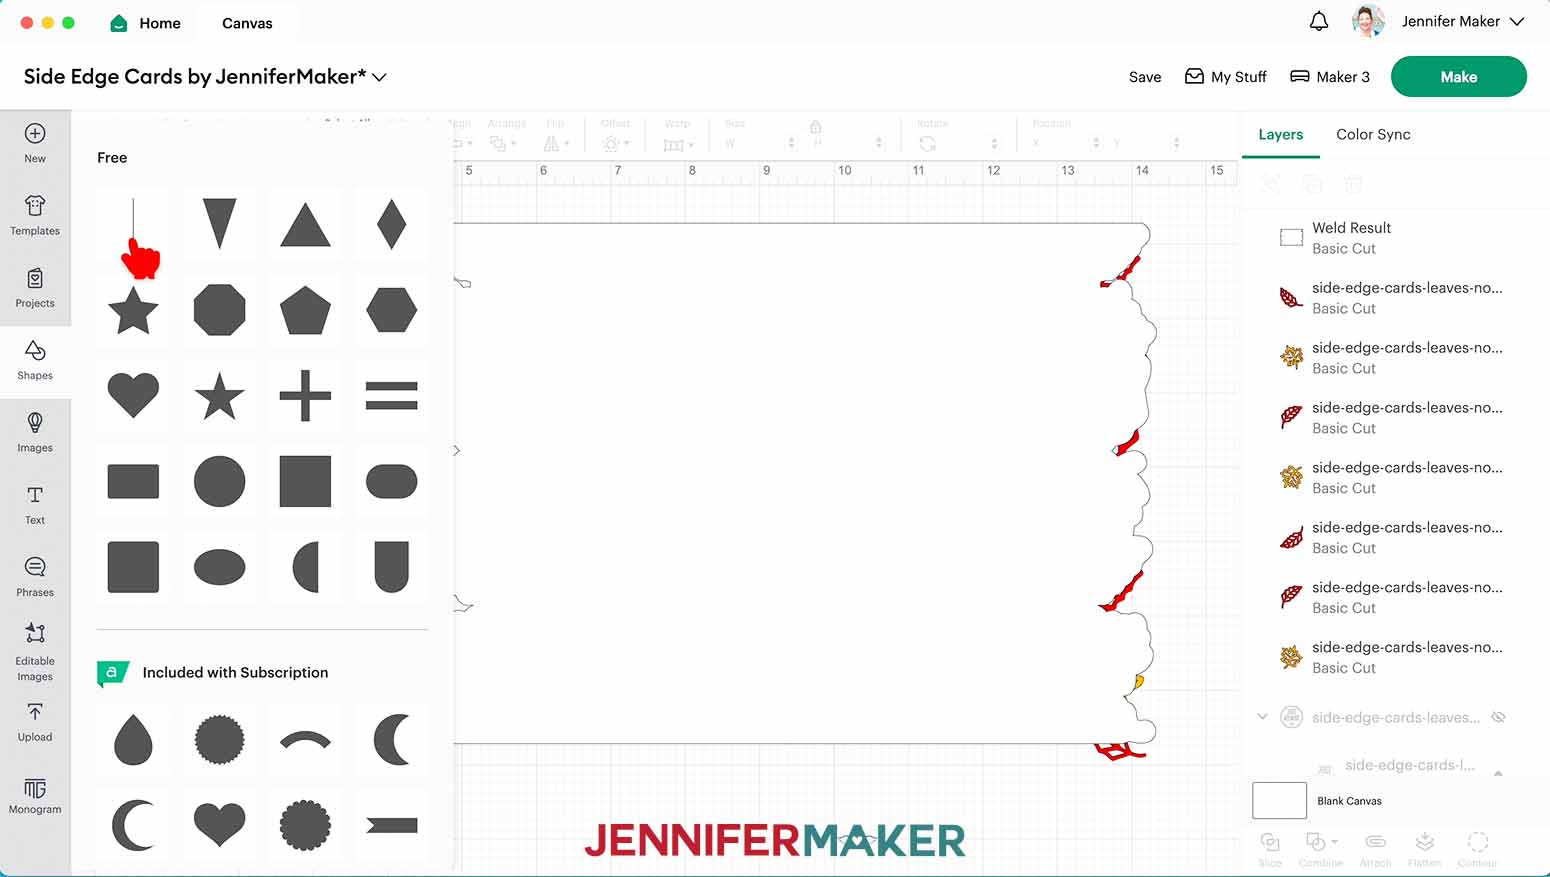
12. Click the “Shapes” menu and select the Square.
13. With the square selected and the lock icon open, type “5” into the width (W) field and “7” into the height (H) field. This is the base piece for the front of our 5” x 7” greeting card.
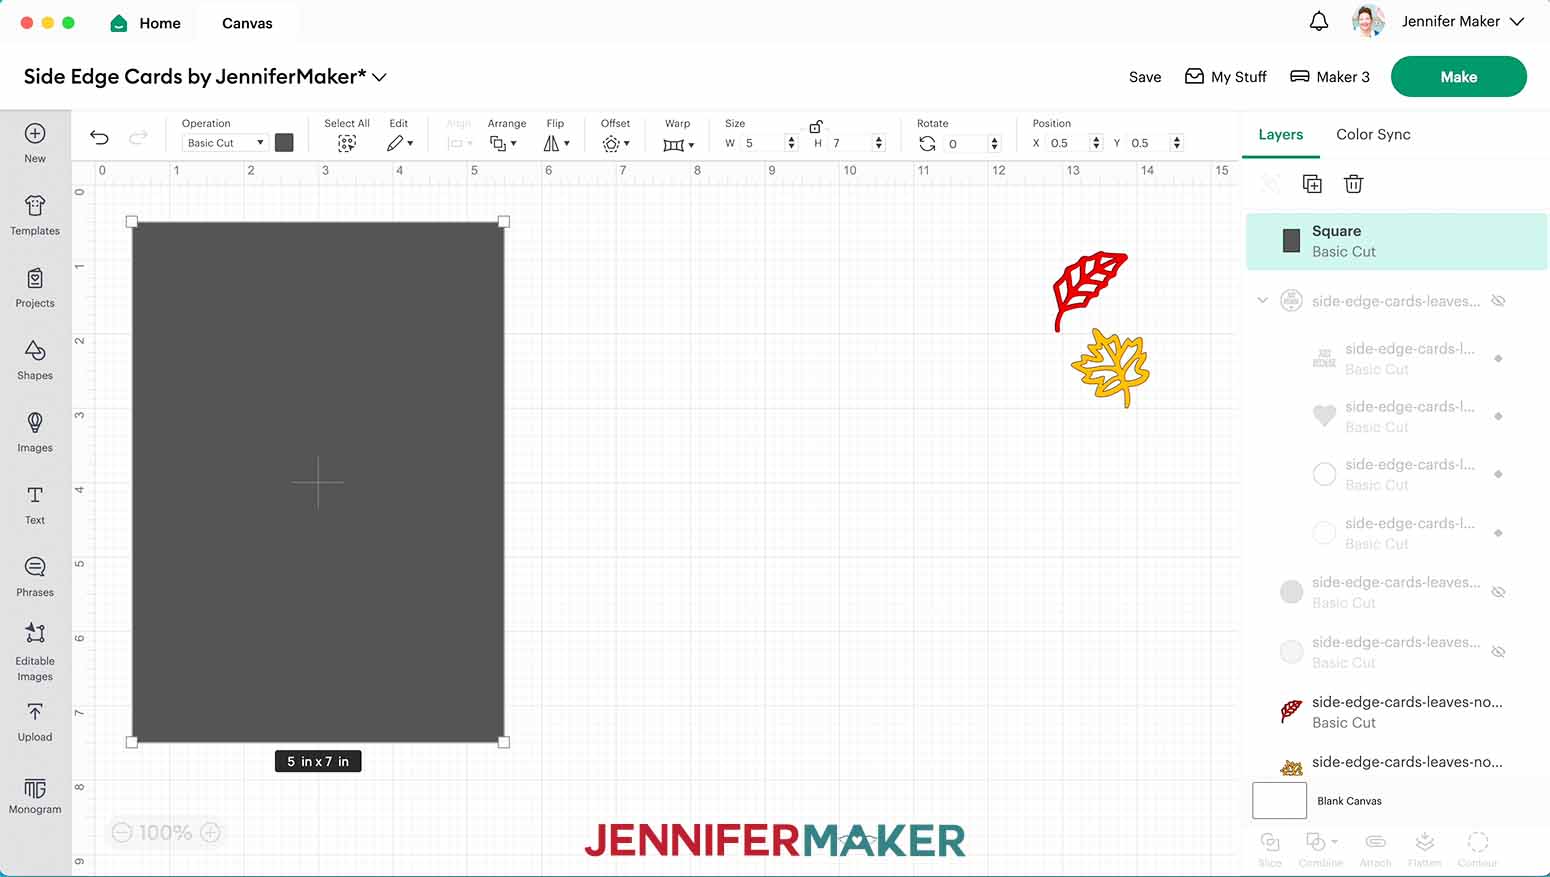
TIP: If you’d like to make a different-sized card, resize your square to match the size you want your folded card to be.
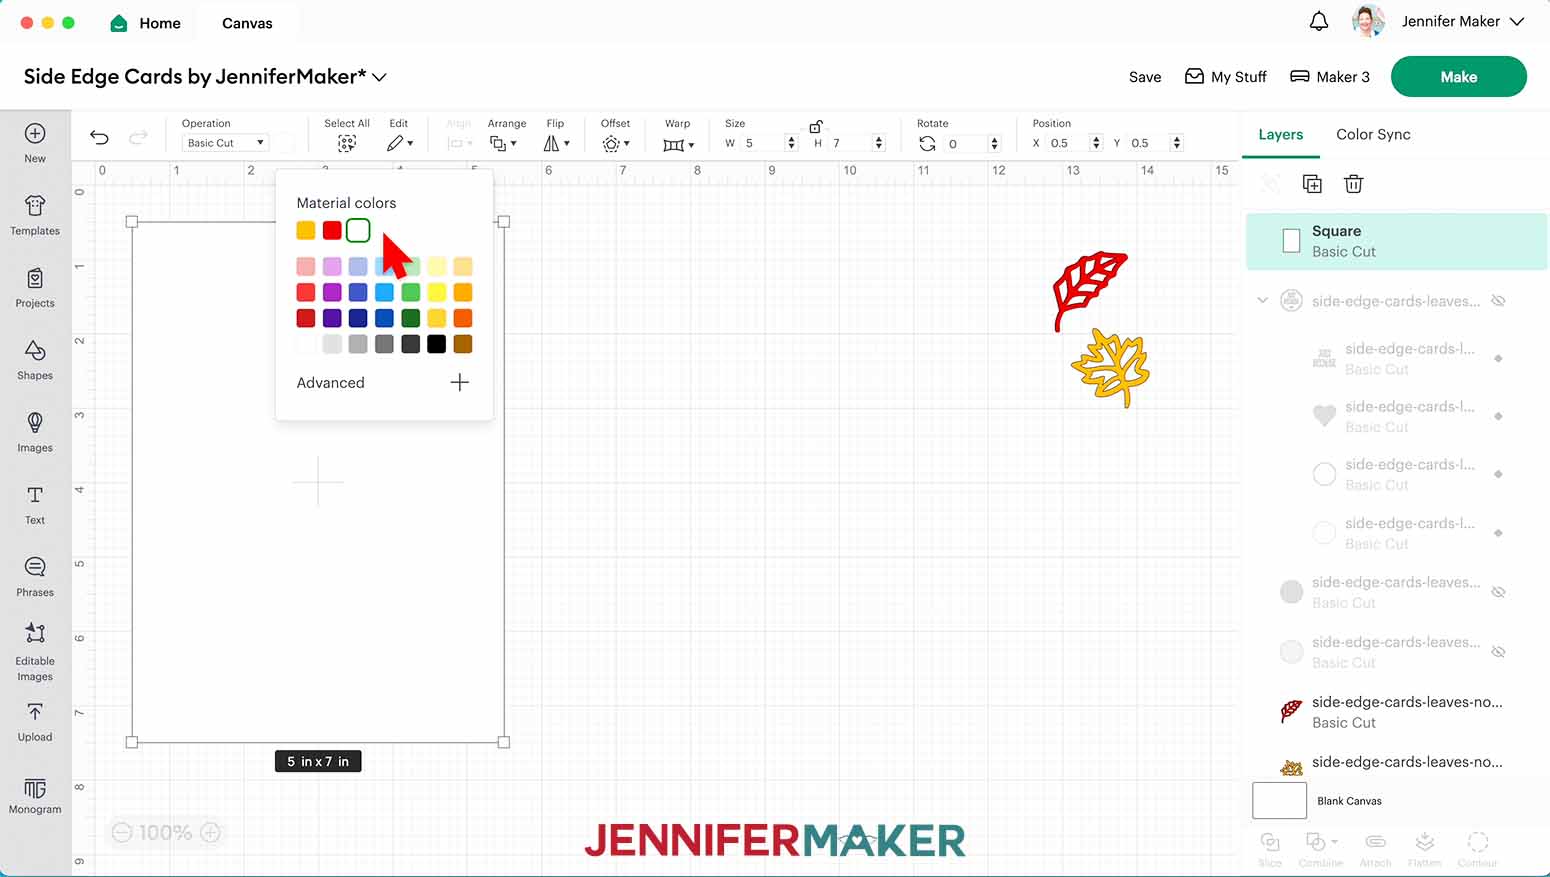
14. Change the color of your resized rectangle to white so it’s easier to work with.
15. With your rectangle selected, click “Arrange” and “Send to Back” so it’s behind your elements.
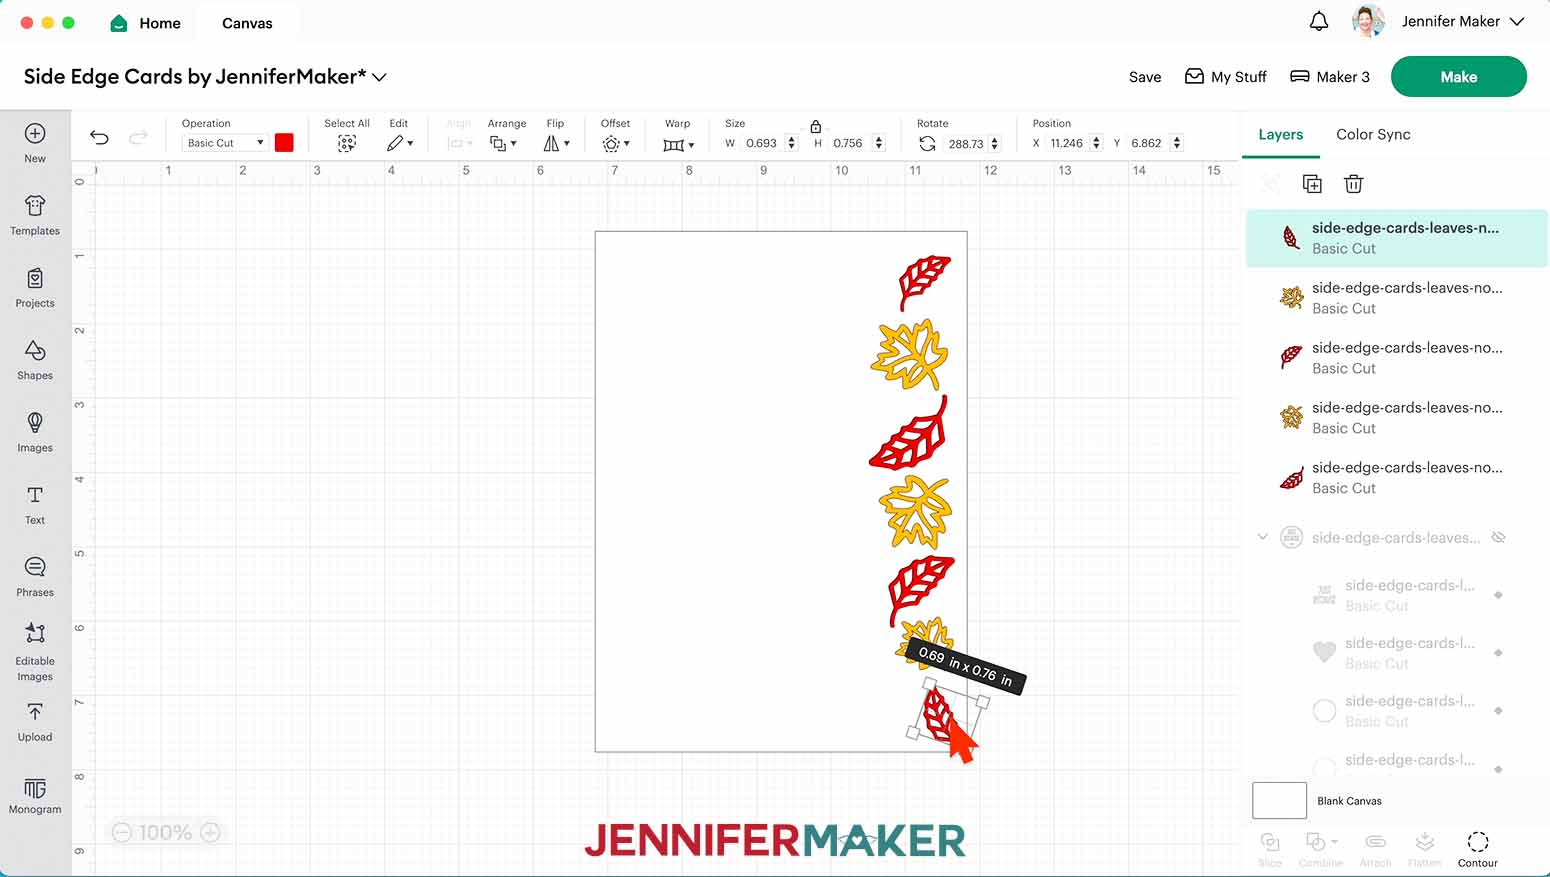
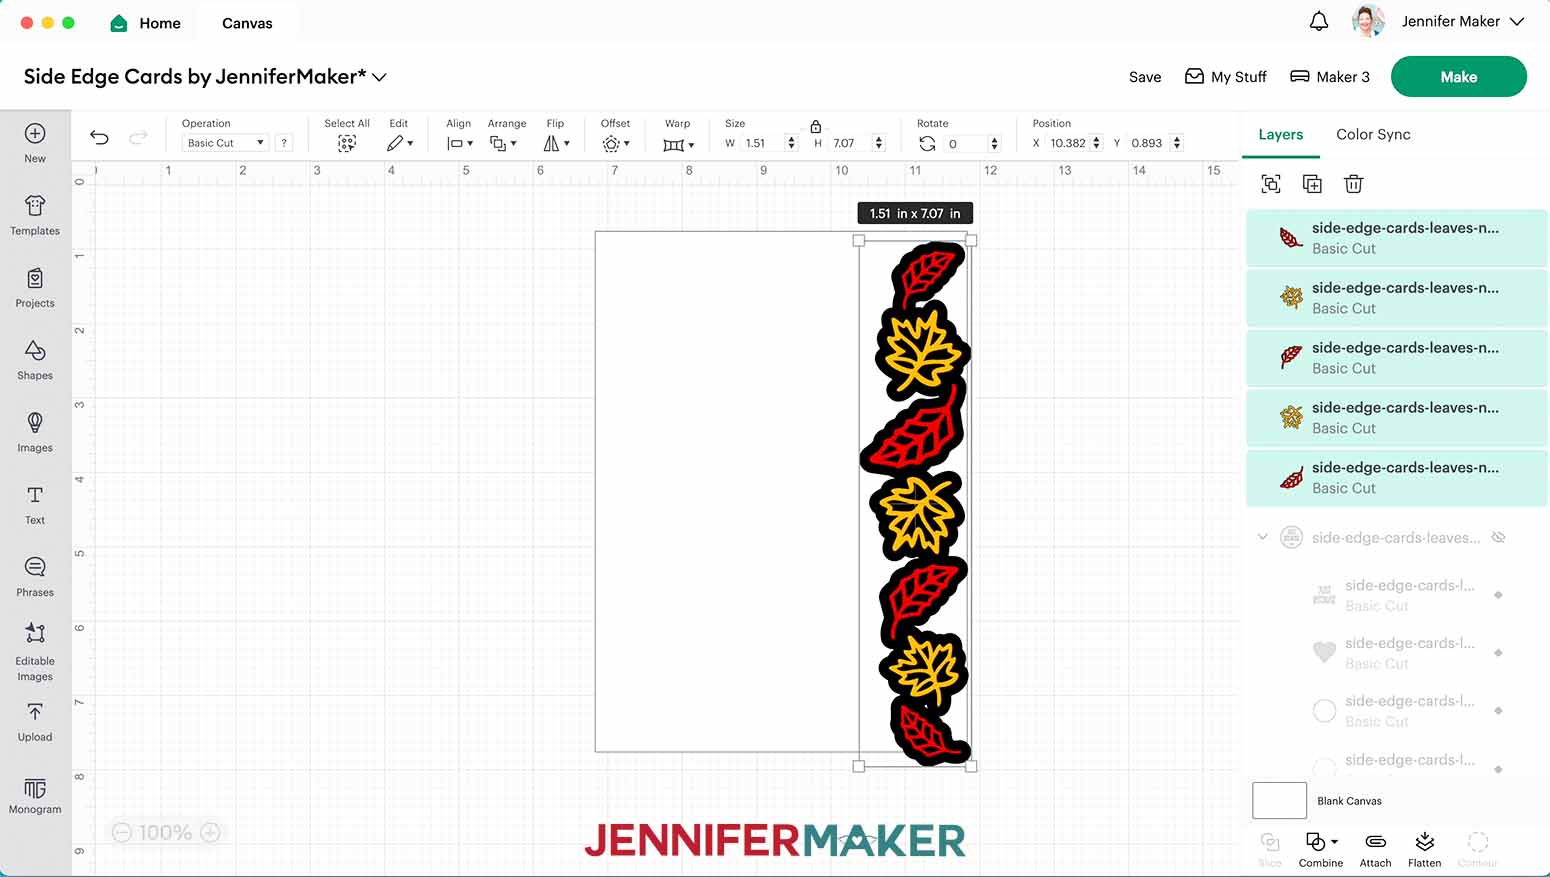
16. Arrange your chosen elements along the right edge of your rectangle, keeping them within the rectangle itself so nothing extends past the top, bottom, or right sides.
NOTE: Duplicate, resize, and rotate your objects as needed until they fit within your rectangle and you’re happy with their placement. Don’t forget to leave some space on the left half of the rectangle for adding a greeting, if you’d like.
TIP: If you’d like to make a landscape card that folds along the top instead of the side, you can arrange your elements along the bottom edge of the card. A landscape card also works well if you’d like to use a single image that is wider than it is tall.
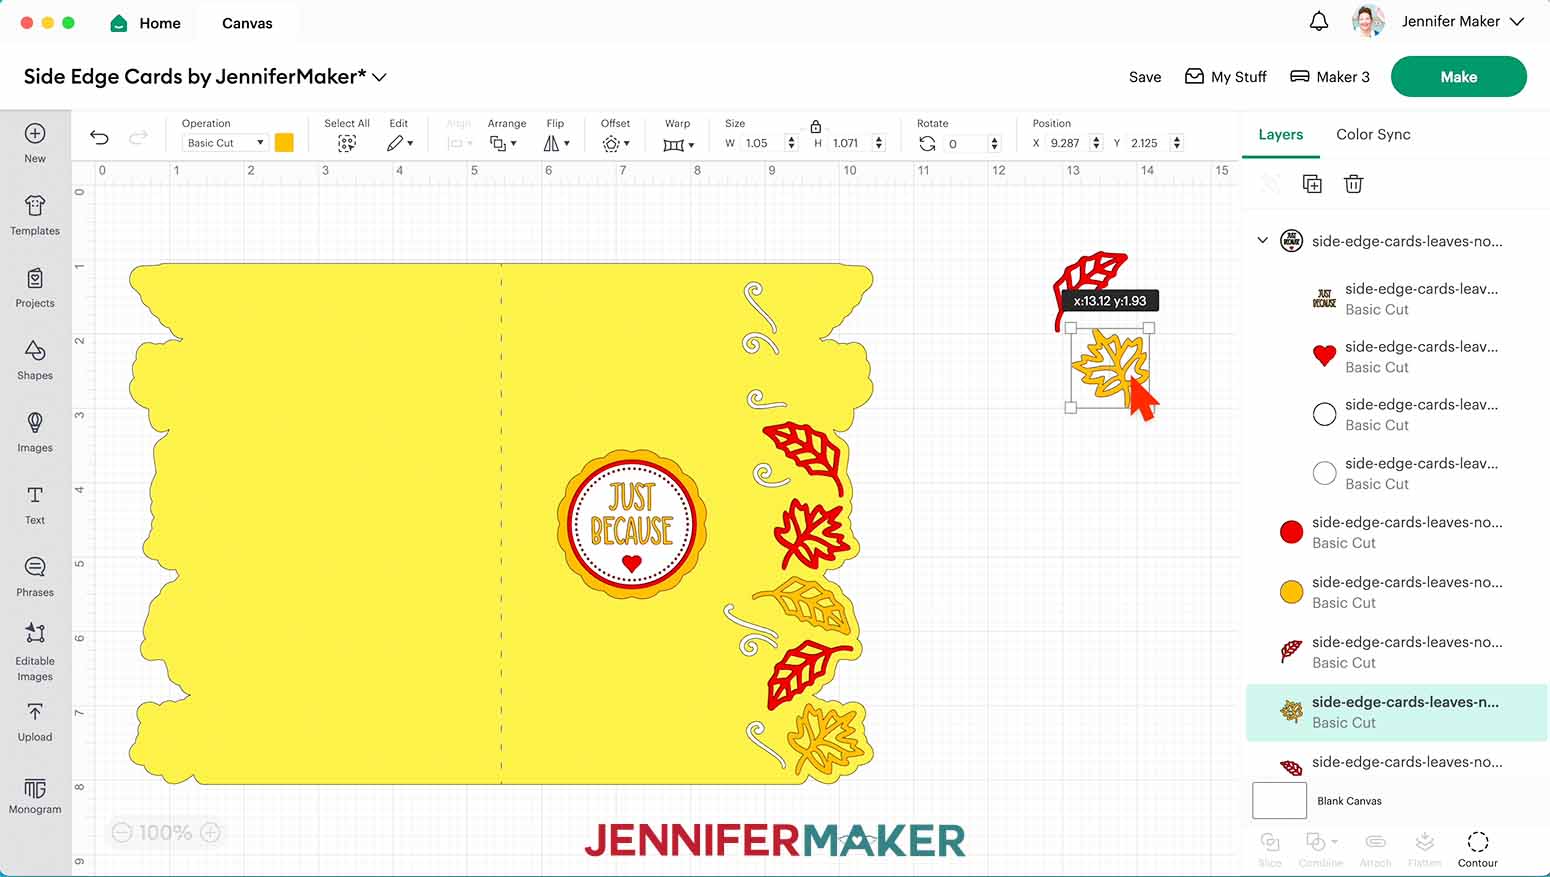
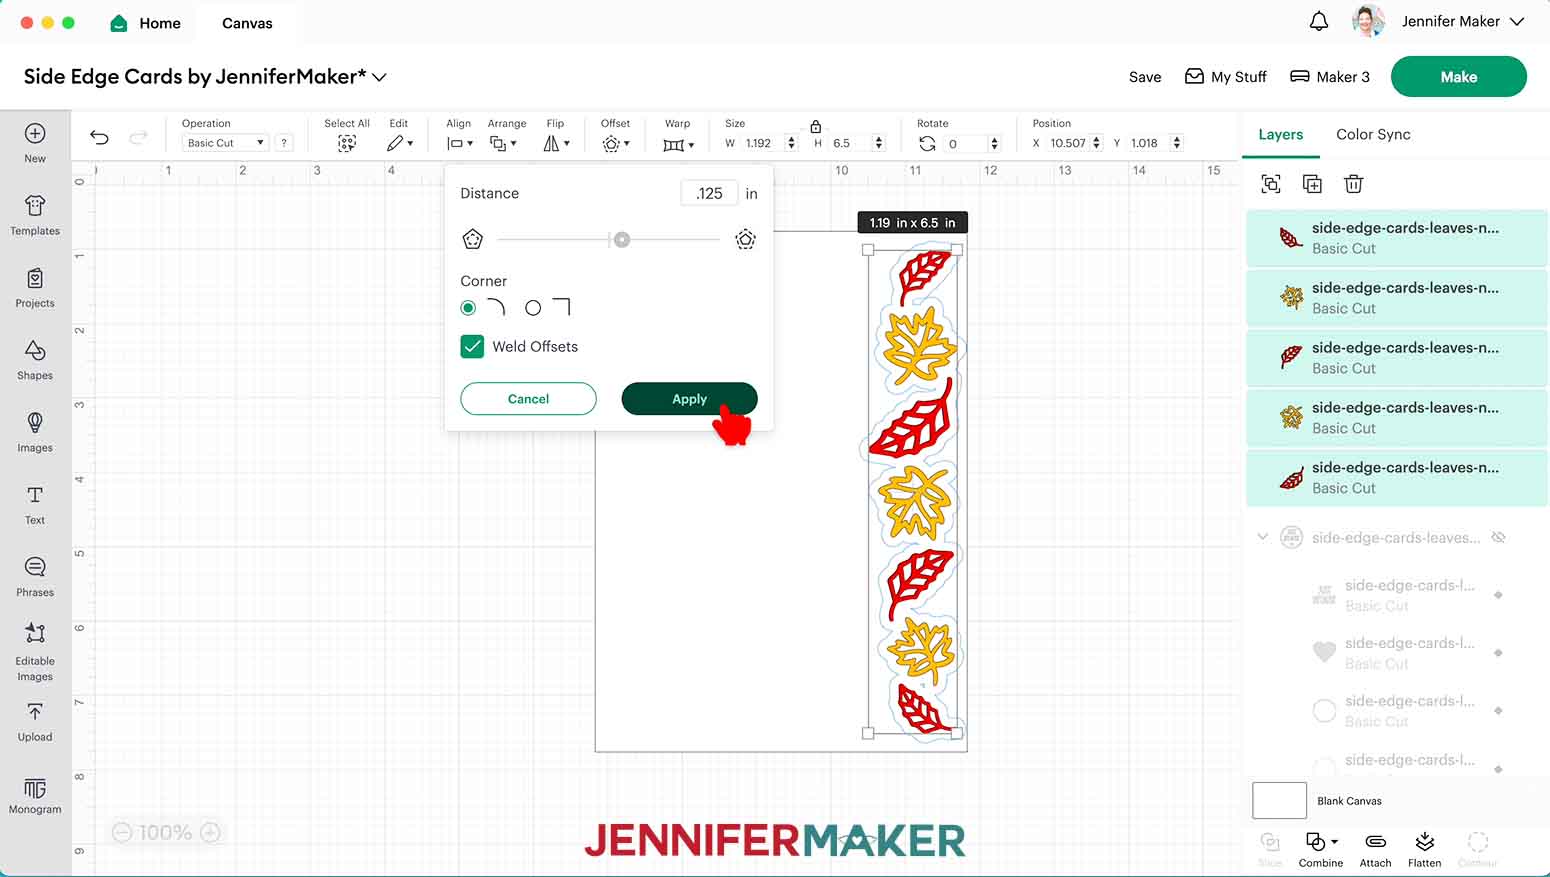
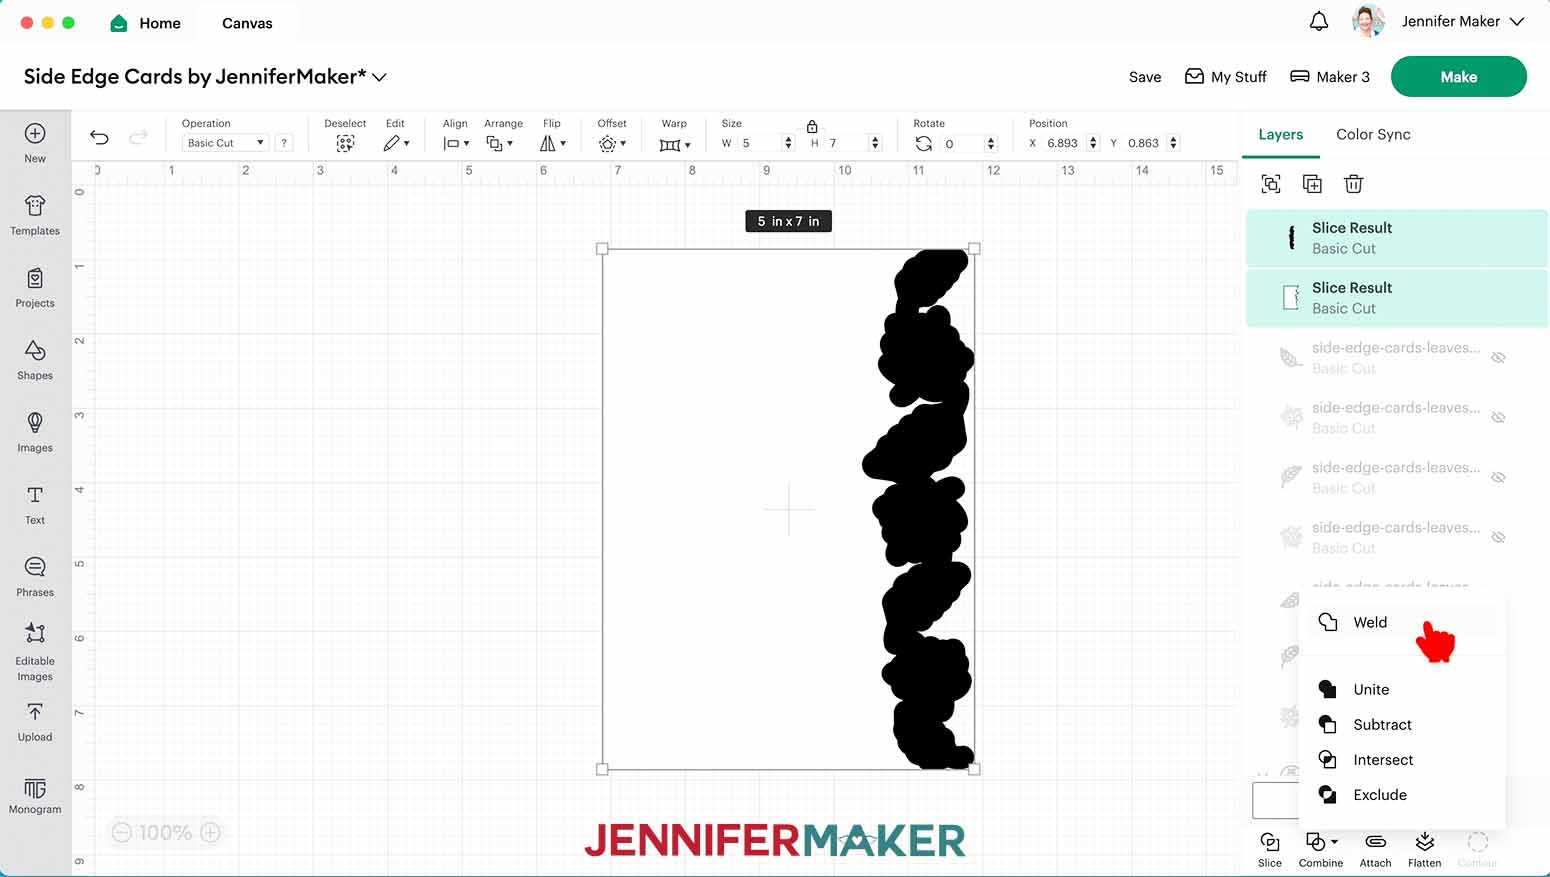
17. Select all of your arranged elements and click “Offset” in the top menu.
18. Move the “Distance” slider back and forth to find a good size for your offset. The offset shapes of each of your elements should slightly overlap each other. I used 0.125” for my offset size.
19. Select your corner style and check the “Weld Offsets” box to make the offset a single shape, then click “Apply.”
20. Select all of your elements and the offset layer you just created and change their combined height so it’s slightly taller than the height of your card. Make sure the lock icon is closed. I made mine 7.07” tall.
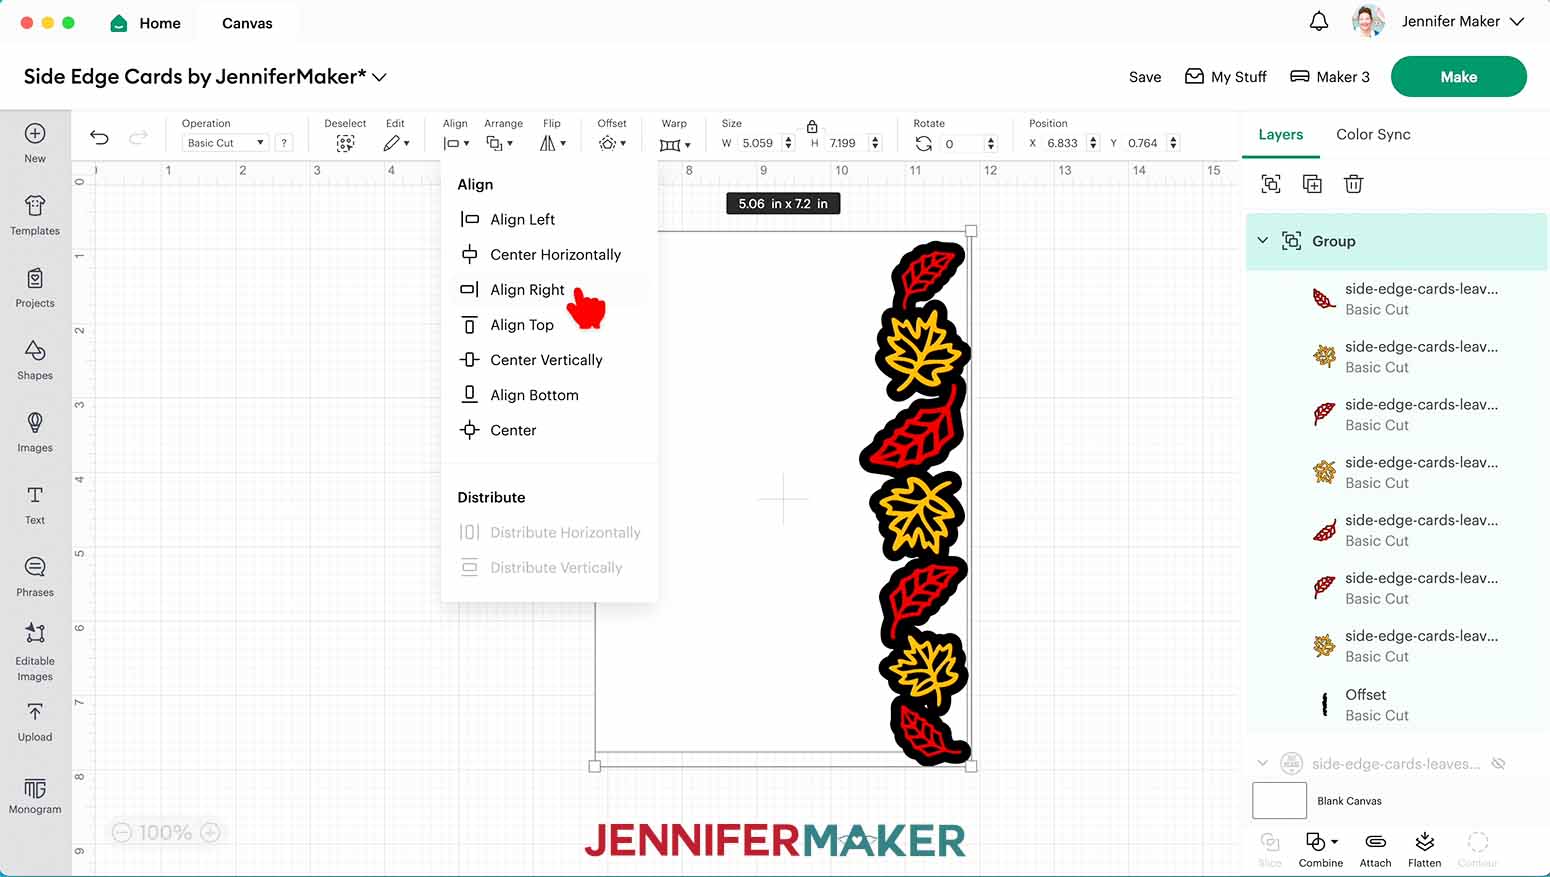
21. With your elements and offset still selected, click the “Group” icon.
22. Select the group and your card base layer and click “Align” and “Align Right.”
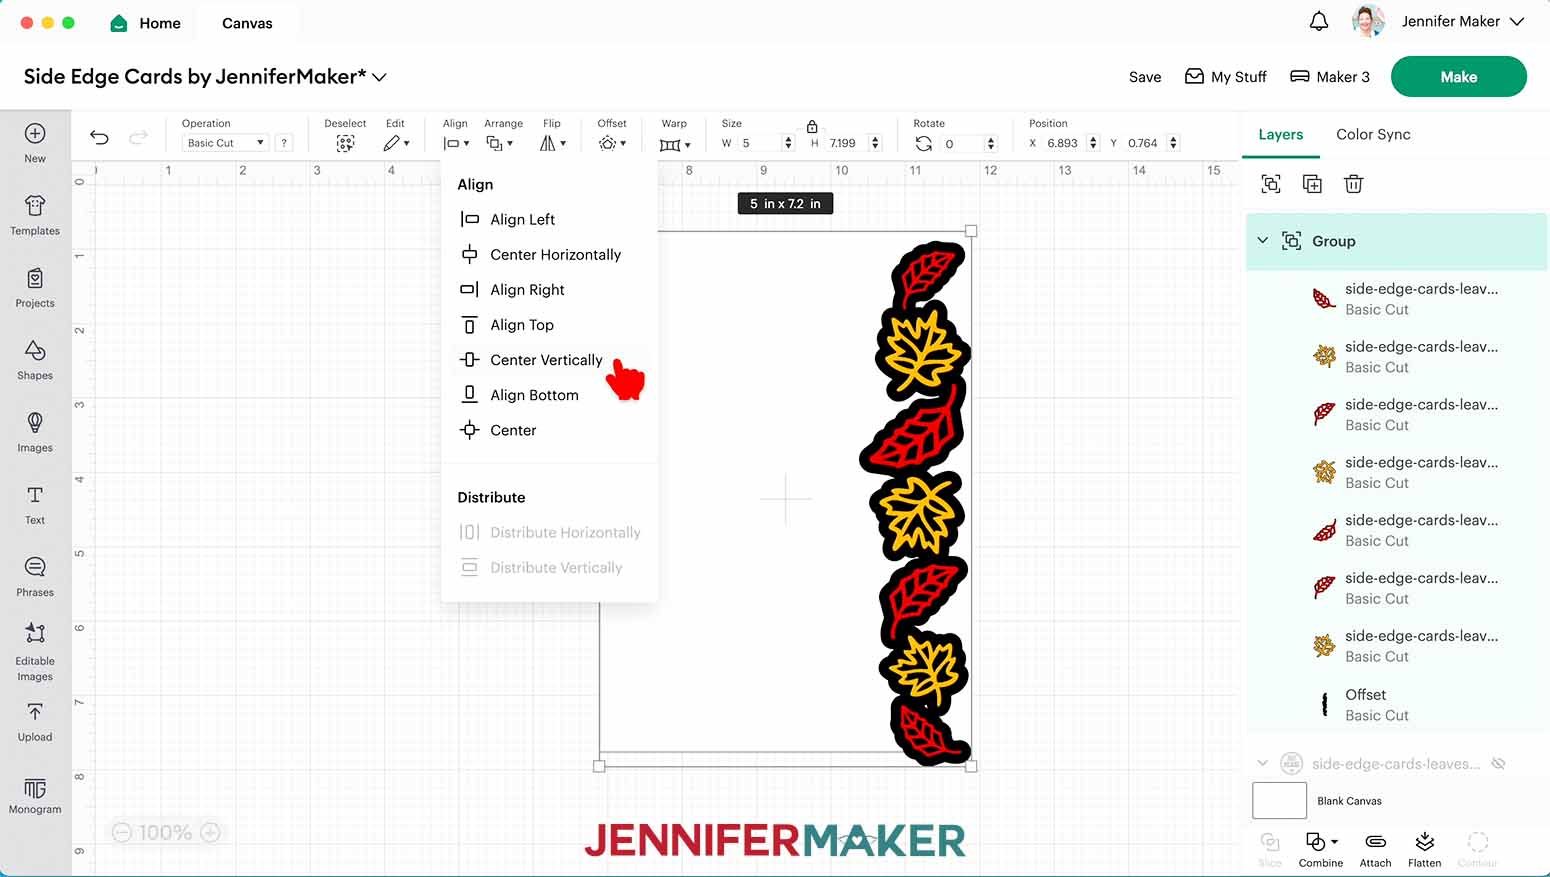
23. Without deselecting anything, click “Align” and “Center Vertically.”
24. Select your shapes and click the “Ungroup” icon.
25. Use the eye icons in the Layers Panel to hide each of your elements, leaving just the card base and offset shape showing on the Canvas.
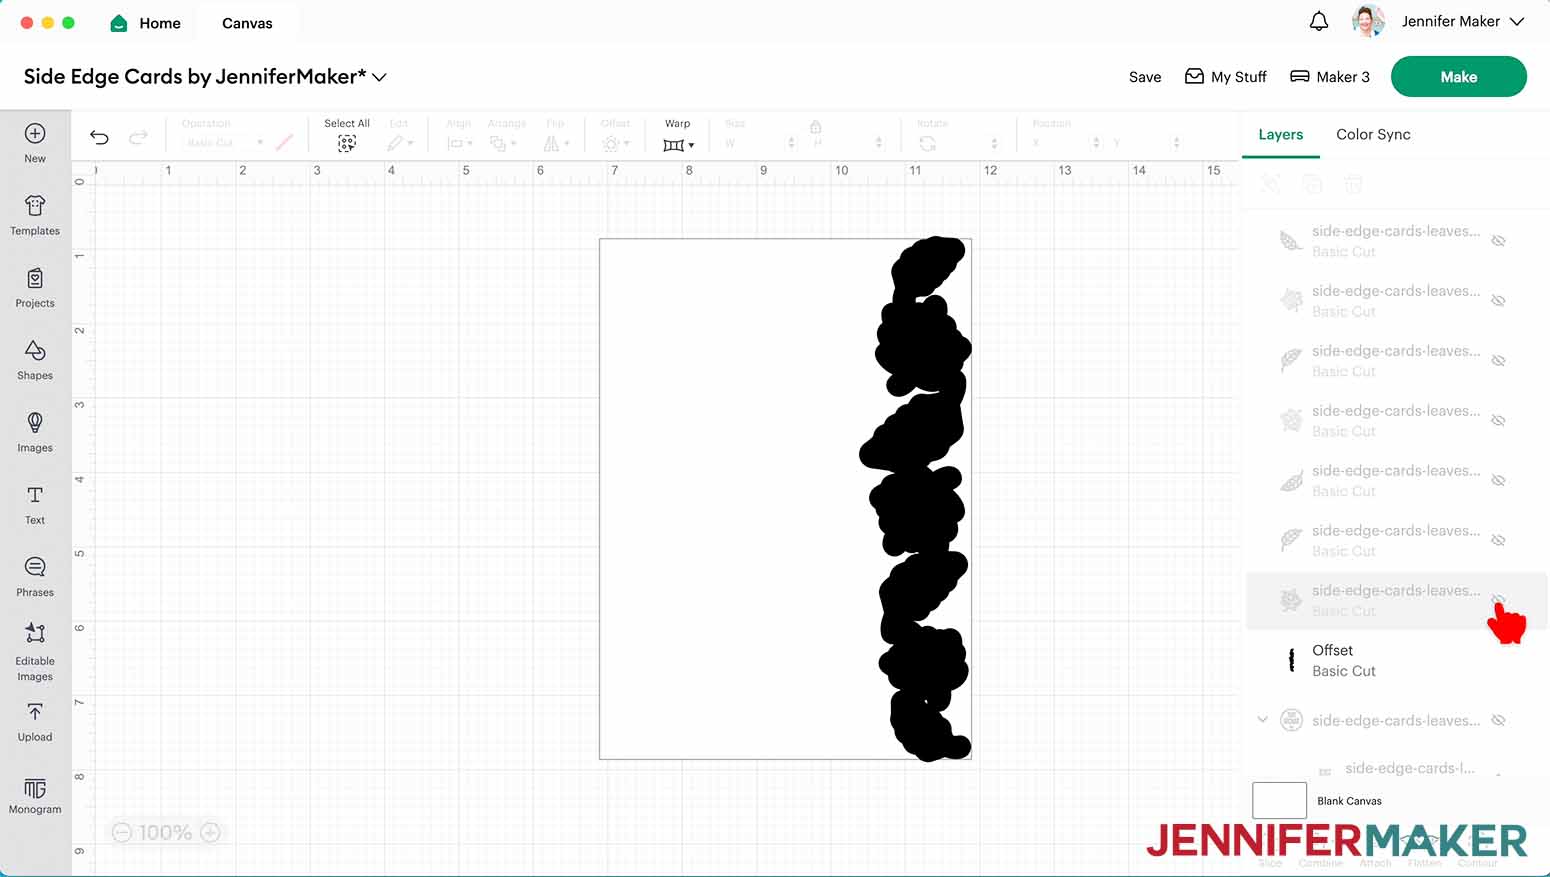
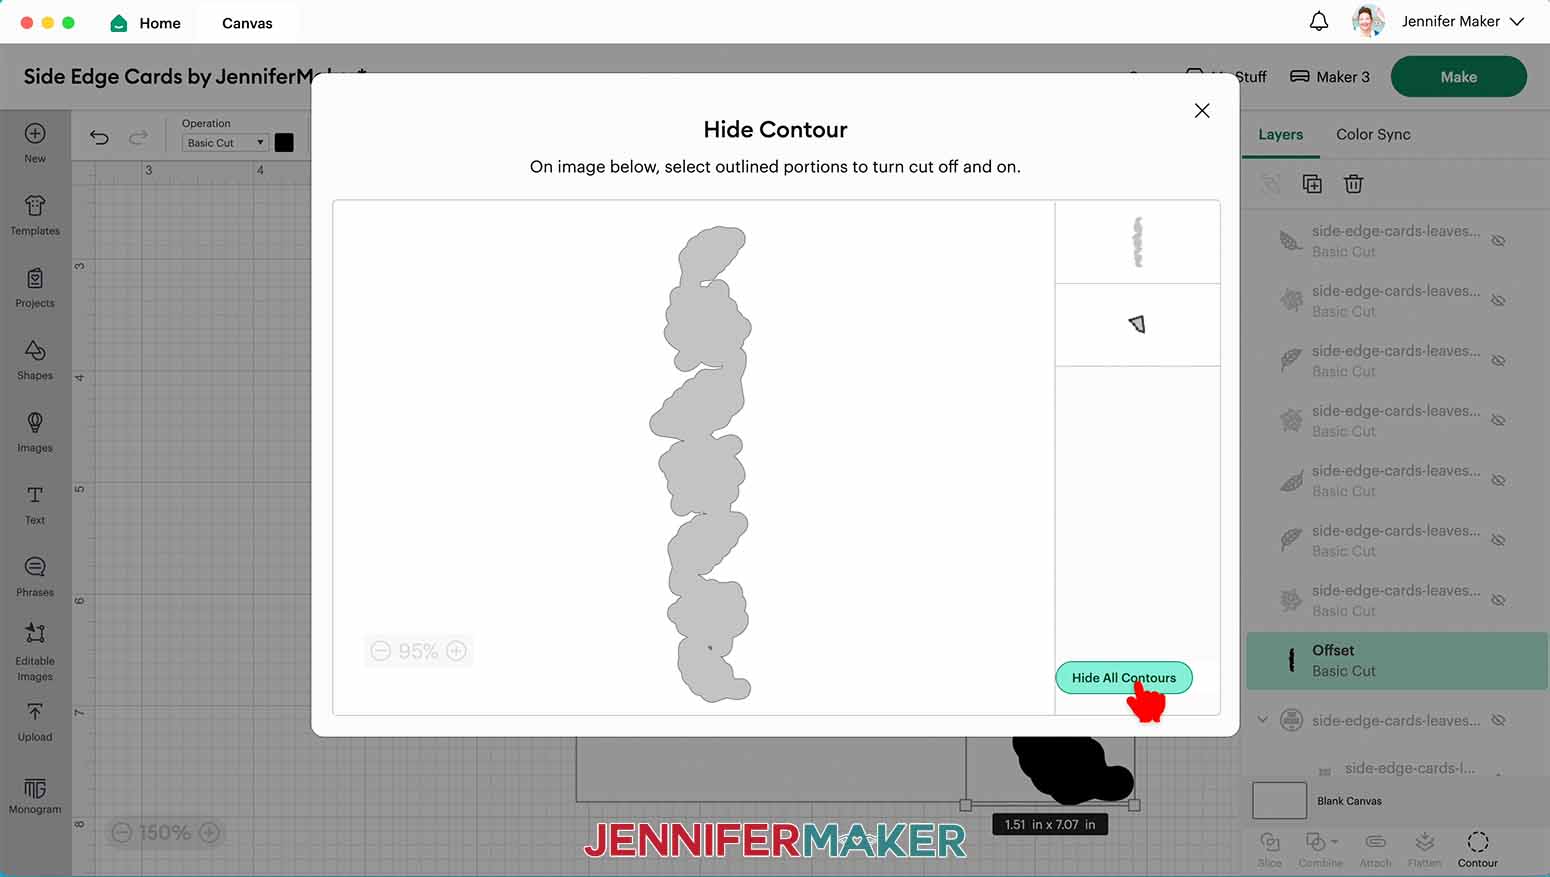
26. Select the offset shape and click the “Contour” icon at the bottom of the Layers Panel.
NOTE: If you don’t have any contours to hide, skip to step 28.
27. Click “Hide All Contours” to remove any inner cutouts from the offset shape, then click the “X” to close the “Hide Contour” window.
28. Select the offset shape and the card base layer and click the “Slice” icon at the bottom of the Layers Panel.
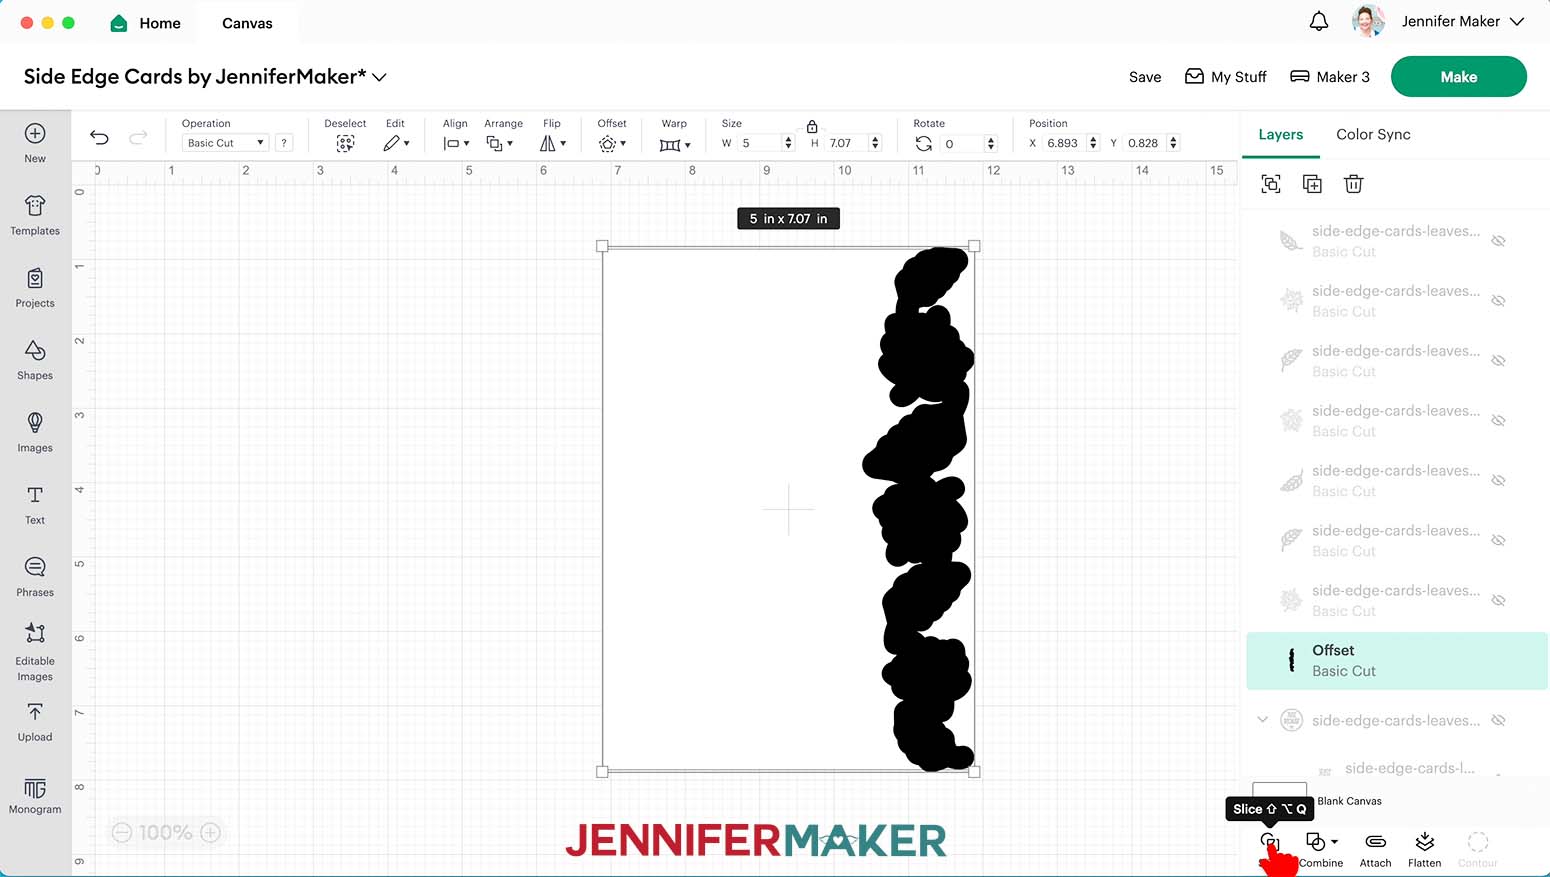
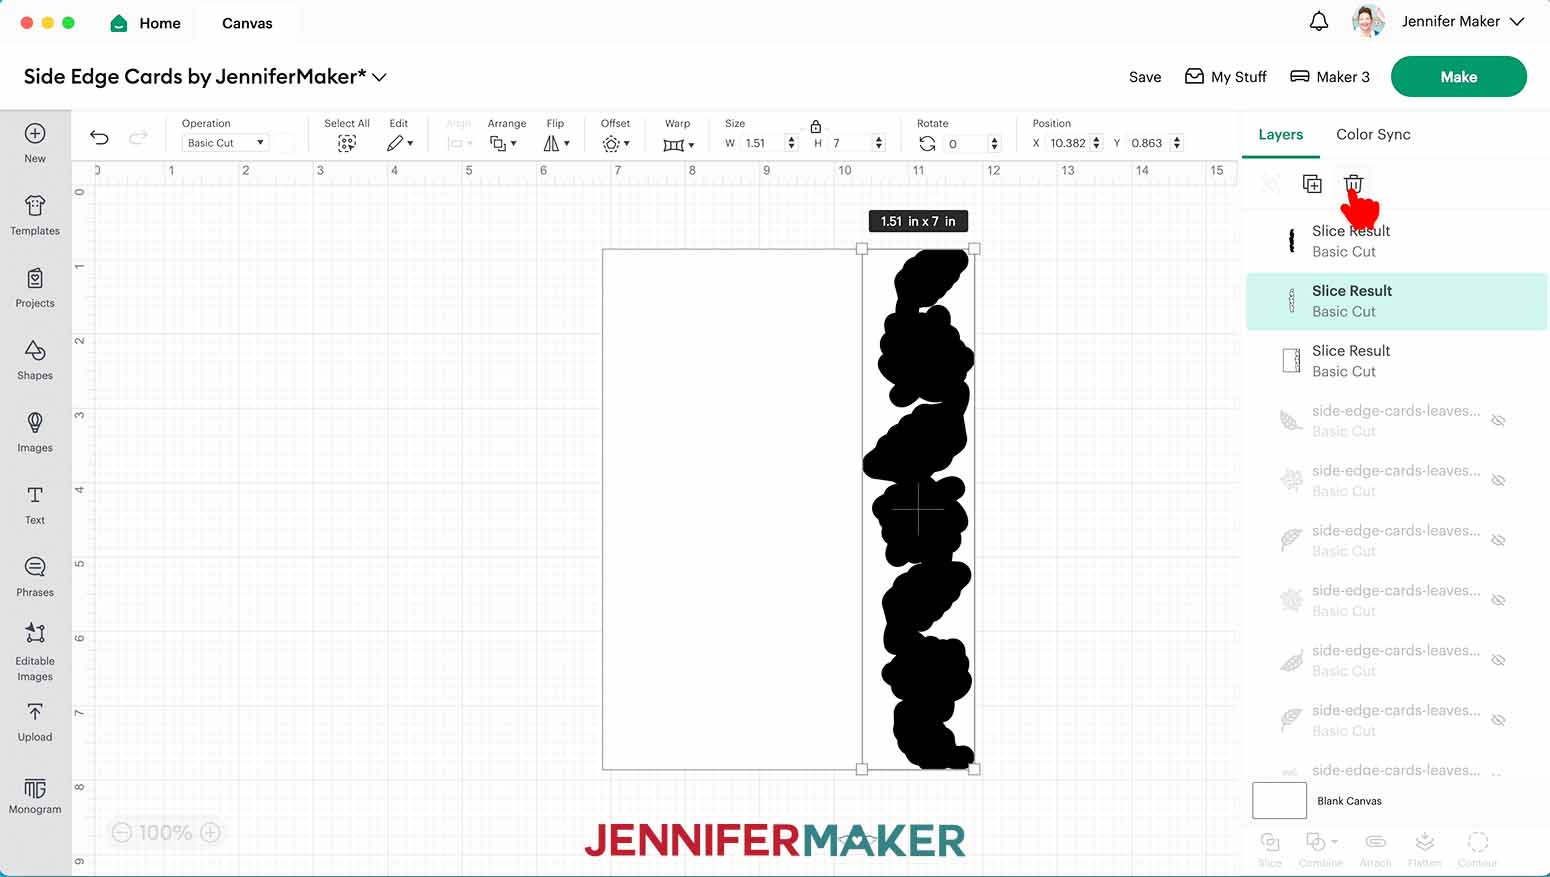
29. Delete any extra pieces and the duplicate offset shape layer, leaving just one offset shape Slice Result layer and one Slice Result layer with the left half of the card attached.
IMPORTANT: Do not move any pieces on the Canvas, or your card may not look right when you weld your remaining pieces together in step 32 below.
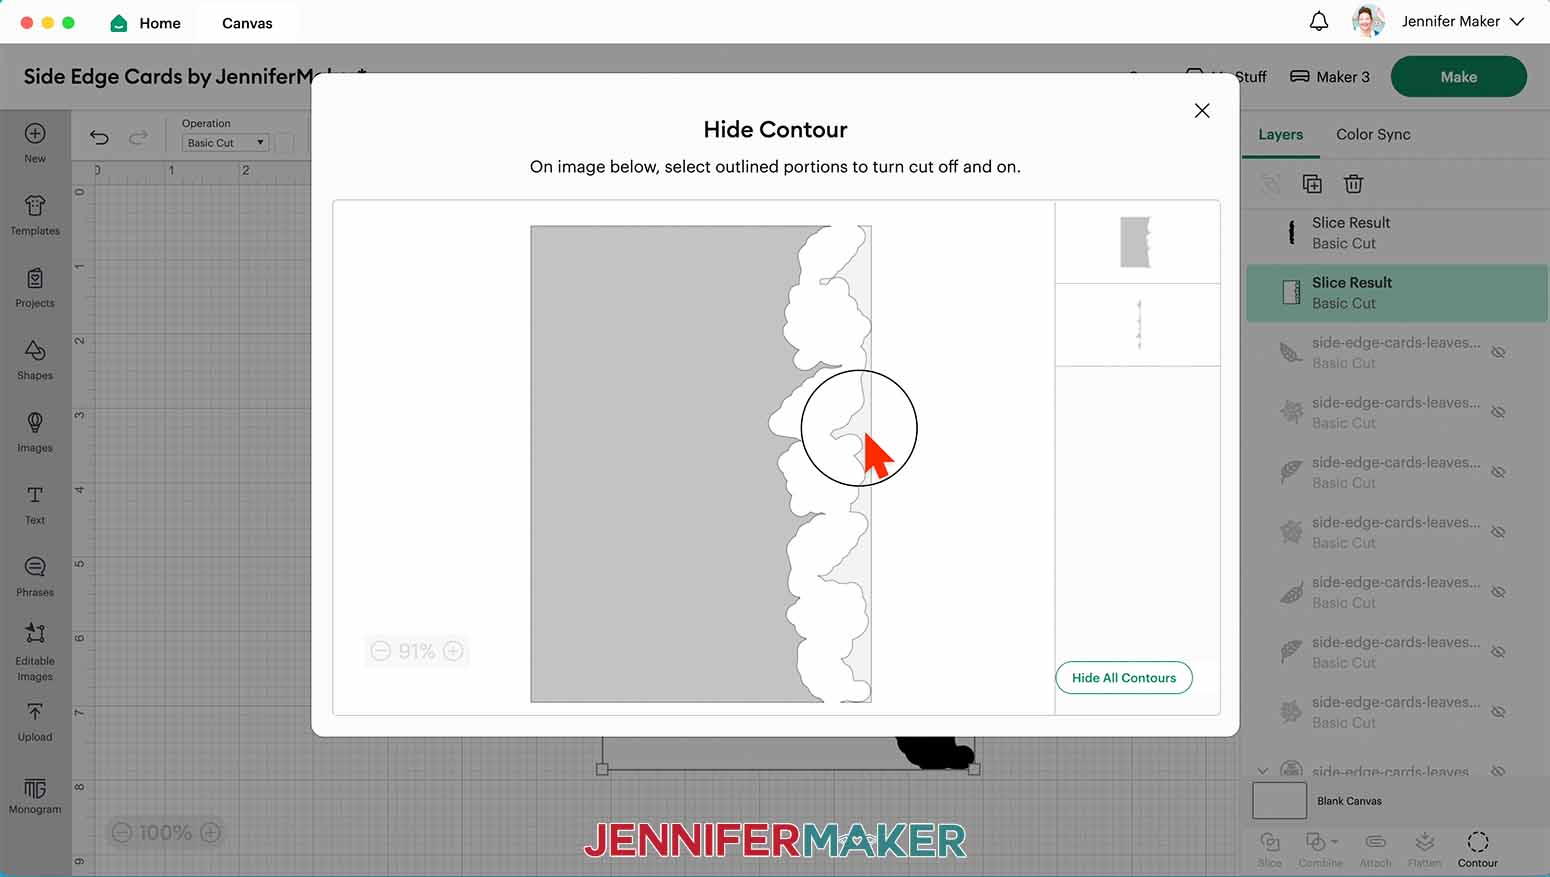
30. Select the layer with the left half of the card and click “Contour.”
31. Click on the pieces to the right of your offset shape to hide them. Click the “X” to close the window when you’re done.
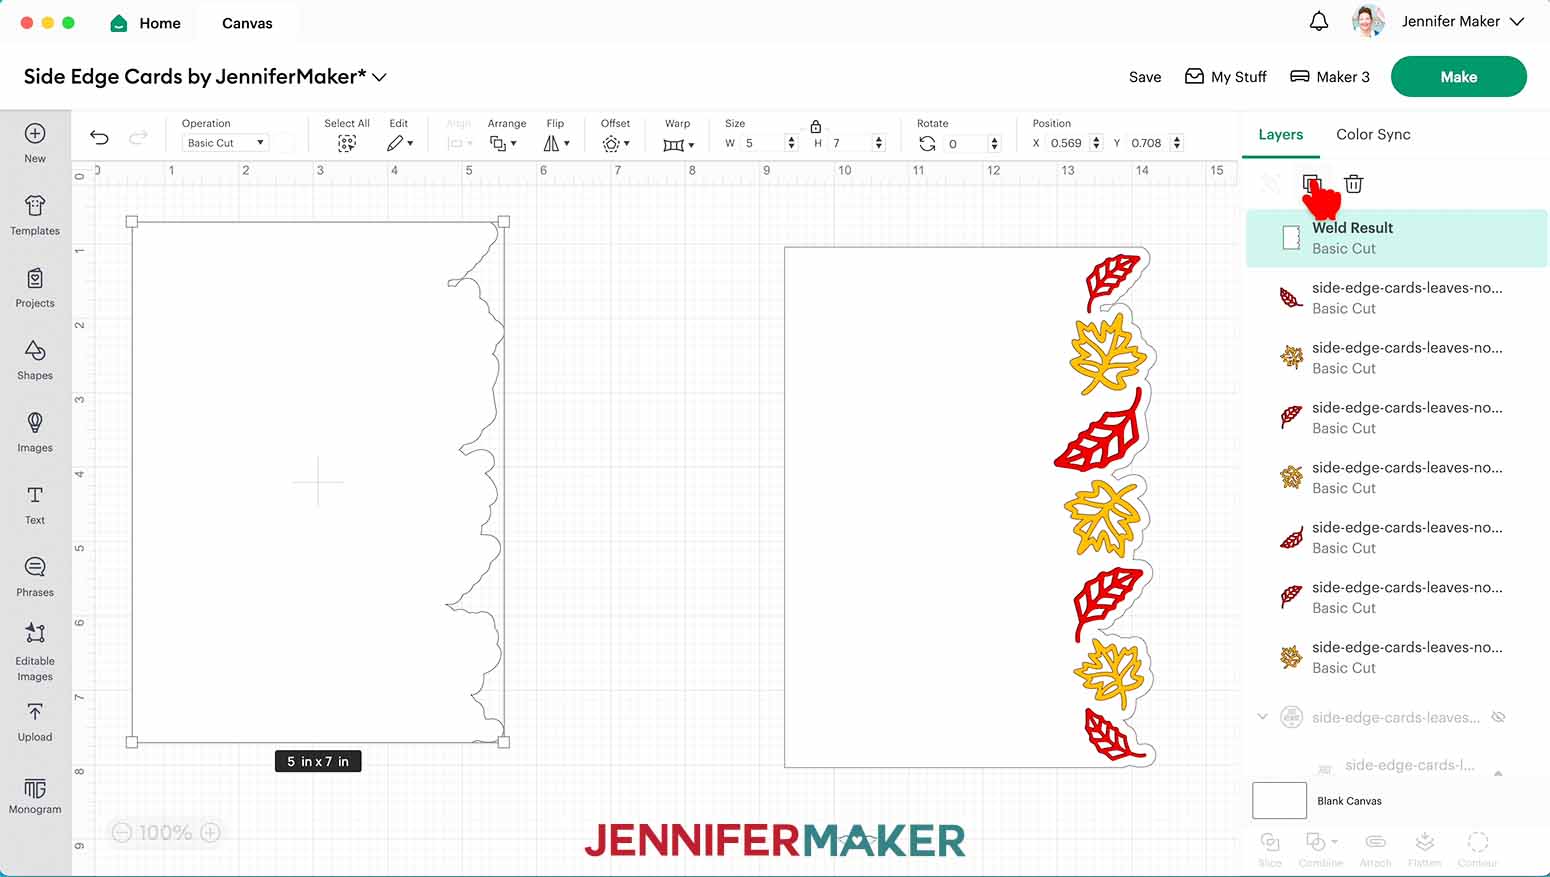
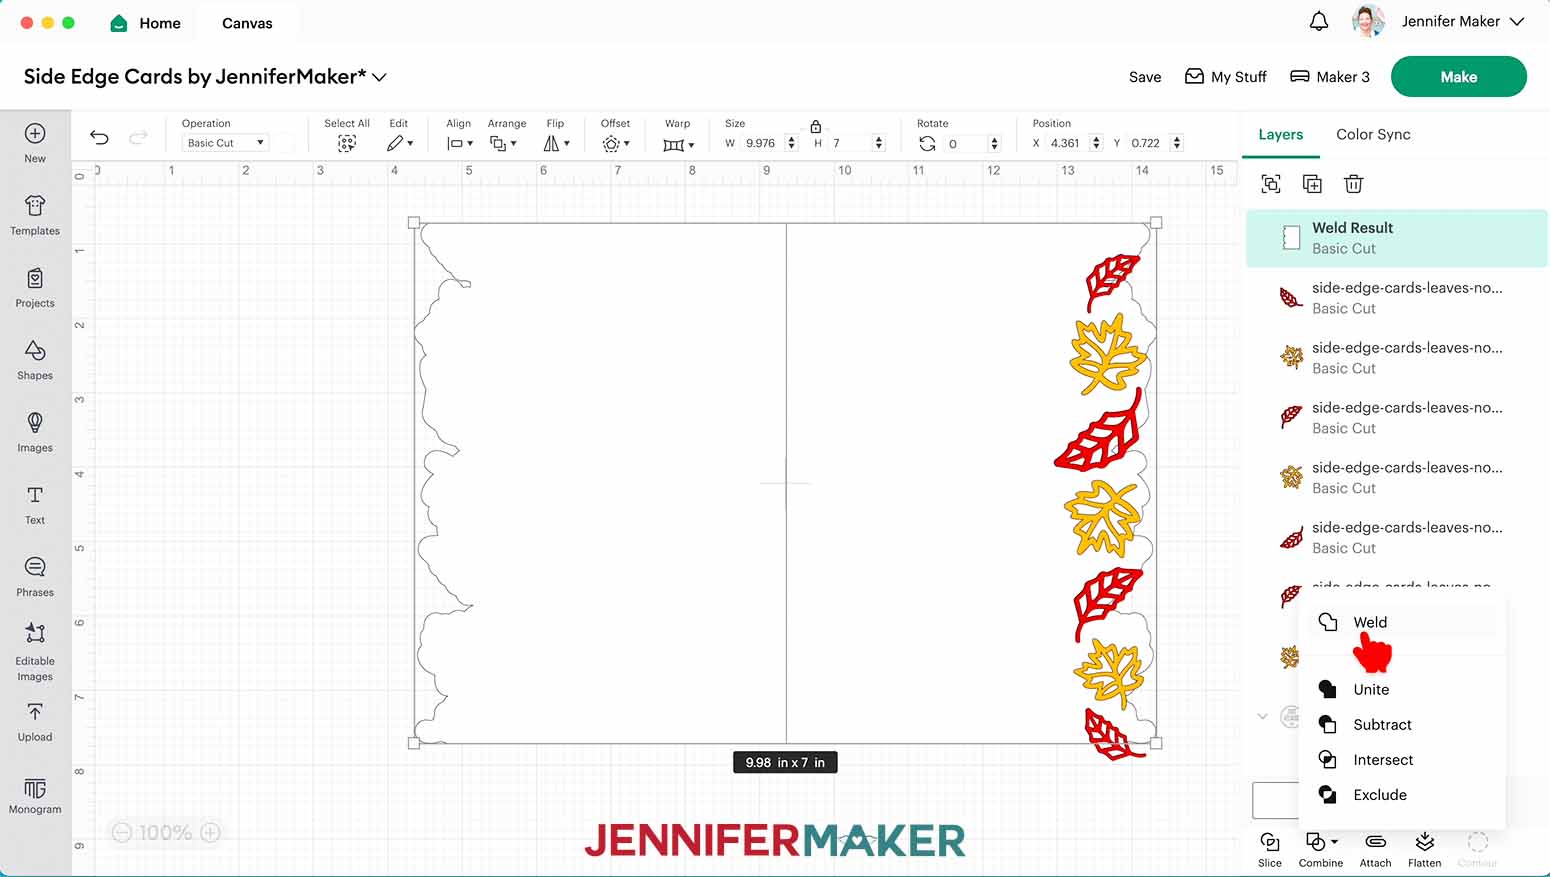
32. Select the offset shape and the left card half layers, then click “Combine” and choose “Weld.” You should be left with a single 5” x 7” shape with a straight edge on the left and a shaped edge on the right.
33. Click the shape and click “Arrange” and “Send to Back.”
34. Click the eye icons in the Layers Panel to show your card elements.
35. If you’re happy with your card shape, select the card base and click the “Duplicate” icon.
36. Select the duplicated layer and click “Flip” and then “Flip Horizontal.”
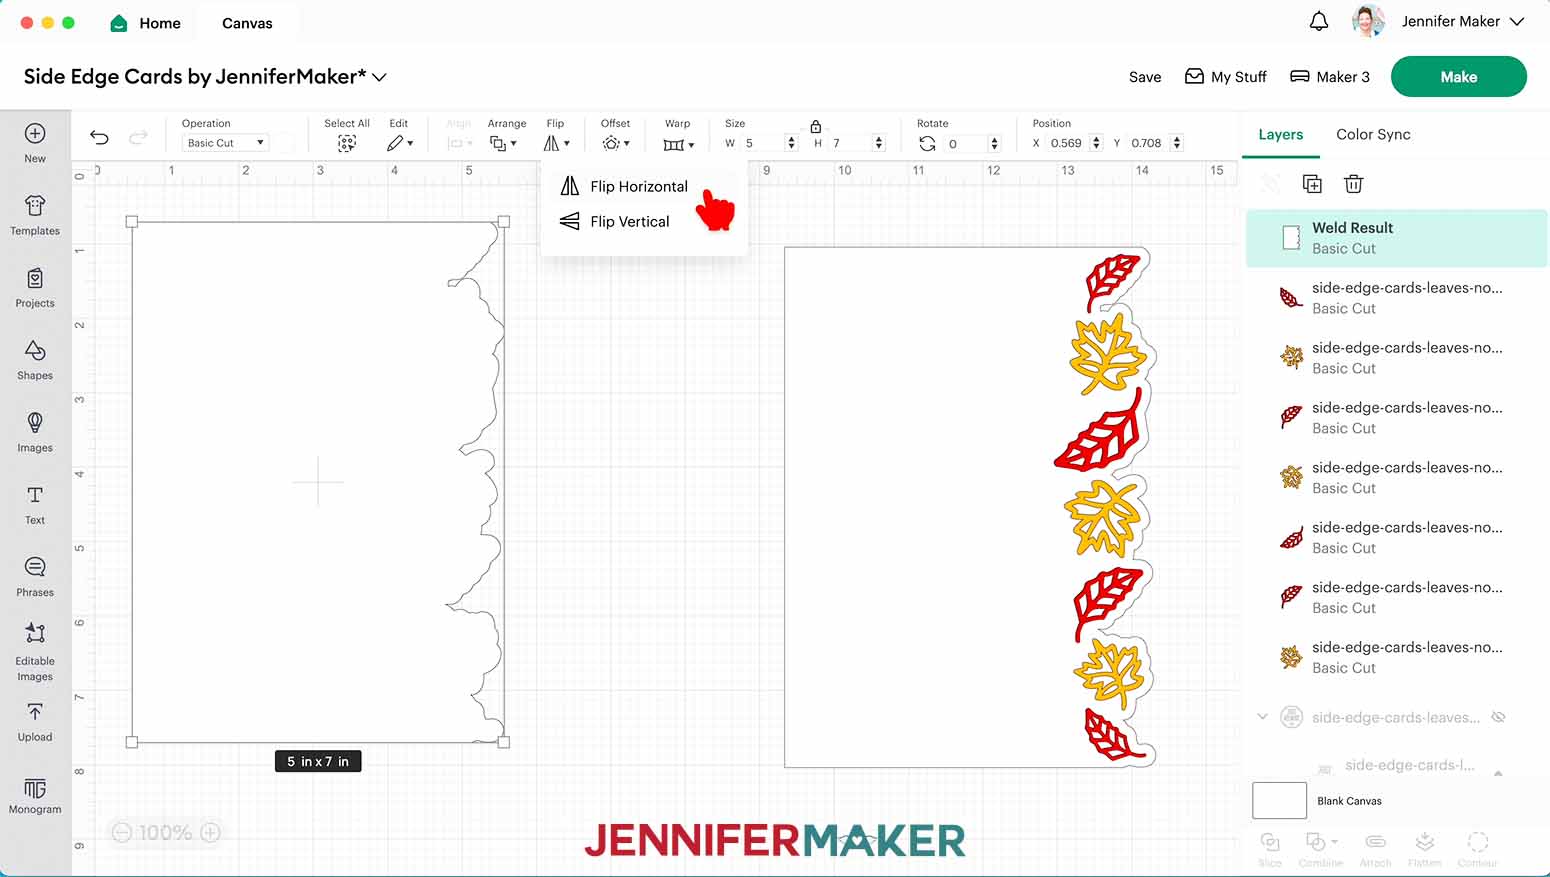
37. Select both card halves and click “Align” and “Align Top.”
38. Hold your shift key and move each card half to the left or right so they slightly overlap each other in the center.
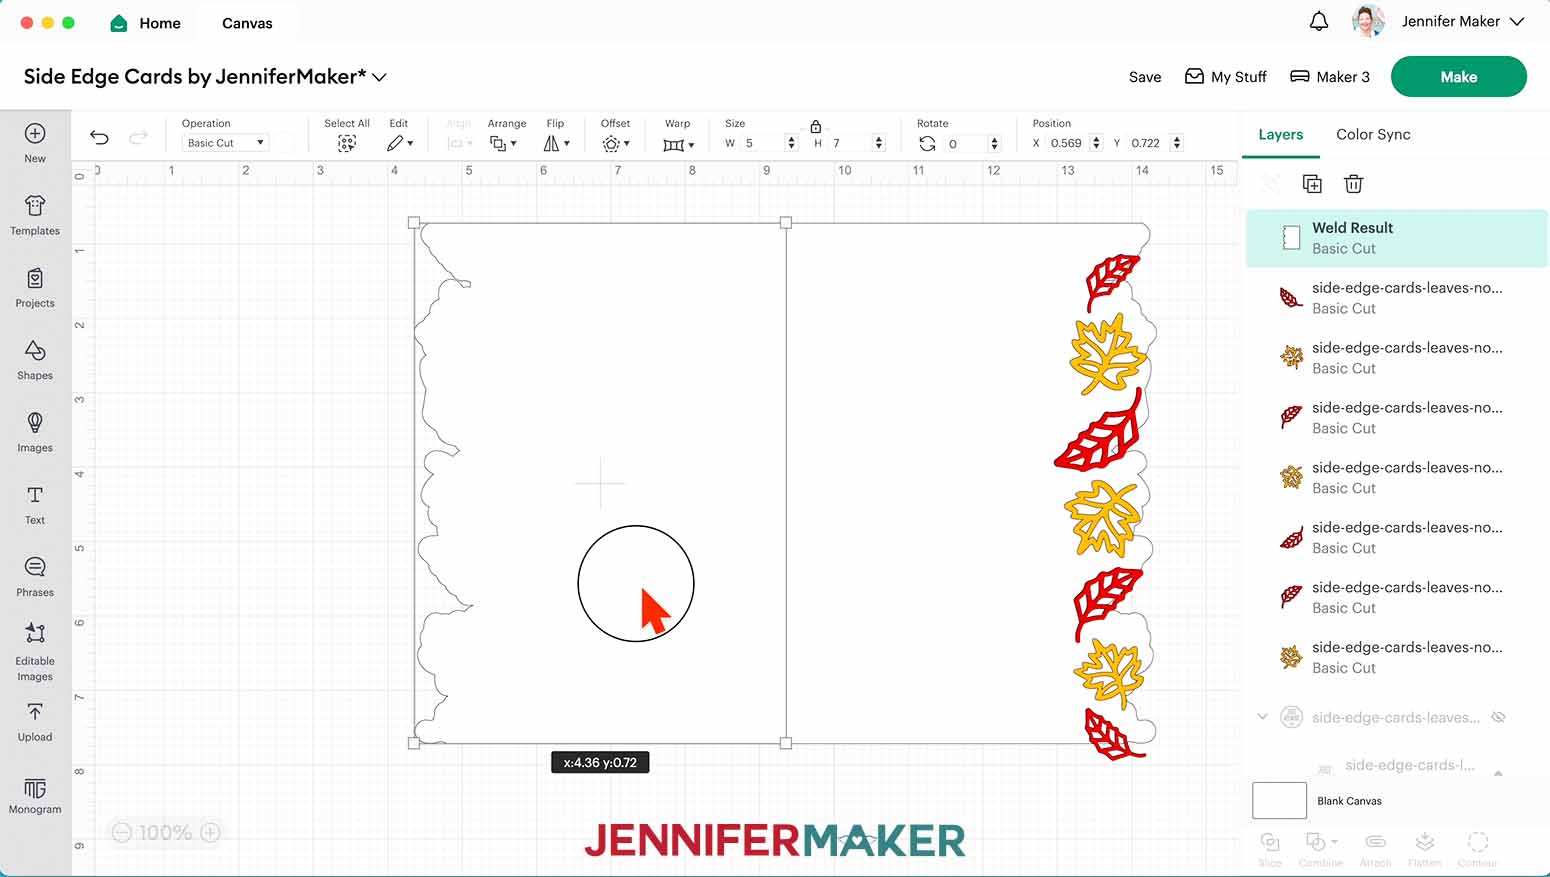
39. Select both card halves. Their combined width should be slightly less than 10”. If the width is more than 10”, move one of the halves so it overlaps the other a bit more.
40. With both halves selected, click “Combine” and choose “Weld.”
41. Click the “Shapes” menu and select the Score Line.
42. With the score line selected, resize it to 7” tall by typing “7” into the height (H) size field.
43. Select the score line and the card base and click “Align” and then “Center.”
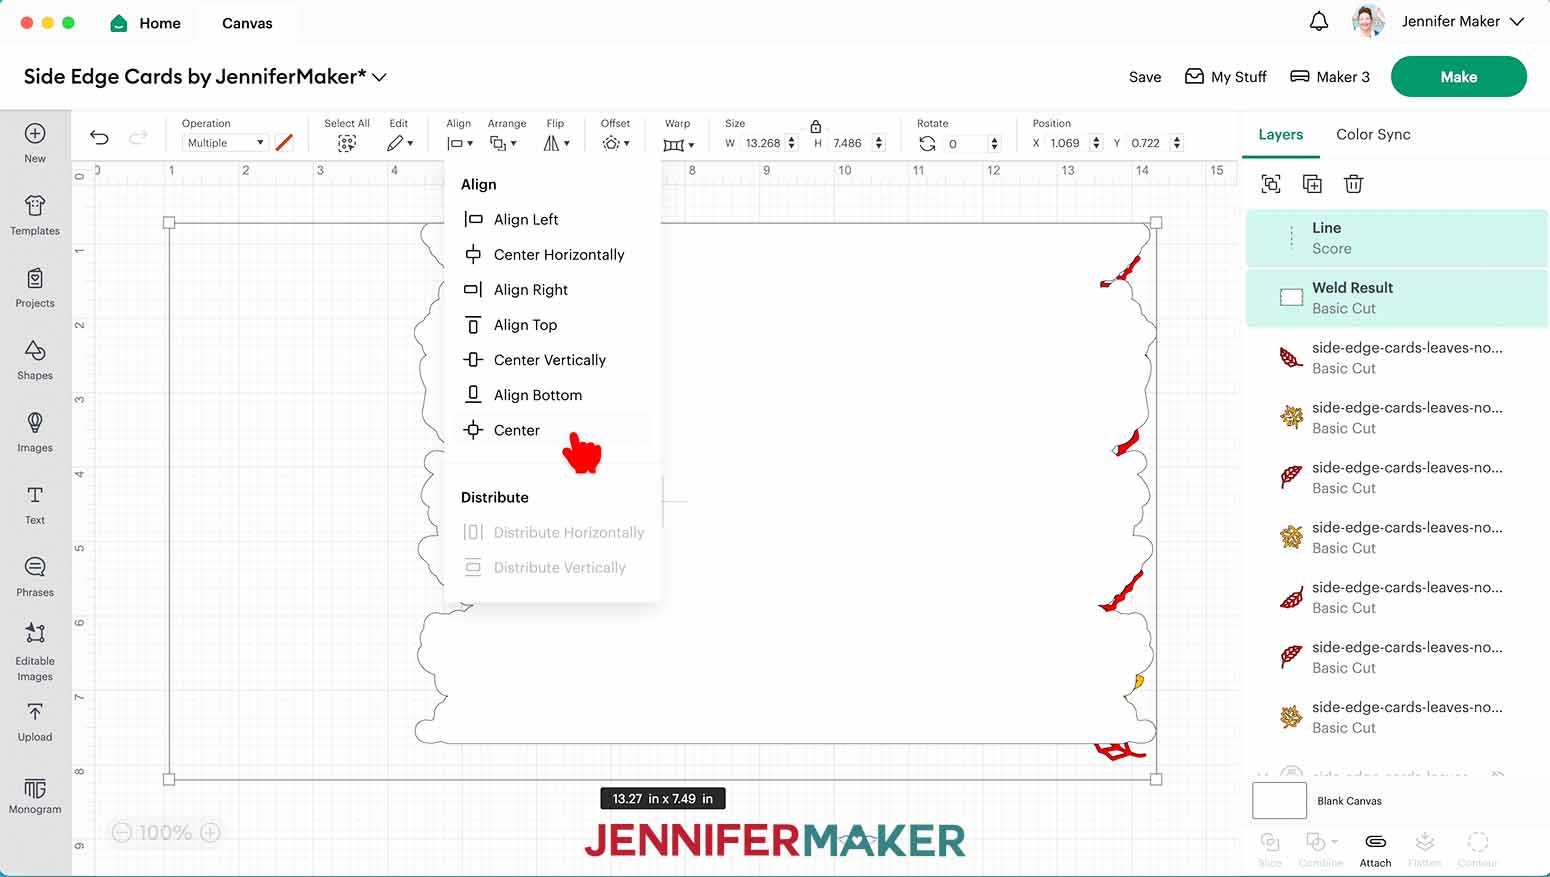
44. With both layers still selected, click “Attach” at the bottom of the Layers Panel.
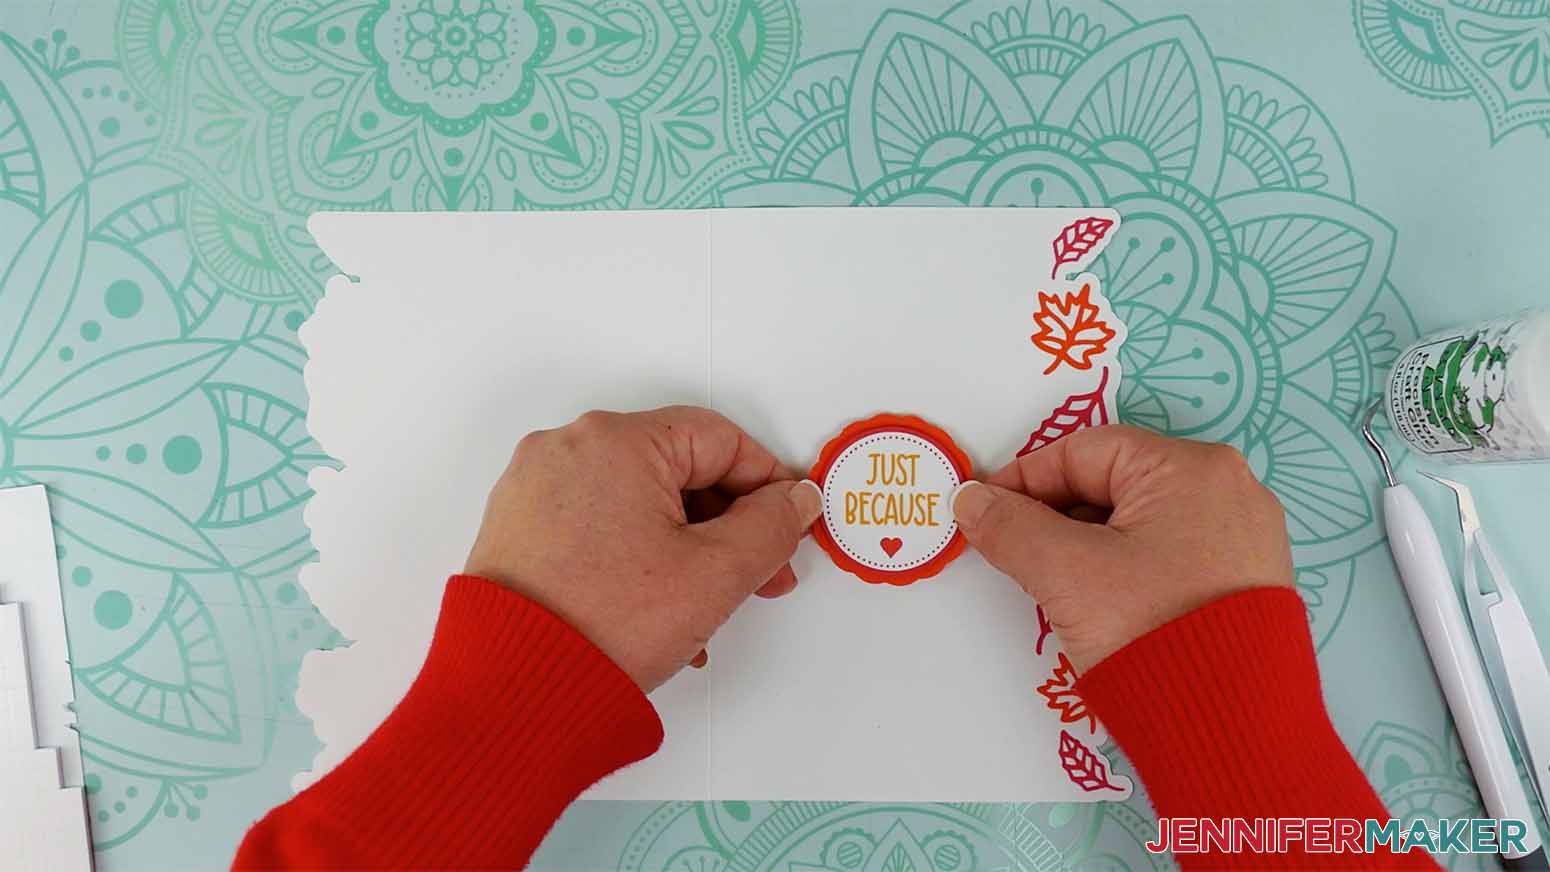
45. Add a sentiment in the open space on the front of the card, if you’d like. I’ll use the “Just Because” sentiment, along with the corresponding red and orange circles, from the leaves SVG file.
TIP: If you’d like to add a custom sentiment that your machine can write in pen, follow the steps in my Birthday Card Pop Up tutorial .
46. The “Just Because” sentiment is meant to be a Print Then Cut piece, so it needs to be flattened before we can cut it. Select the sentiment group and then click “Flatten” at the bottom of the Layers Panel.

47. Select the attached card base and score line and click “Arrange” and “Send to Back.”
48. Move your elements and sentiment into place on the card and make sure you’re happy with everything. Make any adjustments if needed.
49. Follow the “Project 1, Step 2” CRICUT DESIGN SPACE steps 12-17 above.
1. Follow the “Project 1, Step 2” CUTTING steps 1-8 above to cut your customized side edge card pieces.
NOTE: If you added a written sentiment to the front of your card, load your Fine Point Pen when prompted.
TIP: If you added a Print Then Cut sentiment or image, follow the steps in my Stained Glass Cards tutorial to print and cut your respective pieces.
STEP 3: ASSEMBLE YOUR CUSTOM LEAVES SIDE EDGE CARD
1. Fold the card base piece in half along the scored line. If you’re using two-sided cardstock, make sure the pretty or colored side is face out.
TIP: Use a scraper for a sharp crease.
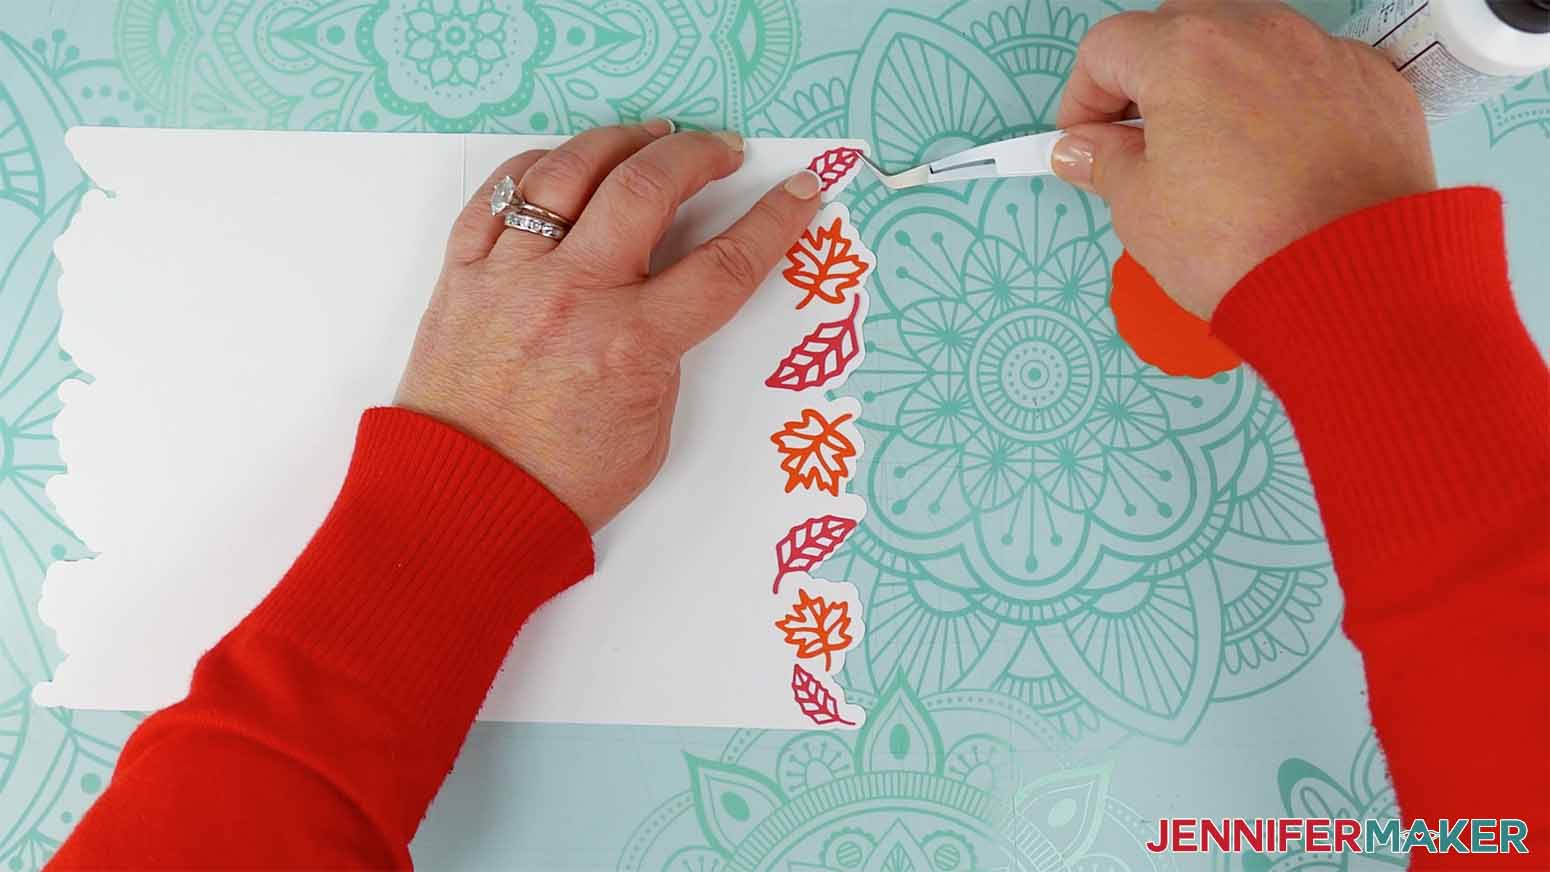
2. Add a few dots of glue to the edges and center on the back side of a leaf piece.
3. Match up the leaf’s edges with its corresponding offset shape on the right edge of the card. After the leaf is correctly positioned, press down to adhere it to the front of the card.
TIP: Refer to your Design Space Canvas if you need help determining where to place each piece.
4. Follow steps 2-3 to attach the rest of the leaves to the card.
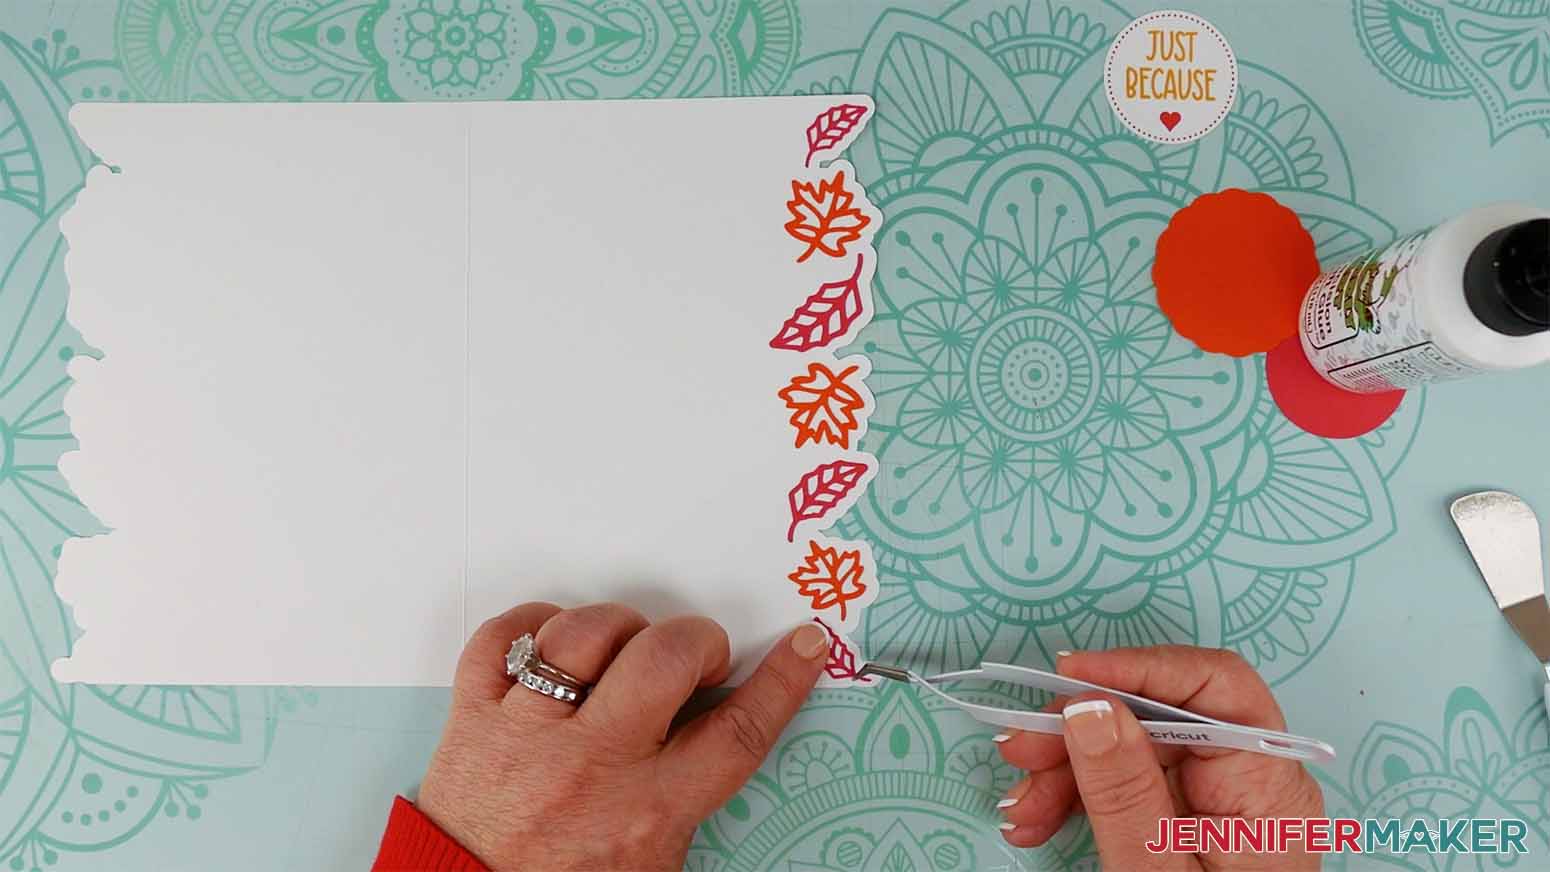
5. To make the Print Then Cut sentiment, first add glue to the back of the printed circle and attach it to the center of the red circle.
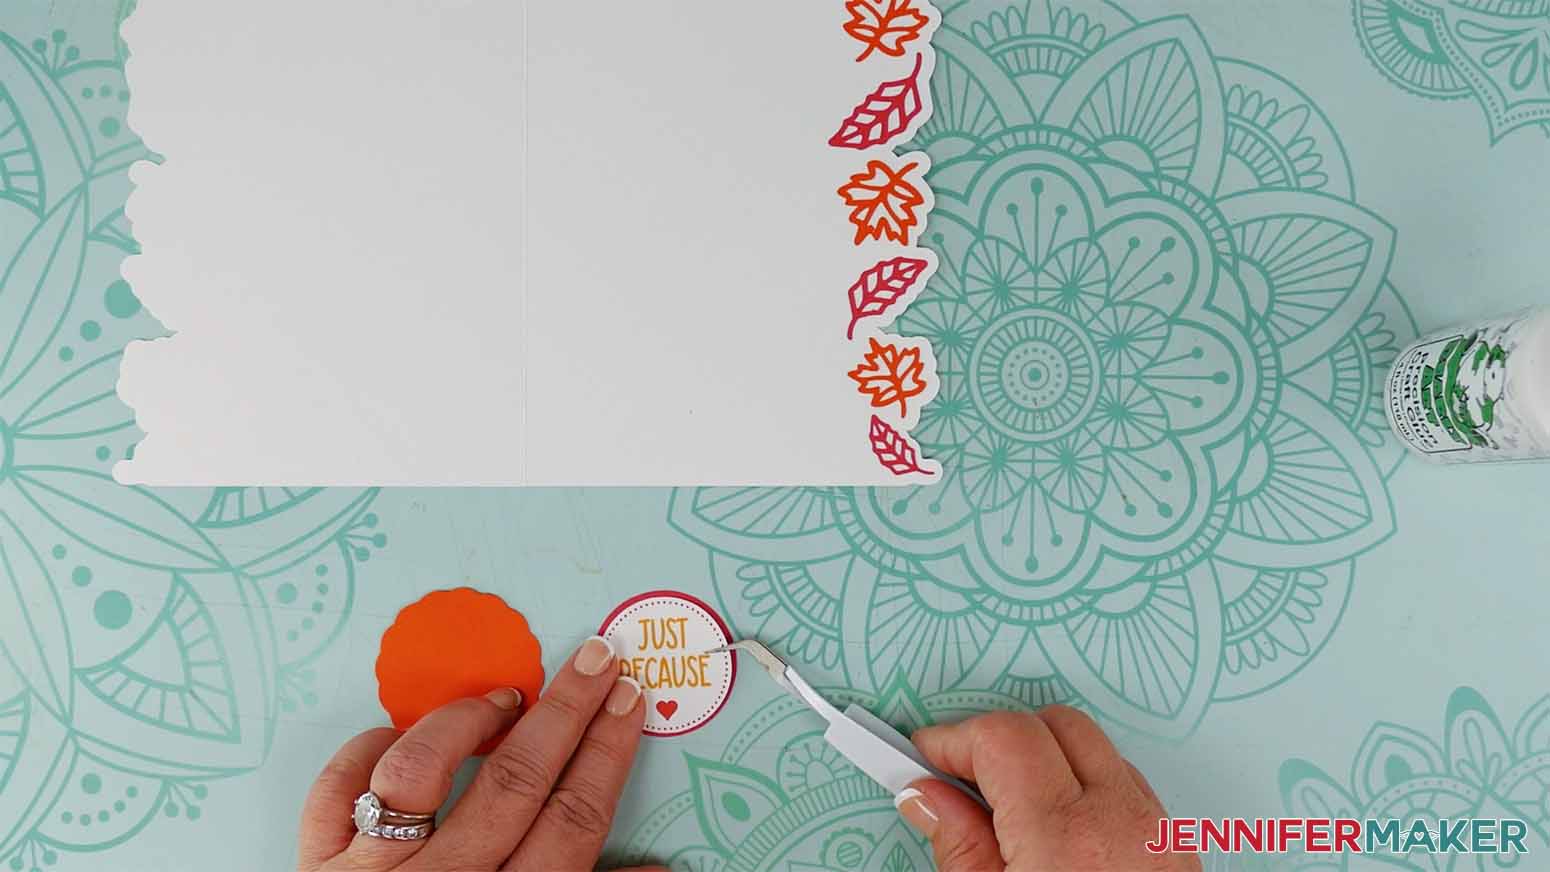
6. Attach four foam adhesive squares to the back of the red circle, spacing them evenly around the outside edge.
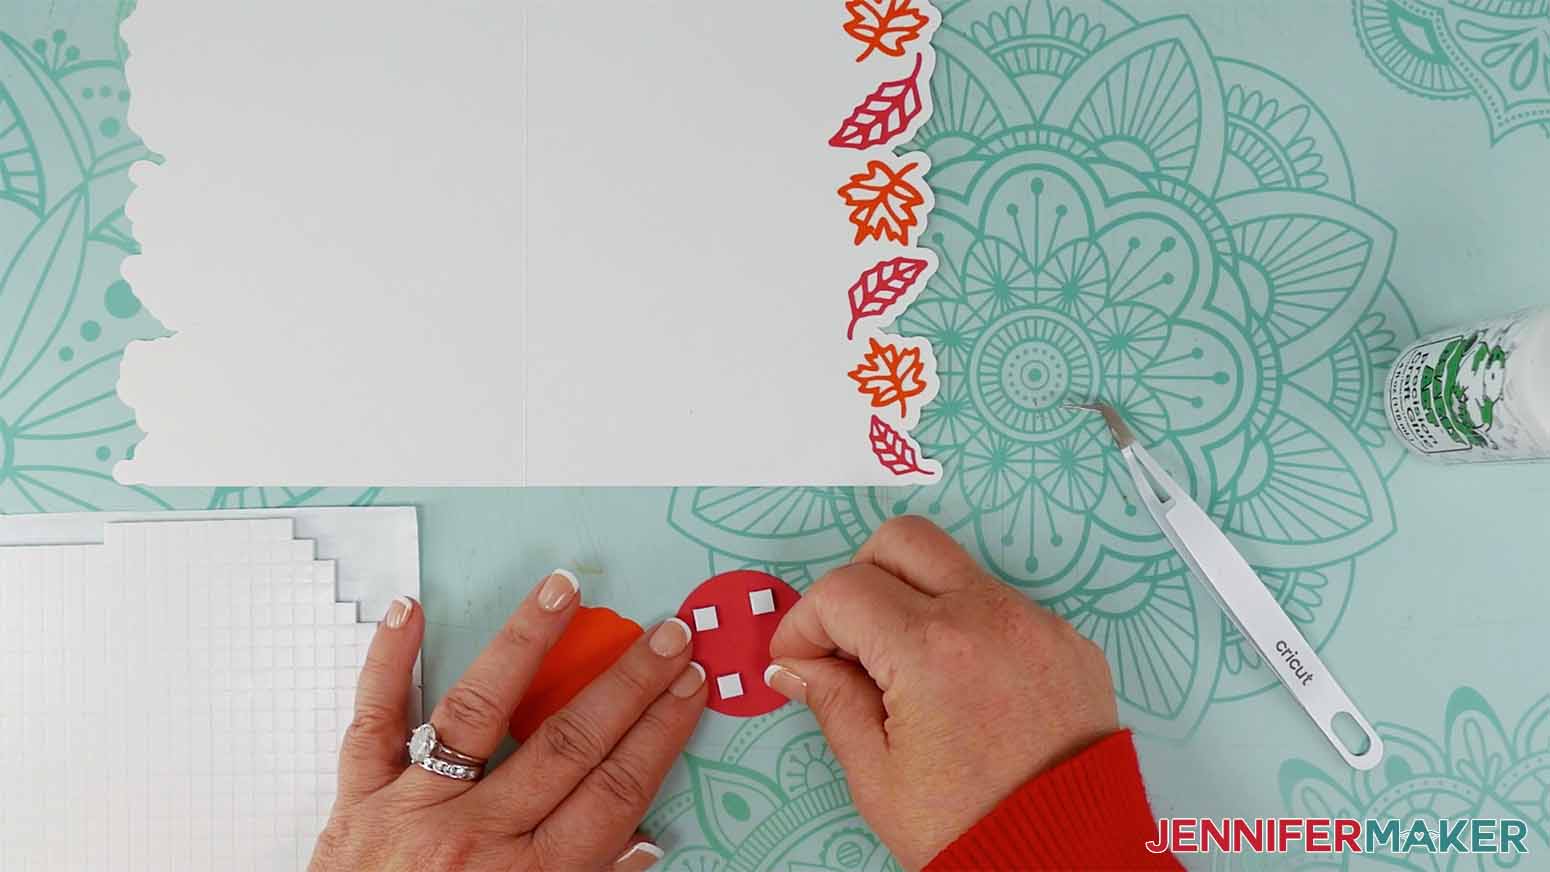
7. Remove the adhesive backings and attach the sentiment pieces to the center of the orange circle. Press down to adhere them.
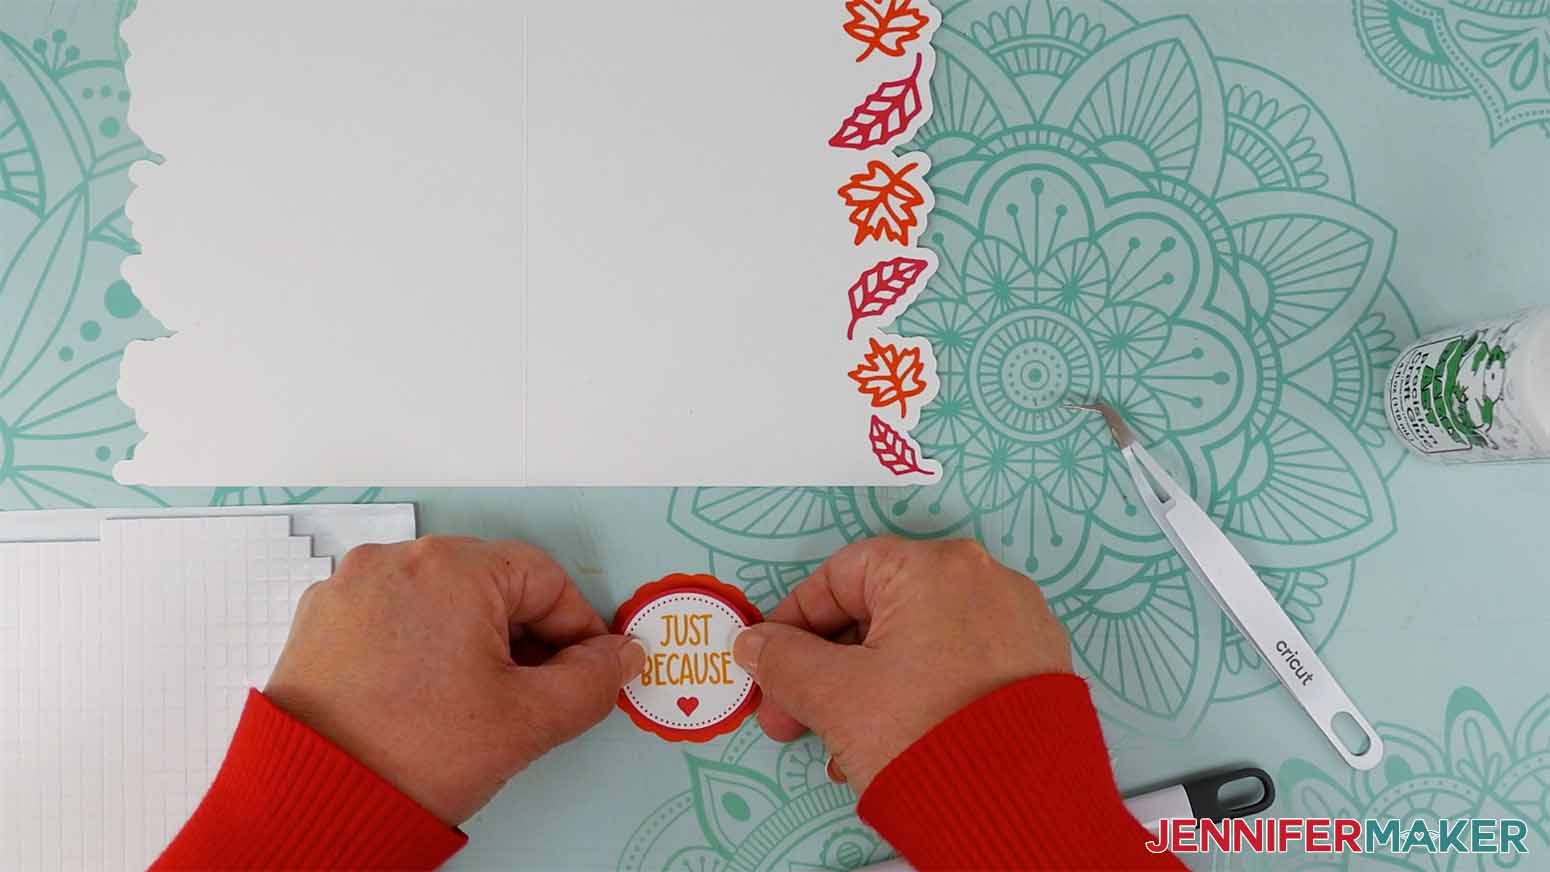
8. Attach four foam adhesive squares to the back of the orange circle and then attach it to the front of the card, centering the completed sentiment from top to bottom.
VARIATION 1: PEACOCK SIDE EDGE CARD
1. Follow the “Project 1, Cricut Design Space” steps 1-9 above.
2. Add a sentiment in the open space on the front of the card, if you’d like. You can follow the steps in my Birthday Card Pop Up tutorial to add a sentiment that your machine can write in pen.
TIP: My font JM Tall works really well for this. Don’t forget to convert your sentiment to Pen and attach it to the card base before cutting!
3. Make sure the correct machine is selected in the top right.
4. Click “Make.”
5. If prompted, click "On Mat," choose your mat size, and click “Confirm.”
6. On the Prepare Screen, you should have two mats for the peacock side edge card - 1 white for the card base and 1 teal for the card liner.
7. If needed, change the Material Size to match each paper you’re using.
8. Select the first mat again and click “Continue.”
1. Follow the “Project 1, Cutting” steps 1-8 above. I cut my white layer on 65 lb. cardstock and my teal layer on metallic foil cardstock using these settings:
- Metallic Foil Cardstock - “Holographic Cardstock” Setting with More Pressure
STEP 3: ASSEMBLE YOUR PEACOCK SIDE EDGE CARD
1. Fold the card base piece in half along the dashed or scored line. If you’re using two-sided cardstock, make sure the pretty or colored side is face out.
2. Open the card and add glue to the left side, avoiding the cutouts and very edges.
TIP: You just need a few dots of glue in between the feather cutouts, on the wing, and on the eye piece.
3. Carefully align the foil liner to the glued area with the foil side facing down so it shows through to the front of the card.
TIP: Make sure the liner piece doesn’t extend past the fold.
4. Flip the card over before the glue dries and wipe away any excess.
VARIATION 2: BUTTERFLIES SIDE EDGE CARD
2. Make sure the correct machine is selected in the top right.
3. Click “Make.”
4. If prompted, click "On Mat," choose your mat size, and click “Confirm.”
5. On the Prepare Screen, you should have six mats for the butterflies side edge card - 1 white for the card base, 1 gray for the vinyl sentiment, 1 orange, 1 yellow, 1 green, and 1 teal.
6. If needed, change the Material Size to match each paper you’re using.
7. Select the first mat again and click “Continue.”
1. Follow the “Project 1, Cutting” steps 1-8 above. I cut my white and colored layers on 65 lb. cardstock and my gray layer on white permanent vinyl using these settings:
STEP 3: ASSEMBLE YOUR BUTTERFLIES SIDE EDGE CARD
2. Weed the vinyl sentiment.
3. Use a piece of StandardGrip transfer tape slightly larger than the sentiment to transfer the words to the teal backer piece.
4. Attach one foam adhesive square to the back of each of the eight largest butterflies.
TIP: You can also use glue to attach these butterflies.
5. Attach each butterfly to the front of the card, aligning its right edge with the corresponding offset shape on the right side of the card.
6. Add a small amount of glue to the back of the five small butterflies.
7. Attach one to the remaining blank offset area on the front of the card, aligning its right edge to the offset shape.
8. Attach the remaining four butterflies wherever you’d like.
STEP 4: SHOW IT OFF!
Here is what my finished side edge cards look like!
Now you can give them to friends or family members to brighten their day. You can even make a DIY envelope to mail your finished card by following my How to Make an Envelope tutorial .
Typefaces Used:
Charlotte (butterflies design)
BFC Hello Flower (snowflakes design)
JM Sweet (leaves design)
JM Tall (peacock design)
Finished Size: Each card is 5" x 7" when folded

Peacock Model of Urban Design – Sustainable Urban Habitations/Eco Cities
Urban development is explained through planning, architectural and critical theoretical perspectives. The concept of peacock model comes as the living being tries to extricate itself from today’s polluted environment, this model resolves the problem by merging the buildings, waste management systems, Green and Blue Infrastructure into a cohesive whole by bringing nature close to where humans live. Rather than distancing humans from natural environments the Peacock model integrates human life around forests. The symbiosis of humanity and nature via this novel architecture may solve some of the greatest problems facing mankind. As more human choose to live in dense yet green natural environments we predict massive increases in productivity, increased happiness and sustainability.
Introduction and Literature Survey
There has been attempts to create sustainable green cities 1 in the past like the garden cities of the United Kingdom. Even though they have received much acclaim, they have also received criticism for encouraging urban sprawl 2 and result in low population densities. European and American cities are tethered by extensive car based transportation networks. Population Density in metropolitan Indian cities 3 exceeds 20000 people/sq.km. The Peacock model proposed takes inspiration from the city of Curitiba, Brazil 4 where all public parks are interlinked by pedestrian, cycling paths and an extensive BRTS system that allow commuters to travel across the cities without impinging the vehicular traffic in a seamless manner. Manhattan island, New York City has large Central Park that anchors the city and function as the green lung 5 . The Peacock model of urban design is an attempt to combine all these concepts to make the sustainable cities at a population density of about 20000-40000 people / sq.km which is the present population density of many of the urban metropolis in India Mumbai.

Peacock Model for Urban design
Peacock feathers describe the peacock Model for urban design, as the feather comprise the different colors merge together giving beauty to the environment. Similarly Peacock Model for urban design comprises the component giving the environment, community best sustainability solution increasing the beauty of Nature. The composition of blue, Green, brown, silver in the peacock feather states the component in the Urban model, blue as the water bodies, Green as forest area, Brown as the Open land and recreation areas and silver as the human Habitation.
Related: Relationship Between Mental Wellbeing and Green Space in Your City
Components of Peacock Model
Model below exhibit the the different component in the Urban design Habitation in the model consists of a mix Building of 36m Height creating the boundary to the Urban model. The building will be 10 floors +2 stilt for parking. Parking will only be in the stilt area. The area in the center 120 m width and 266m length will be for trees, solid waste Composting unit and waste water treatment unit and the rain water harvesting pond. Between the building and the center area, there is a track constructed which will be used as a running or cycling path of 6m.

Figure 2: Peacock Model for urban design: Human habitat Floor Space 16000sqm
Waste generation from Community:
- Solid Waste Recycling / Composting system: Solid waste generated from the community will be collected and segregated Bio-Degradables waste is taken to the composting plant inside the urban model. The compost from the composting plant will be used as the manure for the trees thereby supporting urban gardening. Plastics, Metals, Glass, Electronics are recycled and reused.
- Waste Water Recycling System: Similarly wastewater is collected and taken to the Wastewater treatment plant . The treated water is used for flushing gardening, cleaning tracks, washing vehicles etc. This reduces the requirement of fresh water from outside. The critical aspect
Storm Water System
Rain water is collected through the storm drain and gets connected to the water body which is located in the center of the garden area which comprises nearly an area of 5000 sq.m. This pond gives the aesthetic view to the garden as well as recharge the groundwater table. Whenever need arises as when there is shortage in the water supply the water can be taken through the borewells and used for the day to day purpose.
Green Zones / Miyawaki Forests:

Figure 3: A Miyawaki Forest by Afforest 6
Miyawaki Forests 7 conceived by Dr Akira Miyawaki a celebrated botanist is an innovative concept in developing dense natural forests. The green zone integrates forest areas and Urban Permaculture 8 is created around the waste recycling systems to allow utilization of the compost, treated wastewater and stormwater from the RWH system. The Green zone will contribute to the societies for their day to day vegetables in permaculture areas and construction materials like bamboo or teak from the forest areas. Green Zone prevents the Erosion of soil, they also provide transpirational cooling to the human habitations surrounding them. The green zone encourages natural and Arboreal wildlife. Measures are taken to connect these green zones to green zones in other nodes.
Habitations and Recreation
Infrastructure includes 36m tall buildings, interconnecting tunnels or skywalks, treatment units, joggers parks. The building includes 10 floors and 2 stilt floors. Stilt floor will be used as a parking, where a ramp from the ground will be provided. The Outside facing facade of the buildings could be business units and the inside facade would primarily be used for residential purposes. The design of the interiors of this mixed use facility would be to encourage shared common facilities. A set of 4 apartments could be served by a common lounge, common kitchen. Such model of community living have been successfully implemented by cooperative housing projects in many universities in United States and Canada.

Figure 4 : Escher Cooperative House a blueprint for Social living
The cooperative house Renaissance and OKeefe house together called the Escher House 9 (a noted civil rights leader) 10 where the author stayed during his Ph.D. at the University of Michigan provides inspiration for this concept. We propose to convert this to serve families rather than just students. The shared living area and connected suites of Escher have been replicated in the Peacock model. We believe that the interconnected living space will give rise to collaborations and social networks leading to massive increases in productivity. The building designed can be used for Schools, Business, Hospitals, Restaurants, Retail and Business in a flexible manner. The idea of this flexible design is to minimize the requirements of residents to commute long distance for daily needs. Escher house was designed so that residents could traverse the entire house via interlinked corridors at all levels. Common areas within such a design became locations for exchange of idea, thoughts and discussions. Escher House for example had common kitchens (9 of them) and 2 large kitchens which catered to community meals in the evening. This was very similar to the Sanjha Chulha concepts of community cooking in Rajasthan in India or Langars in Sikh Gurdwaras .
Life Cycle and Maintenance Cost
Peacock Cities are designed to give responsibility and employment to private entities hired by each node to maintain and harness the facilities provided for public benefit. The green zone area can cultivate the fruits, vegetables, flowers in the huge amount and earn by selling this to the community in that zone. This creates the transparency of the producer and the consumer, builds the trust and since can be paid more. People in the habitat had to pay a very low maintenance cost as revenue will be generated from the waste generated by the society making waste as their resource.
Key Technologies
Choosing eco sensitive, low lifecycle cost, locally maintainable technologies are critical in the Peacock model to decrease cost to the inhabitants. Close Integration of such ecological facilities also results in significant savings for inhabitants. One of the key costs of living in cities is the power costs for cooling. Peacock cities are designed to provide ecologically assisted cooling via their central forests.
Rain Water Harvesting
Nowadays the rainfall is uncertain and the level of groundwater gradually goes on reducing. It is very important to create a rainwater harvesting system for every township so to reduce the water requirement from an outside source. The proper design of the water body to handle the storm water surges so that the rain water harvesting system can recharge ground water is critical. The inlet works of the water harvesting system have to remove undesirable contaminants like silt/grit and micro pollutants before allowing the water to percolate into the subterranean Aquifers.
Waste Water Recycling Technology

Figure 5: Collage of images of CAMUS-SBT type Waste Water Treatment Plants 11
Waste Water treatment is a critical infrastructure. In general the quality of life of communities with excellent waste water recycling facilities is far superior to nearby cities with inferior facilities. The treated waste water allows a higher levels of cleanliness. Many waste water technologies exist, however the quality of treatment is dependent greatly on the attention to detail and operations and maintenance of such plants.
We propose that natural technologies capable of high quality of treatment meeting or exceeding NGT 12 13 , norms 14 such as CAMUS-SBT 15 , Vermifilters 16 , should be used due to their lower operating costs and superior water quality. However using more conventional treatment processes like MBBR 17 , SBR 18 , ASP 19 etc may be considered with proper contract conditions with WWTO vendor to ensure quality outcomes required for reuse. In Peacock cities Flush reuse of waste water is mandatory as that ensures that the vendor providing the waste water treatment solution necessarily has to provide quality outcomes as the product (treated waste water) is being checked for quality on a constant basis by the user in the toilets and green areas where it is used for irrigation. Natural treatment technologies we recommend can be integrated into the forest areas more easily.
Solid Waste Recycling Technology
Technology came for the solid waste treatment which includes vermicomposting 20 , bio gasification Pyrolysis. Composting can be the technology which is used sustainably to maintain the luxuriant green zone. Compost from the composting plant will be used as the fertilizer for the plants which are grown in the green belt this give more productive in terms of Agricultural Products. Organic Solids wastes can also be used for biogas applications along with the waste biomass produced by the green areas. It is our estimate that food waste of 100 families can provide cooking gas for 1 family. However with the presence of leaf litter and biomass from the forest we are confident that up 20% of cooking gas can be obtained from green zone if deemed necessary.
Roof Top Solar Panels and Solar Heaters
Solar panels are installed at the roof of the building. The solar power generated by the solar system is to be used for the common area like parking area, lift ,corridors, stair case, garden area etc. Solar Heaters for the entire building ensure that the sun powers all requirements for hot water and perhaps even steam for commercial kitchens. Such concepts have been successfully implemented in many charitable institutions for their community kitchens.
Related: Urban Planning & COVID-19 | Density, Travel Demand, Water & Hygiene
Network of Infrastructure
We recognize that the biggest benefits of such models of urban design are achieved when the master plan ensures that all infrastructure is properly networked. One critical design feature of the Peacock model naturally enforced separation of pedestrians/cyclists from arterial roads by creating separate rights of way (ROW) within the green zone. Road networks are all designed in essentially straight lines/continuous corridors to allow fast movement of cargo and traffic. is considered to be one of the keys to urban development of a region. Arterial streets, a continuous route carries heavy traffic. Most of the commutes for residents in Peacock cities will be within the node itself. However the interconnectedness of green zones of all nodes allows commuters to chose eco friendly non vehicular modes of transit such as cycling, electric carts, skates, running etc, in water rich cities/areas the pond networks can be connected by canals to promote boating as a method of transit. Huma powered transit will be supported by a shower/locker facility will be made available at every node that would allow commuters to choose to commute freely knowing that at the end of the commute they can take a shower, change, go to work and then in the evening get the exercise they need in their commute back home. Such facilities are commonly available in most American and European cities and allows residents of these cities to choose such alternatives for their commute.

Figure 6 : Network Environmental Assets
Storm networks are also connected to each other, excess in one area overflows to other reservoirs downstream and the rain water harvesting structures will replenish the ground water for the entire city. The Green Zone are also connected via green corridors which allow small wildlife (squirrels, rabbits, hares, porcupines, beavers, peacocks, deer, foxes etc) to traverse the city. This concept was inspired by the author’s time at the IIT Bombay and University of Michigan campus where there was a significant yet safe interaction of wildlife and humans. Infact for added safety pedestrian corridors can be chain linked fenced to prevent wild life from harming humans if more dangerous animals such as foxes and wolves are envisaged in any node. Perhaps in some nodes the central green zone can be converted to public zoos with more extensive wildlife.
Conclusions and Call for Action
Looking forward for the collaborators to take this initiative forwards. The concept note is released to generate a discussion around eco-friendly cities. Please connect with us at [email protected] https://www.linkedin.com/company/vision-earthcare/
Author Bio: Dr. Chandrashekar (Ph.D) completed his B.Tech in Chemical Engineering at IIT Bombay After IIT Bombay. He finished his Ph.D from the University of Michigan at the Department of Materials Science and Engineering on the computational study of smart self healing materials with the biologically inspired ability to heal failure, he also stayed in Cooperative Housing Societies governed by the Inter Cooperative Council (ICC) 21 where the diverse membership from many nations shaped many of the concepts being incorporated here. Post his PhD, He worked as a Post Doctoral Researcher on development of Novel membrane systems based on Carbon Nanotubes and Graphene for low energy reverse osmosis applications for desalination at the University of Pittsburgh. In 2010 inspired by the pioneering work by Prof Shankar at IITB who demonstrated the ability of Soil Ecology to treat organic wastes. he returned to India as CEO and Director of Research and Product Development at Vision Earthcare Pvt Ltd (VEC) a Green Tech startup incubated in SINE (Society for Innovation and Entrepreneurship) at IIT Bombay. VEC has been instrumental in developing and promoting called C ontinuous A dvanced Mu ltistage S ystem using S oil B io T echnology (CAMUS-SBT) which is the advanced form of technology that can meet the required NGT norms. Vision Earthcare has been instrumental in setting up over 150 CAMUS-SBT type water resource recovery plants serving 4.5 Million People Nationwide with a cumulative installed capacity of 45 MLD. VEC team and its contractor partners are currently executing 60 MLD of projects nationwide. VEC CAMUS-SBT technology is perhaps the largest nature inspired treatment technology with over 120MLD of waste water recycling project underway. Machines and movement have always been a passion. He is particularly interested in subject areas as Urban Planning, Aerospace, Advanced Materials, Energy Sciences, Urban Transportation systems such as Personal Rapid Transport (PRT) and drone based solutions for point to point connectivity. Apart from all things mechanical Chandrashekar is deeply inspired by natural systems and biology especially in the design of sustainable / green communities and habitations. He looks forward to greater interactions between the Industry, InfoTech, Academic, Architecture and Engineering communities in order to develop eco-friendly approaches that harmonize with the design of nature while providing the better and more sustainable living conditions. He looks forward to consulting for innovators and startups to bring their innovations to market.
Ms Ashwini Tayade completed her B.E in Civil Engineering at Sant Gadge Baba Amravati University and M.tech in Environmental Engineering from Veermata Jijabai Technological Institute, Mumbai. Currently working at the Vision Earthcare Pvt. Ltd. Mumbai
References:
- [1] “Garden city movement – Wikipedia.” https://en.wikipedia.org/wiki/Garden_city_movement . Accessed 30 Jun. 2020.
- [2] “Urban sprawl – Wikipedia.” https://en.wikipedia.org/wiki/Urban_sprawl . Accessed 30 Jun. 2020.
- [3] “List of cities proper by population density – Wikipedia.” https://en.wikipedia.org/wiki/List_of_cities_proper_by_population_density . Accessed 30 Jun. 2020.
- [4] “Curitiba – Wikipedia.” https://en.wikipedia.org/wiki/Curitiba . Accessed 30 Jun. 2020.
- [5] “Manhattan – Wikipedia.” https://en.wikipedia.org/wiki/Manhattan . Accessed 30 Jun. 2020.
- [6] “Role of Miyawaki forests in mitigating urban heat island effects.” 30 Sep. 2019, https://india.mongabay.com/2019/09/role-of-miyawaki-forests-in-mitigating-urban-heat-island-effects/ . Accessed 1 Jul. 2020.
- [7] “Akira Miyawaki – Wikipedia.” https://en.wikipedia.org/wiki/Akira_Miyawaki . Accessed 1 Jul. 2020.
- [8] “Permaculture – Wikipedia.” https://en.wikipedia.org/wiki/Permaculture . Accessed 1 Jul. 2020.
- [9] “Escher Cooperative House – Wikipedia.” https://en.wikipedia.org/wiki/Escher_Cooperative_House . Accessed 30 Jun. 2020.
- [10] “Renaissance Community Homes.” https://www.rchi.org/home.html . Accessed 30 Jun. 2020.
- [11] “Vision Earthcare – 42 Photos – 3 Reviews … – Facebook.” https://www.facebook.com/visionearthcare/ . Accessed 1 Jul. 2020.
- [12] “National Green Tribunal.” https://greentribunal.gov.in/ . Accessed 30 Jun. 2020.
- [13] “National Green Tribunal Act – Wikipedia.” https://en.wikipedia.org/wiki/National_Green_Tribunal_Act . Accessed 30 Jun. 2020.
- [14] “After NGT asks for stringent norms for STPs — a new dilemma.” 8 May. 2019, https://www.downtoearth.org.in/news/waste/after-ngt-asks-for-stringent-norms-for-stps-a-new-dilemma-64412 . Accessed 30 Jun. 2020.
- [15] “Vision Earthcare.” http://www.visionearthcare.com/ . Accessed 30 Jun. 2020.
- [16] “Vermifilter – Wikipedia.” https://en.wikipedia.org/wiki/Vermifilter . Accessed 30 Jun. 2020.
- [17] “Moving bed biofilm reactor – Wikipedia.” https://en.wikipedia.org/wiki/Moving_bed_biofilm_reactor . Accessed 30 Jun. 2020.
- [18] “Sequencing batch reactor – Wikipedia.” https://en.wikipedia.org/wiki/Sequencing_batch_reactor . Accessed 30 Jun. 2020.
- [19] “Activated sludge – Wikipedia.” https://en.wikipedia.org/wiki/Activated_sludge . Accessed 30 Jun. 2020.
- [20] “Vermicompost – Wikipedia.” https://en.wikipedia.org/wiki/Vermicompost . Accessed 1 Jul. 2020.
- [21] “Inter-Cooperative Council.” https://icc.coop/ . Accessed 1 Jul. 2020.
About The Author

Leave a Comment Cancel Reply
Your email address will not be published. Required fields are marked *
Save my name, email, and website in this browser for the next time I comment.
Notify me of follow-up comments by email.
Notify me of new posts by email.
- Skip to main content
- Skip to footer
Your Go-To for Hit Movies, TV, Live Sports & More
Plans start at $5.99/month. Cancel anytime.
*Due to streaming rights, a small amount of programming will still contain ads (Peacock channels, live sports and events, and a few shows and movies).

Exclusive Originals

Sports & Events
LIVE Sports The LIVE sports you love all in one place, including golf, Big Ten Basketball, and Premier League.

The Hottest Movies, Straight from Theaters
Pick Your Plan. Cancel Anytime.
Stream 80,000+ hours of the best in TV, movies, and sports.
Premium Plus
Everything you get with Premium, plus:
Watch Peacock on Your Favorite Devices Stream on 3 devices at once. Plus, create up to 6 profiles with kid-safety settings.
Watch Peacock on Your Favorite Devices
Stream on 3 devices at once. Plus, create up to 6 profiles with kid-safety settings.

Windows & Mac

Select Models

iOS and Android

Select TV Models

Select Devices

View list of supported devices
Questions? We've Got You Covered.
Peacock is a streaming service from NBCUniversal. With tons of hit movies and TV shows, Originals, current NBC & Bravo hits, and LIVE Sports including Sunday Night Football and Premier League, Peacock is here for whatever you’re in the mood for, from bingewatching to channel surfing. Sign up here to start streaming.
With Peacock Premium, you can stream hundreds of hit movies, full seasons of iconic TV shows and bingeworthy Peacock Original series, the latest hits from NBC & Bravo, can't-miss live sports, and Peacock Channels 24/7, plus daily live news, late night, and more to satisfy your FOMO. You’ll also get access to kids’ movies and shows, hit Spanish-language TV shows, and news from Telemundo.
To watch Peacock without ads* or download select shows and movies to watch offline on your mobile device, upgrade to Peacock Premium Plus. You'll also get access to your local NBC channel LIVE, 24/7.
*Please note: due to streaming rights, a small amount of programming will still contain ads (Peacock channels, events and sports, and a limited number of shows and movies).
Lots! For instance:
TV Android TV, Apple TV, COX, Fire TV, LG TV, Hisense VIDAA, Roku, Samsung, Vizio Smart TV, Xfinity
Computer Chrome OS, macOS, Windows PC
Mobile & Tablet Android phones & tablets, Fire Tablet, iPhone and iPad
Game Consoles PlayStation, Xbox, Meta VR devices
View a list of all supported devices here . (If you don’t see it listed, we’re probably working on it!)
Yes, eligible college/university students can get 1 year of Peacock Premium for only $19.99, instead of the current rate of $59.99/year. Existing Peacock subscribers may need to take additional steps to redeem. To learn more, visit www.PeacockTV.com/Student .

- No menu assigned!
Game Design Track
- No Comments

When & Where: Orange Hall, May 17, 11:15 am
The original War Robots meta was based on only three classes of robots: light, medium, and heavy. Vladimir Krasilnikov , Head of Game Design Department, Pixonic will tell you what kind of problems you may encounter with this approach, and how to find practical solutions to these problems.
How to figure all it takes with Excel and elementary education

When & Where: Orange Hall, May 17, 11:45 am
A lot of game designers who don’t have any higher technical education need to do math on their projects. More often than not, it is very time consuming and is a real pain in the neck, yet the results can still be disappointing. This talk from Aleksey Rehlov , Head of Russian Branch, Creative Mobile , will help you save your glial cells and attain more predictable results in the future.
Game Design by Community (based on Surgeon Simulator, I Am Bread and Worlds Adrift)

When & Where: Orange Hall, May 17, 12:30 pm
Bossa Studios is famous for creating strange games in strange ways. Imre Jele , Co-founder, Creator-In-Chief, Bossa Studios , is going to touch on how they let go of dictatorial auteurship and embrace co-creation with their audience, allowing players to make them laugh through the irreverent comedy of Surgeon Simulator and build Worlds Adrift together, making it the first community-crafted MMO.
Neighbor’s design

When & Where: Orange Hall, May 17, 03:30 pm
“Hello Neighbor” is unexpected YouTube phenomenon of 2017. Game that stretched its gameplay over a year long period. Nikita Kolesnikov , Game designer, Dynamic Pixels , is going to cover such questions as ‘How was it all created?’ ‘How everything worked out?’ ‘Is it fun to sleep on the floor?’ ‘How not to die?’
From idea to proposal: a method to make your game concept viable and strong

When & Where: Green Hall, May 17, 04:45 pm
This talk will explain a method to create and revise your game idea in a new, unexplored way. Sviatoslav Torik , Product Vision Expert, Research & Development, Wargaming.net , will guide you through the whole process: from stating the idea to explained possibilities and USPs. To be totally fair with you Sviatoslav will provide a challenging game idea example as well.
Creating Game Design Tools

When & Where: Orange Hall, May 18, 11:00 am
This talk from Konstantin Sakhnov , Head of Game Department, Rocket Jump , will cover useful cases of creation and tuning different game design tools (no need of in-depth programming skills) that can help every game designer optimise his work.

When & Where: Red Hall, May 18, 11:00 am
Such experienced game-designers as Serge Himmelreich , Game Designer, Co-founder, GDCuffs , ARPU.GURU , Vladimir Kovtun , Creative Mobile , Sviatoslav Torik , Product Vision Expert, Research & Development, Wargaming.net , Gregory Choporov , Producer, 2RealLife , will offer publicly practical ways of gameplay improvement to 3 selected but not released projects.
Prototyping pipeline: Lessons learned

When & Where: Orange Hall, May 18, 15:00 pm
The session of Ivan Barishnikov , Team Lead Prototyping division, Wargaming.net , will focus on prototyping pipeline. Building process from the scratch, evolving and working on mistakes. Problems that we’ve got and solutions that we’ve found.

When & Where: Pink Hall, May 18, 04:45 pm
During this session, Pavel Sovushkin , Head of UX department, WOWlab, is going to share the insights on UX design for VR projects. You’ll learn: what actions will help you to reduce the risks and improve the quality of a project at the pre-production stage; what you should take into account to make a VR project intuitively understandable and interesting for audience; how to make a prototype of a VR project in two days.
We’re waiting for you at DevGAMM Moscow. Take the chance to learn great insights on how to improve your game design and what tools you should use. Tickets are on sale 🙂
Get your tickets

Lerika Mallayeva
Email: [email protected] Skype: mallayeva Phone: +79035826001

Maria Chyrvona
Email: [email protected] Skype: chyrvona Phone: +380938368195

Sergey Chernobrivets
Email: [email protected] Skype: sergey_ukraine_acc Phone: +380990311747

Tori Pavlenko
Email: [email protected] Skype: viktory1209 Phone: +79689363486
Sales and business relationships with sponsors.
- Parties & Networking
- Career Wall
- Awards 2018 Winners
- Speed Game Dating
- Submit Game
Moscow Penthouse Apartment Overlooking the Red Square
You do not have to stay stick to a trend if you want a successful interior design masterpiece! A modern, comfortable apartment that does not necessary follow a particular style was spotted on AD Magazine . Decorator Ksenia Nikitina and her husband Ken bought this family duplex in Moscow, Russia with stunning panoramic views. The home has a living room and dining room as well as a rooftop terrace with incredible city views. She decided to leave the first floor, which is public spaces, as an open space plan, with a dining room, study and spacious living room separated by bi-fold doors. The second floor was a lot more challenging, where the master bedroom, children’s game room and her two son’s rooms are located. The result was a very clever design, where the decorator tried to bring the wall to the window frames, and because of this, the game room on one wall makes a king of zigzag which she concealed with a closet.

Copyright © 2016 - 2024 DesignRulz . All rights reserved.
IMAGES
VIDEO
COMMENTS
25 peacock🦚 border designs/project work designs/a4 sheet/file/front page design for school projects 100 beautiful border designs/project work designs/a4 she...
Welcome to our mesmerizing peacock design tutorial! In this step-by-step guide, we'll show you how to create stunning peacock-inspired art that will leave yo...
Peacock 🦚 Border Designs/ Project Work Designs/ Front Page Design/ Holiday Project Work/ Feather 🪶#peacockborderdesigns #feather #holidayhomeworkfrontpage#...
15 33. Peacock logo design. AFSANA AKTHER RIZA. 1 7. Peacock Vector And T-Shirt Design. SHAKIL ISLAM. 20 36. Logo «Peacock». Franciska Demchenko.
The Conquest of Happiness is a book written by the great Bertrand Russel. The title is self explanatory enough, and in one of the chapters, he talks about peacocks. Russel says (I am paraphrasing) when a peacock shows his plumage to a peahen, he acts grandiose, haughty, even cocky (pun intended). This bird is there, prancing around with pride ...
Peacock design. Sep 2, 2021 - Explore Meenakshi Venkatesh's board "Peacock design", followed by 1,526 people on Pinterest. See more ideas about peacock art, peacock, peacock design.
Find the perfect designer to match your style and budget. Then collaborate one-on-one to create a custom design. Start a project. by. Unigram. Learn more about how it works. 4.8 average from 37,581 customer reviews.
Abstract Designs and Shapes. Peafowl. Watercolor. Feather. Embroidery. Wallpaper. of 1,393. Find Peacock Design stock images in HD and millions of other royalty-free stock photos, illustrations and vectors in the Shutterstock collection. Thousands of new, high-quality pictures added every day.
Images 10.60k Collections 3. ADS. ADS. ADS. Page 1 of 100. Find & Download the most popular Peacock Template Vectors on Freepik Free for commercial use High Quality Images Made for Creative Projects.
Mobile. Animation. Web Design. Illustration. Discover 6 Peacock Design designs on Dribbble. Your resource to discover and connect with designers worldwide.
Peacock 🦚 Border Designs/Border design for project/Project work designs/Assignment front page design handmadeHow to Draw Simple Border Designs | Easy Border...
Find & Download Free Graphic Resources for Peacock Design. 100,000+ Vectors, Stock Photos & PSD files. Free for commercial use High Quality Images
PEACOCK BORDER DESIGNS/PROJECT WORK DESIGNS/ASSIGNMENT FRONT PAGE DESIGNS/A4SHEET/PROJECTOR DESIGNS😍Peacock 🦚 Border Designs/ Project Work Designs/ Front P...
One (1) Sheet of 8.5" x 11" or 12" x 12" Blue Metallic Cardstock (optional for peacock card liner) One (1) 3" x 2" Piece of Permanent Vinyl (optional for sentiment) One (1 ... CRICUT DESIGN SPACE. 1. Follow the "Project 1, Cricut Design Space" steps 1-9 above. 2. Make sure the correct machine is selected in the top right.
The Peacock model of urban design is an attempt to combine all these concepts to make the sustainable cities at a population density of about 20000-40000 people / sq.km which is the present population density of many of the urban metropolis in India Mumbai. Figure1 : Peacock feather.
Your Local NBC Channel LIVE, 24/7. $11.99/month. Get Premium Plus. *Due to streaming rights, a small amount of programming will still contain ads (Peacock channels, live sports and events, and a few shows and movies). Watch Peacock on Your Favorite Devices. Stream on 3 devices at once. Plus, create up to 6 profiles with kid-safety settings.
Game Design Track. Each conference we're organizing Game Design Track which is, by the way, one of the most favorite among our participants. Be ready to learn lots of insights on how to make your a with your community, how 'Hello Neighbor' was created, how to highlight your game idea & more. Make sure to visit Anti-Lynch within this track.
Decorator Ksenia Nikitina and her husband Ken bought this family duplex apartment in Moscow, Russia with stunning panoramic views. The roof terrace, envisioned as a space dedicated to relaxation, recharging the batteries and refreshing the mind. Floors are treated with oak planks and a lot of paintings and posters decorate the walls.
How to make Peacock Border Design? Peacock border designs on paper, front page assignment designs college, Peacock front page designs, Peacock project wor...
Facts. 164 000 m² total area. 246 m tower height. 55 aboveground floors. 60 000 m² cold-formed glazing area. 1 floor in 6 days the speed of erection of the building frame. 1 350 underground parking capacity. 90° angle of reflection on the façade. 156° turn the building by around its axis.
Annual Heating and Humidification Design Conditions 99.6% 99% DP HR MCDB DP HR MCDB WS MCDB WS MCDB MCWS PCWD 2 3a3b4a4b 4c 4d4e 4f 5a5b 5c 5d6a6b 1 -22.5 -19.5 -25.3 0.4 -22.1 -22.1 0.5 -19.2 8.6 -3.2 7.8 -4.3 1.4 N/A Annual Cooling, Dehumidification, and Enthalpy Design Conditions DB MCWB DB MCWB DB MCWB WB MCDB WB MCDB WB MCDB MCWS PCWD
Peacock 🦚 Border Design/ Project Work Designs/ Assignment design/ Holiday Project Work/ Feather 🪶#peacockborderdesign#feather #peacockbeautifuldrawing #hol...