- Skip to primary navigation
- Skip to main content
- Skip to primary sidebar
- Skip to footer

Easy "How to" Guides on Adobe Illustrator

How to Get Out of Presentation Mode in Illustrator
Last updated on October 17, 2022 at 7:29 am by ezGYD Staff
Sometimes, it may happen that you accidentally enter Presentation mode, or maybe by choice. But getting out of the presentation mode becomes difficult when you don’t know the right key. In Presentation mode, all tools bar, and menu bar disappear. All you can see is the artboard and design on it.
You can easily enter into any Preview , like Outline mode or View Mode. However, you may also have the knowledge and idea of how to get out of it because no keys work, especially when you are in Presentation mode.
Table of Contents
Get Out of Presentation Mode in Adobe Illustrator – Video Tutorial
You can also watch the below video tutorial, to learn how to get out of Presentation mode in Adobe Illustrator. You only need to know the right key when you enter the Presentation mode in Illustrator.
Presentation mode helps you to have a look at the design that you have on the artboard. If any design overlaps the artboard, then it will not be previewed in presentation mode.
You can also learn:
- How to Preview in Illustrator
- How to Get Out of Isolation Mode in illustrator
If you are new or don’t have any idea to quickly turn off or get out of presentation mode in Adobe Illustrator, then you are at the right place. In this tutorial, you will learn how you can leave or get out of the Presentation mode in Adobe Illustrator.
So let’s start.
Get Out of Presentation Mode in Adobe Illustrator
To get out of Presentation mode in Illustrator, press the Esc key on the keyboard. Illustrator will leave the presentation mode and enter into the normal preview mode.
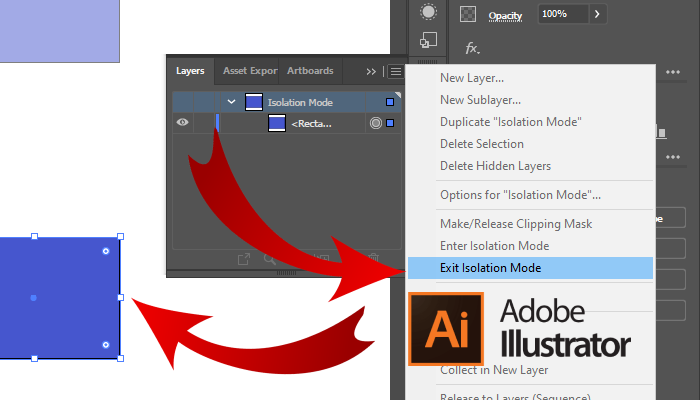
Following are the detailed steps to enter and exit the isolation mode in Adobe Illustrator.
Presentation Mode in Illustrator
To enter presentation mode in Illustrator, you can use the View menu. Under the View menu, there are different previews available that can easily be used when you need them.
To enter presentation mode, go to View > Presentation mode.
You will immediately see that everything has disappeared and the artboard is only visible with all designs.
Get out of Presentation mode in Illustrator
To get out or exit, Presentation Mode, press the Esc key on the keyboard.
Because no other key works in the presentation mode. The only key that is used for exit presentation mode is the Esc key on the keyboard.
You have learned to get out of Presentation Mode in Adobe Illustrator.
In this tutorial, you have learned to get out of Presentation Mode in Adobe Illustrator. You can easily exit and continue in the normal mode. No keys work if you are stuck in presentation mode and only the Esc key works.
Have More Questions?
If you have any questions related to getting out of Presentation mode then ask in the comment section below. We have also answered some most frequently asked questions below.
Illustrator Stuck in Presentation Mode
Press the Esc key on the keyboard, If you are stuck in Presentation Mode in Illustrator. No other keys work, you only have to use the Esc key.
How to Full Screen in Illustrator
To full-screen in Illustrator, press F from the keyboard. You will get the full-screen mode.
All Done! Enjoy.
About ezGYD Staff
The ezGYD team, which operates at ezGYD.com, consists of skilled Adobe Illustrator professionals who are led by Muhammad Jawad. With over a decade of experience designing in Adobe Illustrator, they are experts in their field. Since 2010, they have been producing Adobe Illustrator tutorials, and as a result, ezGYD has emerged as the biggest free resource site for Adobe Illustrator in the industry.
How to Make Text Stickers in Illustrator
The sticker-style text adds a playful and eye-catching ... Read More... »
How to Use Gradient Tool in Illustrator CC
Gradients are always amazing and do wonder. Design that has ... Read More... »

How to Convert a PNG to Vector in Illustrator CC
Hello everyone. Many time you need to convert a png to a ... Read More... »
How to Change Artboard Size in Illustrator
In Adobe Illustrator, we work on Artboard. All designs are ... Read More... »
How to Make Dotted Line in Illustrator CC
Dotted lines are mostly used in Adobe Illustrator if you are ... Read More... »
Join Our Newsletter!
Enter your email address:
Reader Interactions
Leave a reply cancel reply.
Your email address will not be published. Required fields are marked *
Save my name, email, and website in this browser for the next time I comment.
About ezGYD®
EasyGyd is a free graphic design resource website for beginners. ezGYD was specifically designed for beginners in the graphic design field. We’re here to help you improve graphics you’re just starting out with with the right tips, tricks, and hacks.
Our team is hiring: Apply Now!
Search EZGyd
What’s New in Illustrator CC 2019?
Each year Adobe comes out with new features, so what changed in Illustrator CC 2019? We’ll cover the most important changes we think you should know about.
Freeform Gradients
In addition to Linear and Radial gradients, Adobe added a new kind of gradient called Freeform gradients. Freeform gradients are similar to a gradient mesh, but are easier to work with and the color blending acts differently.
You can add color stops (places where you choose a color) anywhere in an object and move them around. These color stops can be points or lines . You can switch between the two modes in the Gradient panel, Properties panel, or Control panel.
Global Editing
If you have many copies of an element throughout a file, you can now edit them all at the same time! After selecting one of the copies, start a global edit by doing one of the following:
- Go into the Select menu and choose Global Edit .
- In the Properties panel click Start Global Edit .

All the copies will become highlighted. Change the original and all the copies will be automatically updated!
100% Zoom = Real Life Size
Depending on your monitor size and resolution, 100% zoom has not always matched real life sizes. Thankfully this has been fixed in Illustrator CC 2019.
When zooming to 100% by choosing View > Actual Size , you will now see an accurate representation of the real life size. For example, a business card will accurately show the size of the printed business card.
Adobe Fonts & Previewing Fonts
Typekit has been renamed Adobe Fonts , but it’s not just a rebranding. There are more features and the Adobe Fonts collection of fonts are more integrated into Illustrator. Previously only some fonts could be synced to your computer and there were limits as to how many fonts could be synced at the same time. Those limits are now gone!
Accessing the 14,000+ fonts available within Adobe Fonts service can now be done directly in Illustrator:
- When choosing a font, click the Find More tab.
- If you have text selected, hovering over each font will preview it in the file without have to download the font!
- To download that font for use on your computer, click the cloud icon to the right of the font.
Even if you aren’t using Adobe Fonts, hovering over any font name will preview it on your selected text, which makes it a lot faster to find the right font!
Illustrator CC 2019 has a new Trim View, which is like InDesign’s Preview mode if you’re familiar with that app. Choose View > Trim View to hide guides and artwork that falls outside the artboard.
While Trim View does not have a default keystroke, you can assign one in Edit > Keyboard Shortcuts .
Presentation Mode
There’s a new presentation mode, like the one InDesign has. It shows your file full-screen with no menu bars, guides, etc.
- To enter Presentation mode, press Shift–F or choose View > Presentation Mode .
- In Presentation mode, use the Right and Left Arrow keys to switch artboards.
- To exit Presentation mode, press the Esc key.
Scalable Interface
Do you have a hard time seeing the icons and reading the text in Illustrator’s interface? Good news, you can now make the interface bigger!
- Go into the Illustrator CC menu (Mac) or Edit menu (Windows) and choose Preferences > User Interface .
- Adjust the UI Scaling to your preferred size.
- Quit and restart Illustrator.
Customizable Toolbar
With so many tools, Adobe has created two preset toolbars ( Basic and Advanced ), and you can further customize them or create your own toolbars with just the tools you want. The Basic toolbar has fewer tools, and Advanced toolbar has all the tools.
- To choose switch toolbars, going into Windows > Toolbars and choose Basic or Advanced .
- To see hidden tools, add/remove tools, etc. click the Edit Toolbar button (...) at the bottom of the toolbar.

Learn Adobe Illustrator & Graphic Design
Master Illustrator at Noble Desktop with hands-on training in Adobe Illustrator classes and graphic design courses . Each course comes with our step-by-step workbook and numerous real-world projects to help you learn all the essential tools. An aspiring graphic designer can attend our licensed Graphic Design Certificate Program which includes classes on the graphic design applications, design theory, and portfolio development.
Learn more in these courses
Graphic design certificate.
- Evenings, weekdays, or sundays
- Open to beginners
- Financing available
- 1:1 Mentoring
Begin your journey as a professional graphic designer by learning the essential skills and tools used by industry experts. Gain hands-on experience in Adobe Photoshop, InDesign, and Illustrator, and create a stunning portfolio to showcase your talent to potential employers or clients.
Adobe Illustrator Bootcamp
- Weekdays, evenings, or sundays
Learn how to draw and edit vector graphics using Adobe Illustrator. This course covers the basics and advanced features, including the Pen tool, effects, layers, masks, and more. Perfect for creating logos, icons, and packaging.
Digital Design Certificate
- Weekdays or evenings
Become a well-rounded Digital Designer by learning essential Adobe applications, Figma for UI design, and key design concepts and theory. Develop a comprehensive understanding of design concepts, processes, and workflows, create great-looking modern designs, and showcase them in a portfolio.
Default keyboard shortcuts | Illustrator
- Illustrator User Guide
- What's new in Illustrator
- Common questions
- Illustrator system requirements
- Illustrator for Apple silicon
- Workspace basics
- Learn faster with the Illustrator Discover panel
- Create documents
- Default keyboard shortcuts
- Customize keyboard shortcuts
- Introduction to artboards
- Manage artboards
- Customize the workspace
- Properties panel
- Set preferences
- Touch Workspace
- Microsoft Surface Dial support in Illustrator
- Undo edits and manage design history
- Rotate view
- Rulers, grids, and guides
- Accessibility in Illustrator
View artwork
- Use the Touch Bar with Illustrator
- Files and templates
- Tools at a glance
- Direct Selection
- Group Selection
- Rotate View
- Shape Builder
- Type on a Path
- Vertical Type
- Add Anchor Point
- Delete Anchor Point
- Anchor Point
- Line Segment
- Rounded Rectangle
- Free Transform
- Generate a vector graphic using a text prompt
- Recolor your artwork using a text prompt
- Neon glow text
- Old school text
- Convert sketch to vector
- Illustrator on the web (beta) overview
- Illustrator on the web (beta) FAQ
- Troubleshooting issues FAQ
- Keyboard shortcuts for Illustrator on the web (beta)
- Create and combine shapes on the web
- Add and edit text on the web
- Apply colors and gradients on the web
- Draw and edit paths on the web
- Work with cloud documents on the web
- Invite collaborators to edit on the web
- Illustrator on the iPad overview
- Illustrator on the iPad FAQs
- System requirements | Illustrator on the iPad
- What you can or cannot do on Illustrator on the iPad
- Illustrator on the iPad workspace
- Touch shortcuts and gestures
- Keyboard shortcuts for Illustrator on the iPad
- Manage your app settings
- Work with documents in Illustrator on the iPad
- Import Photoshop and Fresco documents
- Create repeat objects
- Blend objects
- Draw and edit paths
- Draw and edit shapes
- Work with type and fonts
- Create text designs along a path
- Add your own fonts
- Vectorize raster images
- Apply colors and gradients
- Work with Illustrator cloud documents
- Share and collaborate on Illustrator cloud documents
- Share documents for review
- Upgrade cloud storage for Adobe Illustrator
- Illustrator cloud documents | Common questions
- Troubleshoot create or save issues for Illustrator cloud documents
- Troubleshoot Illustrator cloud documents issues
- Drawing basics
- Draw pixel-perfect art
- Draw with the Pen, Curvature, or Pencil tool
- Draw simple lines and shapes
- Draw rectangular and polar grids
- Draw and edit flares
- Image Trace
- Simplify a path
- Symbolism tools and symbol sets
- Adjust path segments
- Design a flower in 5 easy steps
- Create and edit a perspective grid
- Draw and modify objects on a perspective grid
- Use objects as symbols for repeat use
- Draw pixel-aligned paths for web workflows
- Measure and plot dimensions
- About 3D effects in Illustrator
- Create 3D graphics
- Map artwork over 3D objects
- Create 3D Text
- Create 3D objects
- About color
- Select colors
- Use and create swatches
- Adjust colors
- Use the Adobe Color Themes panel
- Color groups (harmonies)
- Color Themes panel
- Recolor your artwork
- About painting
- Paint with fills and strokes
- Live Paint groups
- Transparency and blending modes
- Apply stroke on an object
- Create and edit patterns
- Select objects
- Group and expand objects
- Move, align, and distribute objects
- Stack objects
- Lock, hide, and delete objects
- Copy and duplicate objects
- Rotate and reflect objects
- Intertwine objects
- Create realistic art mockups
- Crop images
- Transform objects
- Combine objects
- Cut, divide, and trim objects
- Puppet Warp
- Scale, shear, and distort objects
- Reshape using envelopes
- Reshape objects with effects
- Build new shapes with Shaper and Shape Builder tools
- Work with Live Corners
- Enhanced reshape workflows with touch support
- Edit clipping masks
- Live shapes
- Create shapes using the Shape Builder tool
- Global editing
- Add text and work with type objects
- Create bulleted and numbered lists
- Manage text area
- Fonts and typography
- Convert text within images into editable text
- Add basic formatting to text
- Add advanced formatting to text
- Import and export text
- Format paragraphs
- Special characters
- Create type on a path
- Character and paragraph styles
- Find missing fonts (Typekit workflow)
- Arabic and Hebrew type
- Fonts | FAQ and troubleshooting tips
- Create 3D text effect
- Creative typography designs
- Scale and rotate type
- Line and character spacing
- Hyphenation and line breaks
- Spelling and language dictionaries
- Format Asian characters
- Composers for Asian scripts
- Create text designs with blend objects
- Create a text poster using Image Trace
- Work with effects
- Graphic styles
- Appearance attributes
- Create sketches and mosaics
- Drop shadows, glows, and feathering
- Summary of effects
- Best practices for creating web graphics
- Slices and image maps
- Place multiple files
- Manage linked and embedded files
- Links information
- Unembed images
- Import artwork from Photoshop
- Import bitmap images
- Import Adobe PDF files
- Import EPS, DCS, and AutoCAD files
- Creative Cloud Libraries in Illustrator
- Save artwork
- Use Illustrator artwork in Photoshop
- Export artwork
- Collect assets and export in batches
- Package files
- Create Adobe PDF files
- Extract CSS | Illustrator CC
- Adobe PDF options
- Document info panel
- Set up documents for printing
- Change the page size and orientation
- Specify crop marks for trimming or aligning
- Get started with large canvas
- Print with color management
- PostScript printing
- Print presets
- Printer's marks and bleeds
- Print and save transparent artwork
- Print color separations
- Print gradients, meshes, and color blends
- White Overprint
- Data merge using the Variables panel
- Automation with scripts
- Automation with actions
- Crash issues
- Recover files after crash
- File issues
- Supported file formats
- GPU device driver issues
- Wacom device issues
- DLL file issues
- Memory issues
- Preferences file issues
- Font issues
- Printer issues
- Share crash report with Adobe
- Improve Illustrator performance
Use keyboard shortcuts to become more productive while using Adobe Illustrator.
Illustrator provides many shortcuts to help you get work done faster. Many keyboard shortcuts appear when you hover over icons in the command menu.
- The following list includes the most helpful shortcuts. You may find additional shortcuts in menu commands and tool tips.
- You can customize the keyboard shortcuts in Illustrator. See Customize keyboard shortcuts .
Keyboard shortcuts cheat sheet
Download and print a handy one page reference of some helpful keyboard shortcuts for Illustrator.
Popular shortcuts
Work with documents, select tools, work with selections.
Set keyboard increments in General Preferences ( Ctrl/ Cmd + K ).
Edit shapes
Work with live paint groups, work with objects, create variable width points, work with type.
To change the increment value for type shortcuts, choose Edit > Preferences > Type (Windows) or Illustrator > Preferences > Type (macOS). Enter the values you want in the Size/Leading , Baseline Shift , and Tracking text boxes, and click OK .
Actions panel
Brushes panel, character and paragraph panels, color panel, gradient panel, layers panel, swatches panel, transform panel, transparency panel, function keys, export keyboard shortcut list as a text document.
You can export the list of default and custom keyboard shortcuts for tools and menu commands in Illustrator as a text document by following the steps given below:
Choose Edit > Keyboard Shortcuts .
Click Export Text on the lower-left corner of the Keyboard Shortcuts dialog box.
Navigate to the desired location to save the text file.
Click Save .
Get help faster and easier
Quick links
Legal Notices | Online Privacy Policy
Share this page
Language Navigation

- all Visual Literacy lessons
- all classes
- art teacher resource
- art vocabulary
- color scheme
by JuliannaKunstler.com
Custom PowerPoint design is a cool skill to know. Unique presentation looks professional and fun.
You can create the entire design with PowerPoint drawing tools, but it is easier to use Adobe Illustrator for that.
We are going to create a custom template, based on your own color scheme (see color scheme tutorial ).
The process of designing a custom template is as follows:
1. Use Adobe Illustrator to create 5-6 slide layouts (.PNG images)
2. Export designs into PowerPoint
3. Combine with PowerPoint editable elements

You will need 6 slide layouts:
- Title slide
- Title + content
- Content slide (content with caption)
- Image with caption
- Blank slide
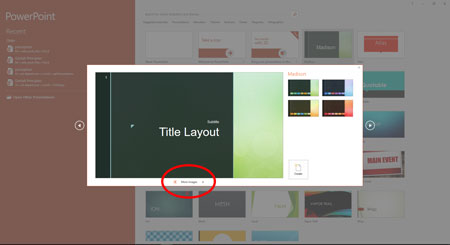
You can get some ideas of slides types by checking existing templates and images.
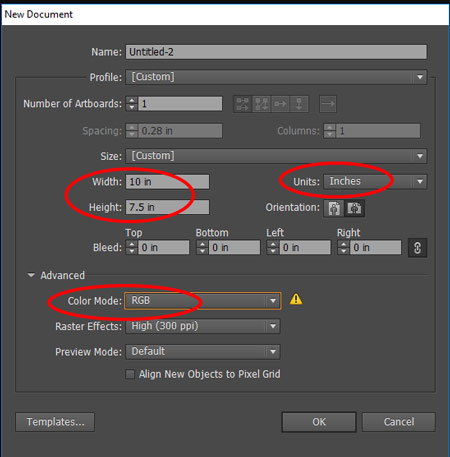
Open a new file.
Default presentation size is 10 x 7.5inches (or 720 x 540 px , that is 4:3 aspect ratio ).
Color mode should be RGB (as the presentation is viewed on a screen).
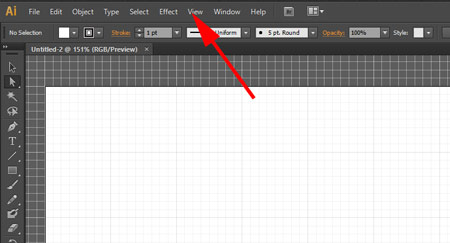
To keep all design elements aligned, add a grid view:
View > Show Grid
Gris will not be a part of your design - it's a tool
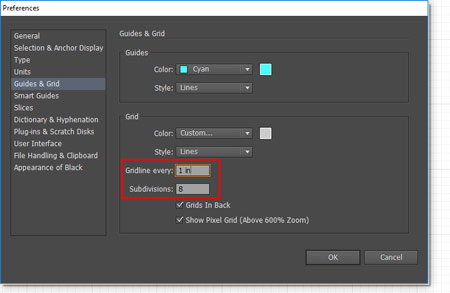
I recommend the following grid settings:
Subdivisions: 8
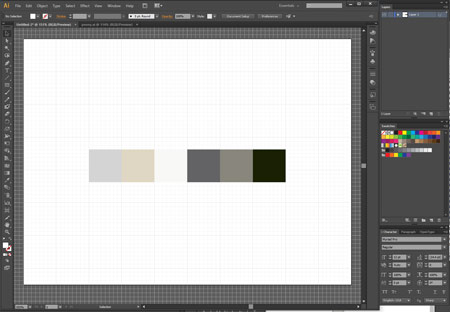
Paste the color swatches from previous assignment.
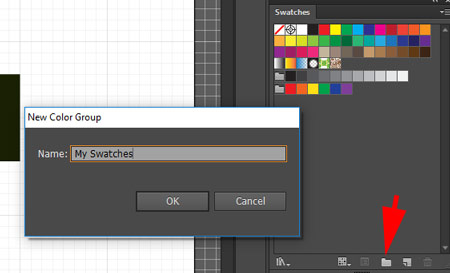
In Swatches palette:
Create a new Color Group to keep your color scheme swatches.
(If you do not have swatches palette open, go to Window > Swatches).

Select Eyedropper tool and click on the first swatch.
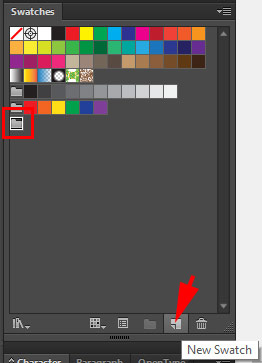
step 1: Select folder
step 2: Click on New swatch button.
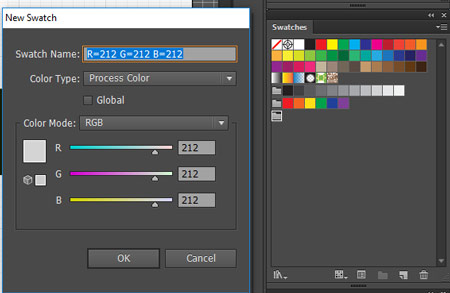
Double-check the color settings.
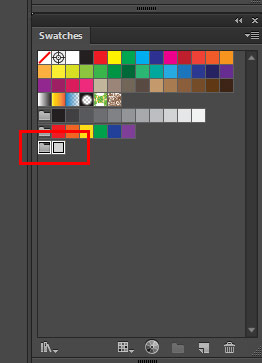
Now you have your first color saved in the folder.
Always select the folder before clicking on New Swatch button
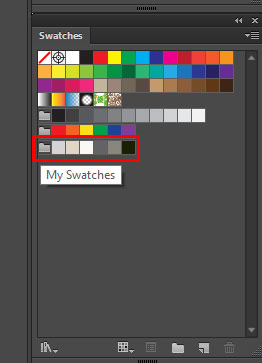
Save the rest of the colors.

Use Selection and Direct selection tools to move, resize, and modify the objects.
- Background supports the content, not competing with it - make room for text and images in your design.
- Use only colors from your color scheme, you do not have to use all of them. White and Black are acceptable add-ons.
- Design should be consistent in all slides.
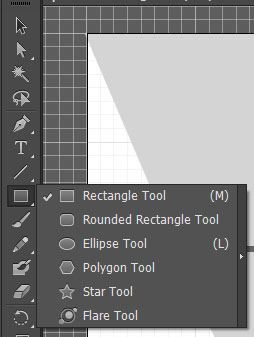
Use shape tools to add shapes and graphics.

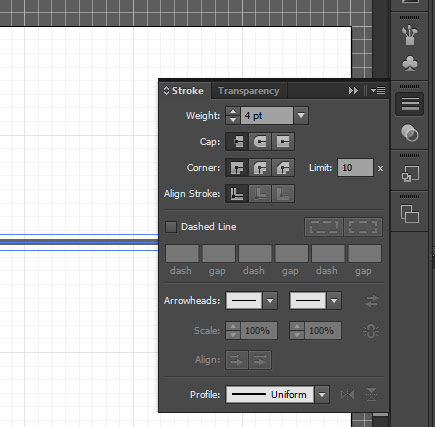
Use line tool for extra lines.
Hold SHIFT for horizontal, vertical, or 45 degrees lines.

Pencil tool is for free-hand path drawing.
Use Pen tool for custom shapes and lines.
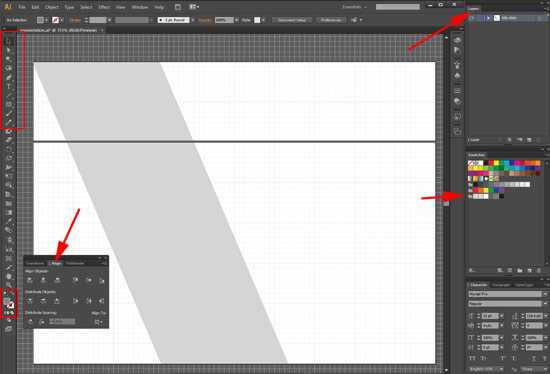
Tools that you might use:
- Selection and drawing tools
- Fill / stroke color swatches
- Align palette
- Layers palette
- Swatches palette
Questions you should ask yourself:
- Background: solid? gradient? photo? design/pattern? combination?
- Title: position in a slide? alignment to other elements? size? font? color?
- Subtitle: needed? font properties? alignment? position?
- Do you have enough space for the actual presentation?
- So you want to add your signature/hallmark to slides?
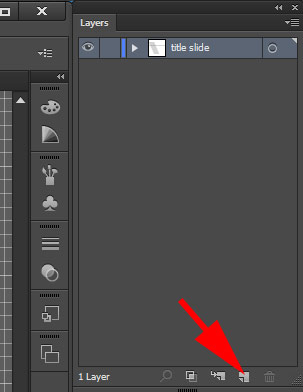
Add a new layer for each slide graphics.
Use text fields for design reference purpose only to determine text placement, size, font, alignment, etc.
Remove from work area before saving the background as an image.
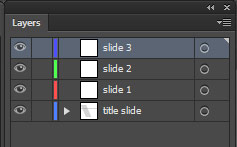
You can rename slides as you add them.
Close Layer visibility (eye icon) for all previous slides.
To apply colors to shapes - make sure the Fill swatch is selected (on the top).
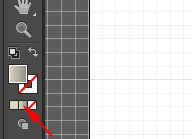
You can apply a gradient as a fill to your shape.
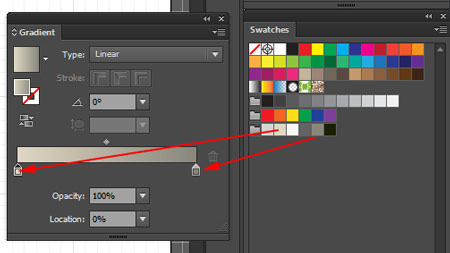
To create a custom color gradient:
Open Swatches and Gradient palettes ( Window > Gradient)
Then drag your custom colors onto the gradient palette.
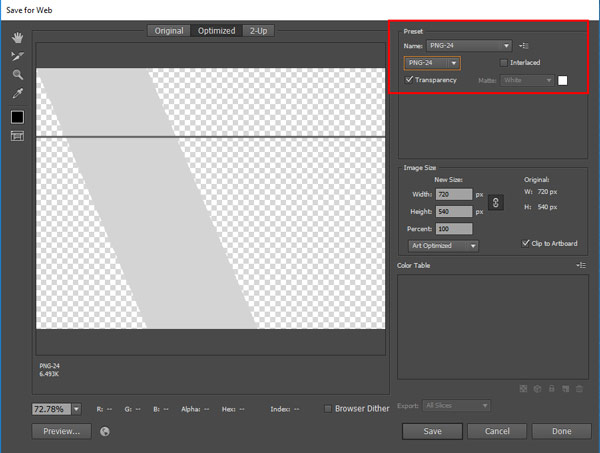
Close all other layers.
File > Save for Web
Choose PNG-24
Check Transparency
Save all images in the same folder.
3 Easy Ways To Get Out Of Outline Mode In Adobe Illustrator
Wondering how to get out of outline mode in adobe illustrator.
If you’re an Adobe Illustrator user, you might have come across the dreaded outline mode. In outline mode, all of your text and objects are displayed as outlines, making it difficult to see the actual content.
This can be frustrating when you’re working on a project but don’t worry, getting out of outline mode is easy. In this comprehensive guide, we’ll walk you through the steps on how to turn off Outline view in Illustrator.
The word “Outline” can refer to a few different things in Adobe Illustrator. If it means “text converted to vector”, known as Create Outlines , then you would be looking for how to undo outline text in Illustrator instead. Or it can refer to the colored stroke on the edge of an object. Both are completely different outcomes from the Outline Mode .
If your artwork looks something like this, with no other colors but black lines:
And you’d like to change the outline version to the normal artwork in Illustrator like this…
…read on, you are in the right place.
What Is Outline Mode
Outline Mode in Adobe Illustrator is a display or Preview mode that shows all text and objects as outlines.
This mode can be useful when you’re working on a complex design and want to see the overall structure, but it can be frustrating when you want to see the actual content.
Why Choose Outline Mode in Illustrator?
Although you may be at wits end right now and can’t wait to switch out of Outline Mode or Outline View , I must say it’s a useful function to improve the quality of your artwork.
When you view your artwork in the normal view, you are able to see how you want the outcome to be.
But the objects, shapes, and elements you have may overlap each other such that if you wish to make changes to the paths, lines, and anchor points , you won’t be able to find them easily in the normal mode.
With the Outline Mode , Illustrator allows you to see through all layers by taking away the opacity of all layers in bulk.
You don’t have to do this manually, layer by layer, yet you can see through all layers where are the paths you need to shift or adjust. These aren’t possible in the normal mode.
Outline Mode is also often used by designers to check the spacing and alignment of text and objects in their design.
Why Do You End Up In Outline Mode
There are several reasons why you might end up in Outline Mode in Adobe Illustrator.
One common reason is that you accidentally pressed the keyboard shortcut keys: Command + Y for Mac or Control + Y for Windows.
It’s easy to press the wrong keys especially when you try to work as fast as you can. This shortcut switches Illustrator to Outline Mode.
Another reason is that you may have selected the View > Outline option from the Illustrator menu.
How To Get Out Of Outline Mode In Adobe Illustrator?
The easiest way to get out of Outline Mode in Adobe Illustrator is to use the Outline Mode Illustrator shortcut by pressing Command + Y on Mac or Ctrl + Y on Windows. Or go to the top menu bar and select View > Preview .
Here are the detailed steps and methods on how to turn off outline view in Illustrator:
Method 1: Use the Keyboard Shortcut Keys
To exit Outline Mode with the keyboard shortcuts, press Command + Y for Mac.
Or press Ctrl + Y for Windows.
Method 2: From the View Menu
You can also undo Outline Mode by selecting View on the Illustrator menu, then choose Preview in the dropdown menu.
Method 3: From the Layers Panel
First, open the Layers Panel by going to Windows in the top menu. Then select Layers in the drop-done menu. Or go to Windows > Layers .
The Layers Panel will now open up. Then, press Command on your keyboard for Mac, and click the eye icon on the left column of the main layer at the same time.
Or Ctrl for Windows, and click the eye icon .
Final Thoughts on How to Get Out of Outline Mode In Adobe Illustrator
There are various ways to exit outline mode in Adobe Illustrator, and doing so is simple. You can quickly return to preview mode whether you like to utilize the shortcut key, the View menu, or the Preview button. Time to try this out for yourself.
FAQs Related to Outlines in Illustrator
How to turn off outline view in illustrator.
The easiest way to turn off outline view in Illustrator is to use the keyboard shortcut by pressing Command + Y on Mac or Ctrl + Y on Windows . Or go to the top menu bar, select View and Preview in the drop-down menu.
How do I switch out of outline mode?
Before you switch out of Outline Mode , you will have to decide what mode would you like to switch to. There are a few modes you can switch to. Select View in the top menu of Illustrator and you can switch to another mode by clicking on any of the top few options: Preview , Overprint Preview , Pixel Preview , and Presentation Mode .
Why can’t i get out of outline mode Illustrator?
You may have gone to View in the top menu and selected Preview but still can’t get out of Outline Mode . You may have also received an error message that says: “Can’t finish previewing. Could not complete the Requested operation” or “The operation cannot complete because there isn’t enough memory (RAM) available”. In this case, the best way is to reinstall or update your Illustrator to the latest version. Reopen and try again.
How do I change an outline to normal in Illustrator?
Normal Mode in Illustrator has been commonly known as the Preview Mode where you can view your artwork normally like how the outcome should be. To change an Outline to Normal Mode , select View in the top menu and select Preview in the drop-down menu. This will help you change an Outline to Normal Mode in Illustrator.
How do I turn outlines back into text in Illustrator?
You can undo outlines with a few methods. If you have not saved the file, you can use the undo function. Otherwise, you can use Adobe Acrobat’s OCR technology to convert the outline text to editable text. You can also revert to the version when the text was not outlined using the Version History function.
Marilyn Wo is a graphic design expert. She has spent over two decades creating branding and graphic design work for clients all over the world, including X (formerly Twitter) and Samsung.
She runs MeetAnders, a graphic design company where she trains and works with a team of reliable designers. Follow her on LinkedIn .
Similar Posts
How to redo in adobe illustrator, 8 easy tips to fix missing bounding box in illustrator, how to bold text in illustrator, 3 easy ways to export files from figma to illustrator, 3 easy ways to vectorize an image in illustrator, 4 easy ways to embed font in illustrator, leave a reply cancel reply.
Your email address will not be published. Required fields are marked *
Save my name, email, and website in this browser for the next time I comment.

IMAGES
VIDEO
COMMENTS
In Presentation mode, the active artboard of the current Illustrator document fills the entire screen. In this mode, the application menu, panels, guides, grids, and all selections are hidden. It is a non-editable mode in which only the artwork on the artboard is displayed. This mode works well for presenting design ideas.
Find out everything about the new Presentation and Trim Views introduced in Adobe Illustrator CC 2019 that helps you to review all your artboards in a profes...
Get Out of Presentation Mode in Adobe Illustrator. To get out of Presentation mode in Illustrator, press the Esc key on the keyboard. Illustrator will leave the presentation mode and enter into the normal preview mode. Following are the detailed steps to enter and exit the isolation mode in Adobe Illustrator.
Learn the quick and easy way to enter full-screen mode or semi full-screen mode in illustrator as well as the presentation mode in illustrator.So... let's ho...
In this #illustratortutorial video, you will learn How to Get Out of Presentation Mode in IllustratorRead here: https://ezgyd.com/how-to-get-out-of-presentat...
This is similar to the Preview mode in InDesign. To view a multipage document as a slideshow, choose View > Presentation Mode and then click to advance from one artboard to the next or press the ...
Trim View and Presentation Mode - Illustrator Tutorial. From the course: Illustrator 2020 One-on-One: Fundamentals. Start my 1-month free trial. Buy this course ($39.99*) Transcripts. Exercise Files.
Illustrator also provides a full-screen mode, but it's comparatively dull. Illustrator CC 2019 steps things up with View > Presentation Mode, which fills the screen with a single artboard at a time.
Choose , then choose from the drop down list. Find the menu with the item you want.... If the area under is blank, click in that area, then type the shortcut you want. Illustrator will alert you if there's a conflict or the shortcut you typed already exists. The most difficult part is finding a key combo that is not already in use (which is why ...
Trim View, a new feature similar to InDesign's Preview mode, hides guides and artwork outside the artboard, providing a cleaner workspace. Illustrator CC 2019 also introduces a Presentation Mode, which allows you to view your file in full-screen without any menu bars or guides. Noble Desktop offers hands-on training in Adobe Illustrator classes ...
Toggle between screen modes: Normal Screen Mode, Full Screen Mode with Menu Bar, Full Screen Mode. F. F. Fit imageable area in window. Double-click Hand tool. Double-click Hand tool. Magnify 100%. Double-click Zoom tool or press Ctrl + 1. Double-click Zoom tool or press Command + 1. Switch to Hand tool (when not in text-edit mode) Spacebar ...
10. Presentation Mode. Presentation Mode is a helpful feature in Adobe Illustrator that allows you to preview your artwork in a full-screen, distraction-free environment. This mode is ideal for presenting your designs to clients or colleagues, as it removes interface elements and displays your artwork in a clean, professional manner.
This video explains how to make slides in Adobe Illustrator. Also, talks about importing to Powerpoint.
Select Eyedropper tool and click on the first swatch. step 1: Select folder. step 2: Click on New swatch button. Double-check the color settings. Click OK. Now you have your first color saved in the folder. Always select the folder before clicking on New Swatch button. Save the rest of the colors.
In this video, I'll show you how to display full screen mode and toggle between screen modes in Adobe Illustrator. Yes, this method works with Adobe Photosho...
The easiest way to get out of Outline Mode in Adobe Illustrator is to use the Outline Mode Illustrator shortcut by pressing Command + Y on Mac or Ctrl + Y on Windows. Or go to the top menu bar and select View > Preview. Here are the detailed steps and methods on how to turn off outline view in Illustrator:
Learn how to preview artwork in Illustrator without any bleed or graphics outside of Artboards. Details below...TIMESTAMPS0:00 - Example 1: Single Artboard1:...