

Optimizations for windowed games in Windows 11
Optimizations for windowed games improves gaming on your PC by using a new presentation model for DirectX 10 and DirectX 11 games that appear in a window or in a borderless window.
When these optimizations are used, games that originally use the legacy blt-model presentation can use the newer flip-model presentation instead (if the game is compatible). This results in lower frame latency and lets you use other newer gaming features; for example, Auto HDR, and variable refresh rate (for displays that support it).
To use optimizations for windowed games
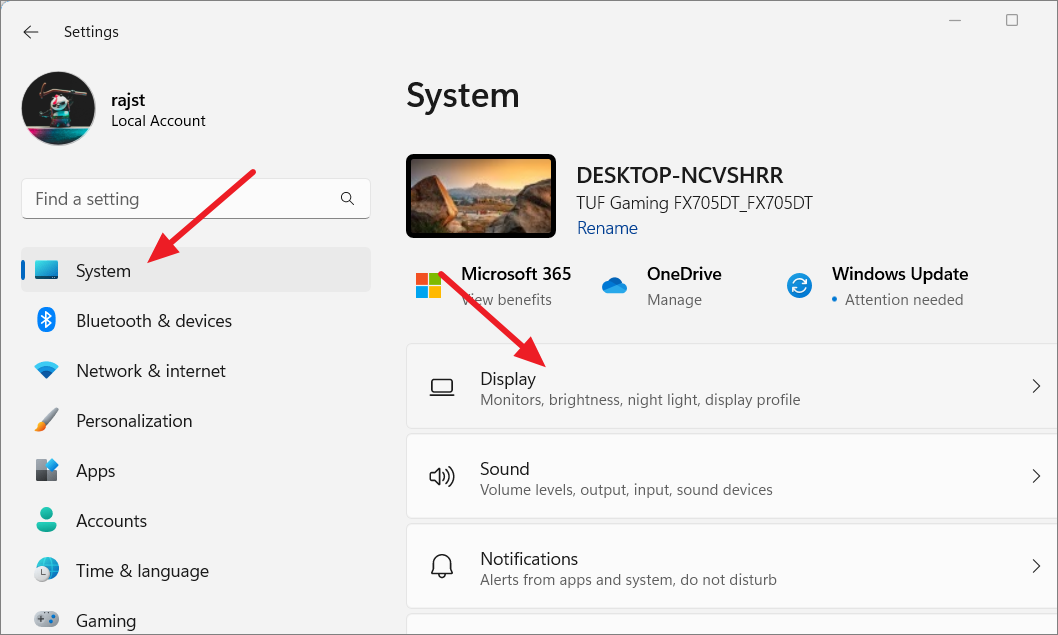
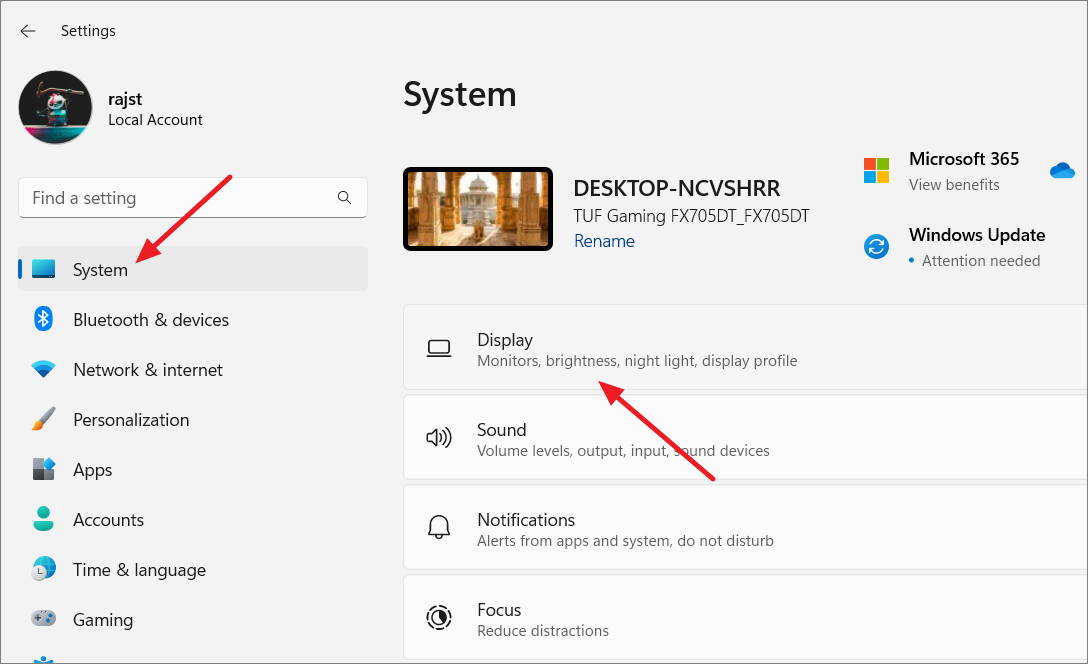
Select the Start button, then select Settings .
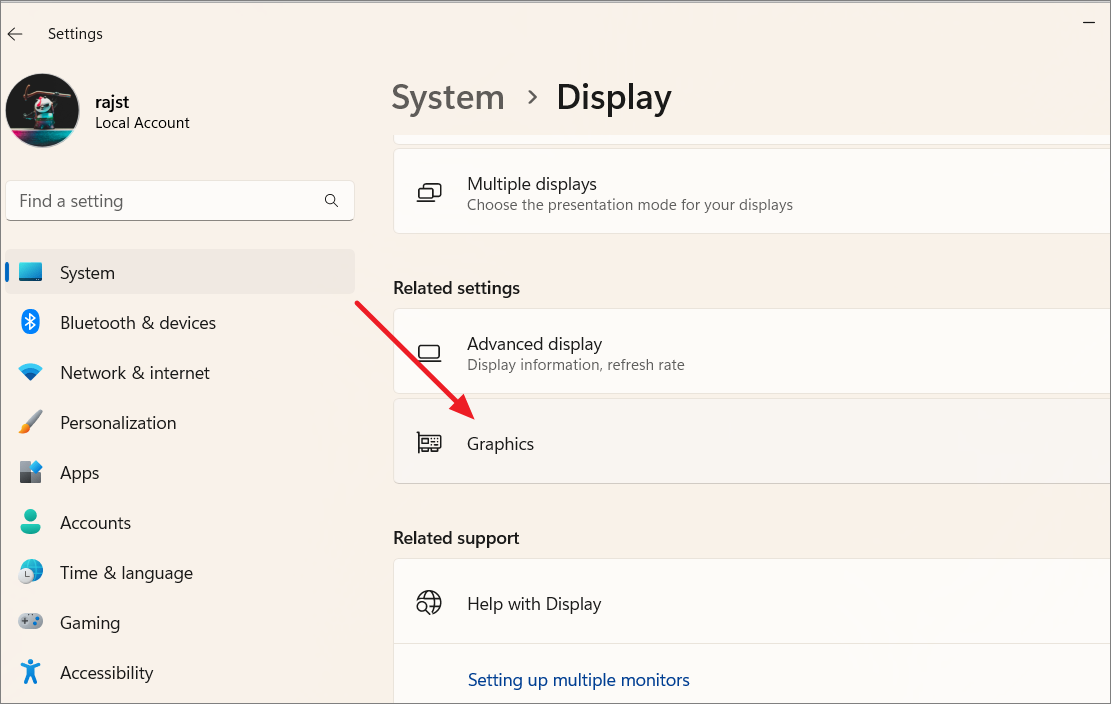
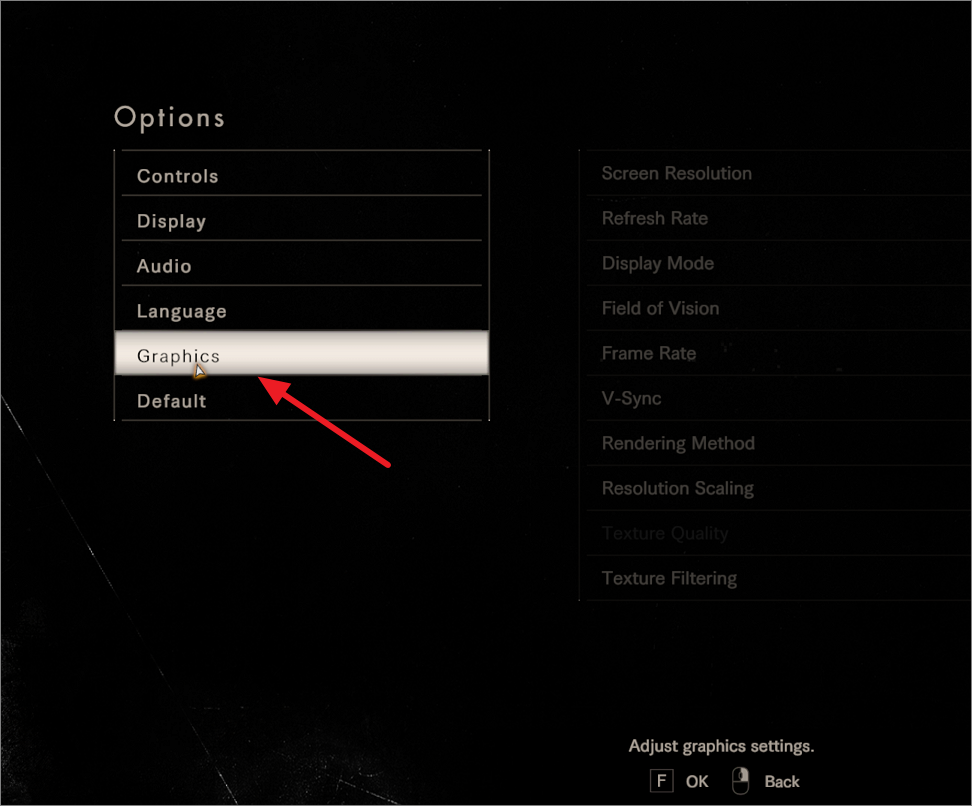
In Settings , select System > Display > Graphics > Change default graphics settings .
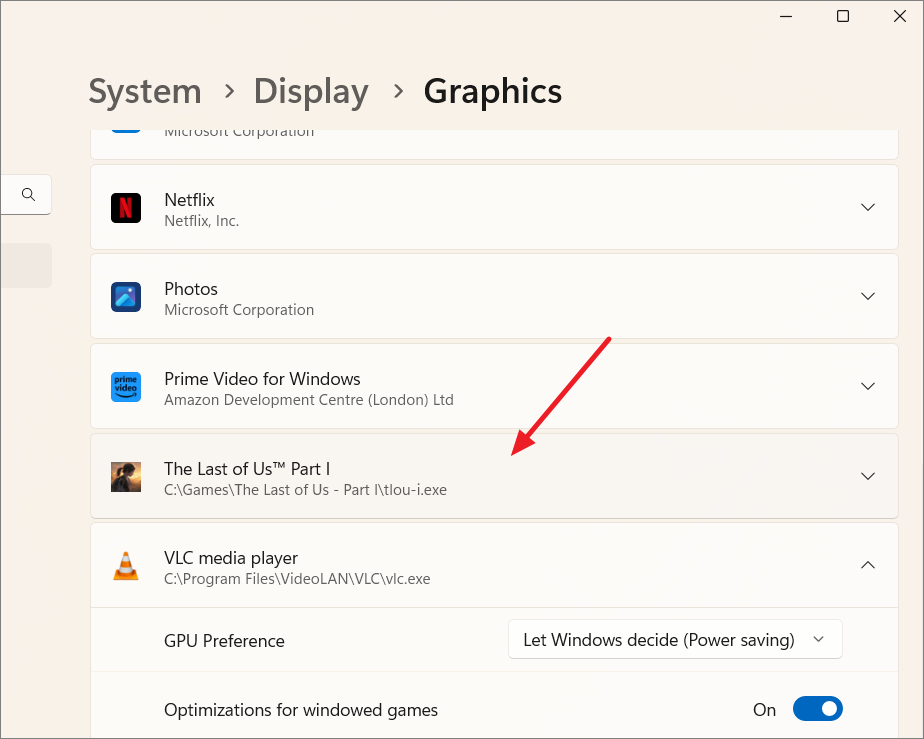
Select the setting under Optimizations for windowed games to turn it On .
Restart your game.
Note: If you turn on Auto HDR , Optimizations for windowed games will be turned on automatically. If you want to turn off Optimizations for windowed games , you’ll need to turn off Auto HDR first.
To turn optimizations off for a specific app or game
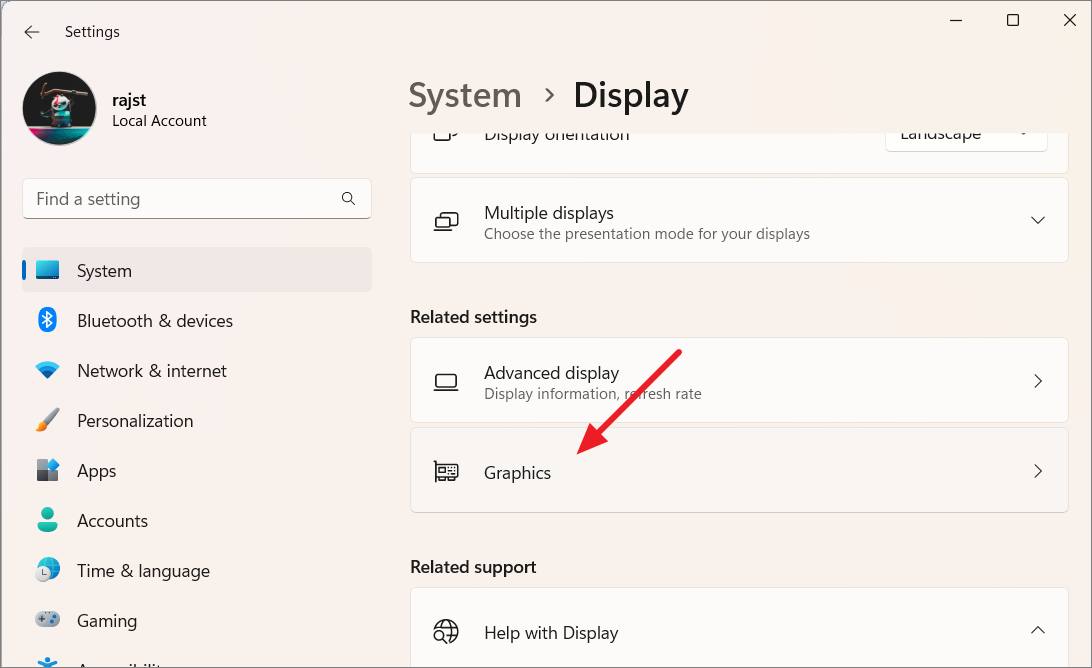
In Settings , select System > Display > Graphics .
Under Custom options for apps , select the app or game you want to change the graphics settings for, then select Options .
In Graphics preference , do one or more of the following:
If your PC has more than one graphics processor (GPU), select the graphics performance setting you want to use for the app or game— Let Windows decide (Power saving) , Power saving , or High performance .
To turn off optimizations for windowed games, select the Don’t use optimizations for windowed games checkbox.
To turn off Auto HDR for the selected app or game, select the Don’t use Auto HDR checkbox.
Select Save .
Restart your game or app.

Need more help?
Want more options.
Explore subscription benefits, browse training courses, learn how to secure your device, and more.

Microsoft 365 subscription benefits

Microsoft 365 training

Microsoft security

Accessibility center
Communities help you ask and answer questions, give feedback, and hear from experts with rich knowledge.

Ask the Microsoft Community

Microsoft Tech Community

Windows Insiders
Microsoft 365 Insiders
Was this information helpful?
Thank you for your feedback.
It’s probably safe to assume that most PC gamers prefer to play their games in full screen, but Microsoft has added some tweaks for users on its latest operating system who, for whatever reason, prefer the less-immersive windowed experience.
As detailed on the DirectX Developer Blog, the latest insider build of Windows 11 includes new optimizations for windowed and borderless windowed DirectX 10/DirectX 11 games that the company claims can “significantly improve latency.” Other improvements for windowed games include Variable Refresh Rate (VRR) and Auto HDR.
Microsoft’s new optimizations for windowed games can be enabled via the Settings menu and going to System > Display > Graphics > Default graphics settings, which now has a toggle for “optimizations for windowed games.” Users also have the option of opting out on a specific game or application by going to System > Display > Graphics and clicking the options button on the relevant app.

Optimizations for windowed games ( Microsoft )
- You might be asking, “what are optimizations for windowed games”? Great question! Let me explain – this setting affects presentation modes used in Windowed and Borderless Windowed DX10/DX11 games. Presentation is the method for getting your game’s rendered frames on your display in the most optimal way.
- This new optimization specifically applies to Windowed and Borderless-Windowed games because when you’re running in Fullscreen, a similar optimization already exists , and this new setting brings a consistent experience no matter which mode you are running in. You don’t need to worry about DX12 games as they already take advantage of the new presentation mode. Specifically, this optimization works by upgrading the legacy presentation model used by a game to a modern one. If you’re wondering more about the various models and how they impact performance, check out our dev blog here which dives deeper. More technically, we are moving apps from the legacy blt-model presentation to modern flip-model. Many games already take advantage of modern flip-model, but this new optimization will allow thousands of games to benefit as well.
- But we called this an optimization, so it does more than just unlock stellar gaming features. Flip model generally results in lower latency. Reducing latency means getting your game’s frames to the screen as fast as possible.
- When your game is configured to not use v-sync, this can result in a new frame being ready before the previous frame is displayed. At high frame rates, this may lead to screen tearing when this feature is turned on. To avoid tearing in your game, you can make sure to configure the game’s frame rate to match your monitor’s display refresh rate. Another option is to turn on v-sync in your game, which is often found in the game’s settings. If neither of those options work for your gaming experience, you can opt out of this feature and the instructions on how to do that are explained below. Another way to address tearing is by using a VRR monitor which can take advantage of the lower latency. However, please note tearing is still possible if you exceed the refresh rate of the monitor.
Recent News
Details for kingdom come deliverance 2 is expected to be revealed on april 18, the rogue prince of persia gains early buzz for its music and unique art style, live-action, r-rated teenage mutant ninja turtles film in development at paramount pictures, amd lists igpu- and npu-less ryzen 7 8700f and ryzen 5 8400f processors, todd howard on potential starfield and elder scrolls shows: “i’ll probably say no”.
Email address:
- © 2022 DCS Reviews, LLC.
- Terms and Conditions
- Privacy Policy
- Windows vNext
- Write for us
- Send news tip
Windows 11 Insiders now have optimizations for legacy games running in windowed mode
Usama Jawad Neowin @UsamaJawad96 · Feb 17, 2022 01:20 EST · Hot! with 8 comments
If you're playing legacy games on your Windows machine, you'll be pleased to know that Microsoft has certain optimizations planned for them, especially if you're running them in windowed mode. The company has announced that Insiders on recent Dev Channel builds can now take advantage of these features.

Essentially, many old games use the "legacy-blt" presentation model to render frames on your display. Although DirectX 12 (DX12) already takes advantage of a new presentation mode called "flip-model", Microsoft is now rolling out this enhancement to DX10 and DX11 games too. The migration will improve latency and will also open the door to further enhancements like Auto HDR and Variable Refresh Rate (VRR).
The change primarily impacts old DX10 and DX11 games running in Windowed and Borderless-Windowed mode. Modern games using DX12 already benefit from this. That said, Microsoft has cautioned that:
When your game is configured to not use v-sync, this can result in a new frame being ready before the previous frame is displayed. At high frame rates, this may lead to screen tearing when this feature is turned on. To avoid tearing in your game, you can make sure to configure the game’s frame rate to match your monitor’s display refresh rate. Another option is to turn on v-sync in your game, which is often found in the game’s settings. If neither of those options work for your gaming experience, you can opt out of this feature and the instructions on how to do that are explained below. Another way to address tearing is by using a VRR monitor which can take advantage of the lower latency. However, please note tearing is still possible if you exceed the refresh rate of the monitor.
Microsoft says that the capability is available on Windows 11 Dev Channel build 22545 or later, which means that users on build 22557, that just rolled out yesterday , can take advantage of it.
You can head over to the Microsoft blog post here to find out how to enable the optimizations globally or for specific apps. It's currently unclear when, or if, these optimizations will be rolled out generally, both on Windows 10 and Windows 11.
- Windowed mode
- Borderless windowed mode
- Dev channel
- Build 22557
_small.jpg "flip presentation model windows 11")
The Xbox HDR Game Calibration app is coming to Windows

Edge Canary makes it easier for you to install web apps across all your devices
Subscribe to our newsletter, community activity.
- Site Front Page not displaying correctly in Site & Forum Issues
- Google Chrome/ IMDB Issue in General Discussion
- Renewing an ID in the Military is Tough... in Jokes & Funny Stuff
- Star Trek: Strange New Worlds (Paramount+) in The Media Room
- SpaceX Super Heavy and Starship updates in Science News & Discussion
- Stick drift on 2nd controller Warranty in PlayStation
- Intel 13th/14th Core “Raptor Lake” gaming instability is now being investigated in Back Page News
- Current sites to get Icons, wallpapers, etc.. in Tips, Tweaks & Customization
- Joker: Folie à Deux in The Media Room
- SpaceX Updates (Thread 9) in Science News & Discussion
Software Stories

foobar2000 2.1.4
Vivaldi 6.6.3271.61

Bitdefender Antivirus Free 27.0.35.146

Microsoft Edge 123.0.2420.97
Trending stories.

Start menu recommendations are part of the latest Windows 11 Beta Channel build 22635.3495

A Microsoft Confidential Windows Server 2012 build has leaked and it's quite pretty

Get the roomy 8TB Samsung T5 Evo external SSD right now for a new all time low price

So it begins: Microsoft starts showing full-screen ads about the end of Windows 10 support
Join the conversation.
Login or Sign Up to read and post a comment.
8 Comments - Add comment
Report comment.
Please enter your reason for reporting this comment.

GameSir Nova, comes with hall effect sticks, 250Hz Bluetooth & A+ calibration
Windows 11 22635.3495 adds Start menu recommendations and more
windows 11 insider preview promo
Windows 11 26100 fixes a few known issues
Magnets, how do they work?! Edifier STAX SPIRIT S3 Planar Magnetic headphones
Here's how the Surface Laptop 6 compares to Surface Laptop 5, and 4
surface laptop 6 for business
The Oukitel RT8 is a 20,000mAh rugged tablet with 48 MP camera for under $300
oukitel rt8
SpaceX set to begin new rideshare mission series dubbed Bandwagon
As a photographer, I used only my Galaxy S24 Ultra on holiday, it was great!
galaxy s24 ultra
What is new in the "Moment 5" update
windows 11 moment 5
Horizon Forbidden West on PC is the definitive way to experience this game
horizon forbidden west
How to open old Task Manager in Windows 11
task manager
How to restore old Notepad in Windows 11
How to enable optimizations for windowed games on Windows 11
You can improve the gaming experience for windowed games with this new feature on Windows 11 22H2.

On Windows 11, “optimizations for windowed games” is a feature available since version 22H2 that affects presentation modes for windowed and borderless DirectX 10 and 11 games. “Presentation” defines the process of rendering the game on frames in the most optimal way, allowing you to have a more consistent experience whether you play a game in full-screen or windowed mode.
In a nutshell, this gaming feature for Windows 11 upgrades the legacy presentation model in games to a modern one to improve latency and unlock other features, such as “Auto HDR” and “Variable Refresh Rate (VRR).”
The feature only works for DirectX 10 and 11 games running in windowed and borderless windows, and the Auto HDR and VRR are only available on capable devices.
This guide will teach you the steps to enable the “optimizations for windowed games” feature on Windows 11.
Enable optimizations for windowed games on Windows 11
Disable optimizations for windowed games on windows 11.
To enable optimizations for windowed games on Windows 11, use these steps:
Open Settings on Windows 11.
Click on System .
Click the Display tab.
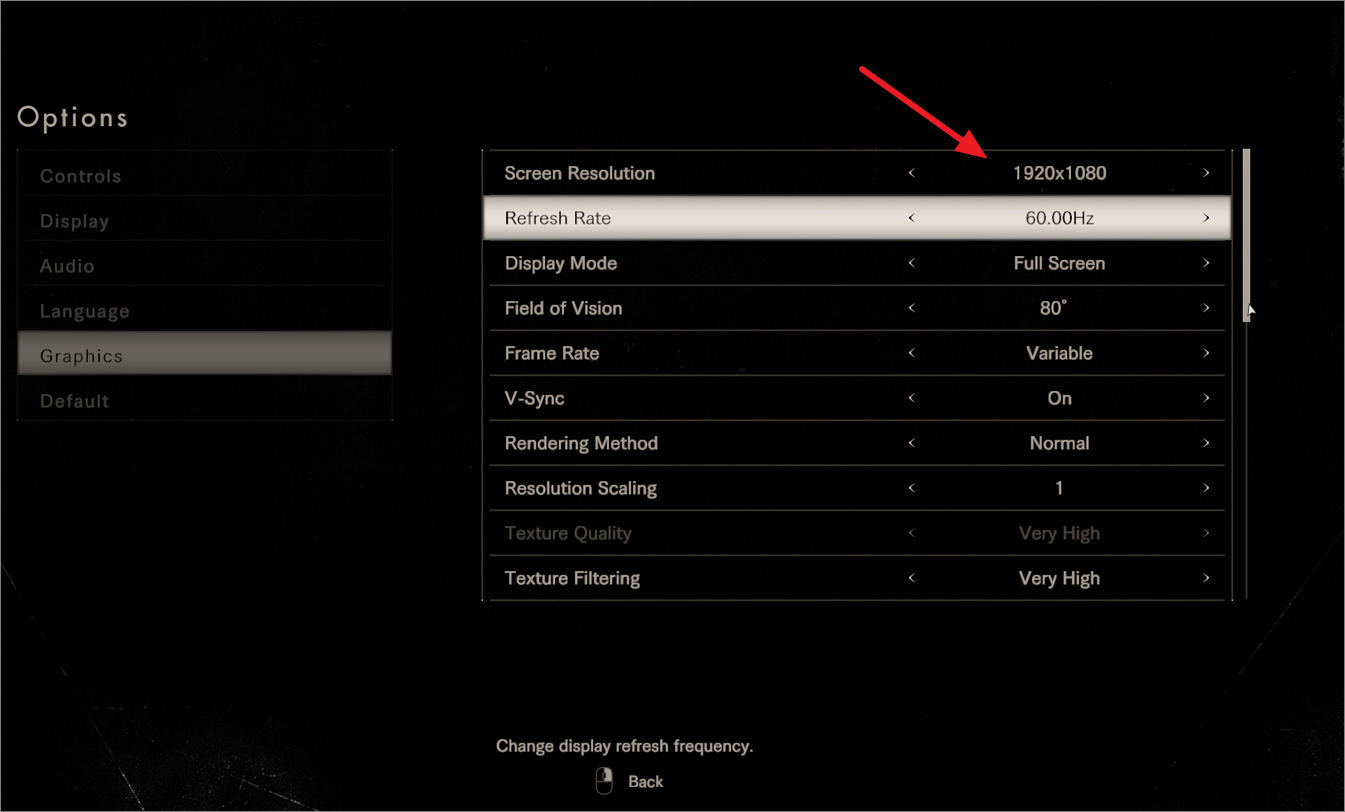
Under the “Related settings” section, click the Graphics setting.

Under the “Default settings” section, click the “Change default graphics settings” option.

Turn on the “ Optimizations for windowed games” toggle switch.

Once you complete the steps, the feature will enable the device to improve latency and unlock other features like Auto HDR and Variable Refresh Rate (VRR).
To disable game optimization features per application on Windows 11, use these steps:
Open Settings .
Select the application and click the Options button.

Check the “Don’t use optimizations for windowed games” option.

Click the Save button.
After you complete the steps, the special settings to optimize games will be disabled for that specific application without the need to disable the feature entirely.

Mauro Huculak is a Windows How-To Expert who started Pureinfotech in 2010 as an independent online publication. He has also been a Windows Central contributor for nearly a decade. Mauro has over 14 years of experience writing comprehensive guides and creating professional videos about Windows and software, including Android and Linux. Before becoming a technology writer, he was an IT administrator for seven years. In total, Mauro has over 20 years of combined experience in technology. Throughout his career, he achieved different professional certifications from Microsoft (MSCA), Cisco (CCNP), VMware (VCP), and CompTIA (A+ and Network+), and he has been recognized as a Microsoft MVP for many years. You can follow him on X (Twitter) , YouTube , LinkedIn and About.me .
- How to configure SMB compression for faster network file transfers on Windows 11
- How to map network drive using PowerShell on Windows 10
We hate spam as much as you! Unsubscribe any time Powered by follow.it ( Privacy ), our Privacy .
- Mobile Computing
- Good to know
- VPN for streaming
- VPNs for gaming
- Privacy news
- VPN reviews
- Windows 11 News
- Windows 11 Help
- Windows tips
- Windows Update
- Data Recovery
- File Sharing
- Microsoft Office
- Firefox add-ons
- Chrome Extensions
- Internet Explorer
- Microsoft Edge
- Google Maps
- Google Android
- Thunderbird
- Crypto & Blockchain
- Development
- Music and Video
How to optimize Windows 11 for windowed games

It is debatable whether Windows 11 is the best operating system for PC gaming . Microsoft did introduce two gaming related features in Windows 11: Auto HDR and DirectStorage.

Auto HDR enables HDR functionality in games that don't support it on devices connected to a HDR-capable display. DirectStorage is designed to improve the loading performance of games. It was introduced on Xbox before it was integrated in Windows 11. DirectStorage is also supported by Windows 10 .
Ashwin benchmarked some of his favorite games and concluded that the gaming performance of Windows 11 was similar to that of Windows 10.
Optimizations for windowed games
Windows 11 2022 Update, the upcoming feature update for Windows 11, includes additional optimizations for games. Announced in February 2022 by Hannah Fisher on the DirectX Developer Blog , optimizations for windowed games aims to improve the performance of DirectX 10 and DirectX 11 games that run in windowed or borderless-windowed mode.
In a nutshell, Microsoft is brining optimizations introduced in DirectX 12 to games that use DirectX 10 or 11. The optimization upgrades the legacy presentation model that DirectX 10 and 11 games use when they run in windowed or borderless-windowed mode to the new presentation mode that Microsoft introduced in DirectX 12.
Fisher explains:
More technically, we are moving apps from the legacy blt-model presentation to modern flip-model. Many games already take advantage of modern flip-model, but this new optimization will allow thousands of games to benefit as well.
The main effect that the feature has on games is that it lowers latency.
The optimizations for windowed games feature has a downside. In some games, the optimizations may lead to screen tearing. Microsoft suggests to match the game's frame rate to the monitor's display refresh rate, if possible, or to enable V-Sync, to avoid that.
Configuring Optimizations for windowed games
Windows 11 users who want to test the new gaming feature need to run a recent Windows 11 Insider build. The feature launches officially with the upcoming Windows 11 2022 Update.
Here is how you configure it on Windows 11:
- Select Start > Settings to open the Settings application. You may also use Windows-I to open it.
- Go to System > Display > Graphics.
- Select "Change default graphics settings".
- Toggle Optimizations for windowed games to turn the feature on or off.
When enabled, options to turn off the feature for individual games is provided. Go back to the Graphics section of the Settings application.
Select an application and activate the options button. There you find "don't use optimizations for windowed games", which you may check to disable the feature for the selected game.

Microsoft notes that games need to be restarted if they run already.
Now You : do you play games on your PCs?
Related content

Valve introduces Steam Families to allow members to share their libraries simultaneously

Microsoft adds games that you can play without download to the Microsoft Store

The 10 best hidden Google Games that you can play in your browser

Xbox's Auto-Upload feature may get your account banned

MSI unveils Intel-powered Windows gaming handheld Claw

Samsung Gaming Hub's first third-party accessory is an Xbox-like controller
Tutorials & tips.

The only Starfield performance optimization guide you need

What is Roblox error 262: "There was a problem sending data"

How to fix the Fortnite "Failed to Download Supervised Settings" error

How to play Roblox on Oculus Quest 2: Guide
Sure, you’ve got Windows 10 but, what if you want to go higher? See, this Windows goes to 11, that’s one more.
My PC is purpose built to play games and the last thing I want interfering with my GPU settings is the windows OS.
One way to enhance your gaming experience is to stay away from Windows 11. This operating system is barely alpha quality and terrible for doing anything than staring at your computer screen. I miss the day when Microsoft created fully functional operating systems before making them available to the general world.
Leave a Reply Cancel reply
Save my name, email, and website in this browser for the next time I comment.
Advertisement
Spread the word, hot discussions.

Recently Updated

Latest from Softonic
- Are there too many video game remakes? Everything points to yes
- The mobile game Fallout receives new content related to the series
- “Scrabble” has become easier than ever… and there are really angry people
- Taylor Swift returns to TikTok before the release of her latest album.
About gHacks
Ghacks is a technology news blog that was founded in 2005 by Martin Brinkmann. It has since then become one of the most popular tech news sites on the Internet with five authors and regular contributions from freelance writers.
- Legal Information
- Terms of use
- Privacy Policy
- Cookie Policy
- Cookie settings
- Advertise with Us
- Martin Brinkmann
- Mike Turcotte
In a new blog post published yesterday , Microsoft unveiled that the latest Windows 11 Insider Build introduces optimizations for DirectX10 and DirectX11 games when played in Windowed or Borderless Windowed modes. This will allow said games, thousands of them according to Microsoft, to support features like Variable Refresh Rate (VRR) and AutoHDR. Additionally, the latency will be greatly improved.
This new optimization specifically applies to Windowed and Borderless-Windowed games because when you’re running in Fullscreen, a similar optimization already exists , and this new setting brings a consistent experience no matter which mode you are running in. You don’t need to worry about DX12 games as they already take advantage of the new presentation mode. Specifically, this optimization works by upgrading the legacy presentation model used by a game to a modern one. If you’re wondering more about the various models and how they impact performance, check out our dev blog here which dives deeper. More technically, we are moving apps from the legacy blt-model presentation to modern flip-model. Many games already take advantage of modern flip-model, but this new optimization will allow thousands of games to benefit as well. But we called this an optimization, so it does more than just unlock stellar gaming features. Flip model generally results in lower latency. Reducing latency means getting your game’s frames to the screen as fast as possible.
You'll have the chance to opt out of the windowed games optimizations on a per-app/game basis, by the way.
Related Story Windows 11 Vs Windows 10:Should You Buy A Win10 Key And Update To Windows 11 For Free?

In a separate blog post , Microsoft also revealed that the Xbox HDR Game Calibration App will soon be available on Windows, too. It will feature the same three test patterns, recommended by the HDR Gaming Interest Group for an optimal HDR experience:
- One to determine the darkest visible detail you can see
- One to determine the brightest visible detail
- And finally, one to determine how bright your display can be
Deal of the Day

Further Reading

Download: Apple Music And Apple TV Apps For Windows 11 Released

Windows 10 and Office 2021 at the Best Price, and More Discounts at Godeal24 Double 12 Deals!

Black Friday and Cyber Week: Get Genuine Windows 10 for only $5.62 and Office 2021 from $13.05!

GoDeal24’s Black Friday: Genuine Windows 10 From $5.62, Lifetime Office 2021 As Low As $13.05, W11 And More!
Trending stories, nuphy gem80 review — the rolls royce of mechanical keyboards, nintendo switch overclocking test reveals huge memory bottleneck, as overclocked ram brings significant performance improvements, samsung 9th gen v-nand with 290 layers launches next month, 10th gen 430-layer nand in 2025, final fantasy vii rebirth is reportedly underperforming, selling half of remake, nvidia geforce rtx 4090 rma in china becomes a huge issue, full refunds offered to affectees, popular discussions, intel lunar lake “core ultra 200” cpus to offer over 100 ai tops & 3x npu performance, 40 million ai cpus shipped by 2024 end, amd zen 5 “granite ridge” ryzen desktop cpu with 8 cores & 16 threads pictured in leak, amd ryzen 9000 “zen 5” cpus listed in latest chipset drivers, intel 13th gen raptor lake-s unlocked “boxed” cpus discontinued, replaced by 14th gen.
How to enable ‘optimizations for windowed games’ in Windows 11
In Windows 11, users can enable the “optimizations for windowed games” to upgrade the legacy presentation model in games to a modern one to improve latency and unlock other features, such as Auto HDR and Variable Refresh Rate (VRR).
“Optimizations for windowed games” is a feature in Windows 11 that can improve the performance of windowed games. This feature uses a new presentation model for DirectX 10 and DirectX 11 games that appear in a window or a borderless window. This results in lower frame latency and lets you use other newer gaming features; for example, Auto HDR, and variable refresh rate (for displays that support it).
Here are some of the benefits of using optimizations for windowed games:
- Lower frame latency : This means that the time it takes for your game to render a frame and display it on your screen will be reduced. This can make your games feel more responsive and smooth.
- Support for newer gaming features : Some newer gaming features, such as Auto HDR and variable refresh rate, require the use of the newer flip-model presentation. Optimizing for windowed games will allow you to use these features even if you are playing in a window.
In this guide, we will show you how to enable the “optimizations for windowed games” feature in Windows 11.

Here is how to enable optimizations for windowed games in Windows 11
Note : Not all games will benefit from optimizations for windowed games. If you experience any problems with a particular game, you can try disabling the feature.
To enable optimizations for windowed games, follow these steps:
- Open Settings .

- When done, the feature will enable the device to improve latency and unlock other features like Auto HDR and Variable Refresh Rate (VRR).
How to disable optimizations for windowed games
To disable optimizations for windowed games, follow these steps:

- Click on Save .
- When done, the special settings to optimize games will be disabled for that specific application without the need to disable the feature entirely.
- How to enable Aero Shake in Windows 11
- How to disable animation effects in Windows 11
- How to change drive label name in Windows 11
Share this:
Ali Hasnain
Blogging is FUN! In love with technology, games, and music. Every day is a new day, so enjoy your life to the fullest.
- @Ali4Hasnain
- Send me an email!
You May Also Like

Easiest way to turn off comments on Facebook post

AFK Journey: Unique blend of adventure and strategy – Review

A guide to mastering Warzone Mobile’s battle royale
Leave a comment cancel reply.
- Create a Menu in Menus and assign it as Hidden Menu in Theme Location

How to Optimize Windows 11 for Gaming
Microsoft claims that Windows 11 is the best Windows OS for gaming purposes. But many users still experience performance issues while gaming on their Windows 11 PCs. Some users face lag or crash issues. At the same time, some users experience issues with FPS.
If you’re also facing performance issues while gaming on your Windows 11 PC, you may need to make some changes to it and optimize it for gaming. To optimize your Windows 11 PC for better gaming performance, check this guide, as it explains everything in detail . So read ahead and optimize your Windows 11 PC for a beast-level performance.
Is Windows 11 Suited for Gaming?
Yes, Windows 11 is suited for gaming, as it comes with many gaming-centric features, such as Xbox Game Bar, Game Mode, AutoHDR, DirectStorage, and more. But the gaming performance not only depends on how good Windows 11 can handle it.
It also depends on your system’s hardware. If you have a system with SSD storage, a high-end graphics card, and the latest processor, you may rarely face issues while gaming on your Windows 11 PC.
But exceptions are always there. In some reports, it’s found that Windows 11 beats Windows 10 in most tests, except a few. For example, a report revealed that the latest Windows 11 got slightly lower results when evaluating frames per second (FPS) performance while playing some set of video games. Otherwise, it scored better than Windows 10.
Optimize Your Windows 11 PC for Gaming
There isn’t any step-by-step formula for improving the system’s gaming performance. You need to try some tips to optimize your Windows 11 PC for gaming. We’ve mentioned all those useful tips below. Apply them and make your PC capable of running games smoothly:
1. Turn On Game Mode
The latest Windows 11 has a feature called Game Mode that automatically allocates the majority of your system’s GPU and CPU resources to the game you’re playing to improve the performance.
So enable Game Mode on your Windows 11 PC and play games seamlessly. You can do so by following the below steps:
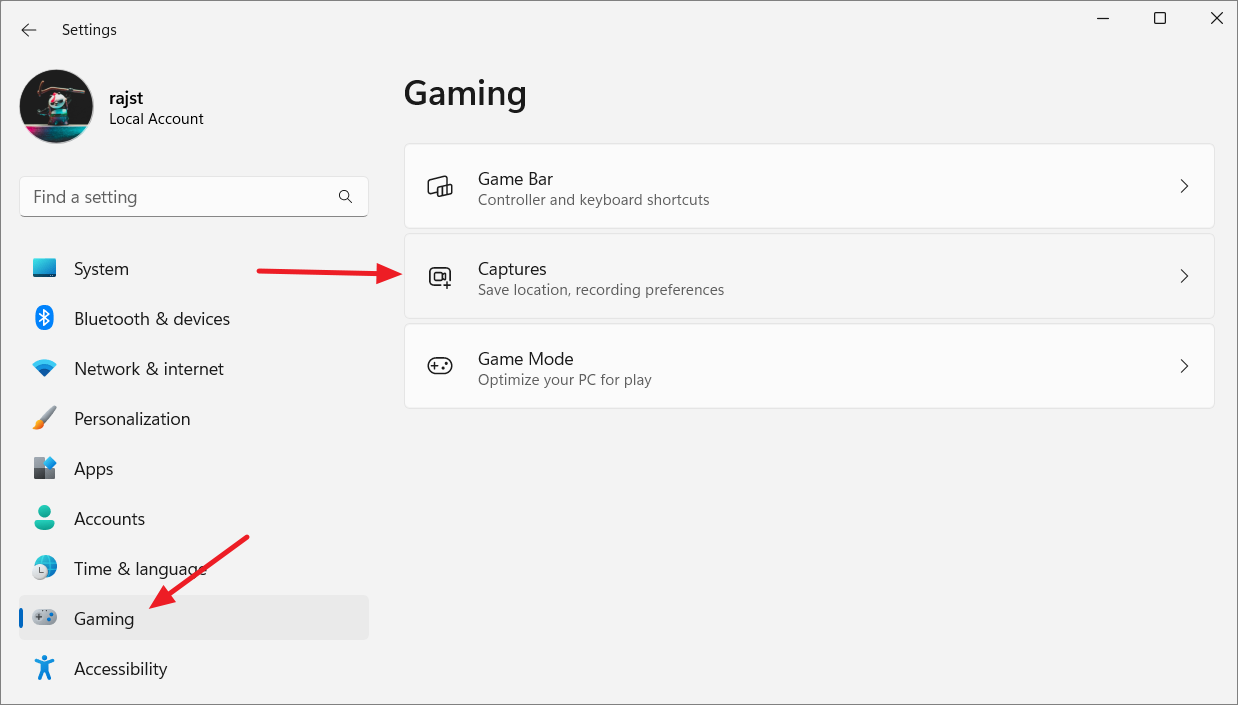
1. Open the Settings app with the Windows + I shortcut and go to the Gaming section from the left pane.

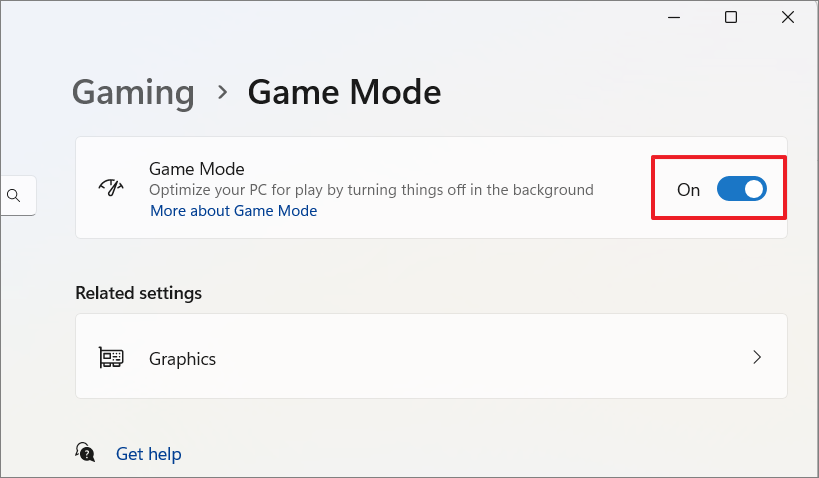
2. Click on the Game Mode option and then turn on the Game Mode toggle.

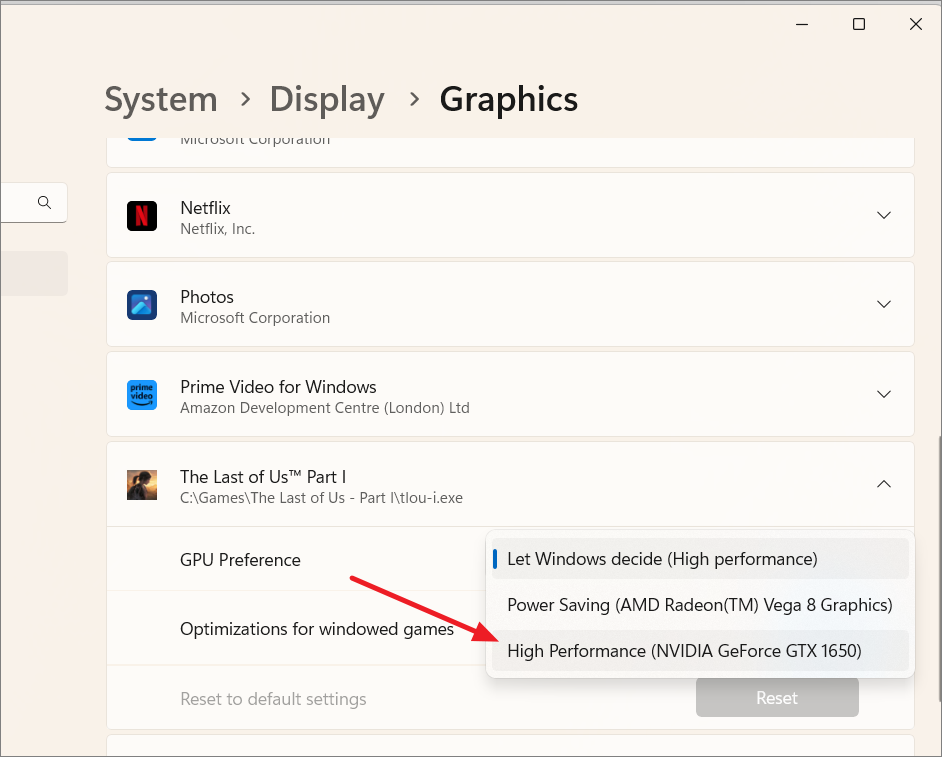
2. Let the Game Use Primary GPU
Another thing you should do before launching a game on your Windows 11 PC or laptop is to allow it to use your system’s primary graphics card or GPU for higher performance. We’ve explained the process of doing the same in the below-mentioned steps:
1. Press the Windows + I keyboard shortcut to open the Settings app and move to the Gaming section.
2. Click on Game Mode on the following window and then click on Graphics under Related settings .

3. Search for your video game in the Custom settings for applications section and click on it.

4. Select the High Performance option from the GPU Preferences menu and close the window.

3. Update GPU Drivers
To get the best gaming performance, it’s necessary to keep the system’s graphics drivers updated. This is because bugs & glitches in the graphics adapters can also cause performance issues.
So update your system’s graphic adapters and keep the gaming performance top-notch. You can follow the below-listed prompts to update your Windows system’s graphics drivers:
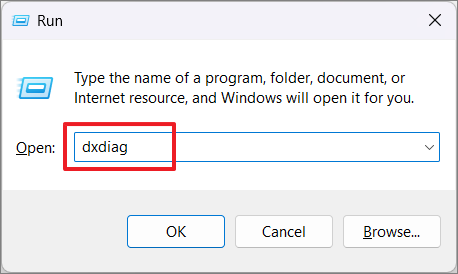
1. Open Run using the Windows + R shortcut and type Devmgmt.msc in the search box.

2. Expand the Display adapters section by clicking twice and then right-click on the driver.

3. Select Update driver from the right-click menu and click on Search automatically for drivers .

4. Wait for the OS to search for the newest version of the selected graphics adapter and install it.
4. Increase Your System’s C Drive
Another way to enhance your Windows 11 PC’s gaming performance is to increase the system’s C drive . You can do so by allocating the unallocated space to the C drive. So, follow the listed steps to increase your system’s C drive:
1. Hit the Windows key to open the Windows Search Box and type Disk management tool in it.

2. Select the Create and format hard disk partitions from the Best match section to open it.

3. Select your C storage drive in the Volume section and then right-click on it in the below section.

4. From the context menu, select the Extend Volume… option and click on the Next option.

5. Enter the amount to extend the volume in the text field after selecting the available space.
6. At last, click on the Next button and then click on the Finish button to apply the changes.

5. Enable Auto HDR
The new Windows 11 comes with Auto HDR support that lets you play and view all the outdated games at their best with HDR on your HDR-supported display. Thus, we suggest you enable Auto HDR on your Windows 11 PC and enhance your game viewing experience.
You can follow the below instructions to enable Auto HDR support on your Windows 11 PC:
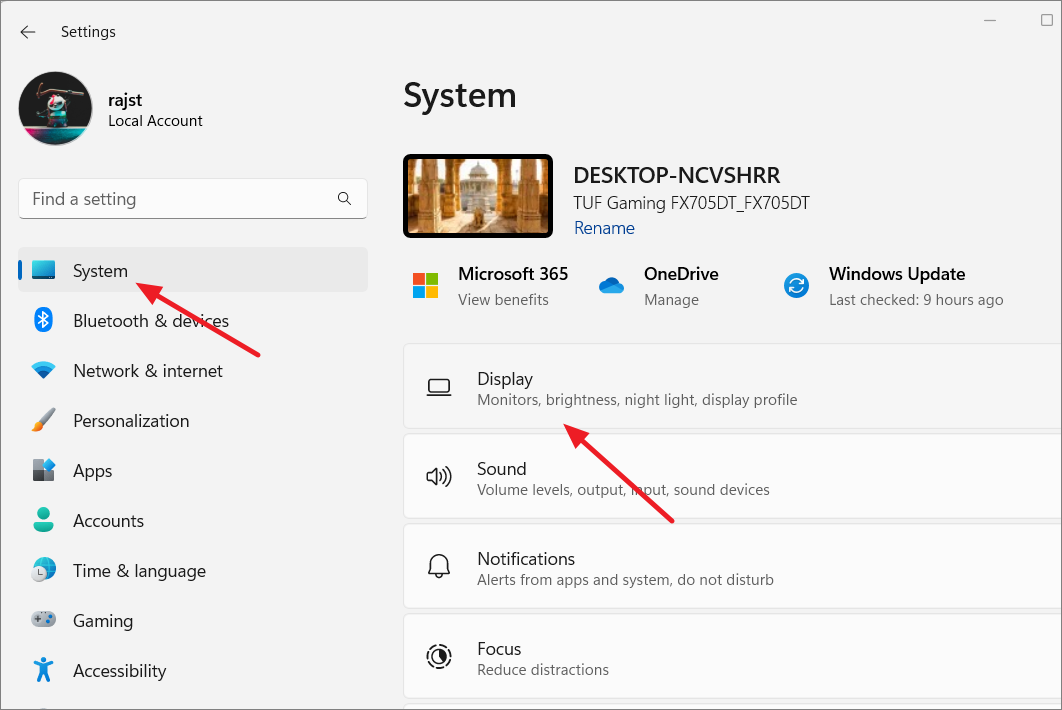
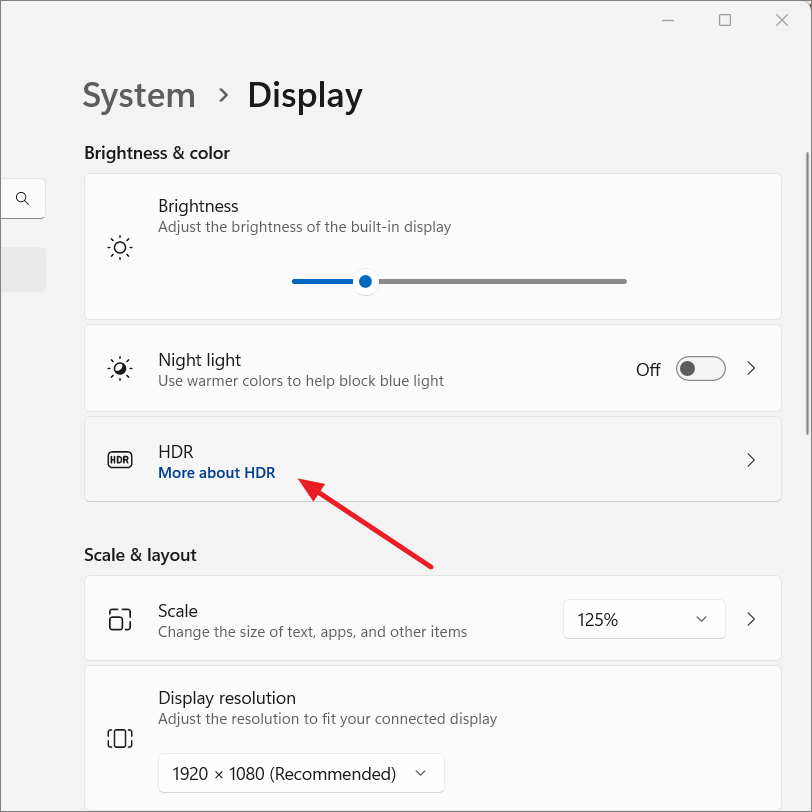
1. Launch the Settings app on your system and navigate to the Display section of it.

2. Click on HDR under the Brightness & color section and switch on the Auto HDR toggle.

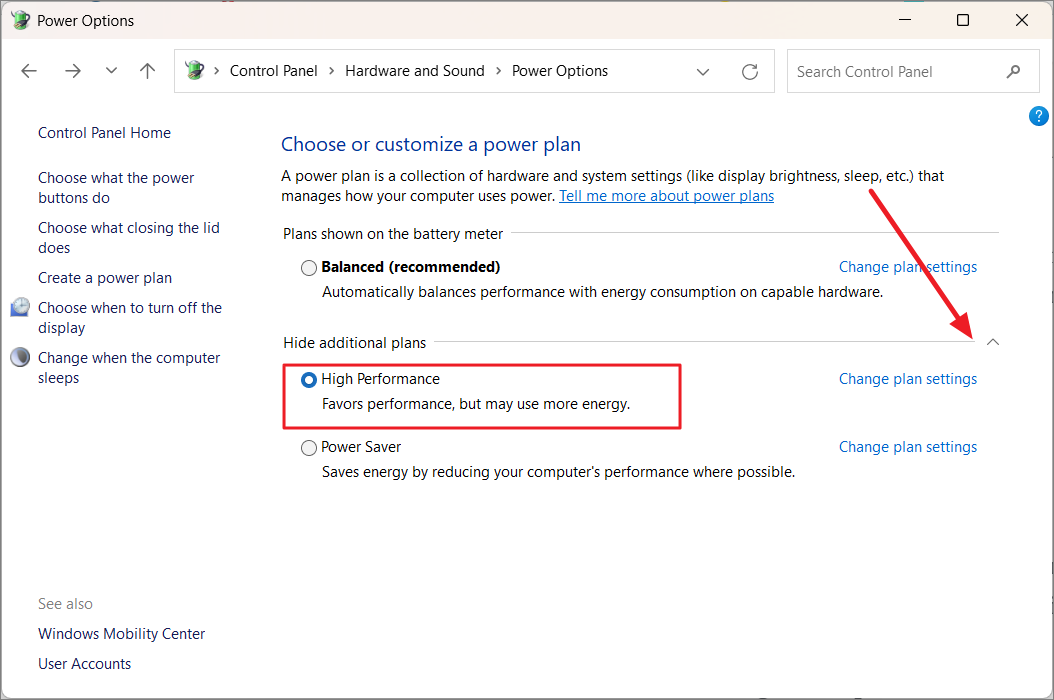
6. Turn On the High Performance Mode
One of the ways to enhance your Windows 11 PC’s gaming performance is by enabling the High performance mode on it. It can be enabled in the Control Panel utility of your system. We’ve mentioned the process to turn on the High-performance mode in Windows 11 below:
1. Open the Control Panel utility on your Windows system and go to the System and Security section.

2. Click on Power Options and select the Create a power plan option from the left side menu.

3. Choose the High performance radio button and name your new power plan in the Plan name: text field.

4. Click the Next button and then click on Create to create a new power plan and save the changes.

7. Halt Automatic Windows Updates
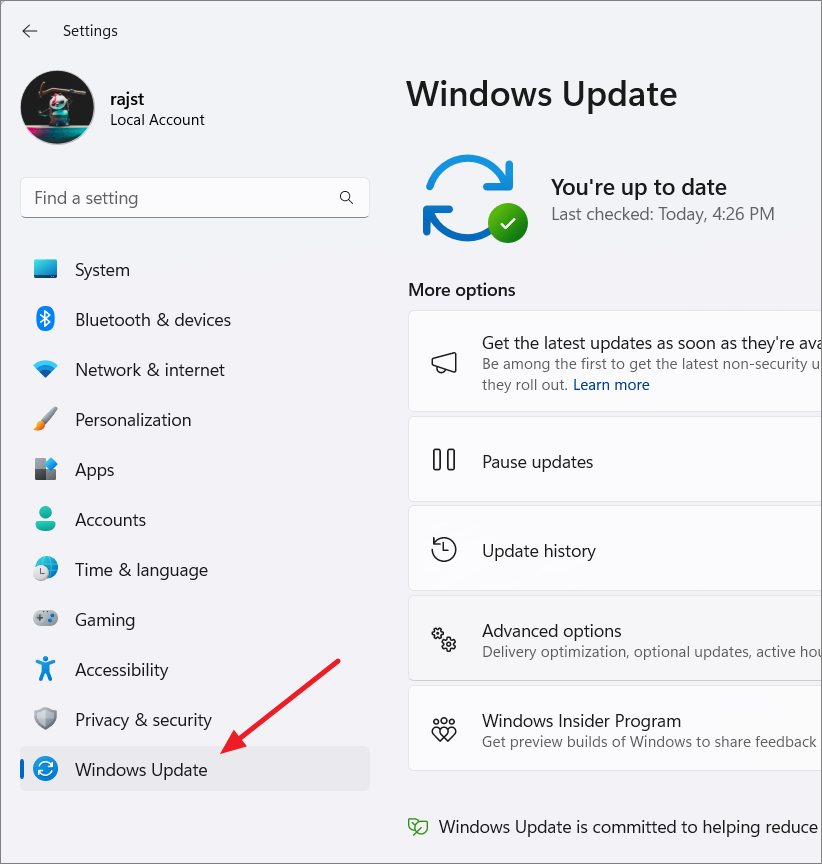
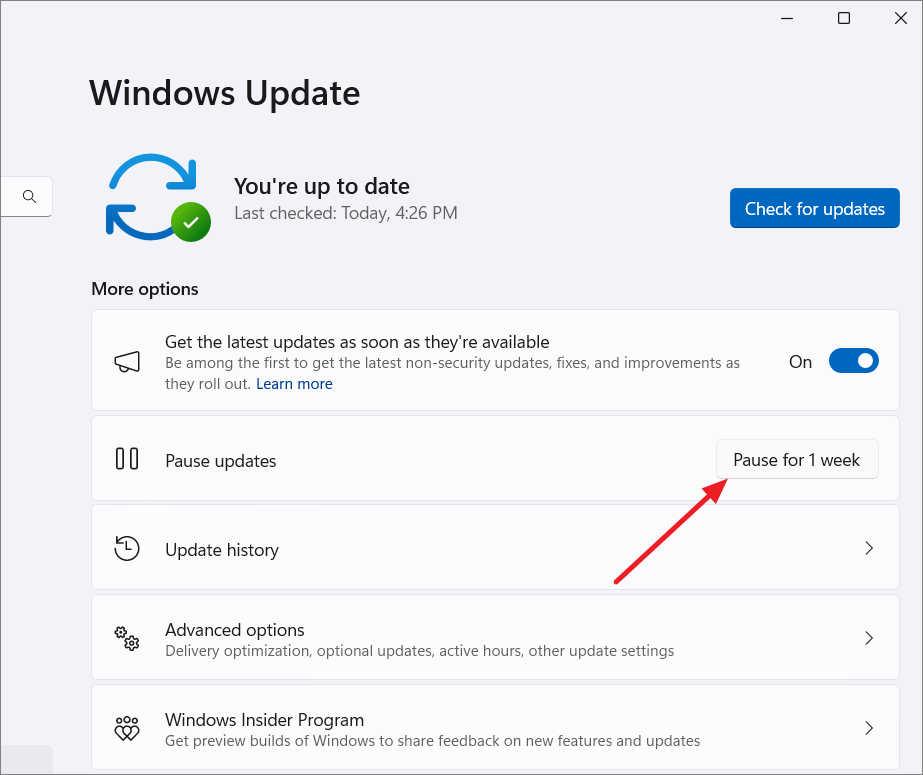
Windows OS automatically searches for the latest updates and downloads & installs them to keep the system up to date. It’s a great thing, but not for gamers, as it slows the system’s performance.
Thus, it’s always better to keep the automatic Windows updates disabled on the system. If you haven’t disabled them, follow the listed steps to halt automatic Windows updates:
1. Open the Settings app on your PC and move to its Windows Update section from the left.

2. Lastly, click the Pause for 1 week button next to Pause updates in the More options section.

8. Configure Your GPU Software
Most Windows 11 PCs come with AMD or Nvidia graphics cards. The best part about these graphics cards is that their performance’s can be customized using their dedicated software.
Below we’ve mentioned some tweaks that you can make in your graphics card’s software to optimize it for better performance gaming:
Nvidia Users
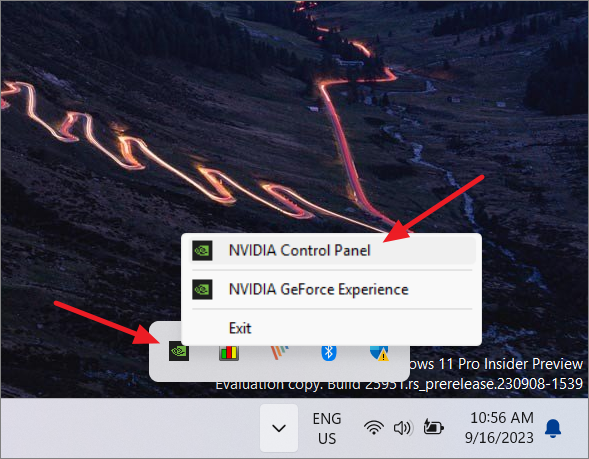
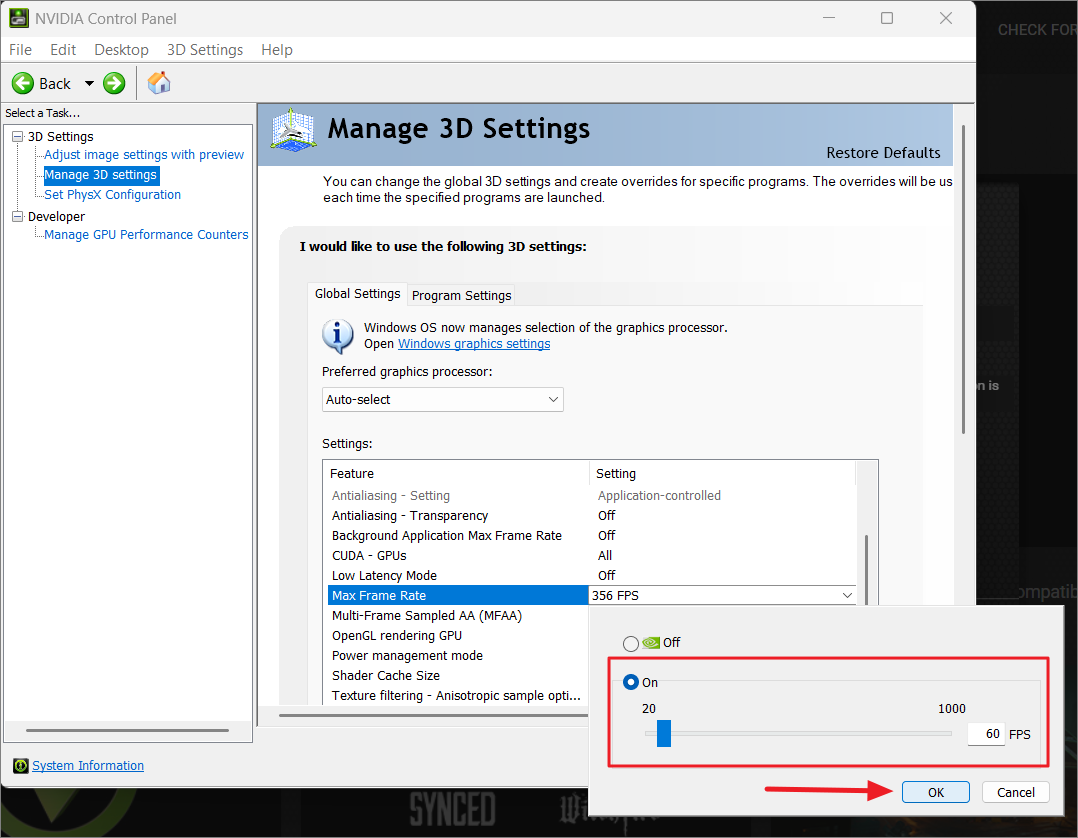
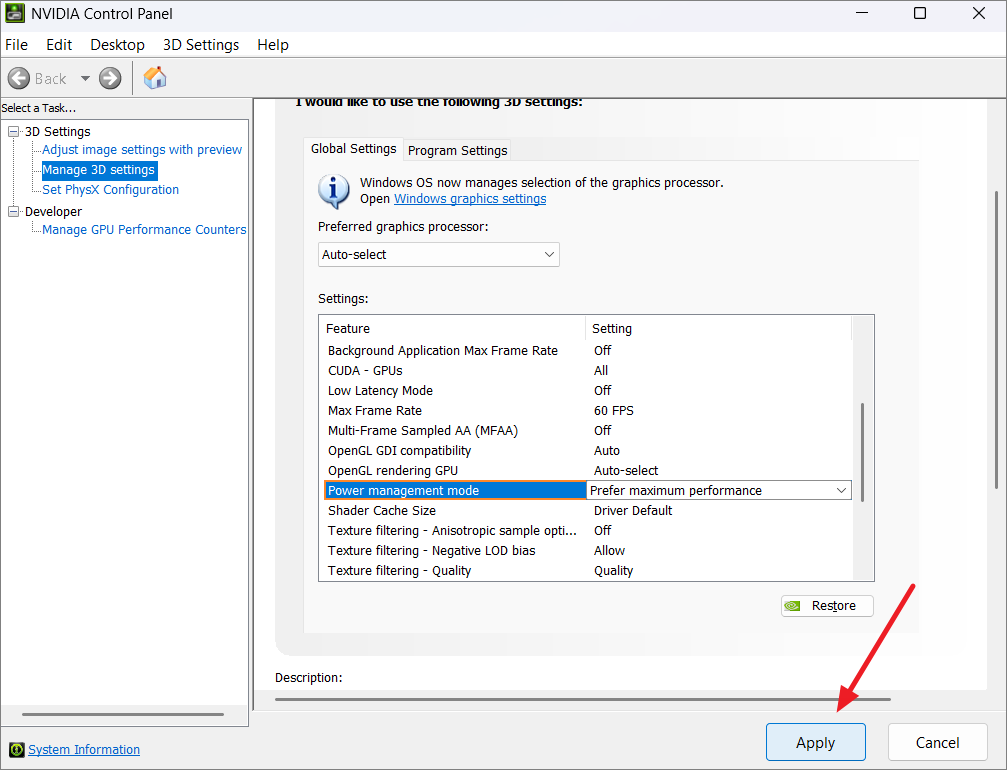
1. Launch the NVIDIA Control Panel app on your PC and select Manage 3D settings from the left pane.

2. Set the Power management mode dropdown menu to the Prefer maximum performance option.

3. Change the Max Frame Rate dropdown menu to the actual refresh rate of your current monitor.

1. Open the AMD Software: Adrenaline Edition app and click on Settings at the top right corner of the window.

2. Click on the Graphics option in the top navigation menu to move to the Graphics section of it.

3. Enable the Radeon Boost and Radeon Anti-Lag toggles to enhance gaming performance.

9. Turn Off Enhance Pointer Precision
There’s a feature in Windows 11 called Enhance Pointer Precision that speeds up or slows down your mouse’s cursor speed based on how fast you drag your mouse. This function doesn’t affect gaming performance. But it does affect the gaming experience.
So, we suggest you turn off Enhance Pointer Precision on your Windows 11 PC by following the below steps:
1. Open the Control Panel utility on your Windows system and click on Hardware and Sound .

2. Choose the Devices and Printers option on the same screen and expand the Mouse section.

3. Click on the Additional mouse settings option under the Related settings section.

4. Move to the Pointers Options tab and uncheck the Enhance pointer precision checkbox.

5. Click on Apply at the bottom right corner of the tab to save the changes.

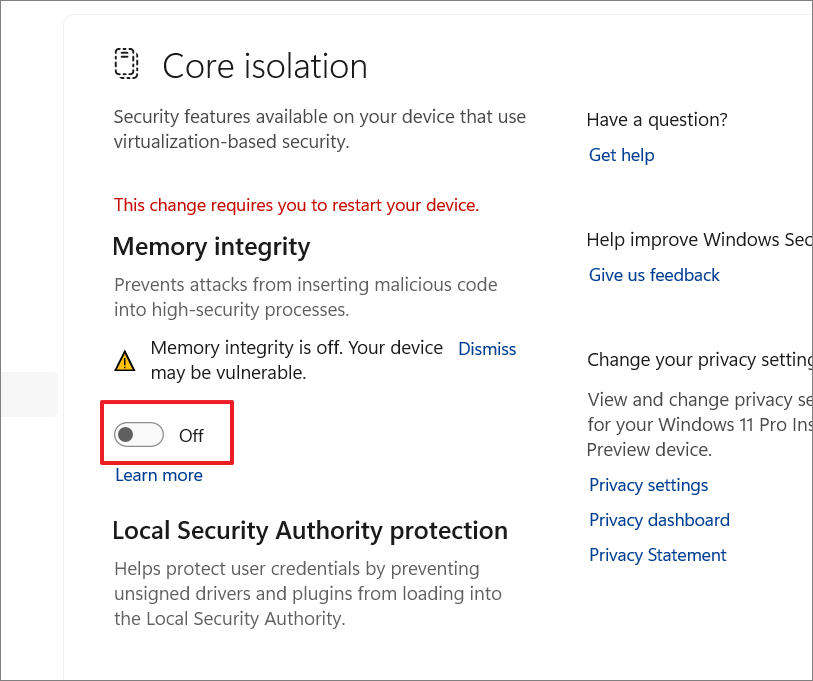
10. Disable Memory Integrity
Memory Integrity is a security feature that prevents viruses and malware attacks from injecting malicious codes into your system. Keeping this function enabled is essential, but it consumes a lot of the system’s resources to work.
Due to this reason, we suggest you disable the Memory Integrity feature on your Windows 11 PC to optimize it for next-level performance. Follow the below steps and disable it:
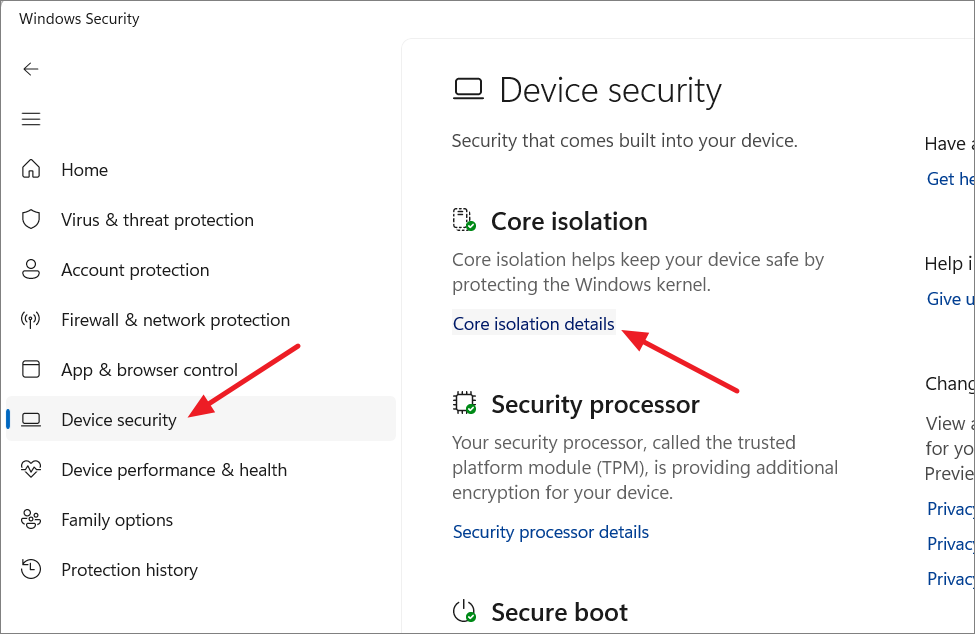
1. Open the Windows Security app on your PC and select Device security from the left menu.

2. Click on the Core isolation details option in the Core isolation section.

3. Lastly, disable the toggle next to the Memory integrity option to switch it off.

11. Turn Off Virtualization
Windows 11 integrates a virtualization functionality that lets you run different OSs, like Android , Linux, etc., on your Windows 11 PC. No doubt, it’s a useful feature. But in some cases, it’s found that keeping it enabled can ruin the system’s performance, as it consumes enormous resources.
Considering this, disable the virtualization functionality on your PC. Here are the steps to disable this function:
1. Open the Settings app on your Windows 11 PC and select the Apps option from the left navigation pane.

2. Expand the Optional features section and then choose the More Windows features option.

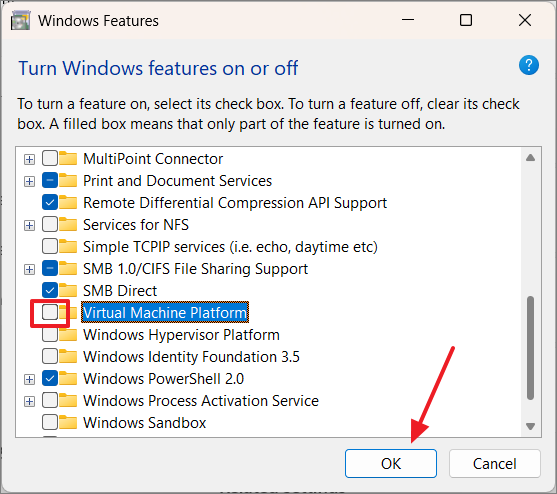
3. Search for Virtual Machine Platform in the Windows Features popup and untick the box next to it.

4. Click the OK button to apply the changes and restart your system.

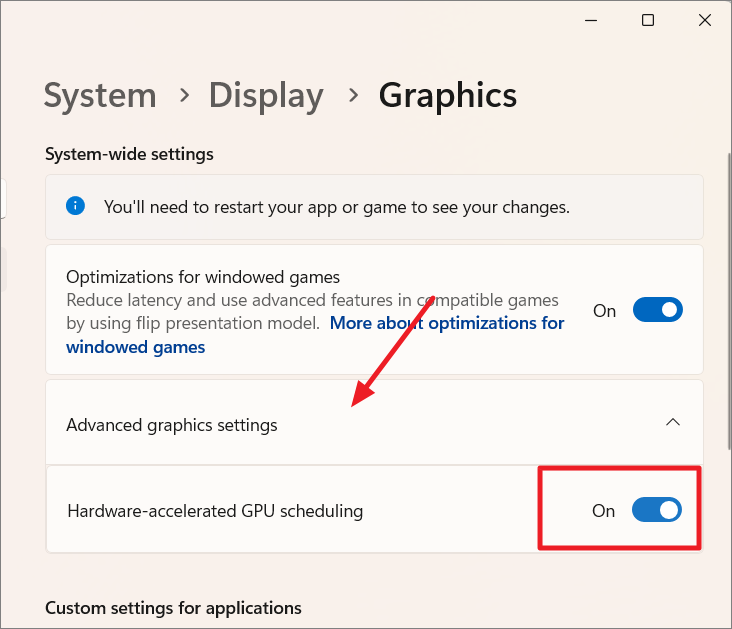
12. Turn On Hardware-Accelerated GPU Scheduling
Hardware-accelerated GPU scheduling is a gaming-centric feature in Windows 11 that lowers latency by processing high-priority tasks through a dedicated GPU-based scheduling processor, which automatically reduces the load from the CPU and improves gaming performance.
In that case, enable the Hardware-Accelerated GPU Scheduling option on your Windows 11 PC. You can do so by trying the below steps:
1. Open the Settings app on your PC and head to the Gaming section from the left menu.
2. Select Graphics in the Related settings section and expand the Advanced graphic settings section.
3. Turn on the Hardware-accelerated GPU scheduling toggle.

13. Enable Variable Refresh Rate
Windows 11’s Gaming settings have a Variable refresh rate option which improves the refresh rate and prevents the screen from tearing while playing games. As this is a game-centric feature and aims to improve gaming performance, we suggest you enable it on your Windows 11 PC.
You can follow the below-mentioned prompts to enable Variable refresh rate on your system:
1. Follow Steps 1 – 2 in Tip 12 to move to Advanced graphic settings of the Settings app .
2. Expand the Advanced graphic settings section and enable the Variable refresh rate toggle.

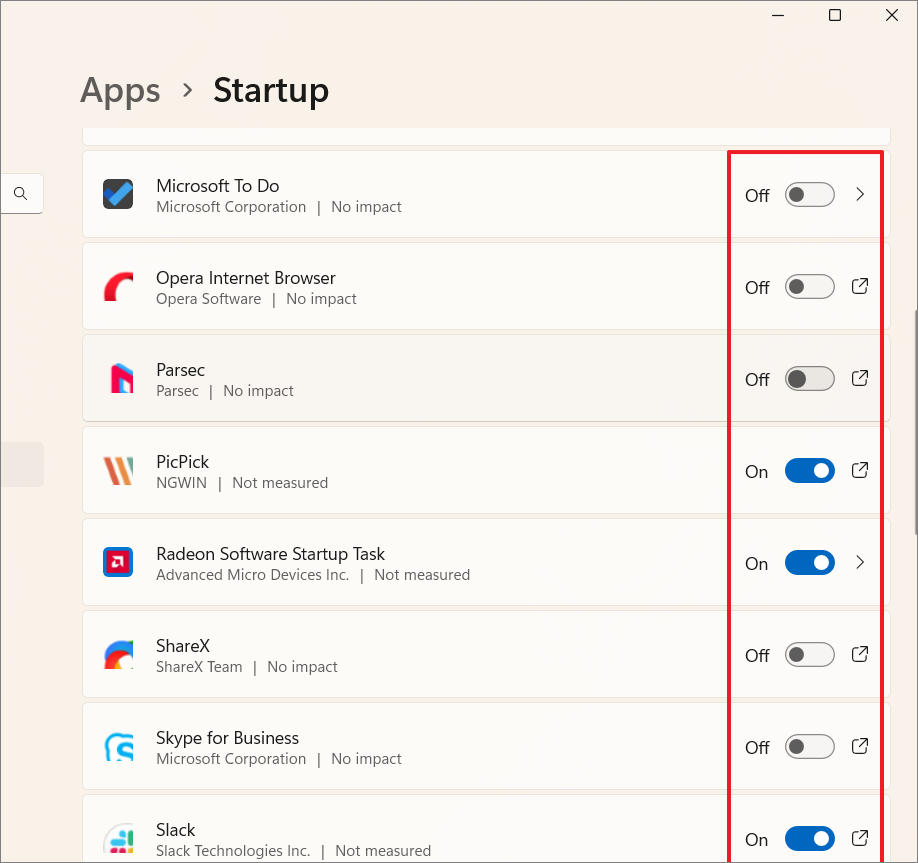
14. Disable Non-Gaming & Unnecessary Startup Apps
Another way to optimize the system’s gaming performance is disabling unnecessary programs from booting at the system’s startup. This will help you save your system’s resources, and your games will use those resources to provide an enhanced gaming experience.
So disable unnecessary startup apps and programs on your PC by following the below steps:
1. Move to the Apps section of the Settings app and click on Startup on the same window.

2. In the Startup window, search for the program that you don’t want to get started at the boot.

3. Lastly, disable the toggles next to those programs and apps and restart your Windows system.

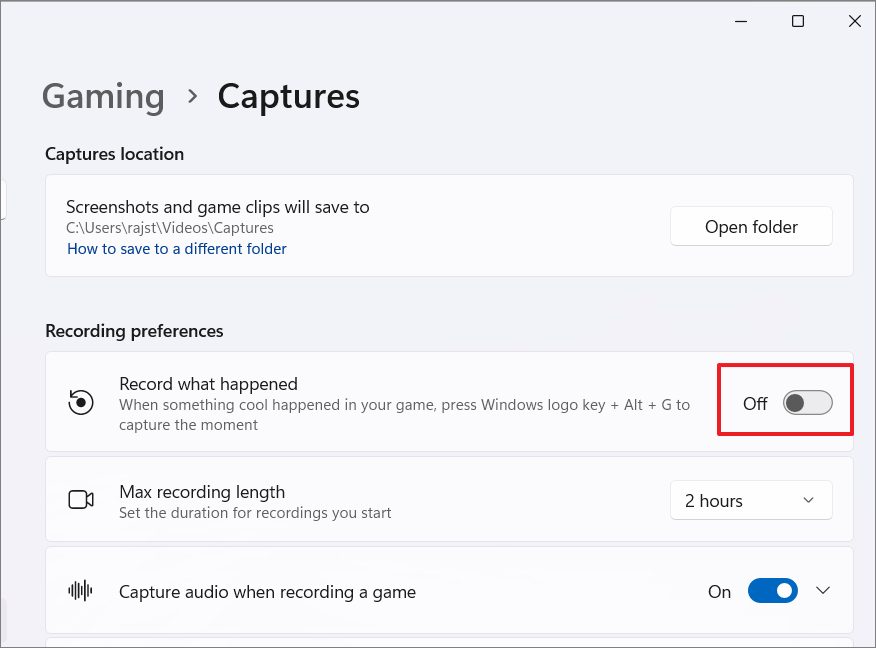
15. Disable Record What Happened
Windows 11 comes with a Record what happened feature that lets you record your game moments in a video with a shortcut. When you keep the Record what happened feature enabled, it keeps running in the background and consumes resources, which affects the performance.
Due to this, we suggest you keep the Record what happened option disabled on your Windows 11 PC. You can check the below-mentioned steps to know whether it’s disabled or not:
1. Go to the Settings section of your Windows 11 PC and proceed to the Gaming section.
2. Click on Captures in the Gaming window and disable the Record what happened toggle.

16. Enable Optimizations for Windowed Games
Enabling the Optimizations for windowed games option on your Windows 11 PC could also enhance its gaming performance. This function reduces latency and uses a flip presentation model to optimize DirectX 10’s and DirectX 11’s games’ performance.
So, try enabling Optimizations for windowed games on your Windows 11 PC by following the below steps:
1. Launch the Settings app on your PC or laptop and proceed to the Display section of it.
2. Choose the Graphics option in the Related settings section to open the Graphics settings.
3. Turn on the toggle next to Optimizations for windowed games under System-wide settings .

How Do I Optimize Windows 11 for Gaming?
You can try enabling Hardware-accelerated GPU scheduling on your system to optimize it for gaming.
Is Windows 11 better optimized for gaming?
Microsoft claims that Windows 11 is optimized for gaming, as it has many gaming-centric features. But you still need to make some tweaks to your Windows 11 PC to fully optimize it.
Is Windows 11 Slower for Gaming?
No, the latest Windows 11 isn’t slower for gaming. But it’s found that some of its built-in features, like Virtualization Based Security (VBS) , could drop the gaming performance by 10%.
Which Windows 11 Is the Best for Gaming?
Windows 11 Pro & Home version is the best for gaming, as it has many enhanced gaming functions.
How Do I Enable 120Hz on Windows 11?
Follow the below-mentioned instructions to enable 120Hz on your Windows 11 PC or laptop:
1. Launch the Settings app on your Windows 11 system and go to the Display section of it.
2. Click the Advanced display option under the Related settings section to adjust the refresh rate.
3. In the end, set the Choose a refresh rate dropdown to 120 Hz and restart your system.
Play Games Smoothly
Windows 11 is undoubtedly good for gaming. But it could be best at it if you make some tweaks to it. Therefore, in this guide, we shared some tips or tweaks that you can apply to optimize your Windows 11 PC for gaming.
So, we hope this guide helped you make your Windows 11 system a better place for playing all kinds of games without any lag, FPS drop, and other issues.

Harshit Arora
Harshit is a tech writer who loves writing about Windows, Android, and the Internet. He uses his IdeaPad Gaming 3 laptop to write the most useful troubleshooting, how-to, and internet guides for you guys. You can connect to Harshit on LinkedIn, as he’s most active there only.
You may also like

How to Open Doc Files on Windows 11

How to Open DLL Files on Windows 11

How to Fix VMWare Not Working in Windows 11

How to Fix Hot Corners Not Working on Mac After Software Update
Leave a reply cancel reply.
Your email address will not be published. Required fields are marked *
Save my name, email, and website in this browser for the next time I comment.
These are Sankey diagrams that should hopefully illustrate the factors involved that results in a favorable presentation model where latency is the lowest.
The presentation model Windows ends up using for a game can be inspected using either Special K’s control panel or framepacing widget, or by using the excellent PresentMon tool from Intel.
The diagrams were created using SankeyMATIC .
A simplification that has been made in the diagrams is that even with MPOs enabled a game can still be reported as using Hardware: Independent Flip on some systems, though when this happens it tend to act and function identical to Hardware Composed: Independent Flip .
¶ Flip (D3D11/12*)

For a game using a Flip swap effect, there are various factors that determine which presentation model will be used:
- (*) The Exclusive Fullscreen (FSE) section is not applicable to DirectX 12 games as its “exclusive mode” is merely an “emulated” mode where the Windows desktop temporarily changes resolution, refresh rate, and colorspace to the one requested by the game, but otherwise acts exactly like a regular borderless fullscreen window.
- Fullscreen Optimizations (FSO) toggle (only relevant for games running in Exclusive Fullscreen (FSE) mode).
- Whether Multi-Plane Overlay (MPO) are available on the hardware.
- DirectFlip : Your swapchain buffers match the screen dimensions, and your window client region covers the screen. Instead of using the DWM swapchain to display on the screen, the application swapchain is used.
- DirectFlip with panel fitters (requires MPO ) : Your window client region covers the screen, and your swapchain buffers are within some hardware-dependent scaling factor (for example, 0.25x to 4x) of the screen. The GPU scanout hardware is used to scale your buffer while sending it to the display.
- DirectFlip with multi-plane overlay (requires MPO ) : Your swapchain buffers are within some hardware-dependent scaling factor of your window dimensions. The DWM is able to reserve a dedicated hardware scanout plane for your application, which is then scanned out and potentially stretched to an alpha-blended sub-region of the screen.
¶ BitBlt (D3D11)

For a game using a legacy BitBlt swap effect, there are various factors that determine which presentation model will be used:
- The requested display mode of the game.
- Special K’s automatic flip model override performs this functionality on Windows 10 and earlier versions of Windows 11 where the OS provided override is not available.
- DirectFlip (requires Fullscreen/Windowed Optimizations) : Your swapchain buffers match the screen dimensions, and your window client region covers the screen. Instead of using the DWM swapchain to display on the screen, the application swapchain is used.
- DirectFlip with panel fitters (requires MPO + Fullscreen/Windowed Optimizations) : Your window client region covers the screen, and your swapchain buffers are within some hardware-dependent scaling factor (for example, 0.25x to 4x) of the screen. The GPU scanout hardware is used to scale your buffer while sending it to the display.
- DirectFlip with multi-plane overlay (requires MPO + Fullscreen/Windowed Optimizations) : Your swapchain buffers are within some hardware-dependent scaling factor of your window dimensions. The DWM is able to reserve a dedicated hardware scanout plane for your application, which is then scanned out and potentially stretched to an alpha-blended sub-region of the screen.
How to Optimize Windows 11 for Gaming
If you've recently switched to Windows 11 or your PC is lagging, look at these 28 ways to optimize Windows 11 for gaming.

Windows 11 is one of the best PC operating systems designed with gaming in mind. However, unlike a gaming console, you won't get the most out of your Windows PC unless it's optimized for gaming. If your PC isn't appropriately optimized, even most high-end PCs can suffer low FPS, lagging, and crashing.
Not only is Windows 11 compatible with almost all major PC games from the last couple of decades, but all newer games also run better on Windows 11. You can tweak several built-in settings and features on your Windows 11 to get the best possible performance for playing your favorite AAA games. Keep reading for more details on customizing these settings to optimize your PC.
Table of Contents
1. turn on game mode, 2. choose high performance power plan, 3. turn off enhance pointer precision, 4. disabling memory integrity & virtual machine platform.
5. Turn On Auto HDR
6. Update Your Graphics Drivers
7. turn on hardware-acceleration, 8. monitor and manage system temperatures, 9. perform disk cleanup, 10. update windows, 11. disable unnecessary background apps and services, 12. install updates for directx and .net framework , 13. specify gpu preference per-game, 14. disable nagle's algorithm, 15. adjust windows visual effects, 16. stop background downloads in steam, 17. disable notifications.
18. TweakIn-Game Graphics Settings
19. Configure your GPU software
20. turn off animations, 21. pause automatic windows updates, 22. upgrade to ssd, 23. switch to faster dns, 24. keep your pc from overheating, 25. overclock your gpu and cpu, 26. disable record what happened, 27. using game optimization software, 28. reinstall windows 11.
Windows 11 comes with a built-in Game Mode that can improve gaming performance. Game Mode turns off notifications, halts or reduces the speed of most background activities, and allocates additional resources to the gaming app to enhance your gaming performance.
To turn on Game mode, open the Start menu from the taskbar and then click on 'Settings' to open Windows Settings.
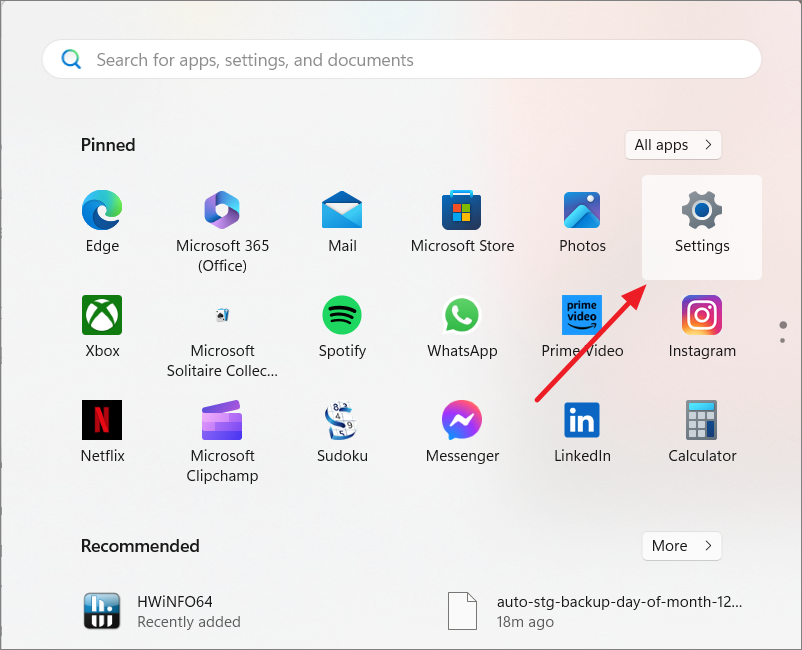
In the Settings app, go to 'Gaming' and click on 'Game mode'.
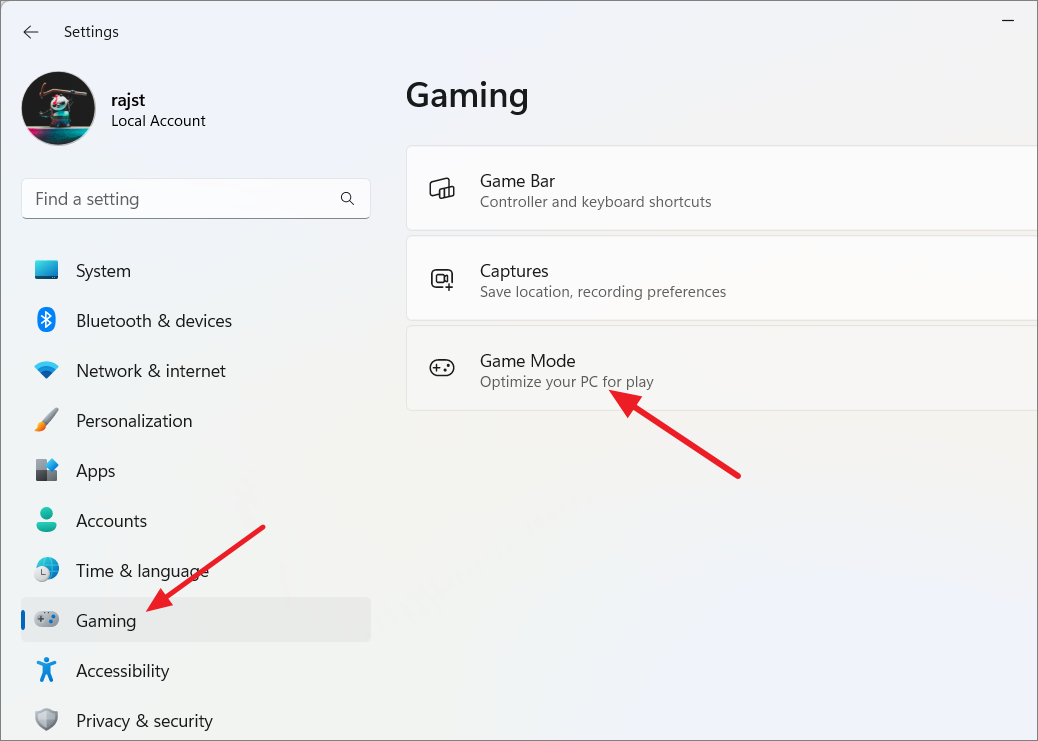
Then, toggle the Game Mode switch to the On position.
If you are gaming on a laptop, switching your power plan to 'High Performance' in Windows can help optimize your system for gaming. This power plan is designed to make your CPU and GPU run consistently at their maximum clock speeds, which can result in better gaming performance.
Open the Start menu, and type Control Panel in the search field. Then, click on the 'Control Panel' application in the search results.

In the Control Panel, ensure your viewing mode is set to 'Large icons,' then select 'Power Options.'

Within the Power Options section, select the 'High performance' option or click on the 'Show additional plans' drop-down menu and choose 'High performance' from the available options.
Before you start your game, you can also easily switch to 'High Performance' mode using Windows Mobility Center. Then, switch back to 'Balanced mode' or 'Power Saver' mode after quitting the game.
Press the Windows Key, type mobility center , and open 'Windows Mobility Center' from the results.
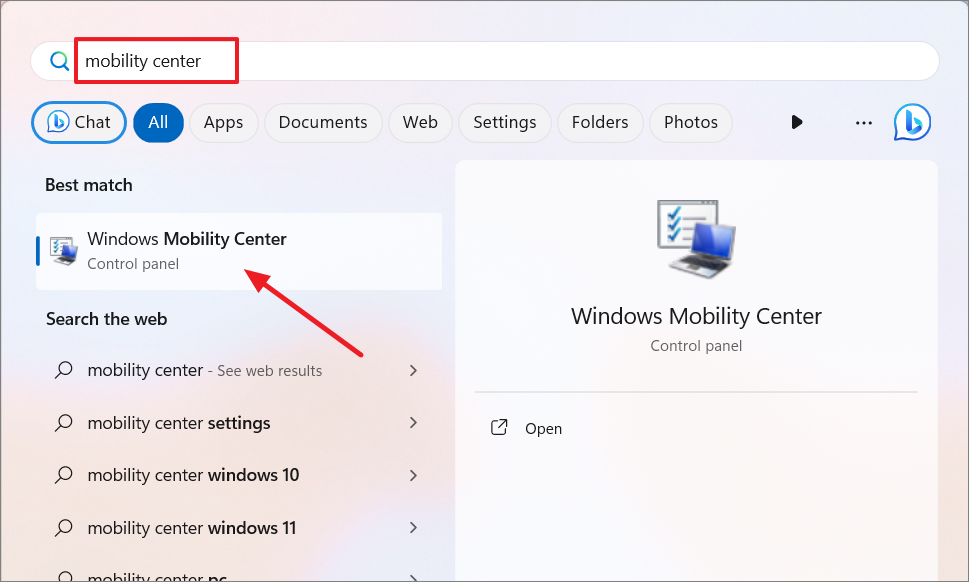
Once the tool opens, select 'High Performance' from the drop-down below Battery status. For easy access, you can even pin the tool to your taskbar.

Some laptop brands come with dedicated power management or energy management software to efficiently manage and optimize your computer's power consumption.
Windows 11 has a feature called Enhance Pointer Precision enabled by default, which smoothes out mouse pointer movements to increase accuracy and responsiveness. It slows down or speeds up your mouse pointer based on how fast you move it. This feature doesn't impact gaming performance but influences the overall gaming experience.
The problem is most games have a pointer precision system that can conflict with the Windows feature. So, if you have a mouse with a suitable sensor, it’s best to turn off this feature to improve mouse movement. Here’s how:
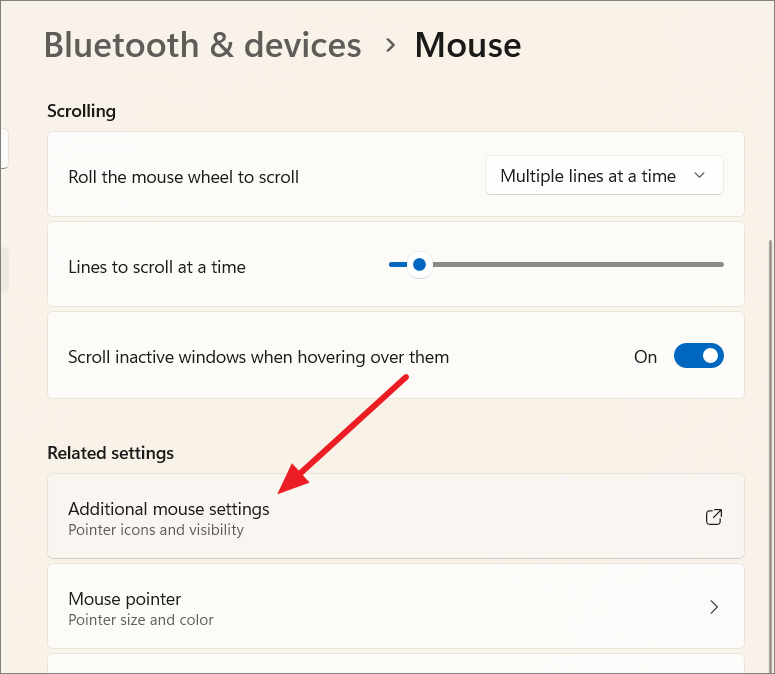
In Windows settings, go to ‘Bluetooth & devices,’ then scroll down and select ‘Mouse’ from the right pane.

On the Mouse settings page, scroll down to the Related settings section and click on the ‘Additional mouse settings’ tile.
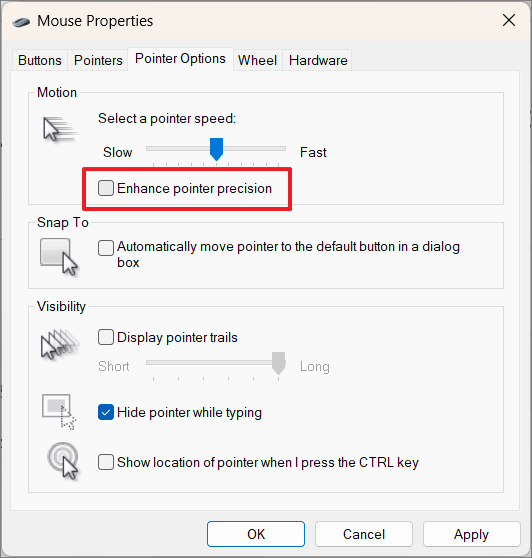
When Mouse Properties opens up, move to the ‘Pointer Options’ tab and uncheck the ‘Enhance pointer precision’ option under the Motion section.
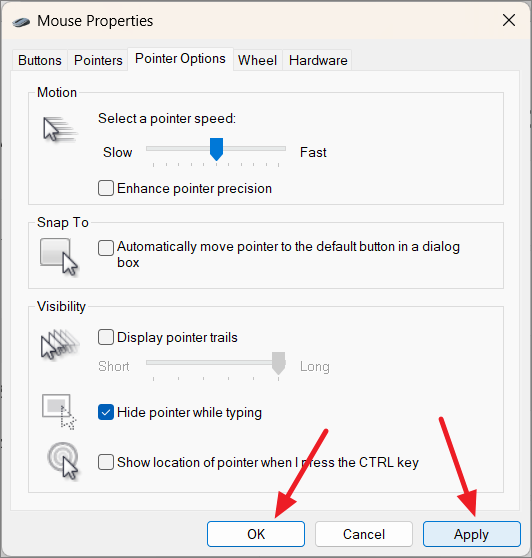
Then, click ‘Apply’ and then ‘OK’.
There are two other features that you can turn on to improve your PC performance: Memory Integrity and Virtual Machine Platform.
According to user feedback, many users have noticed that in certain situations and with particular setups of gaming devices, having both Memory Integrity and Virtual Machine Platform (VMP) enabled can sometimes cause a decrease in performance. Consider turning off these features on your Windows 11 PC to optimize its performance.
Turn Off Memory Integrity
Memory Integrity is a security feature designed to protect against malicious attacks that attempt to tamper with the system's memory, specifically the kernel memory. Since Memory Integrity uses hardware-based virtualization and hypervisor technology to create a secure environment for the Windows kernel, there’s a slight dip in performance.
Open the system tray (Hidden apps menu) from the taskbar corner and click the ‘Windows Security’ icon to launch the Windows Security app.
Select ‘Device security’ from the left menu, and click on ‘Core isolation details’ under the Core isolation section.
Then, turn the ‘Memory integrity’ switch to Off position.
Turn off the Virtual Machine Platform (VMP)
Virtual Machine Platform (VMP) provides a more seamless and integrated experience for running Linux virtual machines and Android apps on your Windows computer. Keeping it turned on consumes a lot of resources.
Open the Windows Settings app and select ‘Apps’ from the left panel. Then, click on the ‘Optional features’ option from the right.

Then, scroll down the Optional features page and click on the ‘More Windows features’ tile under Related settings.
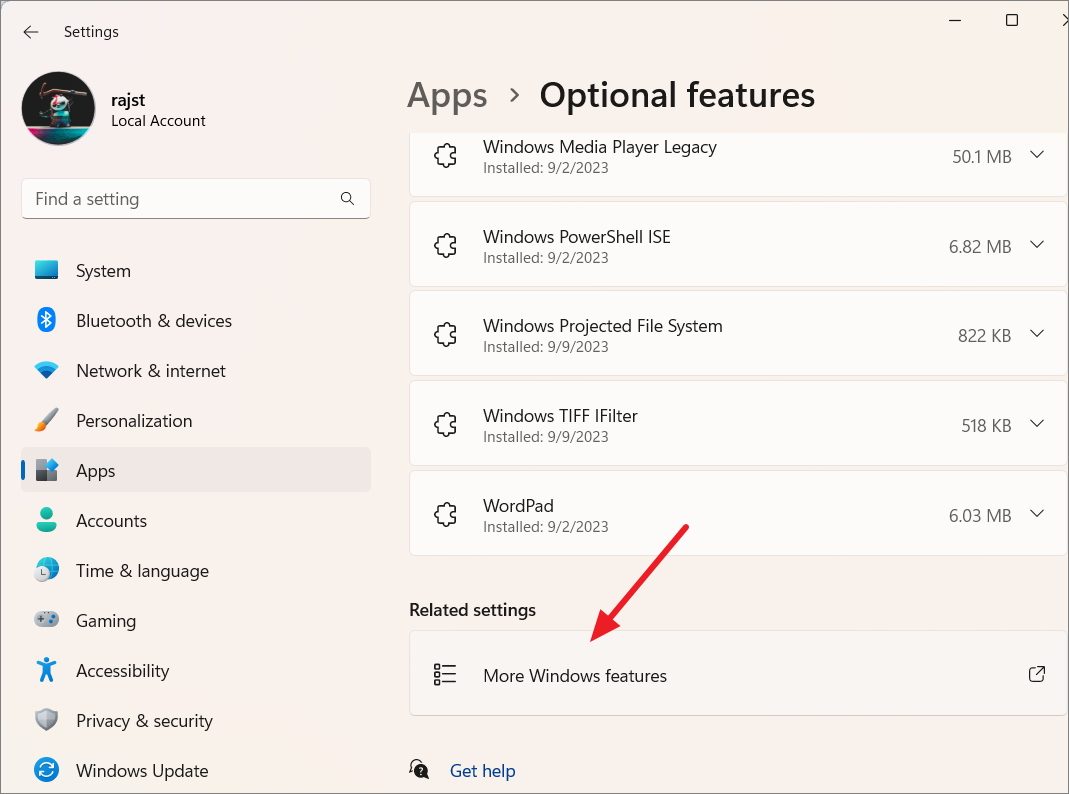
Once the Windows features dialog opens, search for the ‘Virtual Machine Platform’ option and uncheck the box next to it. Then, click ‘OK’ to save the changes.
Restart your computer for changes to take effect. Once you are finished playing, re-enable these features, as Memory Integrity is crucial for protecting your system against various types of attacks, including kernel-level rootkits and memory-based exploits.
5. Turn on Auto HDR
When you play older games, they often use SDR (Standard Dynamic Range) to display content. However, on modern displays, this can make them look a bit washed out and lacking in vibrant colors. Luckily, Windows 11 has Auto HDR support for displays that can handle HDR.
Auto HDR automatically upgrades compatible SDR games to HDR, transforming them with better contrast, a wider range of brightness levels, and more vivid colors. Enabling Auto HDR can make a significant difference in your overall gaming experience.
You can only use HDR if your display and graphics card supports HDR. To check and enable HDR on Windows 11, follow these steps:
Go to Windows Settings, and select ‘Display’ under the ‘System’ settings.
Then, click on ‘HDR’ under Brightness & color.
If you have multiple displays connected to your computer, select the correct one from the drop-down menu.
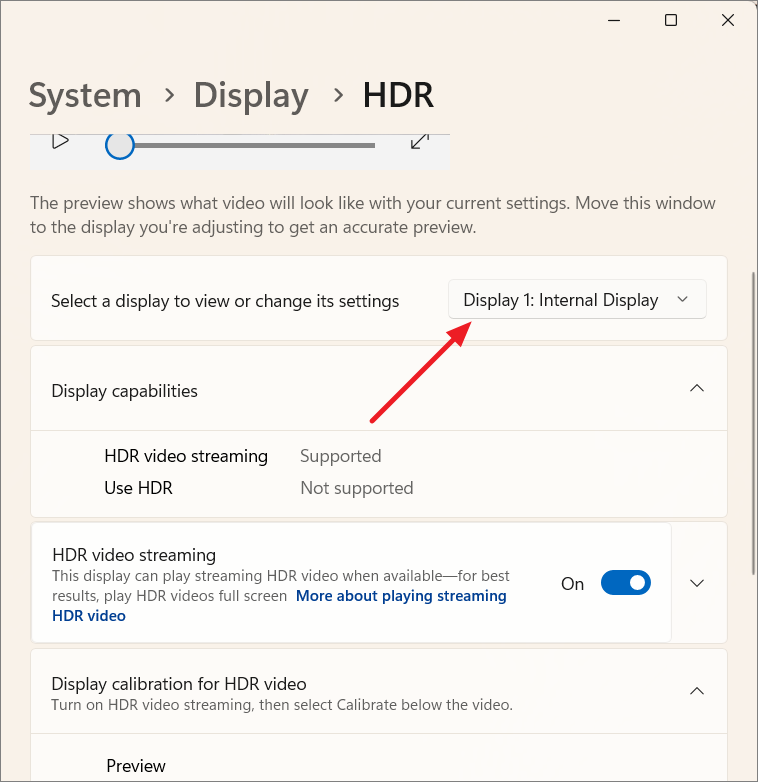
Next, look in the Display capabilities section. If you see that 'Use HDR' is listed as 'Supported,' it means your display is capable of HDR. You can enable it by toggling the 'Use HDR' and 'Auto HDR' switches to the 'On' position.
However, if 'Use HDR' is labeled as 'Not supported,' your display does not support Auto HDR. In this case, you might want to consider purchasing a new display that does support it.
Updating your graphics drivers is one of the first steps you should take towards optimizing Windows 11 for gaming. Older drivers usually aren't a major problem, but they might not provide full support for some newer games.
Keeping your GPU driver up-to-date fixes bugs, optimizes GPU performance, and can significantly enhance gaming performance.
You can usually download the latest drivers from the manufacturer's website (e.g., NVIDIA , AMD , Intel ). Go to the official website, download and install the latest driver for your specific GPU model.
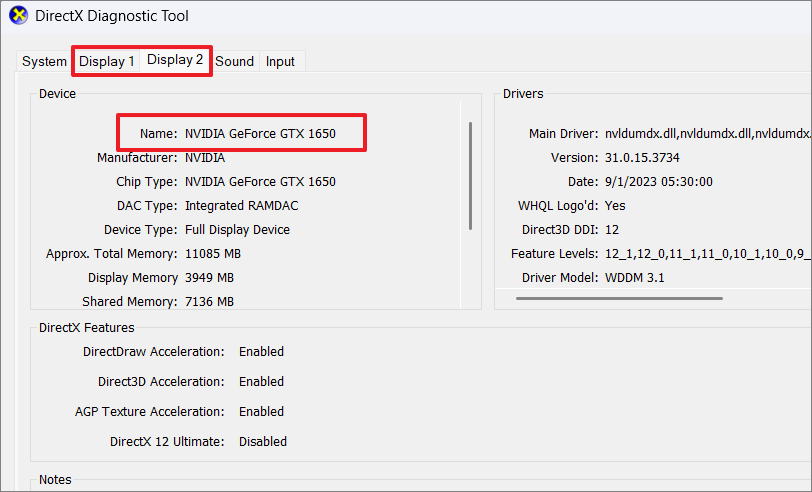
If you don't know your GPU model, press Window + R , type dxdiag and press Enter to open the DirectX Diagnostic Tool.
Now, switch to the 'Display 1' and 'Display 2', and check the device name. This is your GPU's model name.
Although you can update your drivers through Device Manager, it may not always provide you with the most up-to-date version of the drivers.
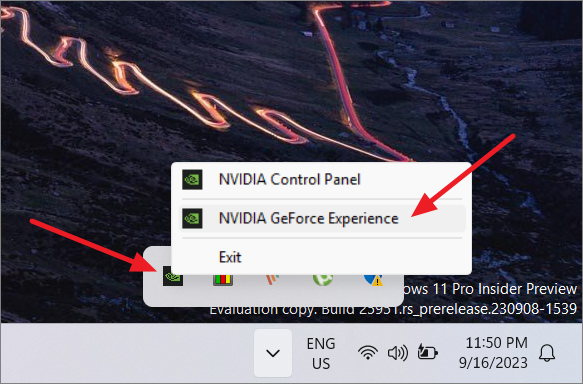
For NVIDIA GPUs, open the NVIDIA GeForce Experience app by clicking the NVIDIA icon in the System and selecting 'NVIDIA GeForce Experience'.
Go to the 'DRIVERS' tab and click the 'CHECK FOR UPDATES' button.
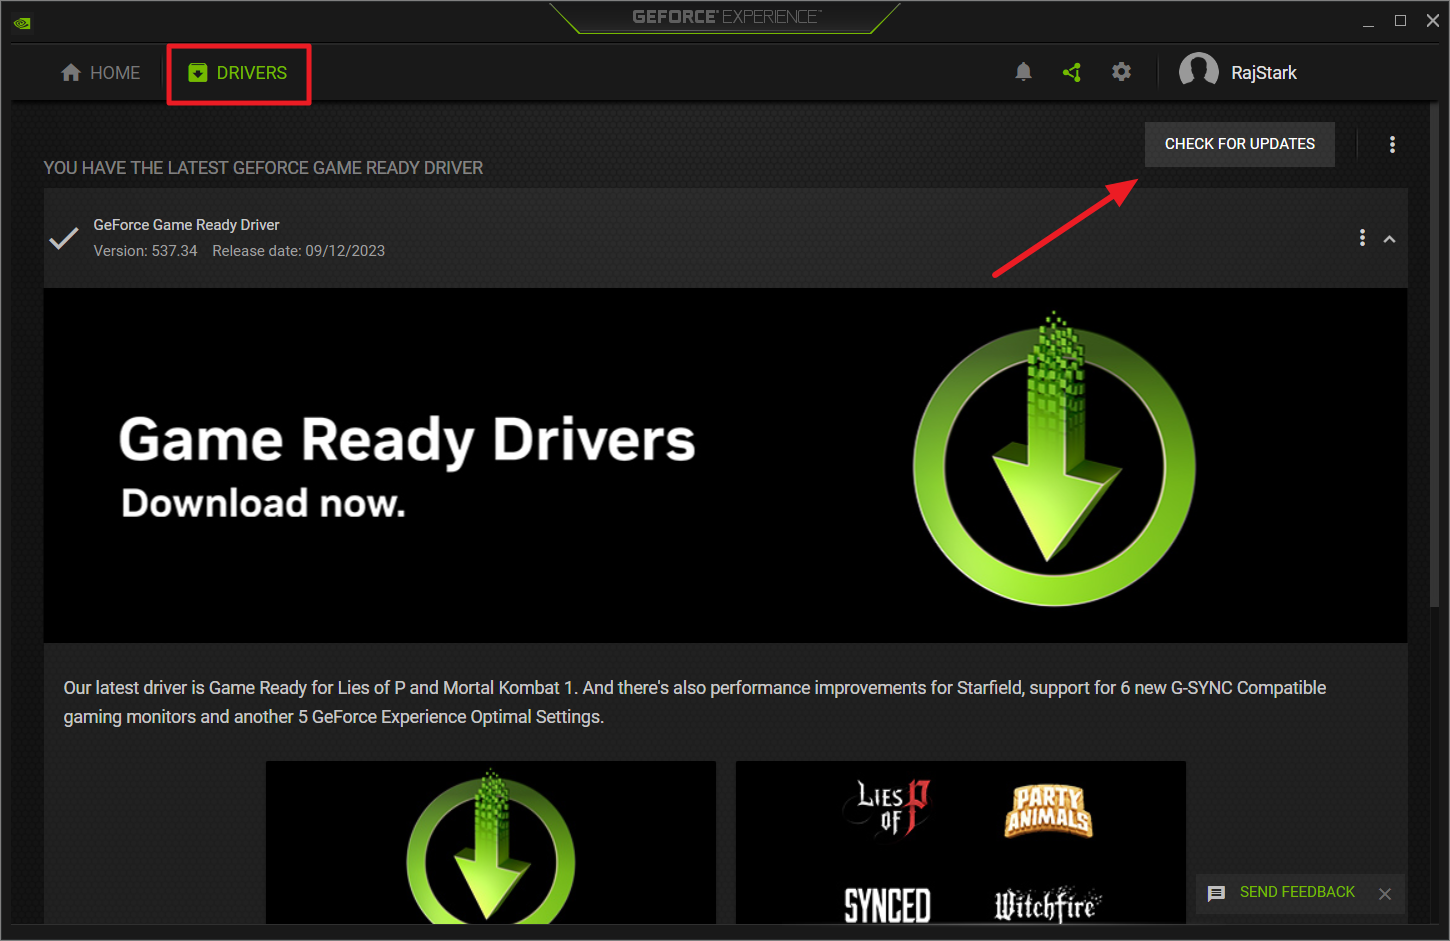
If there's any update available for the driver, download and install it. Then, restart your computer.
Hardware-accelerated GPU scheduling is a gaming feature in Windows 11 that offloads some scheduling tasks to the GPU, reducing CPU involvement. This can lead to better graphics performance, especially in gaming and graphics-heavy apps, by reducing latency and improving responsiveness.
It's usually enabled by default if your hardware and drivers support it. If not you can enable it.
Open Windows Settings, go to the 'System' tab and click on 'Display 'on the right pane.
Scroll down to the Related settings, and select 'Graphics'.
Next, expand the 'Advanced graphics settings' option, and turn on the 'Hardware-accelerated GPU scheduling' toggle.
Similarly, activating the 'Optimizations for windowed games' feature on your Windows 11 computer may also boost gaming performance. This function reduces latency and applies a flip presentation model to optimize the performance of games using DirectX 10 and DirectX 11.
Keeping an eye on and managing your system's temperatures is essential to prevent overheating, which can cause performance issues and even system crashes. Make it a routine to monitor your system's temperatures using third-party software and ensure your PC is dust-free to maintain peak performance while gaming.
You can check temperatures through BIOS settings, but it's a more complex method. Instead, it's recommended to use one of the readily available third-party applications from the web, such as Core Temp or HWMonitor , to easily check your CPU temperature.
Games often require extra space on your hard drive beyond just the size of the game files themselves to work well. The amount of space needed can vary widely depending on the game and your gaming habits. So, regularly use the built-in Windows Disk Cleanup tool to remove unnecessary files and free up disk space.
Open the 'Settings' app by clicking on it in the Start Menu or by using the Windows + I shortcut.
In the Settings app, select 'System’ from the left sidebar and choose 'Storage' from the list.
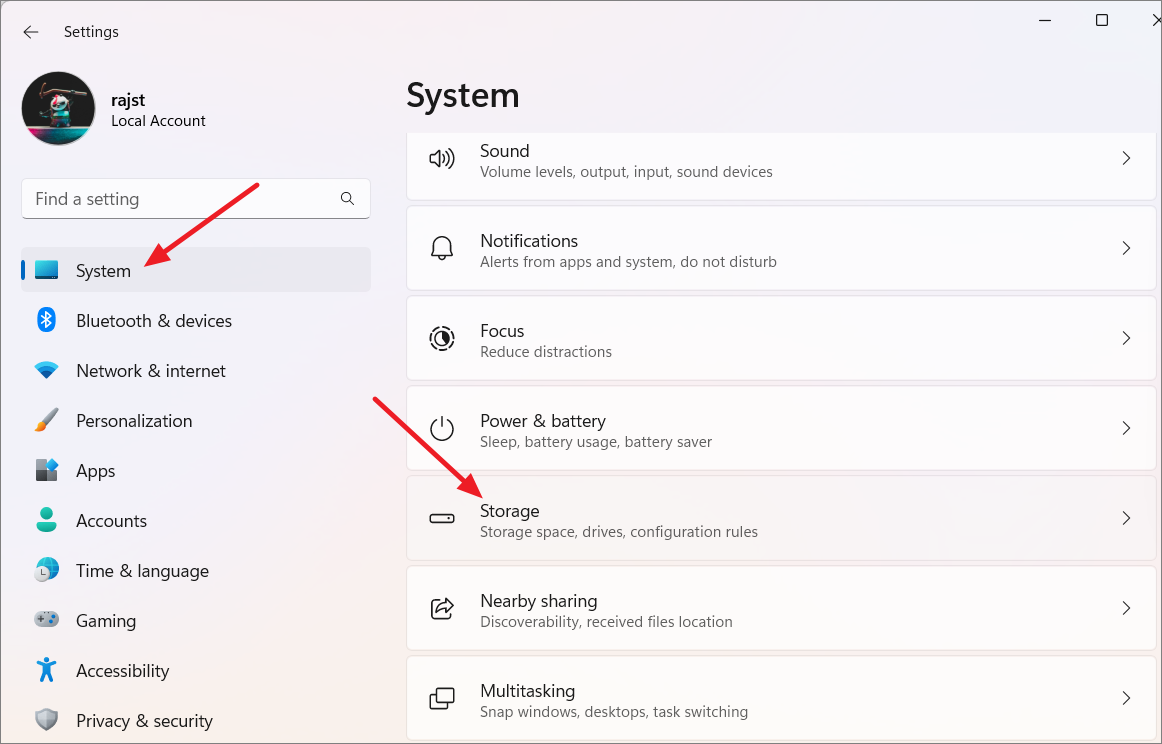
Your computer will scan your Windows installer drive(C:) and show you a breakdown of the types of files using up your storage space. This breakdown includes your personal files, temporary files, your installed programs, and other files. This scan might take a while, so please wait patiently.
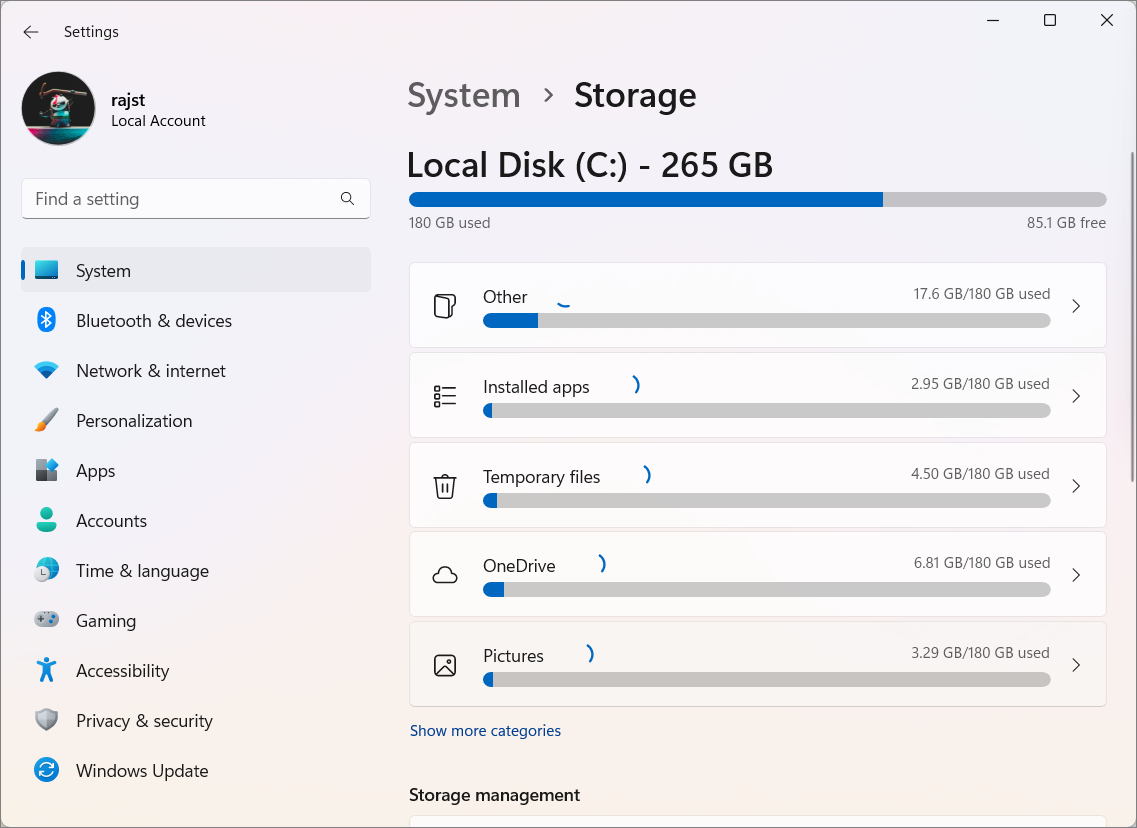
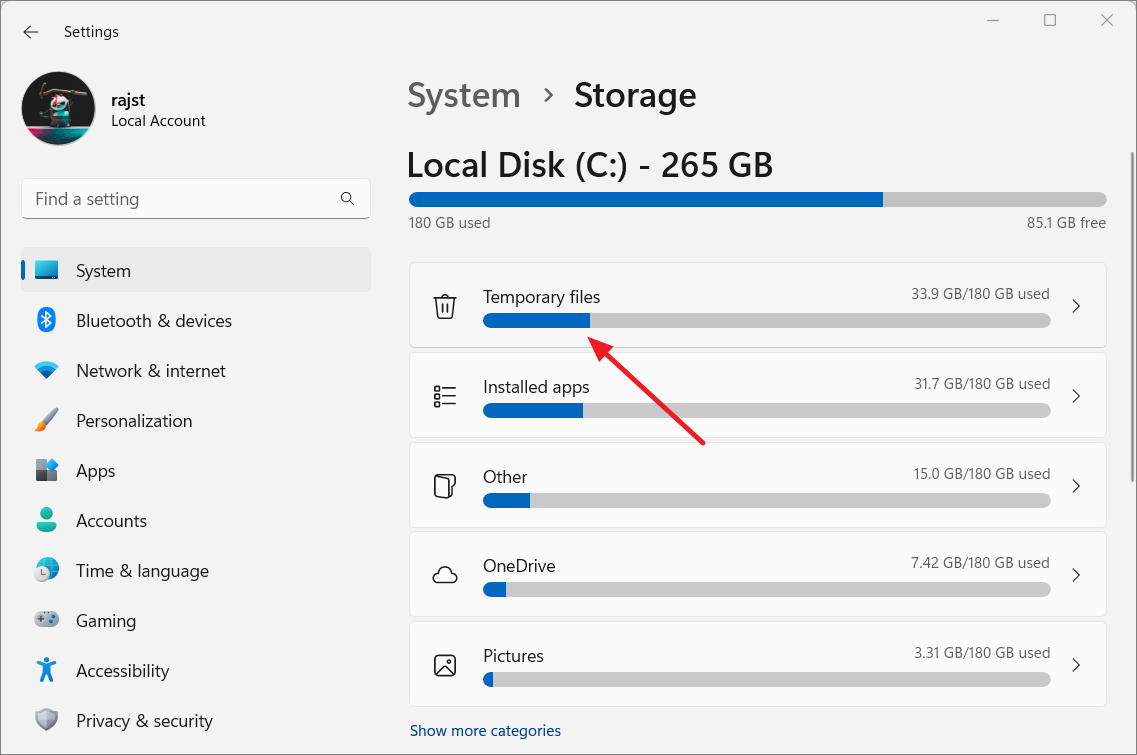
Once the scan is done, click on the category that's taking up the most space on your Windows installer drive. Usually, it's Temporary files, you can remove them without causing any problems.
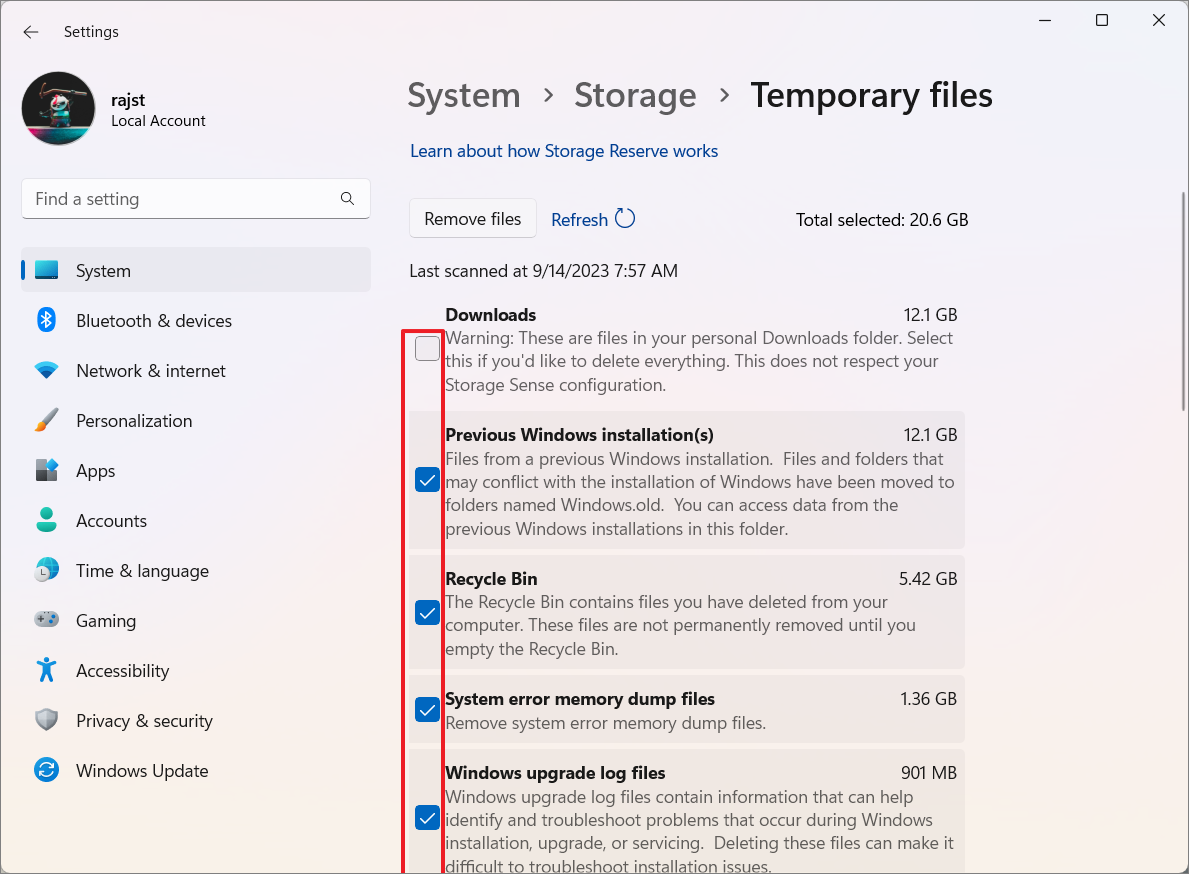
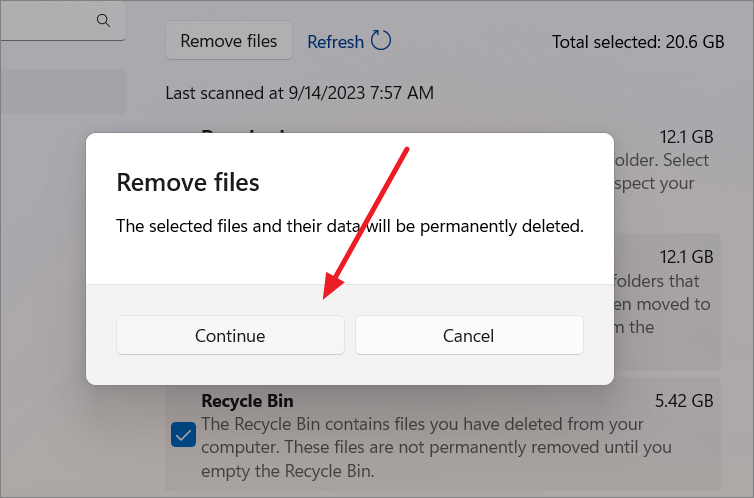
You'll see a detailed list of file types and their sizes in your local storage. To remove a specific file type, click the checkboxes next to their names. Make sure to read the descriptions under each file type to avoid accidentally deleting important files.
After making your selections, click 'Remove files' at the top of the list.
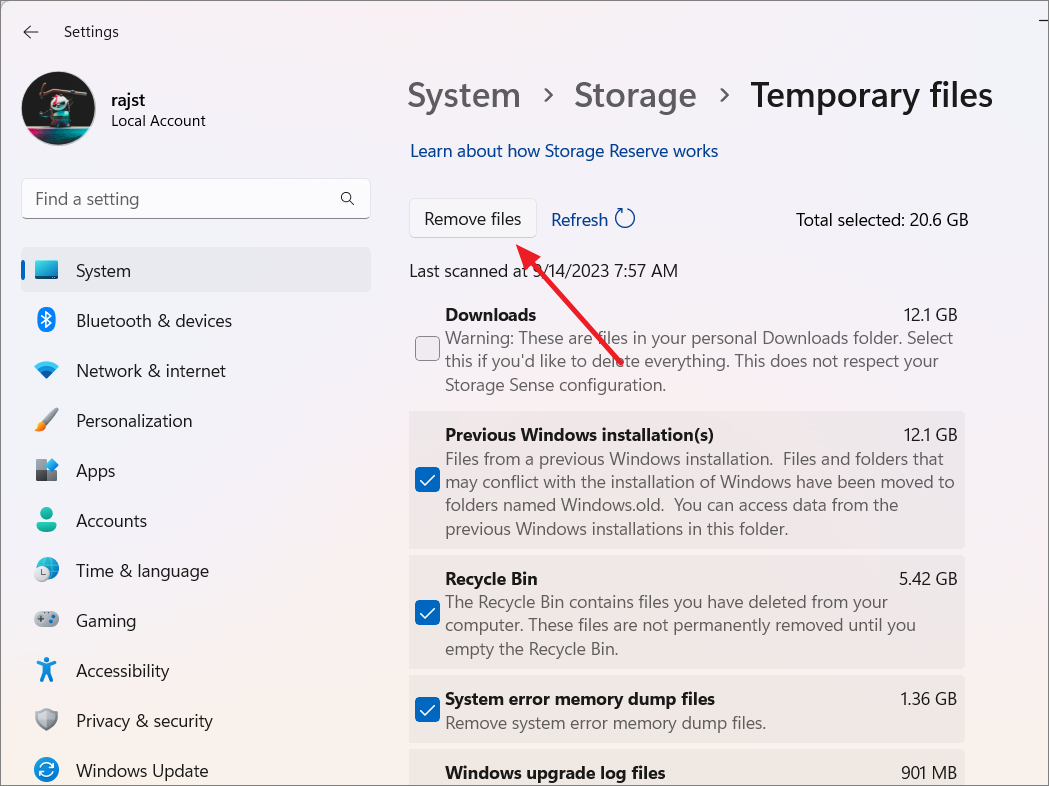
Finally, click 'Continue' in the alert to permanently delete the files you've selected.
If your Windows installer drive has been running out of space, these steps will help you free up some room by getting rid of unnecessary files.
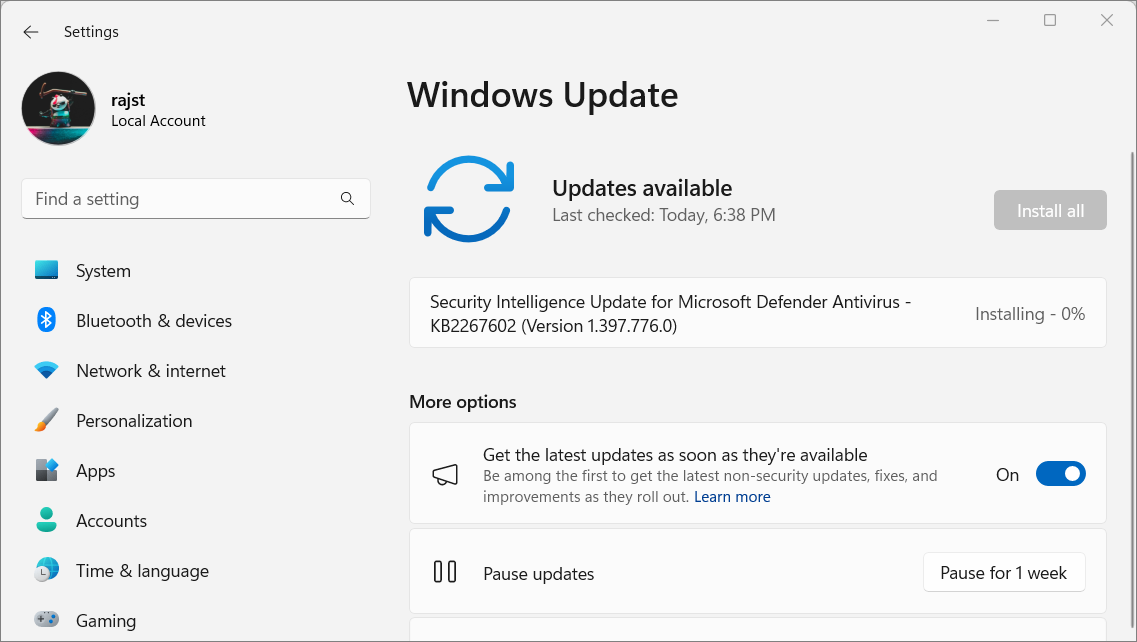
Make sure Windows 11 is updated to the latest version. Microsoft regularly issues updates, like the KB5020044 update, to address gaming performance issues through performance improvements and bug fixes.
To manually check for updates, open Windows Settings, and go to the ‘Windows Update’ section on the left pane. Then, click the ‘Check for updates’ button.
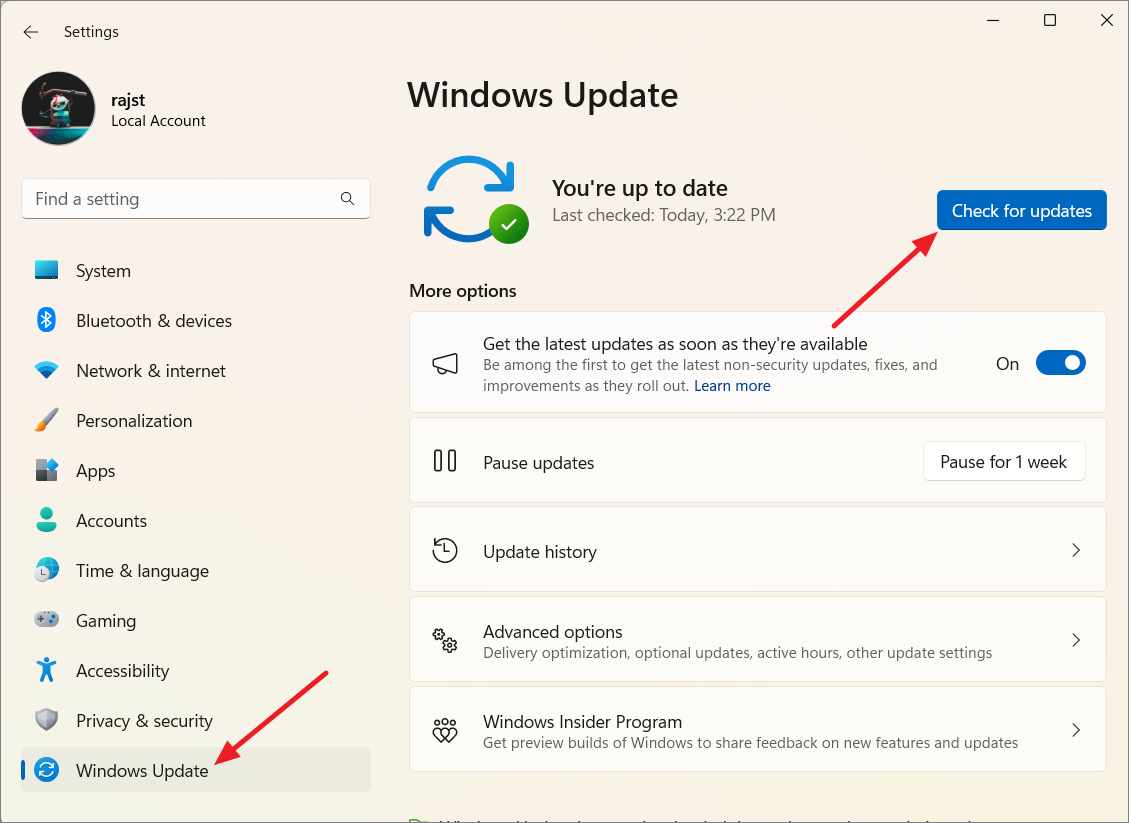
If Windows finds any pending updates, download and install them. If prompted, restart your computer to get the latest features and bug fixes.
When you turn on your computer, several apps launch automatically and run in the background. When too many of them are running in the background, your PC can start to lag when playing games.
So, disable all unnecessary non-gaming apps and services from startup to improve performance.
If there are lots of unnecessary apps running in the background, it’s no surprise that your PC starts to lag when playing games. To fix this issue, disable any apps from running in the background that are affecting your computer’s performance. Here’s how:
Open Windows Settings, head to the 'Apps' section, and then select 'Startup' on the right.
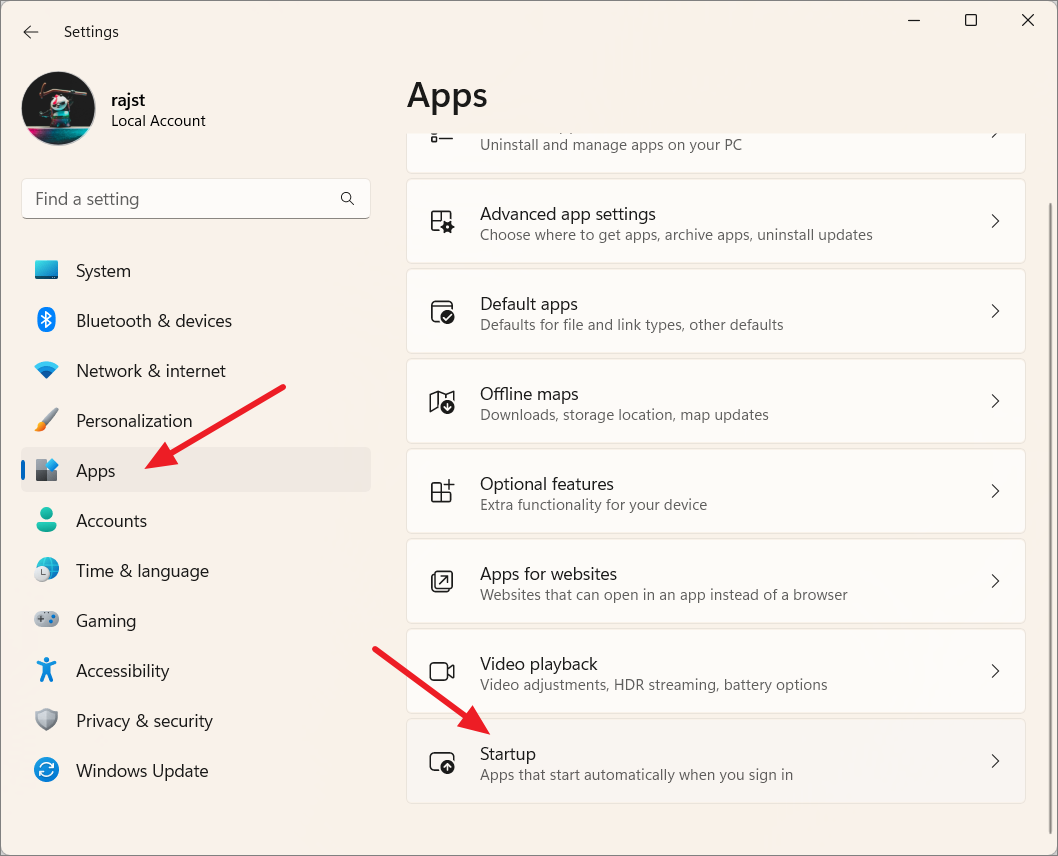
Now, find the apps that you don't want to start when your system boots up. Then, turn off the toggles next to those programs to disable them. After disabling the startup apps, restart your PC.
DirectX and .NET Framework serve as crucial components for gaming on the Windows platform. Make sure you have the most up-to-date versions installed to take advantage of bug fixes and performance improvements.
Usually, Microsoft pushes out updates for these tools through Windows Update. However, you can also get them directly from Microsoft's official website ( DirectX and . NET Framework ).
Many computers, especially laptops, are equipped with both integrated and dedicated GPUs (discrete graphics). When you have both types of graphics cards, Windows will automatically select the appropriate graphics card based on the program's requirements. Dedicated graphics cards are always more powerful and high-performing of the two.
However, there are situations where Windows may mistakenly assign integrated graphics for a game, resulting in lower gaming performance. When you're playing graphically demanding games, you need to make sure that the game is using your most powerful GPU for the best performance.
To manually assign a dedicated GPU for a game, head to Windows Settings, and select 'Display' in the System section.
Next, navigate to the Related settings, and select 'Graphics'.
Find and click on the installed game in the list.
Then, choose 'High Performance' as your preferred GPU from the drop-down.
Nagle's Algorithm is a network optimization algorithm that's designed to reduce network congestion and improve network efficiency by bundling small packets of data into larger chunks before sending them over the network.
But, when playing online multiplayer games, the time it takes to bundle small packets of data together can lead to unnecessary latency issues. Disabling Nagle's Algorithm can reduce this delay and potentially improve responsiveness in online games. Follow these instructions to disable Nagle's algorithm:
Press Windows + R to launch the Run dialog box, 'cmd' and click 'OK'.
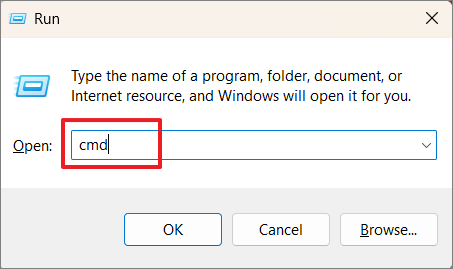
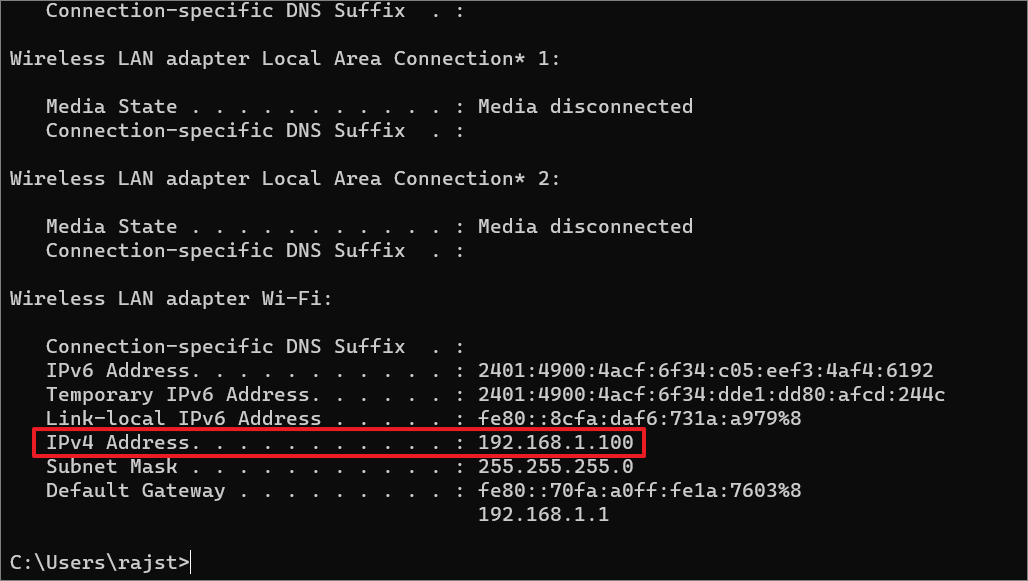
In the Command Prompt, type ipconfig and hit Enter .

Now, note down the 'IPv4 Address' for the network adapter you are currently using.
After that, press Windows + R again to open the Run dialog. This time, type regedit to open Registry Editor.
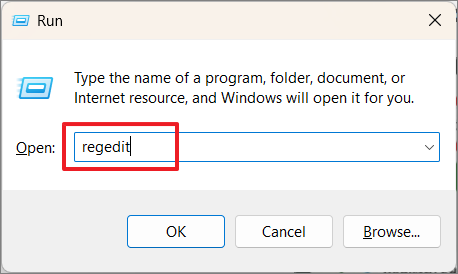
Once the Registry Editor opens, copy and paste the following path into the address bar, and press Enter :

In the left panel, check each folder individually under the Interfaces folder, and locate the folder that contains the 'DhcpIPAddress' entry.
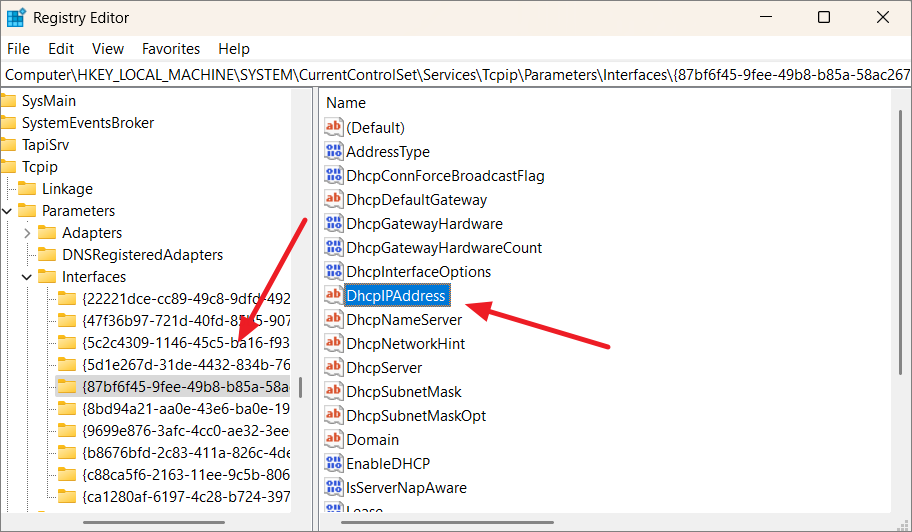
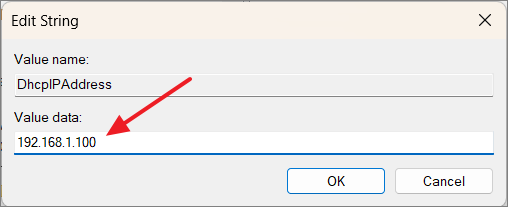
Once you find the 'DhcpIPAdress' entry, double-click on it, and if its Value data matches the IPv4 address you noted earlier.
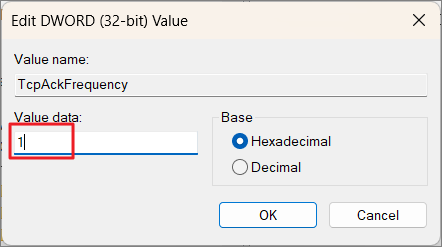
Once you find the right folder, right-click on any empty space and select 'New > DWORD (32-bit) Value'.
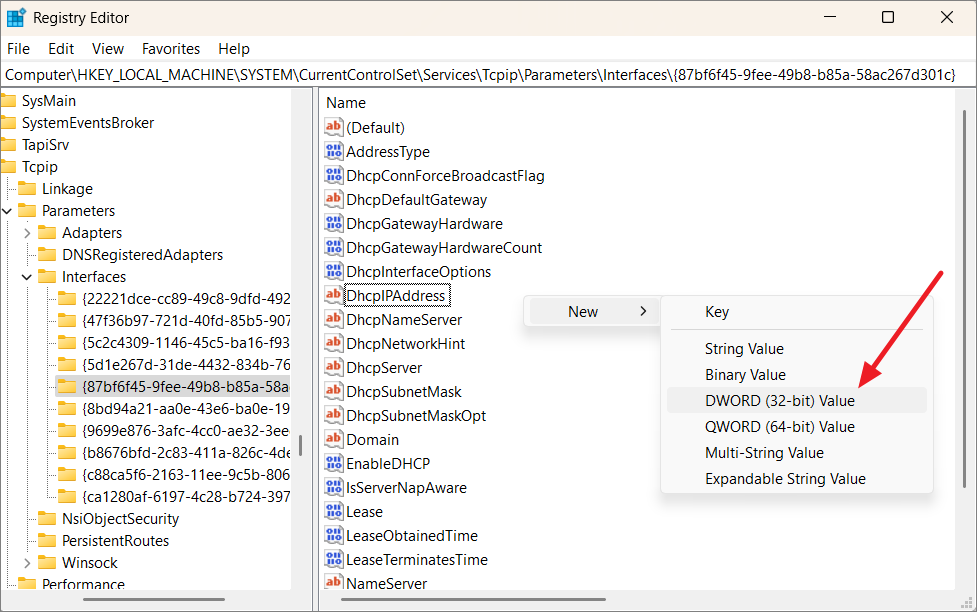
Then, rename the newly created DWORD to 'TcpAckFrequency' and double-click on it.
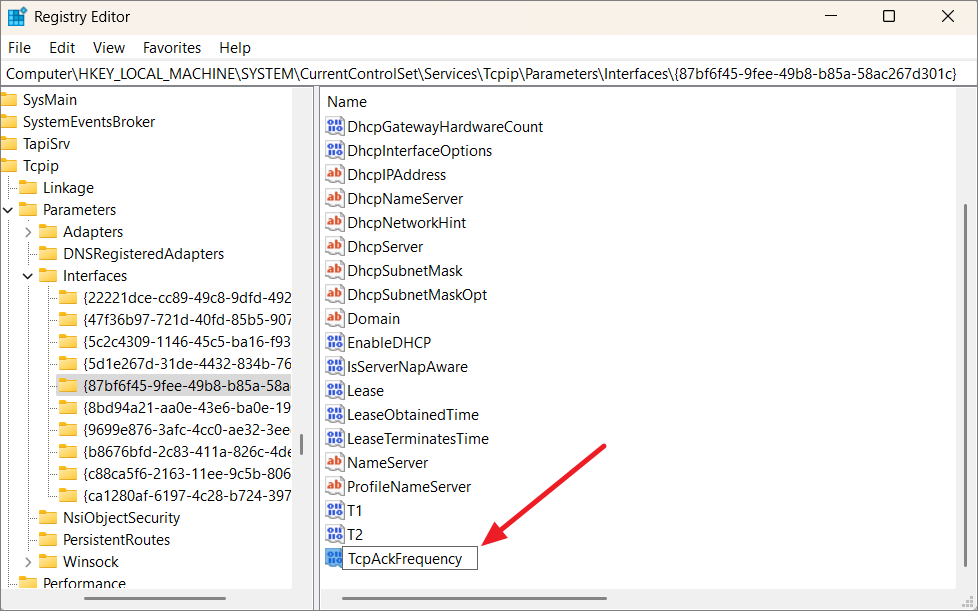
Set the value data to 1 and click 'OK'.
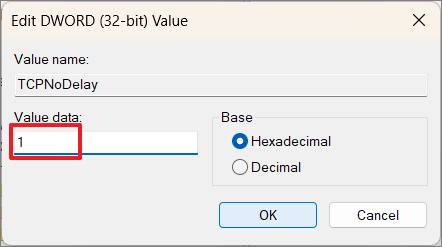
Create another DWORD and name it 'TCPNoDelay'.
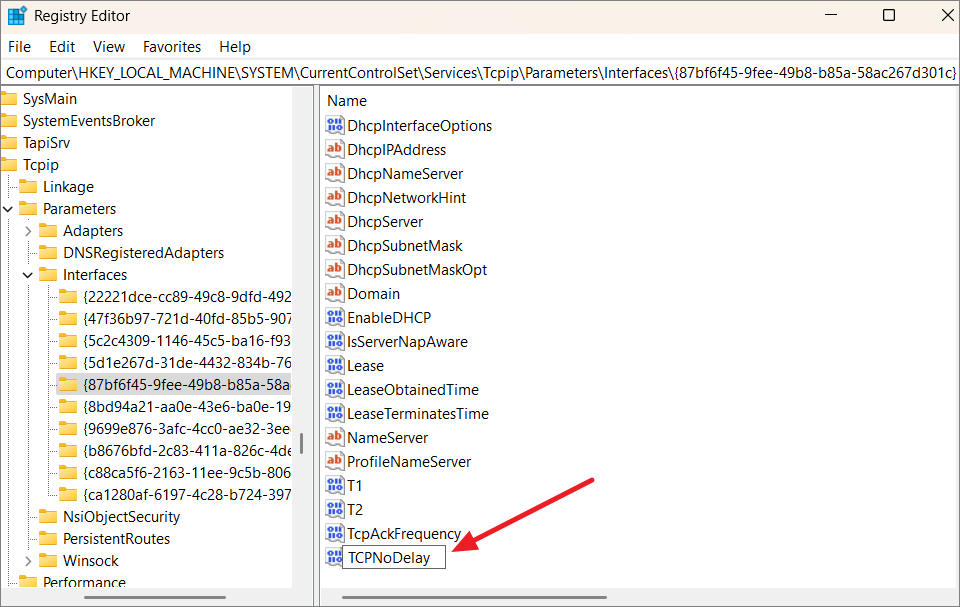
Then, set its 'Value data' to 1 as well.
Once it's done, close the registry editor and restart your computer. To re-enable Nagle's Algorithm, simply go back to the above location, and set the 'TcpAckFrequency' and 'TCPNoDelay' values to 0 .
Windows 11 has several visual effects settings that enhance the appearance and performance of the Windows. Nevertheless, by disabling or reducing some of these effects, you can free up additional resources for gaming.
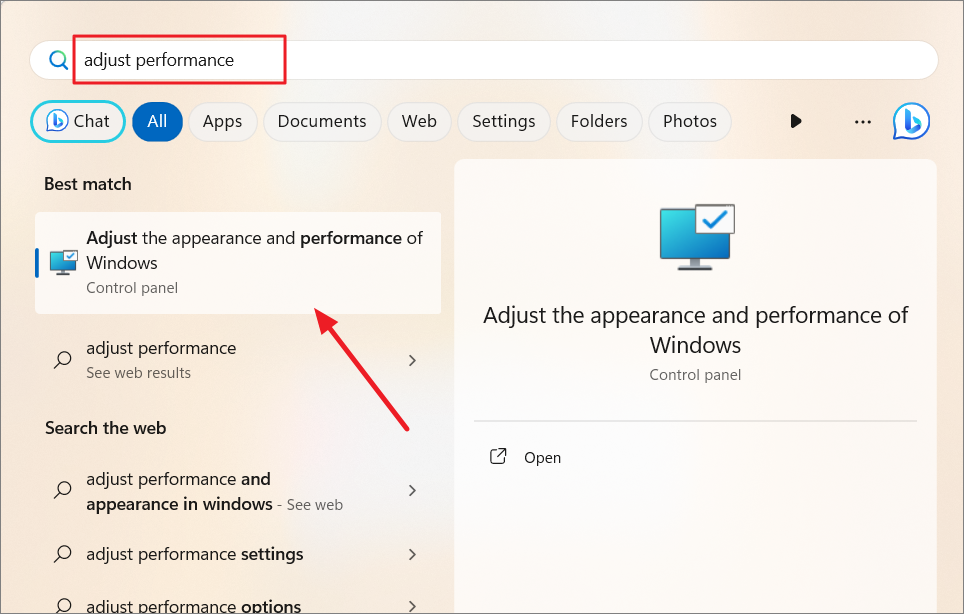
Open the Start menu, type 'Adjust Performance', and select 'Adjust the Appearance and Performance of Windows' from the search results.
Now, select the 'Adjust for best performance' option and click 'Apply'.
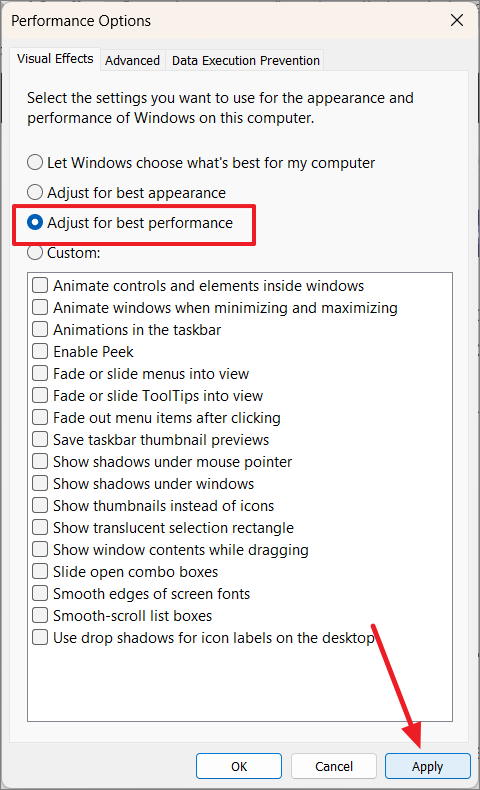
Then, switch to the 'Advanced' tab, and ensure that the 'Adjust the best performance' is set to 'Programs'.

Then, click 'Apply' and then 'OK' to save the changes.
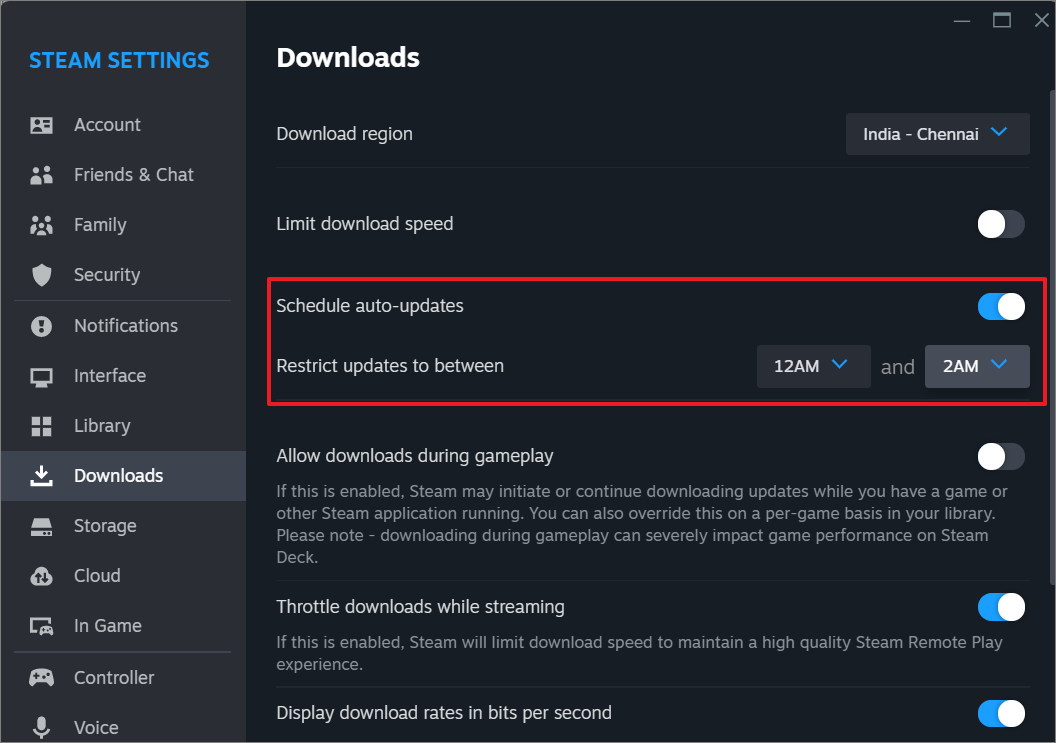
Steam can automatically update 0r download games in the background while you're playing, which can cut down your game performance. By disabling the auto-updates feature on games, you can prevent Steam from using more resources while gaming, resulting in a more seamless gameplay experience on your PC.
Open the Steam app, then click Steam in the upper-left corner, and select 'Settings' .
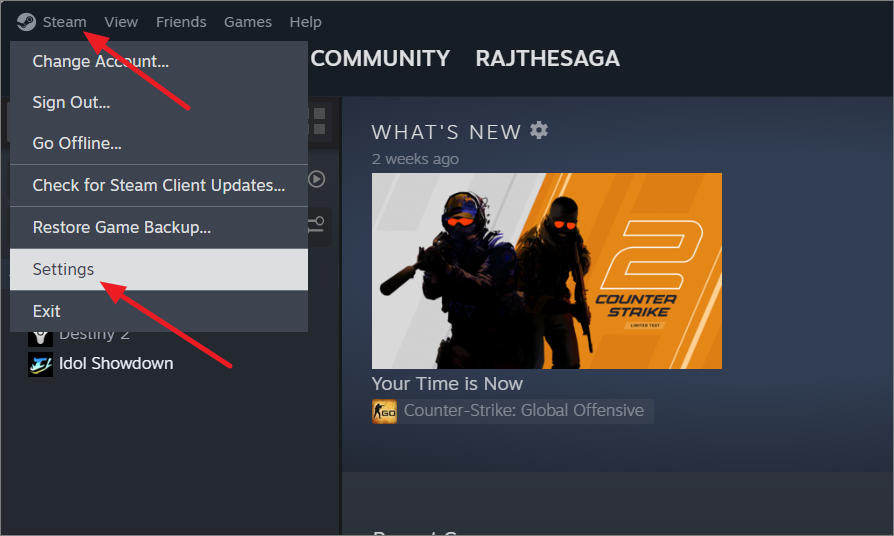
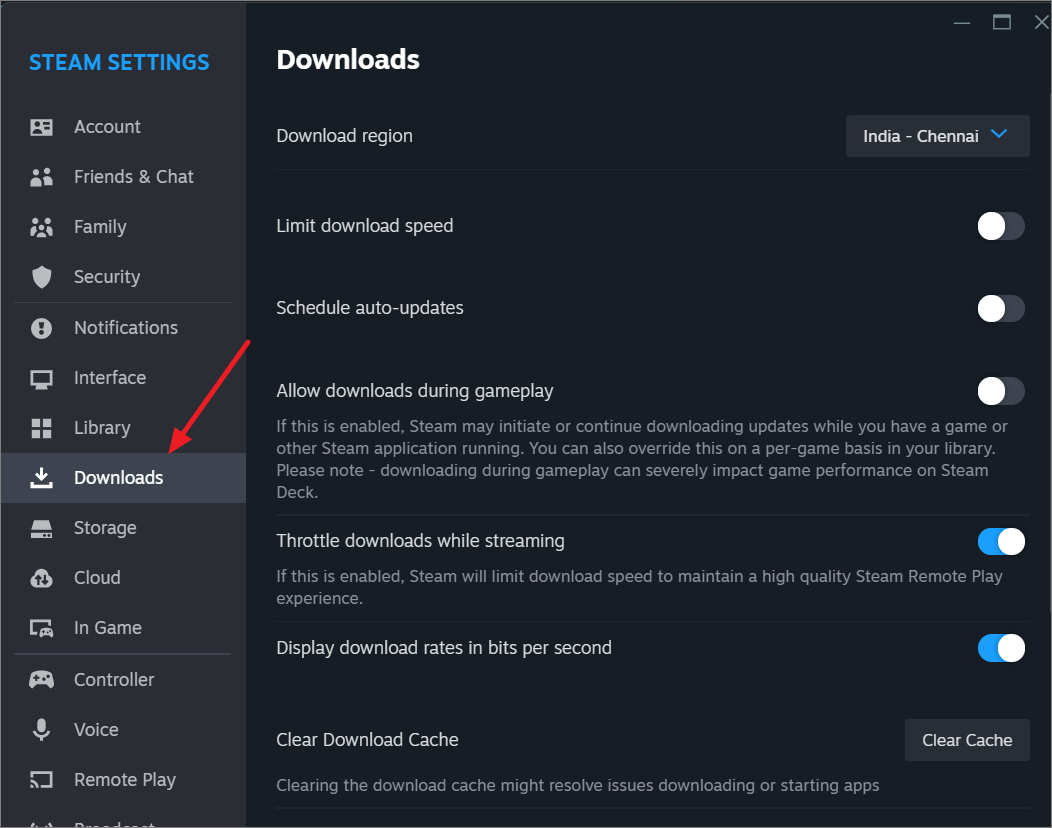
In the Steam Settings, head to the 'Downloads' section on the left.
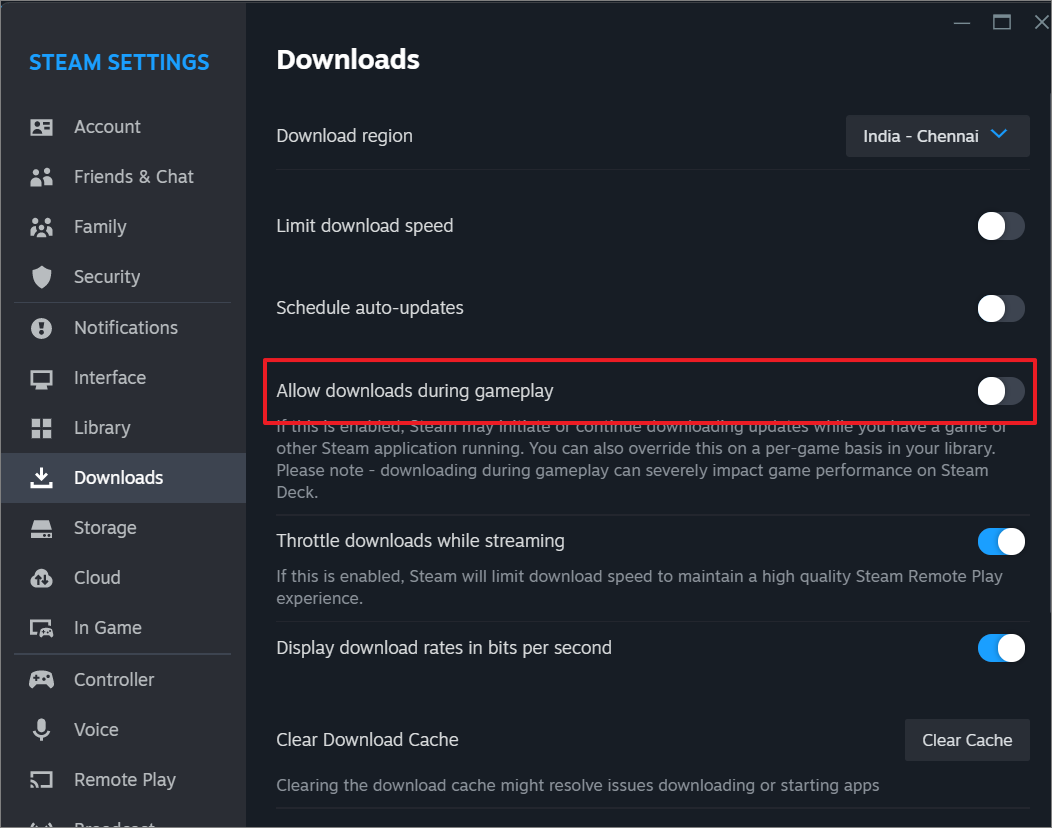
Then, turn off the 'Allow downloads during gameplay' toggle.
You can also schedule game updates for times when you're not using your computer. Just turn on the 'Schedule auto-updates' toggle and choose a time when your system is typically idle or when you're not actively playing games. This way, updates won't interfere with your gaming.
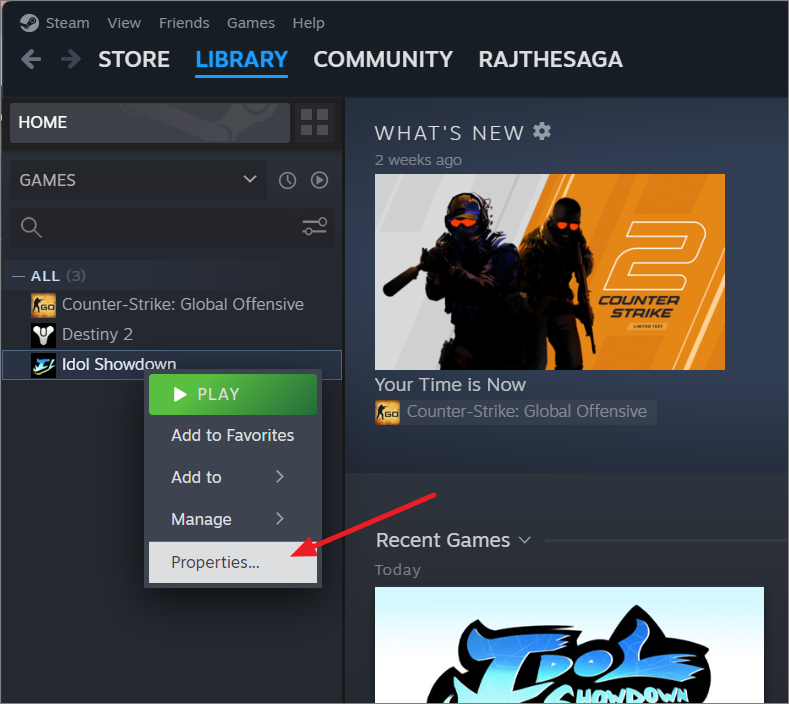
You can also set auto-updates and background downloads per-game basis. To do that, click 'Library' in the menu bar, and select 'Home'.

Right-click on the game in the left panel and select 'Properties'.
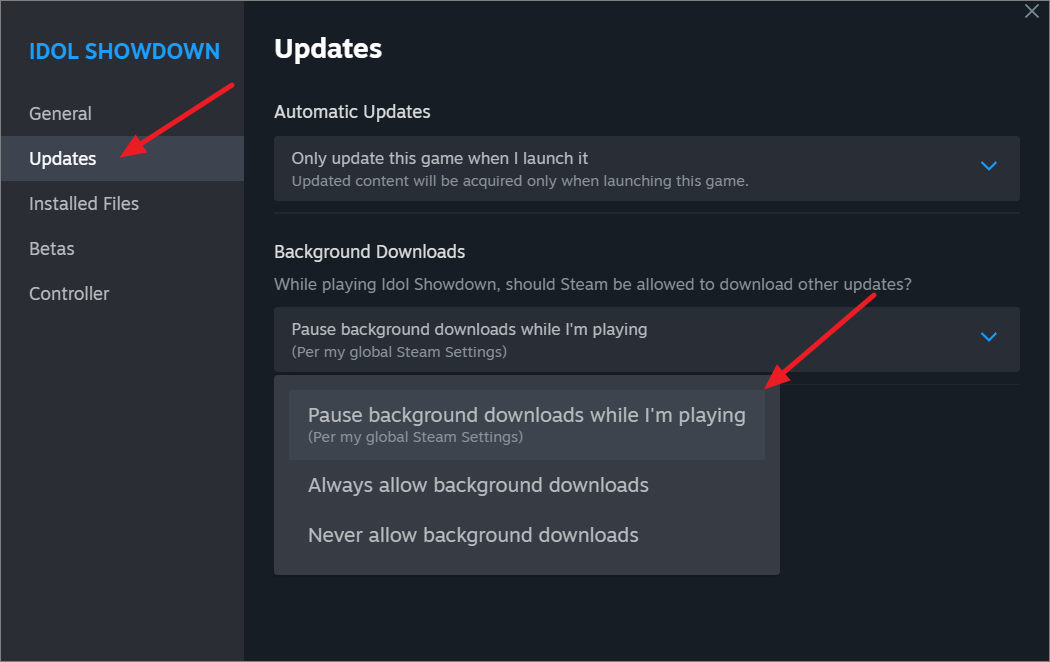
In another window that appears, go to 'Updates' and select 'Pause background downloads while I'm playing' from the drop-down below 'Background Downloads'.
Getting notifications while gaming can be a real buzzkill. They're not just annoying; they can also interfere with full-screen games, sometimes causing them to crash. Game Mode and apps like Game Booster can temporarily silence notifications, but if you want to get rid of them completely, make sure that the notifications are disabled before your next game.
Open Windows Settings and 'Notifications' under the 'System' settings.
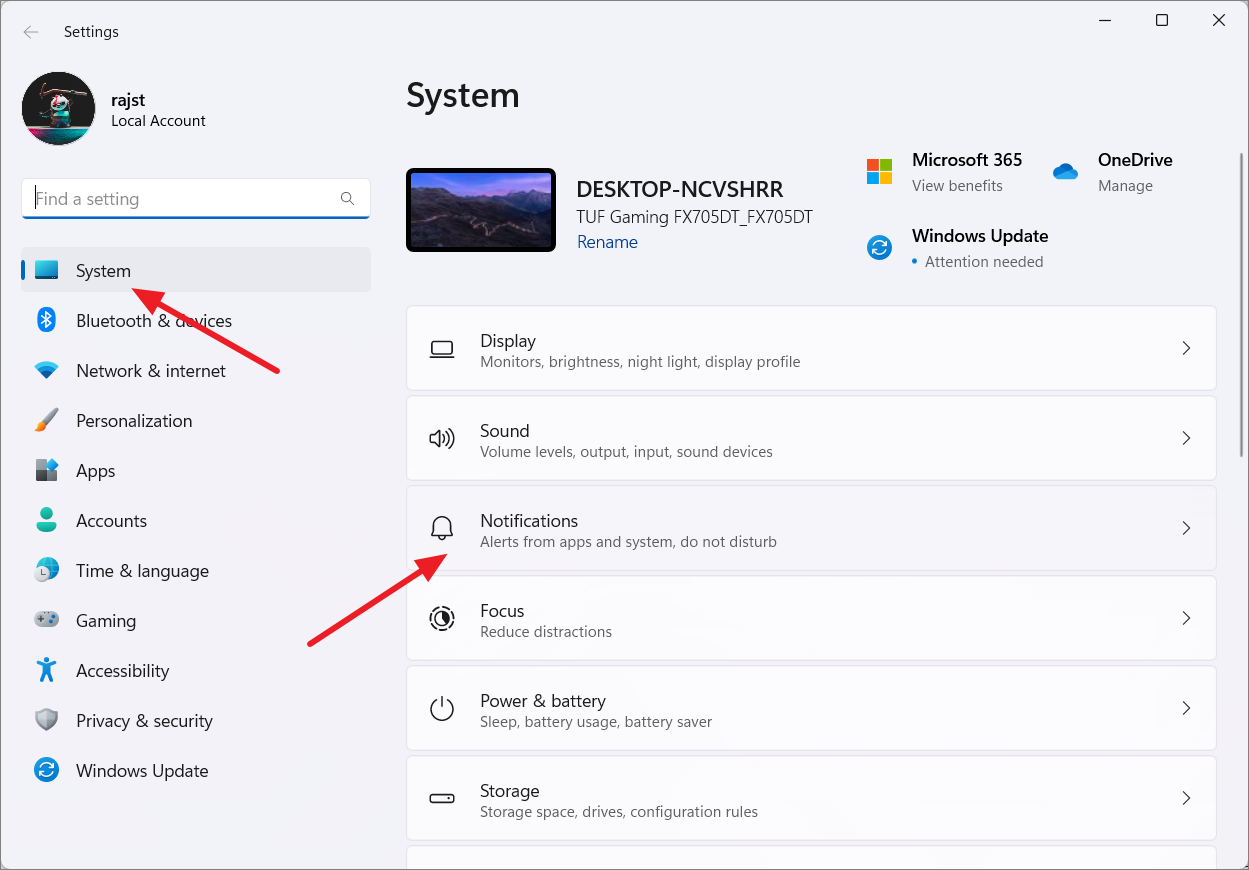
Then, turn off the 'Notifications' toggle to completely disable it.

18. Tweak In-Game Graphics Settings
If you notice your game starts to lag, it could be because your graphics card may not be up to the task, or you might be trying to play a graphics-intensive game on a less powerful system. So, the best thing to do is to lower or disable some of the game's graphics-intensive settings, as it can improve FPS by reducing the load on the graphics card.
Every game offers graphical settings that can be fine-tuned to enhance performance according to your hardware's capabilities.
Launch your game and navigate to the 'Graphics' settings.
Most recent gaming computers can easily handle 1080p ( 1920 x 1080) gaming at 60FPS without much trouble. However, when it comes to supporting higher resolutions like 4K or 2K, some PCs might struggle, and your typical office laptop might even have a hard time with 1080p gaming. So, try lowering your screen resolution to find a good balance between quality and higher FPS.
Tweaking your in-game graphics settings, like anti-aliasing, shadow quality, V-sync, ambient occlusion, and texture quality, can make our gameplay smoother. It's all about finding the right balance between visual appeal and performance to ensure the best gaming experience.
In some games, you'll come across simple graphical options like ultra, high, medium, and low presets. You can try changing it to Low or Medium to achieve optimal performance.
Both Nvidia and AMD graphics drivers come with their own control panels, which enable you to customize and adjust various graphics settings. Adjusting a couple of settings in the GPU control panel can do a lot for your gaming performance.
Open the system tray in the taskbar corner, right-click the NVIDIA icon, and select ‘NVIDIA Control Panel’ from the context menu.
Once the NVIDIA Control Panel opens, click the ‘Manage 3D settings’ in the left panel and make sure, you’re on the ‘Global Settings’ tab on the right.
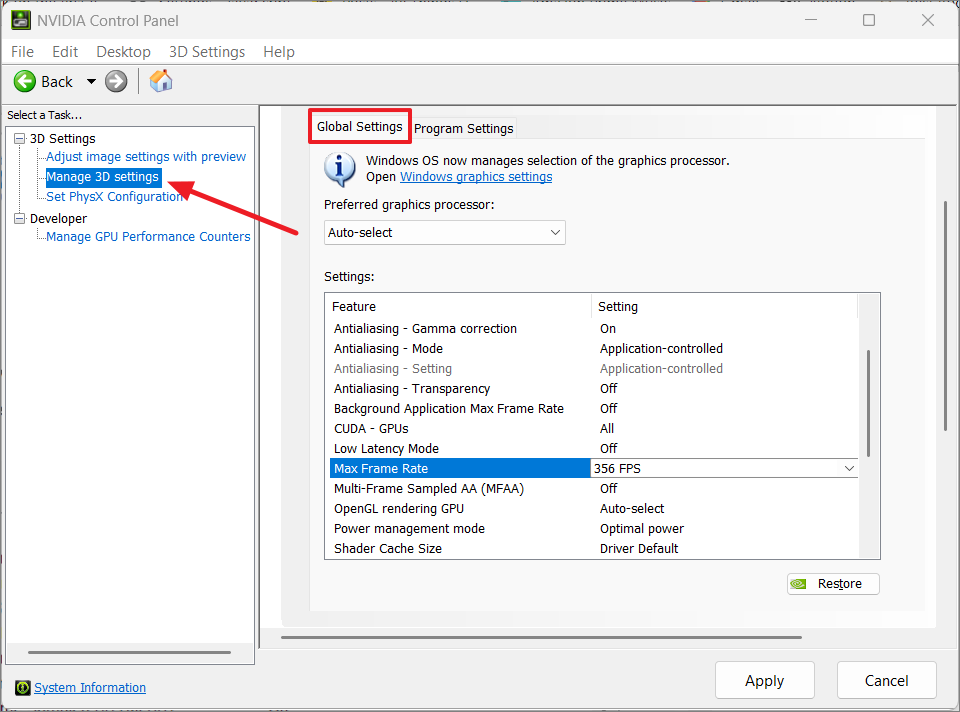
Then, click on the drop-down next to 'Max Frame Rate'.

Set the Max frame rate to the refresh rate of your monitor and click 'OK' to save the setting.
After that, set 'Power management mode' to 'Prefer maximum performance'.
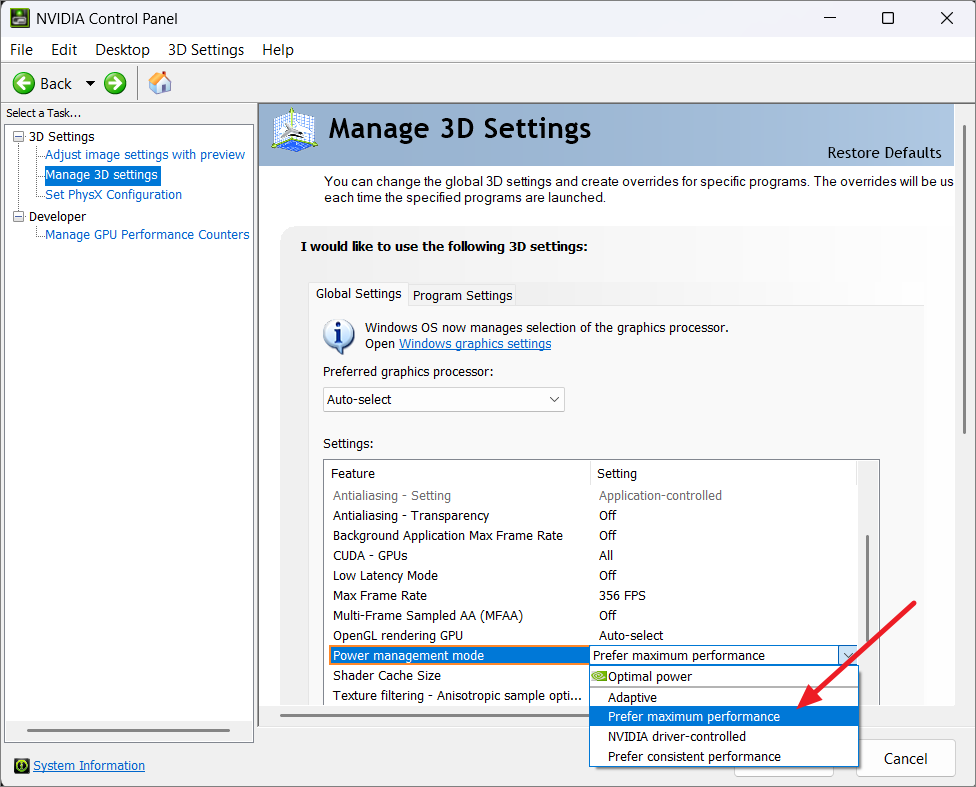
Finally, click 'Apply' to save the changes.
For AMD GPUs:
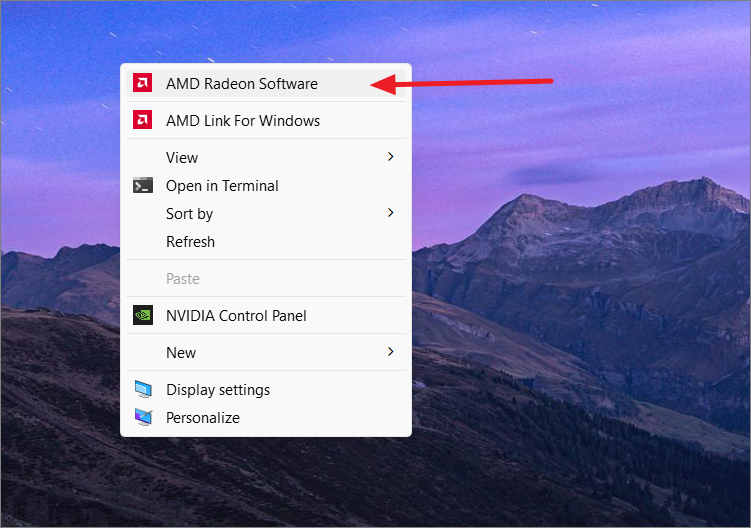
If your computer has AMD graphics, right on the desktop, select 'Show more options'.
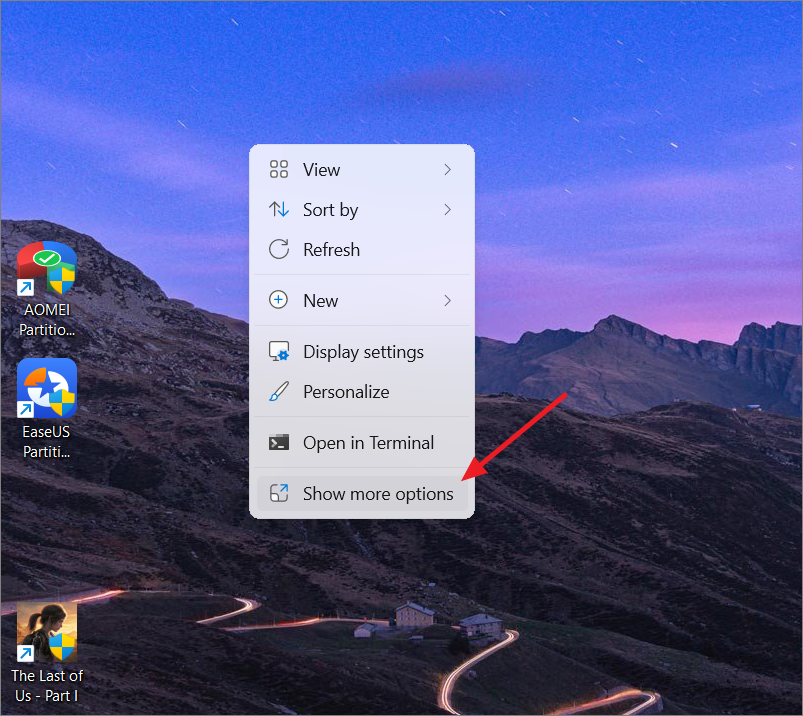
Then, select 'AMD Radeon Software' from the classic context menu.
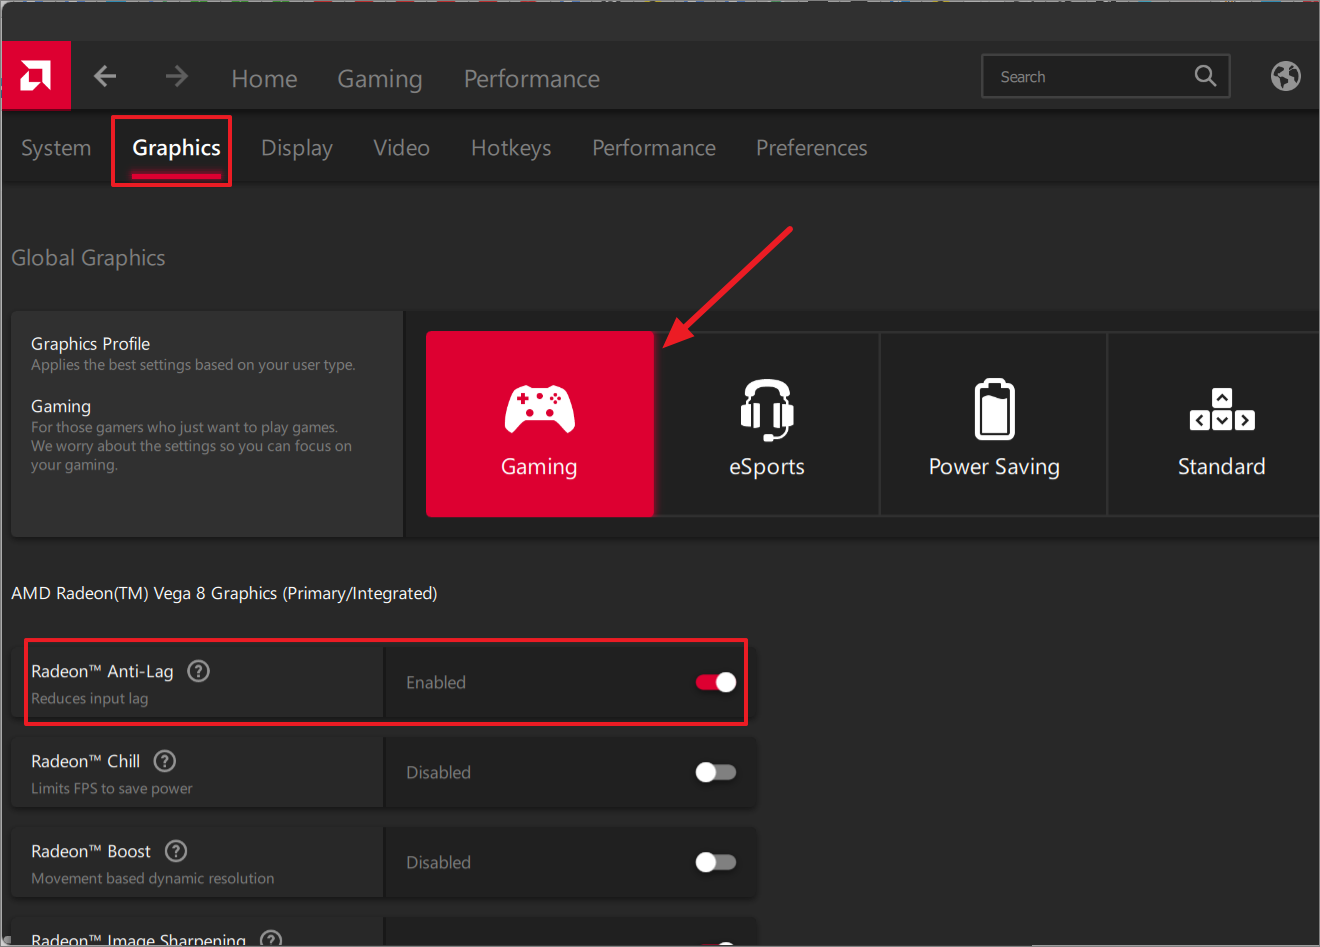
When the AMD Radeon Software opens, switch to the 'Graphics' tab and select the 'Gaming' profile. After that, turn off the 'Radeon Anti-Lag' toggle.
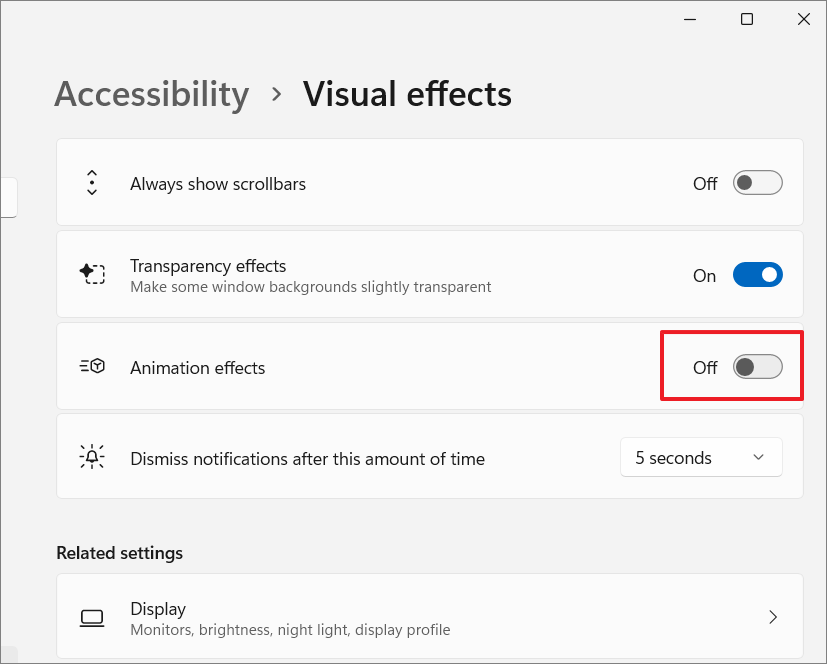
If you're more interested in speed over aesthetics, you might want to think about disabling animations. Windows 11 has some sleek animation effects that enhance its overall look, but they can potentially slow down your system.
In the Windows Settings , navigate to 'Accessibility' from the left menu, and select 'Visual effects' on the right side.
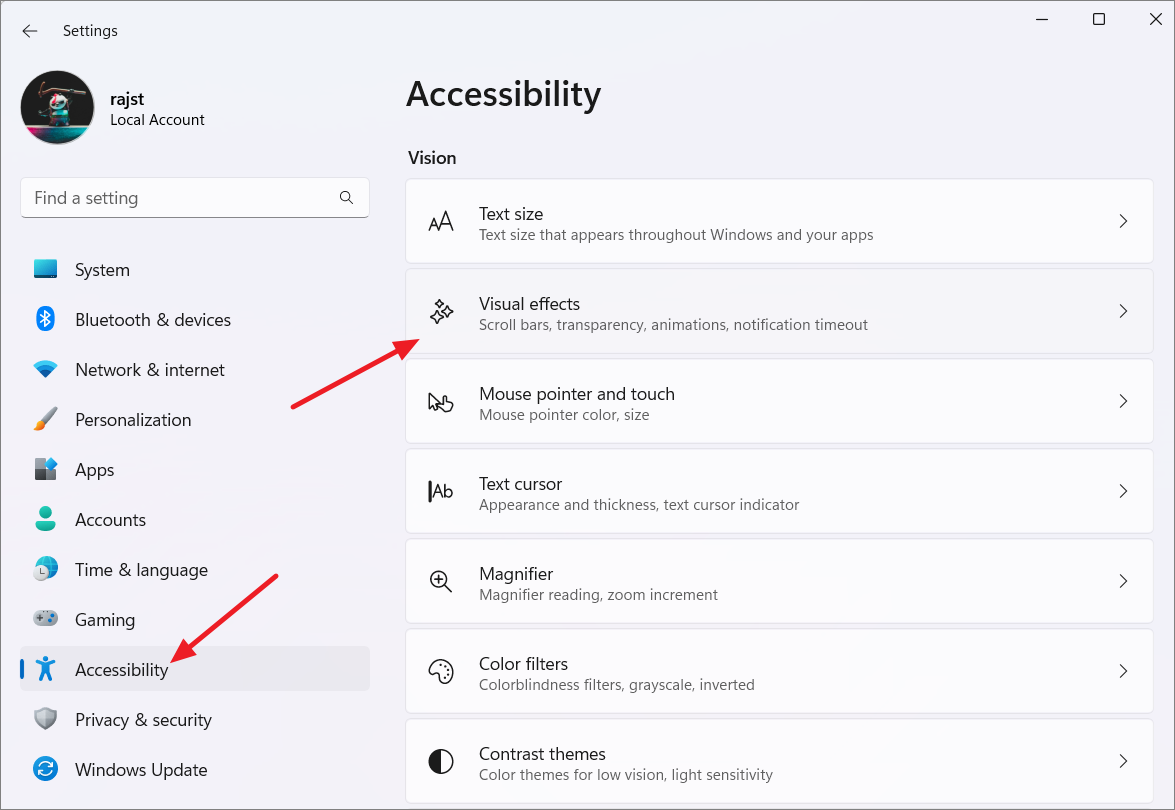
Next, turn off the 'Animation effects' toggle.
The new updates should help your system by providing security patches and bug fixes. However, there have been many cases where new updates caused problems with the games. Therefore, it might be a good idea to turn off the automatic update feature during your gaming sessions and choose when to update Windows according to your own schedule.
Open the Settings app and head to 'Windows Update'.
Now, you can pick how long you'd like to temporarily stop updates drop-down next to the 'Pause updates' option.
If your computer or laptop runs on a traditional hard disk (HDD), consider upgrading to Solid State Drive (SSD). SSDs are much faster than traditional Hard Disk Drives (HDDs) when it comes to reading and writing data.
Installing games on an SSD enhances your gaming experience by offering faster loading times, smoother gameplay, and quicker updates. SSDs are also more reliable than traditional HDDs, although they can be a bit pricier. Overall, they're a great investment for a better gaming experience.
Your gaming performance can suffer due to DNS problems, especially in online gaming. Many internet service providers (ISPs) have their own DNS servers, but they may not always be reliable. It's a good idea to consider switching to faster and more secure DNS providers like Google or Cloudflare to address this issue.
If you notice a drop in gaming performance, especially in online gaming but not during regular gaming, your DNS or internet connection may be the culprit.
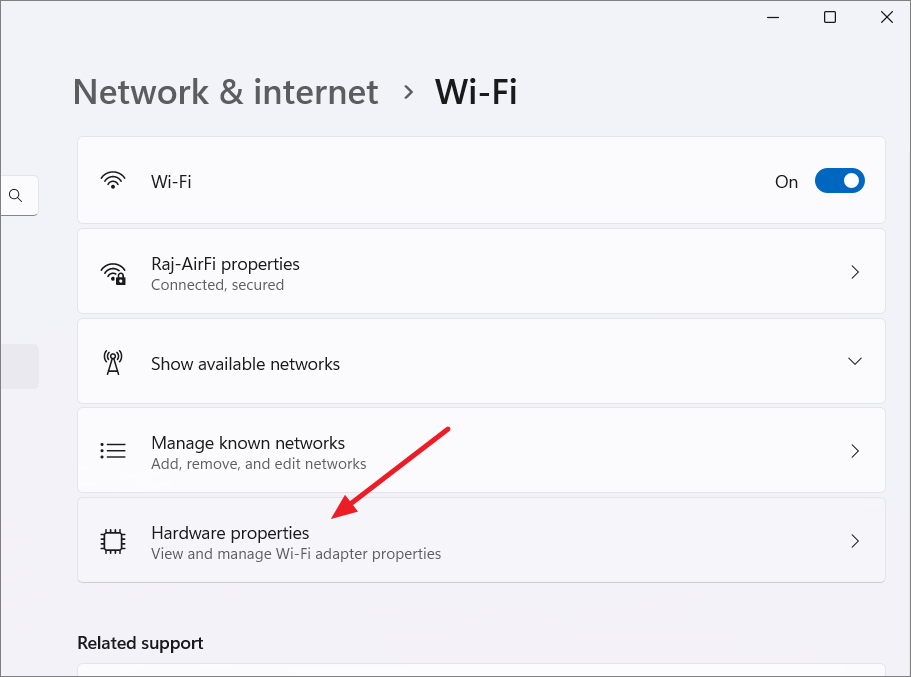
To assign a manual DNS address, launch Windows Settings. Head to 'Network & internet' and select your correct network adaptor. (Wi-Fi or Ethernet).
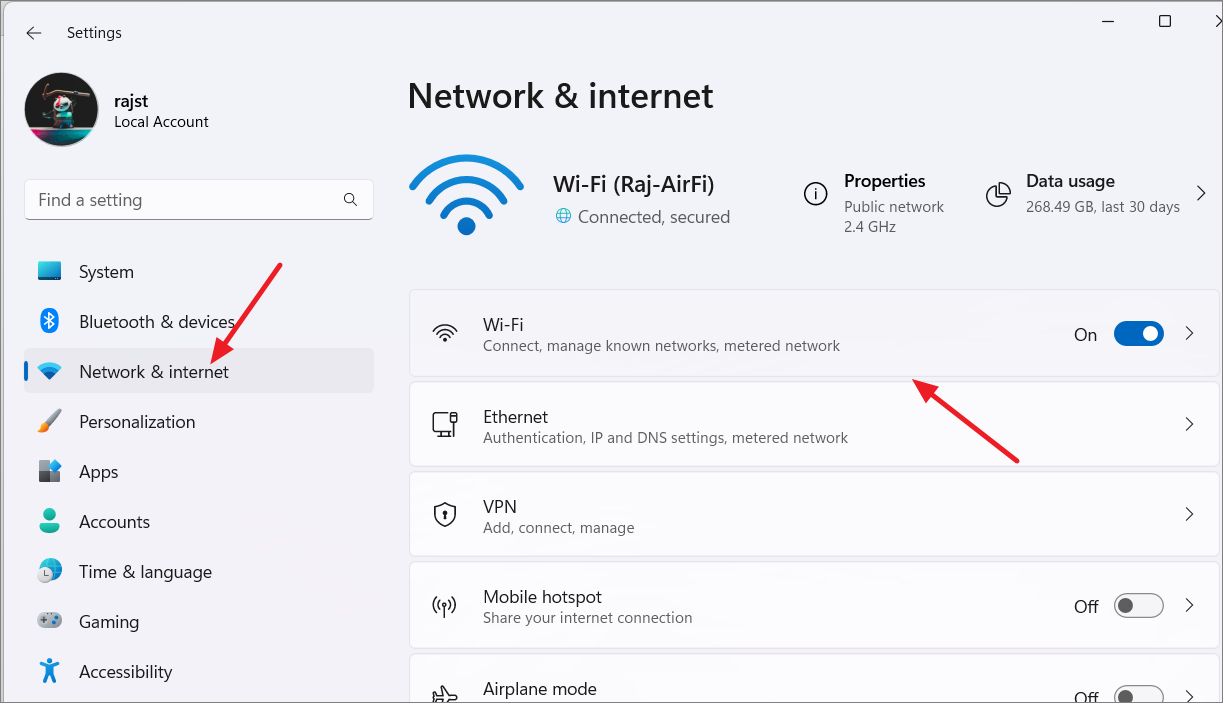
Next, choose 'Hardware properties'.
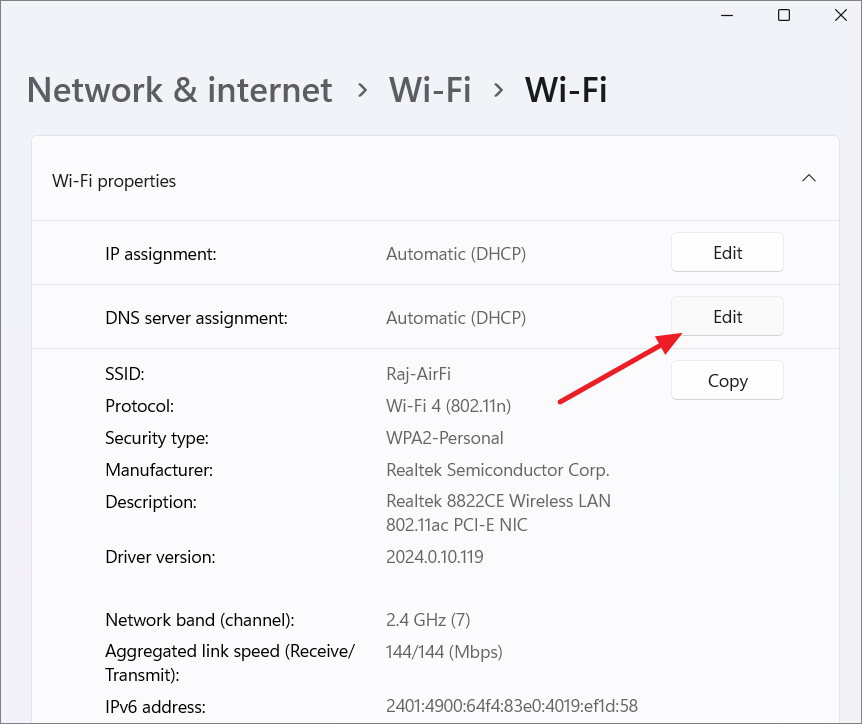
After that, click the 'Edit' button next to the DNS server assignment.
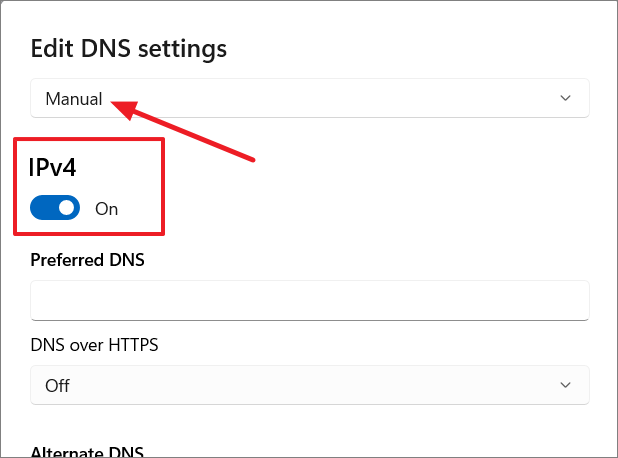
Select 'Manual' from the menu and turn on the 'IPv4' toggle
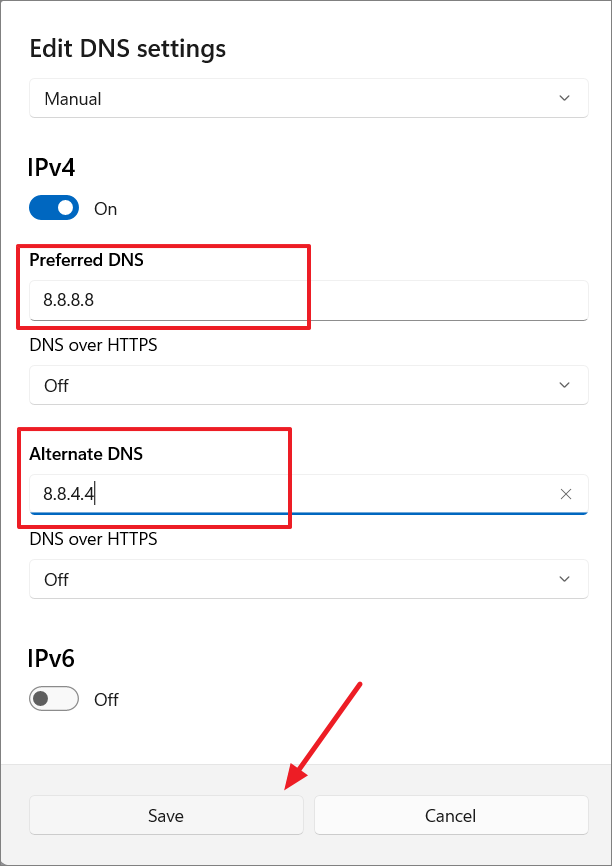
Type in your Preferred and Alternate DNS addresses, and click 'Save'.
If your internet connection is slow with high latency, it can result in game lag and delays. A fast, low-latency broadband connection won't boost your FPS directly but can reduce the lag significantly.
Check your broadband quality; if it's not fast enough or has a high ping when connecting to your favorite game's server, you might want to consider upgrading to a better plan. You can easily test your internet speed using tools like Ookla, Fast.com, Google, and various other websites and apps.
While overheating doesn't directly affect gaming performance, it indirectly affects overall system performance and stability. When your CPU or GPU gets too hot, it can start to throttle, which means it slows down its performance to prevent overheating.
A major reason why PCs can overheat is because dust and cobwebs accumulate on the fans and other parts inside your computer case. To prevent your PC from freezing or slowing down, regularly clean your computer case to keep it within its ideal temperature range.
Another quick way to boost your gaming performance is by Overclocking. When you overclock your graphics card, you can boost its clock frequency and voltage, and you also have the option to control the fan speed. This enables you to find the perfect balance between performance and temperature.
If your BIOS settings have the option to overclock your PC, you can use it to overclock your PC, or you can use third-party tools like MSI Afterburner for the GPU and CPU Tweaker for the CPU. Be cautious, though, as it can potentially damage your hardware if not done correctly.
In Windows 11, there's a 'Record what happened' feature that allows you to capture video of your in-game moments using a shortcut. However, keeping this feature enabled means it runs in the background, using up system resources and potentially affecting your computer's performance, especially if you're using lower-end PCs.
Although the feature effect on gaming performance is generally minimal, disabling it may improve performance on some PCs. Here’s how you do it:
In the Settings app, navigate to 'Gaming', and then select 'Captures'.
Then, turn the 'Record what happened switch' to the off position.
To start improving your Windows 11 for gaming, make sure you've installed the most up-to-date graphics drivers as the first step.
The first step towards optimizing your Windows 11 for gaming is to ensure you have the latest graphics drivers installed. Graphics drivers play a crucial role in rendering images and videos on your screen. Keeping them up-to-date ensures you have access to the latest bug fixes, optimizations, and performance improvements specific to your GPU.
There are various third-party software tools available that can help boost your PC's gaming performance. They often do this by turning off unnecessary background processes and services, which frees up valuable CPU and RAM resources for your games.
Additionally, some game optimizers allow you to customize in-game settings to find the right balance of performance and visual quality. Some of the popular optimizer tools used by gamers to enhance their gaming performance are Razer Cortex , MSI Afterburner , and Game Fire .
Each of these methods plays a role in maximizing your gaming setup's capabilities, ensuring you have a more enjoyable time playing games on your PC.
If everything else fails and your older PC struggles with modern games, your last resort is a complete system upgrade, which may be costly but offers the best gaming experience.
Alternatively, consider reinstalling Windows 11 if you don't want to spend money on new hardware. Sometimes, years of use can lead to accumulated errors, corrupting Windows files beyond repair, and a reinstallation might improve performance without any extra cost.
Reinstalling Windows can improve performance by providing a clean slate, updating drivers, optimizing the registry, removing malware, reducing bloatware, and allowing for optimized settings.

How to Use Gemini Code Assist in VS Code

How to Code Using AI

Microsoft Copilot Pro Review: There is a lot of Unrealized Potential
Get all the latest posts delivered straight to your inbox., member discussion.

How to Customize Windows 11 Start Menu with Third-Party Apps

Can't Update Windows 11? See If You Have These Apps Installed

How to Update Windows 11 with StartAllBack Installed

How to Fix Missing Icons in Taskbar on Windows 11

How to Disable OneDrive in Windows 11

How to rotate your screen in Windows 11
M ost of us use our computers in the typical landscape orientation, since that's what they're all designed around. That's especially true of laptops, which can't be rotated unless they're also tablets. However, convertible laptops are very common, and many monitors also support rotation (usually called pivot), meaning you can use them in portrait orientation.
However, what many of these screens don't support is detecting their orientation, so if you want to use them vertically, you have to manually rotate the screen in Windows 11. Even if your screen rotates automatically, you may want to turn that feature off. We're here to help with that.
Windows 11: Everything you need to know
The typical method for rotating your screen on Windows 11 requires going through the Settings app. On Windows 10, you had the option to use a keyboard shortcut, but that's no longer possible natively. Here's how you can still do it:
- Open the Settings app.
- Choose System from the side menu.
- Choose Display .
- Landscape (default) - The standard orientation
- Portrait - Rotates your screen 90 degrees to the left.
- Landscape (flipped) - Rotates the screen 180 degrees (making it upside down)
- Portrait (flipped) - Rotates the screen 90 degrees to the right.
- Windows will give you 15 seconds to confirm or revert your changes if it doesn't look right. Click Keep changes if it looks good.
Rotate your screen with keyboard shortcuts
Windows 11 doesn't natively support rotating your screen with keyboard shortcuts, and even on Windows 10, most recent PCs no longer allow this due to the feature being removed in graphics drivers. But thanks to third-party apps, you can still bring that functionality back, Here's how:
- Download Screen Rotate from the Microsoft Store and launch the app.
- Ctrl + Alt + R - Rotates the screen 90 degrees to the left. Keep pressing the shortcut to keep rotating all around.
- Ctrl + Alt + A - Rotates the screen 90 degrees to the left from the default position.
- Ctrl + Alt + D - Rotates the screen 90 degrees to the right from the default position.
- Ctrl + Alt + S - Rotates the screen 180 degrees so it's upside down (compared to the default position).
- Ctrl + Alt + D - Restores the screen to the default position.
- If the shortcuts above aren't ideal for you, you can launch the Screen Rotate app and click the Cog icon .
- Click the dropdown menu next to each option to choose one of the shortcuts for a specific rotation.
- Close the window and you should be able to use the new shortcuts you selected.
Turn auto-rotate on or off
If your PC has the hardware to automatically rotate the screen, you can toggle whether it should rotate automatically or not. There are two ways to do this in Windows 11.
Using Quick Settings
The easiest method is to use the Quick Settings panel:
- Click the battery, internet, or sound icons in the right corner of the taskbar.
- If your PC has hardware to detect rotation, you should see a Rotation Lock button.
- If the button is colorless, click or tap it to enable the rotation lock and keep the screen in the same position.
Using the Settings app
You can also turn the rotation lock on or off using the Settings app:
- Head to the System section on the left.
- Click Display .
- Find the Rotation toggle and set it to On if you want the screen to rotate freely or Off if you want it to stay in the same position.
Use rotation to perfect your setup
Whether you have some monitors you want to use vertically or a 2-in-1 laptop, these steps can help you get the most out of your devices. It's also fairly easy to revert the process, so if you just want to play around, you have nothing to fear.

IMAGES
VIDEO
COMMENTS
Learn how to use the new flip-model presentation for DirectX 10 and DirectX 11 games that appear in a window or in a borderless window on your PC. Find out how to turn on or off optimizations for windowed games, Auto HDR, and other graphics settings in Windows 11.
More technically, we are moving apps from the legacy blt-model presentation to modern flip-model. Many games already take advantage of modern flip-model, but this new optimization will allow thousands of games to benefit as well. ... No there's fundamental issues with upgrading to Windows 11 right now, some games perform bad due to driver ...
More technically, we are moving apps from the legacy blt-model presentation to modern flip-model. Many games already take advantage of modern flip-model, but this new optimization will allow thousands of games to benefit as well. But we called this an optimization, so it does more than just unlock stellar gaming features.
Although DirectX 12 (DX12) already takes advantage of a new presentation mode called "flip-model", Microsoft is now rolling out this enhancement to DX10 and DX11 games too.
Learn how to use Optimizations for windowed games to improve latency and unlock features like Auto HDR and VRR for Windowed and Borderless-Windowed DX10/DX11 games on Windows 11. This feature is only available in the Windows Insider Program and requires a compatible game to be running in a Windowed or Borderless-Windowed environment.
Turn On or Off Optimizations for Windowed Games Per-App in Settings. 1 Open Settings (Win+I). 2 Click/tap on System on the left side, and click/tap on Display on the right side. (see screenshot below) 3 Click/tap on Graphics on the right side. (see screenshot below) Open Graphics settings .
To enable optimizations for windowed games on Windows 11, use these steps: Open Settings on Windows 11. Click on System. Click the Display tab. Under the "Related settings" section, click the Graphics setting. Under the "Default settings" section, click the "Change default graphics settings" option. Turn on the " Optimizations for ...
The optimization upgrades the legacy presentation model that DirectX 10 and 11 games use when they run in windowed or borderless-windowed mode to the new presentation mode that Microsoft introduced in DirectX 12. Fisher explains: More technically, we are moving apps from the legacy blt-model presentation to modern flip-model.
With new Windows 11 Insider updates come exciting new features. The latest? A setting that should give MUCH better latency for games running in Windowed/Wind...
synthjunkie. •. Enable it. This allows games that run on DX11 and DX10 to run as Windowed mode with no latency. Like running it as full screen. This means you can run games at full screen windowed mode and go to your second monitor (if you have one) and it won't minimize the game. Neat feature. DX12 games already have this optimization in the ...
With these new optimization, Windows is updating these older titles to use the modern flip-model which drastically reduces latency when run outside of fullscreen mode. To activate these new optimizations on Windows 11, just head to your systems Default Graphics Settings and turn on the new "Optimizations for windowed games" setting.
Flip model generally results in lower latency. Reducing latency means getting your game's frames to the screen as fast as possible. You'll have the chance to opt out of the windowed games ...
Support for newer gaming features: Some newer gaming features, such as Auto HDR and variable refresh rate, require the use of the newer flip-model presentation. Optimizing for windowed games will ...
2. Click on the Game Mode option and then turn on the Game Mode toggle. 2. Let the Game Use Primary GPU. Another thing you should do before launching a game on your Windows 11 PC or laptop is to allow it to use your system's primary graphics card or GPU for higher performance.
The presentation model Windows ends up using for a game can be inspected using either Special K's control ... (available on Windows 11 and only relevant for games running in one of the two window modes). Special K's automatic flip model override performs this functionality on Windows 10 and earlier versions of Windows 11 where the OS ...
In the Settings app, go to 'Gaming' and click on 'Game mode'. Then, toggle the Game Mode switch to the On position. 2. Choose High Performance Power Plan. If you are gaming on a laptop, switching your power plan to 'High Performance' in Windows can help optimize your system for gaming.
I don't know about input latency but I can confirm that completely fixed some stuttering issues on some games while using borderless window mode on those. 2. notinterestinq. • 2 yr. ago. Works great. Promotes games to hardware composed:independent flip. If you have working MPOs then it's even better.
The typical method for rotating your screen on Windows 11 requires going through the Settings app. On Windows 10, you had the option to use a keyboard shortcut, but that's no longer possible natively.
I am trying to figure if I should activate or deactivate the option for the flip model for windowed games, when I am using this system only for Virtual Reality gaming in steamVR. I learned I have much too less knowledge to overview "what has to do with what".