How-To Geek
How to add and remove slide numbers in google slides.
Slide numbers are a good reference points and make for professional looking presentations.

Quick Links
Add slide numbers in google slides, remove slide numbers in google slides.
Slide numbers in a presentation are helpful for referring to a particular slide, using a table of contents , or simply making the show more professional. We'll show you how to add and remove slide numbers in Google Slides.
You have flexibility when adding slide numbers in Google Slides. You can number all slides, only certain ones, or all but title slides. If you change your mind later, removing those slide numbers takes only a couple of clicks.
Related: How to Add Slide Numbers in PowerPoint
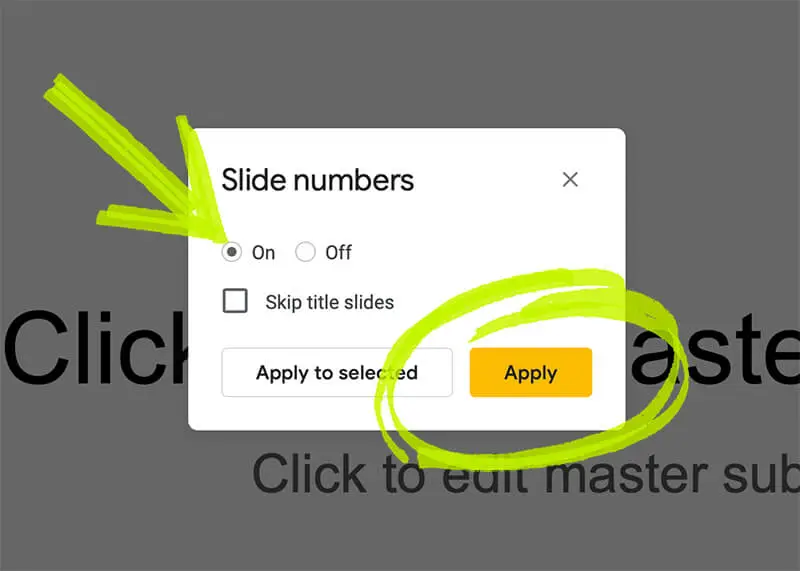
Visit Google Slides , sign in, and open your presentation. To add numbers to all slides, select Insert > Slide Numbers from the menu.
When the Slide Numbers box appears, mark the option for "On" and click "Apply."
To number all slides except title slides, check the box for that option before you hit "Apply." Title slides are those that use the Title Slide layout.
To add numbers only to certain slides, select the slides first.
- To select a range of adjacent slides, click the first slide, hold Shift, and click the last slide in the range.
- To select a range of nonadjacent slides, click the first slide, hold Ctrl (Windows) or Command (Mac), and click each additional slide.
Once you select the slides, then go to Insert > Slide Numbers. Mark the option for "On" and then click "Apply to Selected."
You can also use this option if you want to add slide numbers to various slides one at a time. Just select the slide to make it the active one and add the slide number to it.
While you have flexibility and options for adding slide numbers in Google Slides, it's a bit limited when you want to remove them.
Head back to Insert > Slide Numbers, mark the option for Off, and click "Apply." This removes numbers from all slides regardless of if you have certain ones selected or not.
If you want to remove slide numbers from individual slides, go to a slide, click the number which is contained in a text box, and delete the number.
Related: How to Remove Slide Numbers from PowerPoint Slides
You'll then see "Slide Number" inside the text box instead of the actual number. But you'll only see this while editing, not when you present your slideshow. During your presentation, the box appears blank with no text or number.
If you prefer, you can also delete the text box for the slide number altogether.
For additional ways to improve your Google Slides presentations, look at how to add videos with customized playback or how to insert photos and GIFs in your slideshow .
Home » Google Slides » How to Add and Remove Slide Numbers in Google Slides
How to Add and Remove Slide Numbers in Google Slides
Slide numbers in your Google Slide Presentation are useful in helping you navigate. They can also help you refer to a particular slide. Sometimes you may want to remove the slide numbers from all or a few slides. This tutorial shows you how to add and remove slide numbers in Google Slides.
Let us begin.
How to Add Slide Numbers in Google Slides
You can add slide numbers to all the slides, or to all the slides except the title slide, or to a few specific slides.
Step #1: Open your Google Slides presentation
Open your presentation from the Google Slides home screen at slides.google.com .
Step #2: Add the slide numbers
Click on Insert in the main menu.
Click on Slide numbers from the dropdown menu that opens.

The Slide numbers dialog box opens.
Select the On option and click the Apply button.

Slide numbers are added in the bottom right corner of each slide.
Check the Skip title slides checkbox and then click the Apply button. All the slides are numbered except the title slide.

Adding slide numbers to selected slides only
First, in the navigation pane on the left, select the slides to which you want to add slide numbers.
To select one slide, click it.
To select adjacent slides, select the first slide, hold down the Shift key and select the last slide.

A yellow border surrounds each selected slide.
To select non-adjacent slides, first select the first slide. Then hold down the Ctrl key ( Command on Mac) and click each non-adjacent slide to select it.

A yellow border surrounds each selected non-adjacent slide.
On the Slide numbers dialog box, select the On option and click the Apply to selected button.

Slide numbers are applied only to the selected slides.
How to Remove Slide Numbers in Google Slides
You can remove slide numbers from all slides at once or from one slide at a time.
To remove slide numbers from all slides, from the Insert menu, click on Slide numbers.
Note : It is not necessary to select the slides first.
In the Slide numbers dialog box, select the Off option and click the Apply button.

Slide numbers are removed from all the slides.
To remove slide numbers from individual slides, click the slide number. Its container text box is activated.

Select the number contained in the text box and press the Delete key.
You can also select the text box and press the Delete key or Backspace key. This deletes the text box together with the slide number.
The slide number is replaced with the words “Slide number.”

Note that these words only appear on the slide during editing. During the slide presentation, the text box appears blank without a slide number.
Slide numbers in your Google Slides are useful in helping refer to a particular slide. They also help you to know where you are in your presentation. Sometimes you may want to remove the slide numbers from all or a few slides. This tutorial explained how to add and remove slide numbers in Google Slides.
Leave a Comment Cancel reply
Save my name, email, and website in this browser for the next time I comment.
How to Number Slides in Google Slides
When you are working on a presentation in an application like Microsoft PowerPoint or Google Slides, ensuring that your on-slide content is accurate and looks good is likely the top priority.
But once the slides themselves are ready to show, you often need to make some formatting changes to the presentation so that it is easy for others to navigate or absorb.
One such item that you might consider is using slide numbers. This makes it easier for you to keep your own place, but it also helps your audience make notes or remember where a specific bit of information was.
You can add slide numbers to a Google Slide slideshow by going to Insert > Slide numbers > then checking the On option and clicking Apply.
Page numbers are important and often a requirement for documents that you create in programs like Google Docs or Microsoft Word, but they can be very helpful for other types of documents as well.
In the case of presentations in Google Slides it can help you keep on track if you are working off a printed version of the presentation, or they can serve as a helpful reference point on the displayed slides if you are presenting digitally.
While you may have previously added slide numbers manually, it can be difficult to keep them up to date if you are adding new slides or deleting old ones.
Fortunately, you can add a slide number element in Google Slides that will update automatically and help to ensure that your numbering remains accurate.
How to Add Slide Numbers in Google Slides
- Open your slideshow.
- Click Insert .
- Select Slide numbers .
- Choose On , then click Apply .
Our guide continues below with additional information on numbering Google Slides presentations, including pictures of these steps.
How to Add Page Numbers in Google Slides (Guide with Pictures)
The steps in this article were performed in the desktop version of Google Slides. This is going to add a page number to every slide in your presentation.
If you include additional slides or remove any slides after adding page numbers (such as you could do by following this guide ), then the page numbers will adjust accordingly.
Step 1: Sign into your Google Drive account and open the Google Slides file to which you want to add slide numbers.
Step 2: select the insert tab at the top of the window..

Step 3: Click the Slide numbers option near the bottom of this menu.

Step 4: Select the circle to the left of On , then click the Apply button.
Note that you can also elect to skip title slides if you so choose.

Our tutorial continues below with additional discussion on slide numbers in a Google Slides slideshow.
More Information on How to Add Page Numbers in Google Slides
You will notice that there is also an “Apply to selected’ button that is on this dialog box.
If you select some of the slides in your presentation before going to Insert > slide numbers , then you enable the slide numbers and click Apply to selected , then Google Slides will only add numbers to the slides that you selected.
If you decide later that you want to remove the numbers from your slides then you simply need to return to the Slide numbers dialog box and choose the Off option on that menu.
You might be curious on why there is a specific option to skip a title slide on this menu. When you are creating a Google Slides presentation and you know that you have a particularly discerning audience, then you might want to maximize the effectiveness of the information that you are presenting.
While slide numbers are useful on almost all the slides in a presentation, they can be distracting on a title slide that could be on screen for a long time while you are waiting to begin a presentation.
If you want to use this setting that you will need to go to your slide master at Slides > Edit theme and select one of the slides there to be the “title slide” if you don’t have one already.
You can then select a slide in your presentation that you want to make a title slide, then click Slide > Apply layout > Title slide.
As with most other changes that you might need to make in Google Slides you can apply this to multiple slides at once by holding down the Ctrl key to select more than one slide, then perform the desired action to make a change to each of those selected slides.
Is there a slide in your presentation that you don’t need to show for a particular audience? Find out how to skip a slide in Google Slides so that you don’t show the slide, but can keep it in the event that you need it in the future.
Additional Reading

Kermit Matthews is a freelance writer based in Philadelphia, Pennsylvania with more than a decade of experience writing technology guides. He has a Bachelor’s and Master’s degree in Computer Science and has spent much of his professional career in IT management.
He specializes in writing content about iPhones, Android devices, Microsoft Office, and many other popular applications and devices.
Read his full bio here .
Share this:
- Click to share on Twitter (Opens in new window)
- Click to share on Facebook (Opens in new window)
- Click to email a link to a friend (Opens in new window)
- Click to share on LinkedIn (Opens in new window)
- Click to share on Reddit (Opens in new window)
- Click to share on Pinterest (Opens in new window)
- Click to share on Tumblr (Opens in new window)
Related posts:
- How to Duplicate a Slide on Google Slides
- How to Hide a Slide in Google Slides
- How to Change Slide Dimensions in Google Slides
- How to Delete a Slide on Google Slides
- How to Delete Multiple Slides in Google Slides
- How to Add a Page on Google Docs
- How to Make Columns in Google Slides
- How to Put YouTube Videos in Google Slides
- How to Increase the Transparency of an Image in Google Slides
- How to Change Font on Google Slides Text Box
- How to Add Google Docs Page Numbers
- How to Insert Videos in Google Docs
- How to Print Two Slides Per Page in Google Slides
- How to Add Last Name and Page Number in Word
- How to Download a Single Slide as a Picture in Google Slides
- How to Copy Image from Google Slides
- How to Add a Textbox on Google Slides
- How to Print Multiple Slides on One Page – Powerpoint 2013
- How to Add a Background in Google Docs (An Easy 6 Step Guide)
- How to Rotate an Image in Google Slides
How to Add or Remove Slide Numbers in Google Slides
Want to organize your Google Slides presentation with numbered slides? Here's how you can add or remove it easily.
Google Slides is a web-based tool developed by Google for creating and sharing presentations. If you've created a presentation with Google Slides, one way to keep things tidy is by adding slide numbers to your presentation.
Slide numbers help you organize your slides, and help your audience keep track of the presentation. In Google Slides, you can enable slide numbers so that Google Slides automatically numbers each slide. Furthermore, you can customize the slide number to match your preferred looks.
How to Add Slide Numbers in Google Slides
You can add slide numbers to your presentation with a couple of clicks in the Insert menu.
- Open your presentation in Google Slides.
- Go to the Insert menu.
- Select Slide numbers from the bottom of the menu. A dialog will appear.
In the Slide numbers dialog, select Apply if you want to number all slides. Otherwise, return to Google Slides and select the slides that you want to number and return to Slide numbers to select Apply to selected .
If you check Skip title slides , slides that have the title slide formatting will not be numbered. The title slide is usually the first slide in a Google Slides presentation , and it includes a title and a subtitle.
How to Customize Slide Numbers in Google Slides
Once you add slide numbers to your presentation, these numbers will appear in the bottom-right corner by default. The slide numbers are essentially text boxes, so all the customizations that you can apply to text, you can apply to your slide numbers.
- Right-click on the slide number.
- Select Format options .
In the Format options, you can change the position, angle, and looks of your slide number. For instance, you can give it an angle and also add a drop shadow effect. Changing the color and size of the slide number is done through the toolbar.
- Select the number inside the slide number box.
- Go to the toolbar and increase the font size, or change the font.
You can add more styling, such as bold, italic, or a change of color through the toolbar. Unfortunately, the changes you make to a slide number won't change the numbers in all other slides. If you want to achieve a uniform look, you'll have to change every slide number manually.
How to Remove Slide Numbers in Google Slides
If you don't want to have slide numbers in your presentation, you can remove them the same way you added them.
- Select Slide numbers . A dialog will open.
- Check Off .
- Click Apply .
The slide numbers are gone now.
Keep Track of Your Slides
Slides can get out of hand, especially if you've got too many of them, and they all look alike from afar. One method for organizing your presentation, for both your own and the audience's sake, is numbering the slides.
Now you know how you can number all slides, or just a select few, and then customize them to your liking.
How to Insert a Google Slides Page Number
Choosing to add page numbers to a document, whether it’s a word processing file, spreadsheet, or slideshow, is a little change that can improve the experience of both you as the creator and your audience.
So if you have been wanting to add page numbers to the slides of your Google Slides presentation, then you may be wondering if that option exists.
Google Slides is a great application to use when you need to make a slideshow or presentation for work or school.
It’s simple to use, similar to Powerpoint, and the fact that it automatically saves your presentations to Google Drive helps to ensure that you can access them from anywhere with an Internet connection.
Occasionally your slideshows will be very long, or need to be printed out.
In these situations, it can be tough to remember where you are, or you may have trouble getting a presentation back into the correct order if a printed version somehow winds up in the wrong order.
Fortunately, you can add slide numbers to help resolve these potential problems.
How to Number Slides in Google Slides
- Open your slideshow.
- Click Insert .
- Choose Slide numbers .
- Select Apply .
Our article continues below with additional information on inserting slide numbers in Google Slides, including pictures of these steps.
How to Add Page Numbers in Google Slides Presentations (Guide with Pictures)
The steps in this article were performed in Google Chrome, but should work in other desktop Web browsers as well. Note that this setting is only applied to the presentation that is currently opened. This will not add slide numbers to any existing presentations, nor any future ones that you create.
Step 1: Sign into your Google Drive at https://drive.google.com/drive/my-drive and open the presentation to which you want to add the slide numbers.
Step 2: click the insert tab at the top of the window..

Step 3: Select the Slide numbers item near the bottom of the menu.

Step 4: Choose whether or not you wish to add the slide numbers to title slides, then click the blue Apply button.
Note that there is an “Apply to selected” option if you only want to add slide numbers to some of the slides, instead of all of them. If so, then you will need to select those slides prior to step 2 above.

You can add page numbers in other Google productivity applications as well. For example, this article will show you how to add page numbers in Google Docs for documents that you create in there.
How to Remove Slide Numbers in Google Slides
While many of the other formatting settings that you add or apply to your presentation can be removed by simply clicking them again, these numbers on slides work a little differently.
You will need to return to the Slide numbers pop up window and click the Off button, then click the Apply button to remove numbers that had been previously added to the slideshow.
More Information on How to Add a Google Slides Page Number to Each Slide
Slide numbering in presentation software like Microsoft Powerpoint and Google Slides is useful to you as the presenter, and to your audience. It can be difficult to find a way to easily identify specific slides when your audience asks questions, or when you are editing or collaborating with others.
The slide numbers in Google Slides appear at the bottom right corner of each slide.
You can choose to skip a slide by right clicking on that slide, then selecting the “Skip slide” option. However, the slide numbering will not adjust to accommodate this change. So, for example, if you elect to skip the fourth slide in the presentation then the numbering will jump from three to five in the printed or presented version of the slideshow.
You can remove all of your slide numbers by going to Insert > Slide numbers then choosing the Off option.
One of the options on the slide numbering window is to “skip title slides.” If you choose that option, Google slides will not include page numbers on any slide that uses the title layout. You can change the layout of a slide by selecting the slide from the column at the left side of the window, then clicking the Layout button in the toolbar above the slide. There you can select from any layout for the document, such as section header, one column text, main point, and many others.
While other Google apps like Google Docs or Google Sheets give you some more freedom when adding page numbers to a document, such as placing them in different parts of the header or footer, Google Slides will only add a page number to the bottom right corner of the slide.
The Apply to Selected option on the page numbers menu is interesting, in that it allows you to choose which slides are numbered. So if you only wanted to add numbers to a couple of slides you could select them (by holding down the Ctrl key on your keyboard as you click each slide) then open the slide numbering window and click the “Apply to Selected” button instead of the “Apply button.” Note, however, that this is going to have the same problem with skipped slides that exists when you are numbering the entire presentation.

Matthew Burleigh has been writing tech tutorials since 2008. His writing has appeared on dozens of different websites and been read over 50 million times.
After receiving his Bachelor’s and Master’s degrees in Computer Science he spent several years working in IT management for small businesses. However, he now works full time writing content online and creating websites.
His main writing topics include iPhones, Microsoft Office, Google Apps, Android, and Photoshop, but he has also written about many other tech topics as well.
Read his full bio here.
Share this:
Join our free newsletter.
Featured guides and deals
You may opt out at any time. Read our Privacy Policy
Related posts:
- How to Set Time for Slides in Powerpoint
- Can I Convert My Powerpoint to Google Slides?
- How to Add Page Numbers in Powerpoint 2010
- How to Change the Font on All Slides in Google Slides
- How to Delete Multiple Slides in Google Slides
- How to Unhide a Slide in Powerpoint 2013
- How to Loop a Slideshow on Powerpoint 2013
- How to Add a Border to a Picture in Google Slides
- How to Save a Slide from Google Slides as a Picture
- How to Save Powerpoint as PDF with Notes
- How to Delete a Slide in Powerpoint 2010
- How to Add Bullet Points in Google Slides
- How to Show Speaker Notes in Google Slides
- Google Slides – Change Aspect Ratio
- How to Hide a Slide in Powerpoint 2010
- How to Do a Hanging Indent on Google Docs
- How to Start Page Numbering Later in the Document in Word 2013
- How to Convert Google Slides to PDF
- How to Insert Slides from Another Presentation in Powerpoint 2010
- How to Insert Text Box in Google Docs
Slide numbers in Google Slides

Filter by product
- Accessibility
- Admin console
- Cloud Search
- Directory Sync
- Drive for desktop
- Education Edition
- G Suite for Education
- G Suite for Government
- Google Apps Script
- Google Calendar
- Google Chat
- Google Classroom
- Google Cloud Directory Sync
- Google Docs
- Google Drawings
- Google Drive
- Google Forms
- Google Hangouts
- Google Keep
- Google Maps
- Google Meet
- Google Meet Hard
- Google Meet Hardware
- Google Photos
- Google Sheets
- Google Sites
- Google Slides
- Google Tasks
- Google Vault
- Google Voice
- Google Workspace
- Google Workspace Add-ons
- Google Workspace for Education
- Google Workspace Marketplace
- Google Workspace Migrate
- Marketplace
- Microsoft Exchange
- Microsoft Outlook
- Premier Edition
- Rapid Release
- Rapid Releases
- Scheduled Release
- Security and Compliance
- Weekly Recap
- What's New
Filter by date
Subscribe by feed, subscribe by email, localized google workspace updates, useful links, join the official community for google workspace administrators.
In the Google Cloud Community, connect with Googlers and other Google Workspace admins like yourself. Participate in product discussions, check out the Community Articles, and learn tips and tricks that will make your work and life easier. Be the first to know what's happening with Google Workspace.
______________
Learn about more Google Workspace launches
On the “What’s new in Google Workspace?” Help Center page, learn about new products and features launching in Google Workspace, including smaller changes that haven’t been announced on the Google Workspace Updates blog.
How to Insert a Google Slides Page Number: Step-by-Step Guide
Adding page numbers to your Google Slides presentation can be super helpful when you want to keep things organized or need to reference specific slides. Here’s the quickest way to do it: open your presentation, click on ‘Insert’ in the top menu, then select ‘Slide numbers.’ Choose ‘Apply’ to all slides or select specific slides to number. And voilà, your slides now have neat, little numbers on them!
After you complete this action, you’ll see a small number appear on each slide in the location you chose. This will help you and your audience track the presentation progress and easily refer back to specific slides when needed.
Introduction
Ever found yourself thumbing through a stack of printed slides, trying to find that one crucial point you need to revisit? Or perhaps, mid-presentation, you want to jump back to a particular slide but can’t quickly locate it? This is where the brilliance of page numbers comes into play. Adding page numbers to your Google Slides presentation is like adding a navigational system that guides your audience through the flow of your ideas. It’s a seemingly small addition that has a mighty impact on the effectiveness of your presentation.
For educators, students, professionals, or anyone who uses Google Slides to share information, this topic is incredibly relevant. Page numbers ensure that your audience can follow along seamlessly and make your presentation look more polished and professional. They also make it easier for you to reference certain slides during Q&A sessions, discussions, or collaborative reviews. Whether you’re presenting in a classroom, boardroom, or webinar, knowing how to insert page numbers is a skill that will elevate the quality of your communication. So, let’s dive in and learn how to do just that!
Step by Step Tutorial: Adding Page Numbers to Google Slides
Before we begin, please ensure you have your Google Slides presentation open.
Step 1: Click on ‘Insert’
Click on the ‘Insert’ tab located in the top menu of your Google Slides presentation.
In the ‘Insert’ dropdown menu, you’ll see various options to add different elements to your slides, such as images, text boxes, and shapes. For our purpose, we’re interested in the ‘Slide numbers’ option.
Step 2: Select ‘Slide numbers’
In the ‘Insert’ menu, find and select ‘Slide numbers.’
A new window will pop up, allowing you to customize how your slide numbers will appear.
Step 3: Choose to Apply to All
In the ‘Slide numbers’ window, click on ‘Apply to all’ if you want to number all slides.
If you wish to exclude the title slide or any other specific slides from numbering, simply uncheck the box next to ‘Slide 1’ or any other slides you want to skip.
Additional Information
When you’re adding page numbers to your Google Slides presentation, remember that the default location is usually in the bottom right corner of your slides. However, you’re not stuck with this! You can click and drag the placeholder to move it to a different spot on your slides if you would like. Also, keep in mind that while the font size and style of the page numbers will generally match your slide’s footer, you can change these aspects to suit your preferences or presentation style.
Another thing to consider is that if you’re working on a shared presentation, your collaborators will also see the page numbers you’ve inserted. This can be incredibly helpful for team edits and revisions. Plus, if you’re converting your Google Slides presentation to a PDF or printing it out, having those page numbers can be a lifesaver for maintaining order in your printed materials. Remember, it’s these little details that can make a significant difference in the effectiveness of your communication.
- Open your presentation and click ‘Insert.’
- Select ‘Slide numbers.’
- Choose ‘Apply to all’ or select specific slides.
Frequently Asked Questions
Can i remove page numbers from specific slides.
Yes, you can. When inserting page numbers, simply uncheck the slides you want to exclude from numbering.
Will the page numbers be visible when I print my presentation?
Absolutely, the page numbers will appear on your printed slides just as they do in the digital version.
Can I change the font and size of the page numbers?
Indeed, you can customize the font, size, and color of the page numbers to match your presentation’s design.
What if I add new slides after numbering?
New slides will automatically follow the numbering sequence, and you won’t need to insert numbers for them again.
Can I move the location of the page numbers?
Yes, you can click and drag the page number placeholder to move it to a different location on your slides.
Mastering the skill of inserting page numbers in your Google Slides presentation can have a remarkable effect on your ability to communicate effectively. It’s a simple addition that brings clarity, professionalism, and ease of reference to your slides, whether during a live presentation or in printed format.
By following the steps outlined in this article, you can confidently add page numbers and elevate your presentation game. Remember, it’s the small details like this that can set you apart and ensure your message is received loud and clear. Now, go ahead and number away – your future presentations will thank you!

Matt Jacobs has been working as an IT consultant for small businesses since receiving his Master’s degree in 2003. While he still does some consulting work, his primary focus now is on creating technology support content for SupportYourTech.com.
His work can be found on many websites and focuses on topics such as Microsoft Office, Apple devices, Android devices, Photoshop, and more.
Share this:
- Click to share on Twitter (Opens in new window)
- Click to share on Facebook (Opens in new window)
Related Posts
- How to Remove Page Number from First Page of Google Docs and Google Sheets
- How to Add Page Numbers in Powerpoint 2010: A Step-by-Step Guide
- How to Add a Hyperlink on Google Slides
- How to Make Google Slides Vertical (5 Quick Steps)
- How to Delete Multiple Slides in Google Slides: A Step-by-Step Guide
- How to Add Page Numbers in Google Docs
- How to Rotate a Powerpoint Slide Presentation
- Can You Print a Google Slide?
- How to Save a Slide from Google Slides as a Picture: A Step-by-Step Guide
- How to Flip an Image in Google Docs
- How to Set Google Docs Background Image
- How to Do a Powerpoint Google Slides Presentation Conversion
- How to Delete a Slide in Powerpoint 2010: Step-by-Step Guide
- How to Download a Google Slides Presentation as a Powerpoint File
- How to Bring an Image to the Front in Google Slides
- How to Make a Powerpoint Slide Vertical in Powerpoint 2013: A Step-by-Step Guide
- How to Remove Page Numbers in Excel 2010: A Step-by-Step Guide
- How to Add Line Numbers in Microsoft Word for Office 365: A Step-by-Step Guide
- How to Show Speaker Notes in Google Slides: A Step-by-Step Guide
- How to End Powerpoint on Last Slide in Powerpoint 2010: A Step-by-Step Guide
Get Our Free Newsletter
How-to guides and tech deals
You may opt out at any time. Read our Privacy Policy
Home Blog Google Slides Tutorials How to Add Page Numbers in Google Slides
How to Add Page Numbers in Google Slides

Page numbers can help identify the number of slides left in delivering the presentation during a Live presentation session. Like other presentation platforms, Google Slides also allows end users to add page numbers for their slides. Whether you are making a slide deck from scratch or need to use Google Slides templates , there is a simple method to add page numbers to a slide deck in Google Slides.
How to Add Slide Numbers in Google Slides
To add a Google Slides page number, scroll down to the Insert menu and select Slide Numbers .

From the dialog box that appears, you can enable and (if already enabled) turn off slide numbers in Google Slides. You can skip the title slide for page numbering and choose whether you want the page numbers applied to one slide or the whole slide deck.

Below is an example of how slide numbers, by default, appear in Google Slides.

To edit the slide numbers in Google Slides, go to the master slide via Slide -> Edit Theme .

How to Change the Default Location of Slide Numbers in Google Slides
Select the master slide (top slide) and move the slide numbers ( # icon) to a desired location on the slide.

As visible in the image below, we changed the location of the slide numbers in Google Slides from the default bottom right corner to the bottom left. You can use the master slide to make comprehensive changes to slides the same way, such as adding additional text along with slide numbers, adding new placeholders to slides, inserting a logo, etc.
Final Words
Adding and editing slide numbers in Google Slides is as easy as in PowerPoint. Using the simple instructions above, you can add slide numbers and edit how they appear by using slide master to edit the master slide.

Like this article? Please share
Design, Google Slides Filed under Google Slides Tutorials
Related Articles

Filed under Google Slides Tutorials • March 22nd, 2024
How to Share a Google Slides Presentation
Optimize your presentation delivery as we explore how to share a Google Slides presentation. A must-read for traveling presenters.

Filed under Design • January 11th, 2024
How to Use Figma for Presentations
The powerful UI/UX prototyping software can also help us to craft high-end presentation slides. Learn how to use Figma as a presentation software here!

Filed under Design • December 28th, 2023
Multimedia Presentation: Insights & Techniques to Maximize Engagement
Harnessing the power of multimedia presentation is vital for speakers nowadays. Join us to discover how you can utilize these strategies in your work.
Leave a Reply
How to add page numbers in google slides
let’s explore the trick behind how to add page numbers in google slides
Sanskar Tiwari
Step-by-Step Guide to Adding Page Numbers in Google Slides:

Conclusion:
Frequently asked questions (faqs):, related blogs, how to group different objects together in google slides, how to convert selected text to capitals in google slides, how to convert pdf report to powerpoint presentation, how to convert pdf lecture notes to powerpoint, how to extract webinar highlights from youtube to powerpoint for quick references, how to create language learning materials by converting youtube videos to powerpoint slides, how to create marketing presentations from youtube videos, how to transform historical event videos into powerpoint summaries for educational purposes, how to convert youtube educational content to powerpoint, stunning presentations in seconds with ai.
Install MagicSlides app now and start creating beautiful presentations. It's free!

~1M Installs, rated 4.5/5 ⭐️ by 424 reviews
- Customer Help
- X (Twitter)
Google Slides: add or remove headers, footers and page numbers
The header refers to the section of a document that appears in the top margin. On the other hand, the footer refers to the area of a document that appears in the bottom margin. Text inserted in the header or footer will show on each page of the document where you can add names, dates, and titles.
However, unlike Google Docs or Microsoft PowerPoint, there is no dedicated option to add or remove headers, footers in Google Slides. Still, you can insert them manually just like any other text, and if you want, you can also add page numbers to your Google Slides, and this is the subject of this article.
Adding headers and footers in Google Slides
Listed are the steps you can follow if you want to add Google Slides header and footer.
Step 1: Open your presentation in Google Slides.
Step 2: Choose the Slide where you want to add a header or footer.
Step 3: Select the ‘Text box’ from the Toolbar dropdown menu. Then click and drag to form a text box on the slide. If you’re adding a header, drag it on the top margin and on the bottom footer margin.
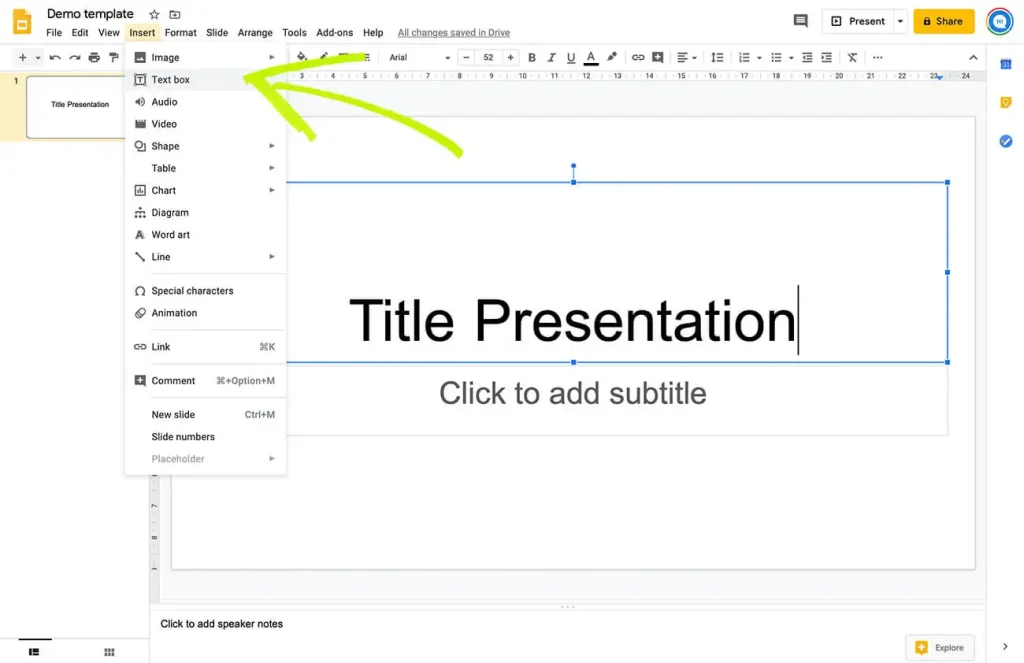
Step 4: Now enter the text for the header or footer. You can change the text’s font, size, alignment, color, and style using the options found on the Toolbar.

Adding the same footer or header on multiple slides
If you have several slides with the same layout and want to add a Google Slides footer or header to all of them, you can do it quickly as long as they come from a similar layout master.
Step 1: Select the slide where you want to insert a header or footer.
Step 2: Click ‘Slide’ and select ‘Edit Master’ from the dropdown menu.

Step 3: The Master Editor View should open.

Step 4: Click the Insert placeholder dropdown arrow on the Toolbar and choose Text Box.
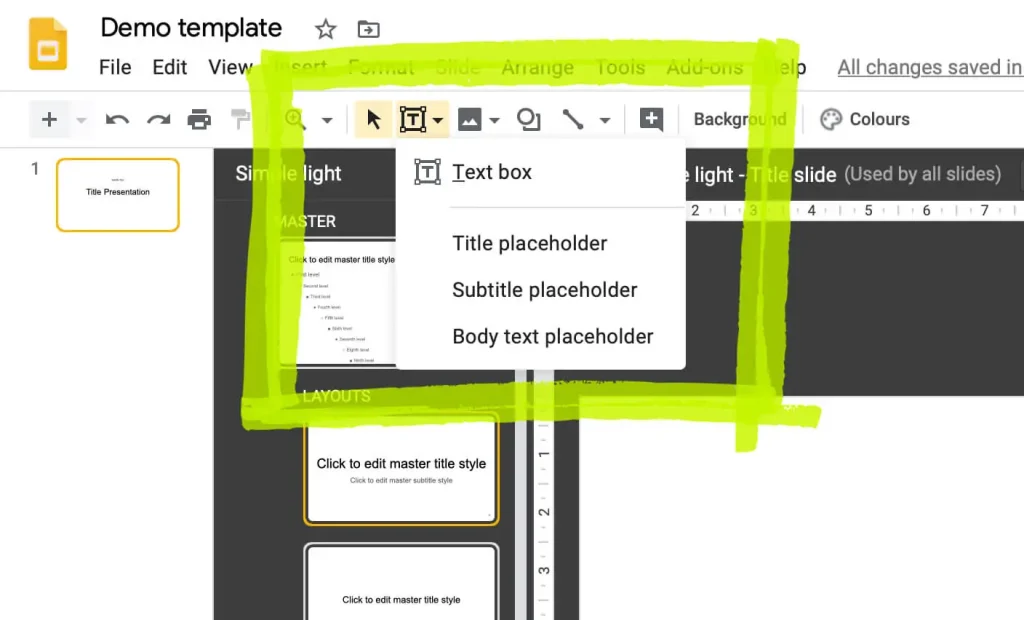
Step 5: Draw a text box where you want to place the footer or header.
Step 6: Now enter the text. You can change the text’s font, size, alignment, color, and style using the options found on the Toolbar.
Step 7: Click the “X” button at the upper-right to exit the master view. The footer or header text will appear on all the slides that are derived from this slide master.
How to delete headers and footers in Google Slides?
Now, when you want to delete the header or footer from your Google Slide Presentation, simply follow the steps below:
Step 1: Open the presentation in Google Slides, from which you want to remove headers and footers.
Step 2: Click ‘View’ from the top menu and select “Master’ from the dropdown menu.
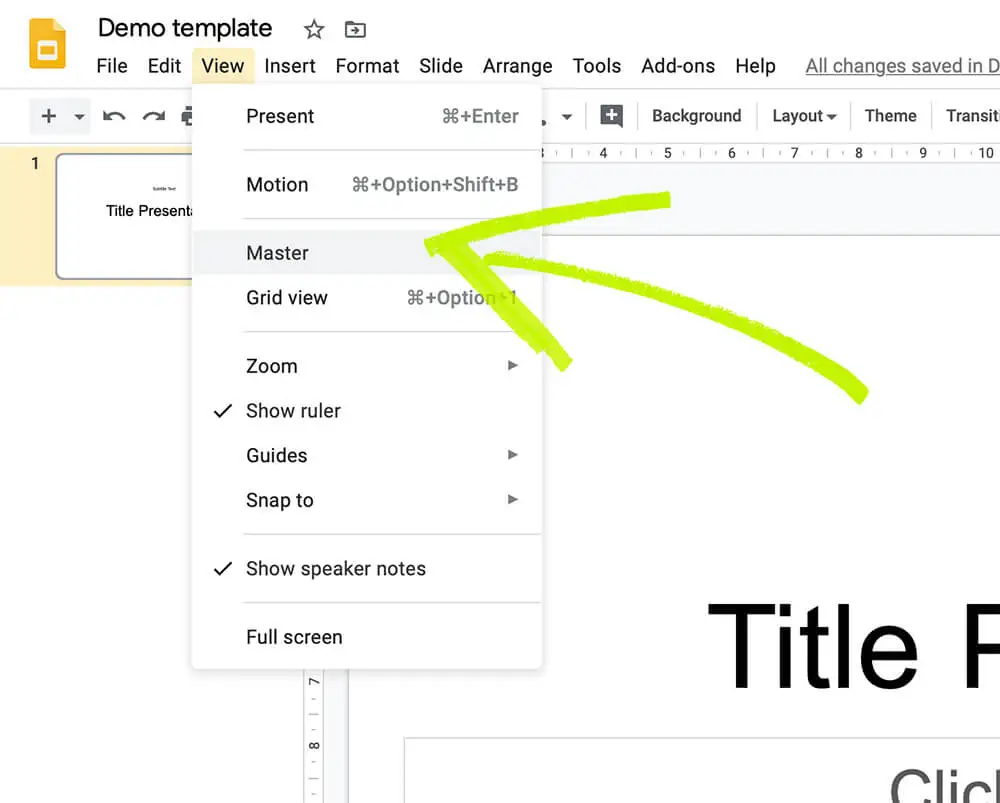
Step 3: Right Click to Delete the header or footer text.

Step 4: Click the “X” button at the upper-right to exit the master view. The footer or header text will be removed on all the slides that are derived from this slide master.
Adding page numbers on Google Slides
If you want to affix page numbers to Google Slides, simply follow the steps below:
Step 1: Open a presentation in Google Slides to which you want to add numbers. Step 2: From the Toolbar menu, click ‘Insert’ and select ‘Slide numbers’ form the dropdown.

Step 3: Click on Apply.
Note: When adding slide numbers, if you don’t want your title slide to be numbered, you need to check the box next to ‘Skip title slides.’ Alternatively, if you’re going to number only specific slides, choose ‘Apply to Selected’ instead of ‘Apply.’
How to get rid of slide numbers from Google Slides?
Step 1: Open the Google Slide presentation containing the slide numbers that you want to remove.
Step 2: Choose the ‘Insert’ tab at the top menu.
Step 3: Select ‘Slide numbers’ at the bottom of the dropdown menu.
Step 4: Choose the ‘Off’ option.

Step 5: Click the ‘Apply’ button.
One comment

It will be good to keep this updated. Thanks
You must be logged in to post a comment.
- Business articles (22)
- Google Slides (57)
- Keynote (27)
- PowerPoint (83)
- Support (2)

Cloud Storage

Custom Business Email

Video and voice conferencing

Shared Calendars

Word Processing

Spreadsheets
Presentation Builder

Survey builder

Google Workspace
An integrated suit of secure, cloud-native collaboration and productivity apps powered by Google AI.
Tell impactful stories, with Google Slides
Create, present, and collaborate on online presentations in real-time and from any device.
- For my personal use
- For work or my business

Jeffery Clark
T h i s c h a r t h e l p s b r i d g i n g t h e s t o r y !

E s t i m a t e d b u d g e t

Make beautiful presentations, together
Stay in sync in your slides, with easy sharing and real-time editing. Use comments and assign action items to build your ideas together.

Present slideshows with confidence
With easy-to-use presenter view, speaker notes, and live captions, Slides makes presenting your ideas a breeze. You can even present to Google Meet video calls directly from Slides.

Seamlessly connect to your other Google apps
Slides is thoughtfully connected to other Google apps you love, saving you time. Embed charts from Google Sheets or reply to comments directly from Gmail. You can even search the web and Google Drive for relevant content and images directly from Slides.

Extend collaboration and intelligence to PowerPoint files
Easily edit Microsoft PowerPoint presentations online without converting them, and layer on Slides’ enhanced collaborative and assistive features like comments, action items, and Smart Compose.

Work on fresh content
With Slides, everyone’s working on the latest version of a presentation. And with edits automatically saved in version history, it’s easy to track or undo changes.

Make slides faster, with built-in intelligence
Assistive features like Smart Compose and autocorrect help you build slides faster with fewer errors.

Stay productive, even offline
You can access, create, and edit Slides even without an internet connection, helping you stay productive from anywhere.
Security, compliance, and privacy

Secure by default
We use industry-leading security measures to keep your data safe, including advanced malware protections. Slides is also cloud-native, eliminating the need for local files and minimizing risk to your devices.
Encryption in transit and at rest
All files uploaded to Google Drive or created in Slides are encrypted in transit and at rest.
Compliance to support regulatory requirements
Our products, including Slides, regularly undergo independent verification of their security, privacy, and compliance controls .
Private by design
Slides adheres to the same robust privacy commitments and data protections as the rest of Google Cloud’s enterprise services .

You control your data.
We never use your slides content for ad purposes., we never sell your personal information to third parties., find the plan that’s right for you, google slides is a part of google workspace.
Every plan includes

Collaborate from anywhere, on any device
Access, create, and edit your presentations wherever you are — from any mobile device, tablet, or computer — even when offline.

Get a head start with templates
Choose from a variety of presentations, reports, and other professionally-designed templates to kick things off quickly..

Photo Album

Book Report

Visit the Slides Template Gallery for more.
Ready to get started?
- Help Center
- Get started
- Learn by product
- Learn by role & industry
- Hybrid workplace tips
- Gen AI tips
- Productivity tips
- Business tutorials
- Switch from Microsoft & others
- Support & accessibility
- Google Workspace
- Privacy Policy
- Terms of Service
- Submit feedback
- What's new?
- Get started Welcome Get ready to switch What to do on your first day Your first week & beyond Cheat sheets & reference guides Open Google Workspace apps
- Learn by product Calendar Chat Chrome browser Docs Drive Gemini Gmail Meet Sheets Slides Managed teams Mobile & device setup All products
- Learn by role & industry Administrative assistants Digital marketing Finance Healthcare Human resources Law practices Manufacturing Media & entertainment Nonprofits Professional services Project management Research & development Retail Sales & marketing Technical support UX design Visual design Web development
- Hybrid workplace tips Hybrid work training & help Use Meet Companion mode Stay connected when working remotely Work from home Work with remote teams Plan & hold meetings from anywhere Hold large remote events Work with non-Google Workspace users
- Gen AI tips Generative AI training & help Get started with Gemini Gemini cheat sheet Role-specific prompts & use cases Tips for writing prompts for Gemini Gemini usage limits Learn about generative AI
- Productivity tips Set up business meetings Discuss topics with your team Brainstorm with colleagues Improve communication Make video conference calls Create great presentations Create strong proposals Onboard team members Optimize your inbox Analyze data Clean up data Go paperless
- Business tutorials Use generative AI at work Plan & manage a project Plan & hold meetings from anywhere Hold large remote events Stay connected when working remotely Collaborate with decision makers Share a final document Free up storage space Plan a project with external clients Delegate work when you're OOO Get up to speed after time off Additional training resources
- Switch from Microsoft & others Switch from Microsoft Switch from Slack Switch from Zoom, Skype, or Webex Switch from Box, Dropbox, or C:\ drive Switch from HCL Notes
- Support & accessibility Support for users Support for administrators Accessibility Save or customize Learning Center guides
Bring your best ideas to life with Gemini for Google Workspace. Get tips & real-life use cases for using gen AI at work .
Get started with Slides in Google Workspace
Create your first presentation in slides.
On this page
Create or import a presentation, add slides to your presentation.
- Update your presentation
Want advanced Google Workspace features for your business?
Try Google Workspace today!
Create your presentation
- Open the Slides home screen at Google Slides .
You can also create new presentations from the URL https://slides.google.com/create .
Import and convert an existing presentation
Converting your file from another program creates a copy of your original file in a Docs, Sheets, or Slides format. You can then edit the file in your browser.
If you have existing files, you can import and convert them to Docs, Sheets, or Slides.
- Go to Drive .
- Choose the file you want to import from your computer to add it to Drive.
Have a Microsoft file?
If you've already stored Microsoft files in Drive, you can also update them without converting them .
Add a slide with the same layout as the current slide
- On your computer, open a presentation in Google Slides .
Add a slide with a different layout
- Choose a slide.
Add a slide with your organization's branding
- At right, click the template you want to use.
Note: The Templates option appears only if your administrator makes organization-branded slides available.
Update your presentation
Choose a theme and layout.
When you first create a presentation, you can choose a theme for your slides. A theme is a preset group of colors, fonts, background, and layouts. Your presentation's layout is the way your text and images are arranged on a slide.
Change your presentation's theme
- On the right, click the theme you want.
Change the layout of your presentation
- Select a slide.
- At the top, click Layout .
- Choose the layout you want to use.
Arrange slides
Move slide —Drag the slide to a different position in the presentation. To move several slides at once, Ctrl+click multiple slides before dragging them.
Delete slide —Right-click the slide and select Delete .
Duplicate slide —Right-click the slide in the sidebar and select Duplicate slide .
Add pictures, text, speaker notes, and more
Rename your presentation —Click Untitled presentation and enter a new name.
Add videos, shapes, charts, and more —Click Insert to add videos, shapes, charts, slide numbers, and other features to your presentation. You can also move, delete, or re-size these inserted features.
Add speaker notes —Use speaker notes to keep track of your talking points for each slide. In the presentation editor, speaker notes appear beneath the current slide. When you present your slides, your speaker notes show in a separate window.
Google, Google Workspace, and related marks and logos are trademarks of Google LLC. All other company and product names are trademarks of the companies with which they are associated.
Was this helpful?
Learn how to print Learning Center guides, save them as PDFs, or customize them for your organization.
How to Add Page Numbers in Google Slides

Adding page numbers to your Google Slides presentations can greatly improve the user experience for both you as the presenter and your audience. Page numbers help keep your presentation organized, provide clear references between you and your audience, and give your presentation a polished, professional look.
In this blog post, we will walk through the step-by-step process for adding page numbers in Google Slides. We will cover:
- The benefits of adding page numbers
- How to enable page numbers
- Customizing page number appearance and formatting
- Skipping page numbers on title slides
- Applying page numbers to all or selected slides
- Removing page numbers
By the end of this article, you will have the skills to seamlessly incorporate page numbers into your Google Slides presentations.
Benefits of Adding Page Numbers in Google Slides
Here are some of the key benefits of adding page numbers in your Google Slides presentations:
Keep Presentations Organized
Page numbers give both you and your audience a reference point to easily follow along with the presentation flow. This organization is especially helpful for long presentations spanning many slides.
Enable Clear References
With visible page numbers, you and your audience can clearly refer to specific slides, improving engagement and interaction. For example, you can say “Let’s review the data on slide 15.”
Look Professional
Page numbers make your Google Slides presentation look polished and put-together. This subtle addition helps showcase the quality and care put into your content.
How to Enable Page Numbers in Google Slides
Enabling page numbers in Google Slides only takes a few clicks:
- Open your Google Slides presentation
- Click Insert > Slide Numbers in the top menu
- In the Slide Numbers dialog box, click the On radio button
- Click Apply
Page numbers will now appear on the bottom right corner of all slides, excluding title slides.
Enabling page numbers
Customizing Page Number Appearance and Formatting
The default page numbers match the presentation theme’s text formatting. However, you can customize the appearance if desired:
- Click Slide > Edit Master in the top menu
- Select the slide master thumbnail
- Click the page number text box (labeled #)
- Edit the text box formatting like font, size, color etc.
- Click Close Master View when done
The updated formatting will apply to all page number text boxes.
Customizing page number formatting
Skipping Page Numbers on Title Slides
You may want your title slide to not display a page number. To skip page numbers on title slides:
- Click Insert > Slide Numbers
- Check the box for Skip title slides
Now title slides will not display a page number while all other slides will.
Applying Page Numbers to All or Selected Slides
By default, page numbers are added to all slides when enabled. However, you can selectively add page numbers to only certain slides:
- Select the slides you want to number
- Click Apply to selected
This will add page numbers only to the chosen slides.
Removing Page Numbers
If you want to remove page numbers later on, simply:
- Click the Off radio button
The page numbers will be instantly removed from all slides.
Adding page numbers in Google Slides is an easy way to boost your presentation’s organization, engagement, and professional appearance. With the step-by-step guidance in this article, you can now seamlessly incorporate page numbers to level up your next Google Slides presentation.
Let me know in the comments if you have any other questions! I’m happy to help explain any part of the process in more detail.
About The Author
Vegaslide staff, related posts.

How to Make Jeopardy on Google Slides

How to Embed a Video in Google Slides

How to Use Google Slides: PC & Mobile

How to Add and Edit Tables in Google Slides

- Generative AI
- Office Suites
- Collaboration Software
- Productivity Software
- Augmented Reality
- Emerging Technology
- Remote Work
- Artificial Intelligence
- Operating Systems
- IT Leadership
- IT Management
- IT Operations
- Cloud Computing
- Computers and Peripherals
- Data Center
- Enterprise Applications
- Vendors and Providers
- United States
- Netherlands
- United Kingdom
- New Zealand
- Newsletters
- Foundry Careers
- Terms of Service
- Privacy Policy
- Cookie Policy
- Copyright Notice
- Member Preferences
- About AdChoices
- E-commerce Affiliate Relationships
- Your California Privacy Rights
Our Network
- Network World
Google Slides cheat sheet: How to get started
How to use Google Slides to create, collaborate on, and lead business presentations.

Need to build a slide presentation for a meeting, training, or other event? Google Slides is an easy-to-use web app that comes with the essential tools and more. It stores your presentations in the cloud with Google Drive. Anyone with a Google account can use Slides and Drive for free, and they’re also included with a Google Workspace (formerly G Suite) subscription for business and enterprise customers. There are Google Sheets mobile apps for Android and iOS, too.
This guide will help you become familiar with the Google Slides web interface and show you how to start a new presentation, upload a Microsoft PowerPoint file to edit in Google Slides, collaborate with others on your presentation, and finally, present it to others.
Create or open a presentation
Log in to your Google or Workspace account. Then:
From Google Slides : At the top of the home page, you’ll see a “Start a new presentation” header, with a row of thumbnails underneath. To start a new, blank presentation, click the Blank thumbnail. To start a new presentation in a template, select one of the thumbnails to the right or click Template gallery toward the upper-right corner, then click any thumbnail on the page that appears.

The Google Slides home page. (Click image to enlarge it.)
Below the “Start a new presentation” area you’ll see a list of presentations that are stored in your Google Drive or shared with you. To open a presentation, click it in this list.
The list of your presentations appears in reverse chronological order starting with the presentation you most recently opened. Clicking the “AZ” icon at the upper right of this list changes the sort order to Last modified by me , Last modified , or in alphabetical order by presentation title. You can also browse to a specific folder by clicking the folder icon next to the “AZ” icon.
From Google Drive : Presentations stored in your Google Drive are listed in the main window of the Drive home page. To see a listing of presentations that others are sharing with you, click Shared with me in the left column. From either list, double-click a presentation to open it in Google Slides.
To start a new, blank presentation, click the New button at the upper-left of the screen and then click Google Slides .
If you want to use a template to start a new presentation, click the New button, then move the cursor over the right arrow next to Google Slides and select From a template . The template gallery for Google Slides will open; click a thumbnail to start a new presentation in that template.

Creating a new presentation from Google Drive.
From Google Slides or Drive: You also can use the search box at the top to find presentations in your Google Drive or shared with you. Enter words or numbers that may be in the presentation you’re looking for.
Upload a PowerPoint presentation to Slides
You can edit a Microsoft PowerPoint presentation in Google Slides, but first you must upload it to Google Drive.
From Google Slides: Click the folder icon ( Open file picker ) that’s above and toward the right corner of your presentations list. On the panel that opens, click the Upload tab. Drag-and-drop your PowerPoint file (.ppt or .pptx) onto this panel, or browse your PC’s drive to select it.
From Google Drive: Click the New button, then File upload , and select the PowerPoint file from your PC’s drive and click Open .
Traditionally, when you uploaded PowerPoint files to Google Drive, they were automatically converted to Slides format. That’s still the case when you upload PowerPoint files via the Google Slides home page .
However, Google now supports the ability to edit Microsoft Office files in their native format. By default, any .pptx files that you upload via Google Drive will remain formatted as PowerPoint documents. You can edit and collaborate on a PowerPoint file right in Slides, with all changes made by you or your collaborators saved directly to the PowerPoint file.
On the Google Slides and Drive home pages, native PowerPoint files will be denoted with an orange “P” icon, and when you open a native PowerPoint file in Sheets, you’ll see a “.PPTX” flag to the right of the document title.

Native PowerPoint files show the PowerPoint icon (top) instead of the Google Slides icon (bottom).
If you’d rather have Google convert PowerPoint files to Slides format automatically when you upload them via Google Drive, click the gear icon in the upper-right corner of the Drive home screen and select Settings from the drop-down menu. In the Settings box next to “Convert uploads,” check the checkbox marked Convert uploaded files to Google Docs editor format .
Work in a presentation
When you open a new or existing presentation, its first slide appears in the main window of Google Slides. Here’s a breakdown of the toolbars, menus, panes, and sidebars that appear around your presentation.
The left pane shows thumbnails of all the slides in your presentation. Click a thumbnail, and the slide it represents will appear in the main window, where you can edit it.

The Google Slides editing interface. (Click image to enlarge it.)
Your presentation’s title appears along the top of the screen. To change it, click anywhere inside the title and start typing.
The menu bar below your presentation’s title has a complete set of tools for working with presentations. These are the main submenus to know:
- File has commands for taking action on the whole presentation, including Print, Rename, and Share.
- Edit lists the standard editing commands such as copy, cut, paste, delete, duplicate, and find and replace.
- View lists several ways that you can view your slides as you design and edit them. This includes arranging them into a grid, previewing them as a slideshow, or zooming in on them. You can also watch the transition effect that takes place between slides when they’re played in a slideshow.
- Insert lets you add several objects to your slides, including charts, diagrams, pictures, tables, and text. You can also add links to YouTube videos or sound or video files that are stored in your Google Drive.
- Format lets you change the look of your slides. Certain functions on this submenu become clickable depending on whether you’ve selected an image or text on a slide, or selected the slide itself.
- Slide is where you can add, delete, or duplicate a slide that you’ve selected. You can also add a preset layout to a slide, change its background or theme color, or add and edit a transition effect that takes place between slides when your presentation is played as a slideshow.
- Arrange lists tools that let you group or reorder objects on a slide in relation to another. For example, you can place an image behind another image or group an image and a block of text together to make them easier to move at once.
- Tools leads to several miscellaneous functions. These include letting you record a voice clip to go with a slide, running a spell checker, and showing you a list of objects in your presentation that are linked to other files.
The toolbar directly above your presentation puts commonly used commands in easy reach. From this toolbar, you can click buttons to add to a slide or change its background, comments, layout, objects (images, lines, shapes, text), text style, theme colors for the whole presentation, transition effects during a slideshow, and more. The buttons on the toolbar change depending on whether you’ve selected image or text on a slide or the slide itself.
Notice that there’s no Save button in the toolbar — or anywhere in Google Slides. That’s because Slides automatically saves any changes you make to your presentation.
Speaker notes: Along the bottom of each slide you’ll see an area marked Click to add speaker notes . Here you can type in brief notes to remind yourself what to do or say when the slide is being shown. Only you will see these notes when you show your presentation to an audience.
Themes sidebar: When you start a new blank presentation, the Themes sidebar opens on the right side of the screen. (You can also open this sidebar at any time by clicking Theme on the toolbar above your presentation.) Themes apply the same fonts, colors, and other design elements to all the slides in a presentation, giving it a consistent look and feel. Click a thumbnail in this sidebar to change your presentation to that theme.
Create and manage slides
Here are the basic things to know about working with slides in a presentation.
Add a new, blank slide to your presentation: Click the + button at the left end of the toolbar above your presentation. Alternatively, if you click the down arrow next to the +, you can choose a layout to use as the basis for a new slide.

Click the down arrow next to the + button in the toolbar to choose a layout for a new slide.
Apply or change a slide’s background: Select the slide’s thumbnail in the left sidebar and click Background on the toolbar above your presentation. On the panel that opens, you can change the slide’s background color or use an image file from your Google Drive, Google Photos account, or PC as the background.
Apply or change a slide’s layout: Select the slide’s thumbnail in the left pane, then click Layout on the toolbar above your presentation. On the panel that opens, select the layout you want to apply to this slide.
Apply or change a slide’s transition: Select the slide’s thumbnail in the left sidebar and click Transition on the toolbar above your presentation. In the Motion sidebar that opens along the right side of the screen, you can apply or change the animated transition effect that is played before this slide.

Choosing a transition style in the Motion pane.
Move a slide to a different spot in the slideshow sequence: Click and hold its thumbnail in the left sidebar, drag it up or down to another place in the sequence, and release it.
Delete a slide: Right-click its thumbnail in the left sidebar and select Delete from the pop-up menu. Alternatively, select its thumbnail and select Edit > Delete from the menu bar or just press the Delete key.
Share and collaborate on a presentation
Presentations are often a group effort, with several team members contributing to and polishing a presentation. In Slides, it’s easy for multiple collaborators to work on a presentation together.
First, you need to share the presentation. When you’re viewing your presentation in Google Slides, click the Share button at the upper-right. Or, from your Google Drive homepage, click to highlight the presentation that you want to share. Then, in the toolbar toward the upper right, click the Share icon (a head-and-shoulders silhouette with a +).
Either way, the “Share” panel will open.

Setting permissions for a file being shared privately.
Share a presentation privately
In the entry box, enter the email addresses (or names of your Google Contacts) of the people with whom you want to share. By default, the people you invite to your presentation can edit it and reshare it with others.
To change access permissions for invitees: Click Editor to the right of the entry box and choose another option from the drop-down menu. Commenter means they can view your spreadsheet and add comments but can’t change it. Viewer means they can view your presentation but can’t edit it or add comments.
To prevent your presentation from being reshared, downloaded, or printed: Click the gear icon at the upper-right of this panel. On the smaller panel that opens, uncheck the boxes by Editors can change permissions and share and Viewers and commenters can see the option to download, print, and copy .
When you’re done setting permissions (and, optionally, typing in a message to your invitees), click Send , and everyone you’ve added will receive an email with a link they can click to access the document.
The shared presentation icon.
A presentation you’ve shared (or that others have shared with you) will have an icon of two silhouetted heads next to it in the presentations list on your Google Sheets and Google Drive home pages.
To limit or change a person’s access to your presentation: With the presentation open in Google Slides, click the Share button at the upper-right. Or, from Google Drive, highlight the presentation and click the Share icon.
The Share panel reopens showing a list of all the people you’ve invited, along with their permission status. Click the down arrow to the right of a person’s name, change their permission level or remove their access entirely, and click Save .

You can change permissions for people you’ve shared a presentation with on an individual basis.
If you have a Google Workspace subscription, another option is to select Give temporary access and, next to Access expires , select a date within one year of the current date. If you set an expiration date for a person that you’ve assigned as Editor, their access will be downgraded to Commenter on the expiration date.
Share a presentation publicly
Most business users will want to share presentations privately with select colleagues or clients, but you do have the option to share a presentation publicly. At the bottom of the Share panel is a “General access” area where you can copy a link to the document. By default, this link is restricted to those you invite to the document. To change it to a public link, click Restricted and select Anyone with the link from the menu that appears.
Click Copy link and the link to your presentation will be copied to your PC’s clipboard. You can share this link by pasting it into a chat message, document, email, forum post, or most other means of online written communication. Anyone who clicks this link will be able to view your presentation online. (Be aware that anyone can copy and reshare this link.)
To allow anyone in the public to comment on or edit your presentation: At the bottom right of the Share panel, click Viewer and select Commenter or Editor from the drop-down menu. Then click the Done button. Now the web link to your presentation will let anyone who clicks it add a comment or edit it.

Sharing a spreadsheet publicly.
To turn off public sharing for your presentation: Bring up the Share panel again. Near the bottom, click Anyone with the link and select Restricted from the menu, then click the Done button.
Note: You can apply both public and private sharing methods to your presentation. For example, you could allow the public to only view your presentation, but allow specific people that you’ve invited to comment on or edit it.
Collaborate on a presentation
The people you’ve shared a spreadsheet with can view or work on it at the same time as you or at other times. Remember that people who have Editor privileges to your presentation can change all aspects of it. Having multiple people making changes to a presentation can get confusing. In most cases, setting everyone to Commenter is the best way to collaborate in Slides: People can attach comments to a slide or to objects in a slide, but their comments won’t alter your presentation’s information or design.
To add a comment to a slide: Right-click its thumbnail in the left sidebar and select Comment from the menu that opens. Alternatively, you can select its thumbnail and select Insert > Comment from the menu bar or click the Add comment button (a speech balloon with a + sign).
A blank comment card with your name on it opens to the right of the slide in the main window. On this card’s entry line, type a brief comment, and when you’re finished, click the Comment button.

Typing in a new comment.
To add a comment to an object on a slide: Right-click the object (a block of text, chart, image, picture, etc.) and select Comment from the menu that opens. Alternatively, you can select the object and select Insert > Comment from the menu bar.
To draw someone’s attention to a comment: As you’re composing the comment, type the @ symbol and begin typing their name, then select the person from the list of suggested Google contacts that appears. They’ll receive an email notifying them of the comment and linking to it.
To read, reply to, or remove a comment: A slide that contains a comment is denoted in the left sidebar with a speech balloon by its thumbnail. Click the slide’s thumbnail to make the slide appear in the main window, and you’ll see all its comment cards on the right.
To reply to a comment, click its card. The card will expand to reveal an entry line where you can add a comment in response.

Replying to a comment.
Clicking the checkmark at the upper right marks the comment card as “resolved” and removes the card from the presentation. Clicking the card’s three-dot icon opens a menu that lets you edit or delete your comment.
To see a list of all comments: Click the Open comment history icon (the speech balloon) to the left of the Slideshow button. A sidebar will open along the right side of the screen; it lists all the comment cards in your presentation. When you click a comment on this list, the view of your presentation in the main window will jump to the cell where the comment is located and open its comment card.

The Comments pane lets you quickly review all comments and jump to specific ones.
For more details about collaborating on your presentation, including what it’s like to collaborate in real time, see “ How to collaborate on a document ” in our Google Drive guide. You can also collaborate on a presentation in Google Chat; that’s covered later in this story.
Recover older versions of a presentation
It’s easy to go too far when making tweaks to a presentation. Fortunately, it’s also easy to roll back to an earlier version of the presentation. Click File > Version history > See version history . This opens a panel on the right that shows a list of older versions of your presentation.

Using Version history to view an earlier version of a presentation. (Click image to enlarge it.)
To view an earlier version of your presentation: Click the date for it in the list. That version of the presentation will then appear in the main window.
To restore an earlier version so it replaces your current presentation: With the version you want to restore showing in the main window, click the yellow Restore this version button at the top of the screen. The restored version will then appear at the top of the version history list.
To give an older version a unique name: Click on its date. You’ll be prompted to type in words to replace the date. (The date and time will then appear in smaller size underneath the new name.)
Give a presentation
When it’s time to play your presentation to an audience, Google Slides has two modes: Slideshow and Presenter view. Slideshow mode essentially shows what your audience will see. Presenter view mode provides additional tools for your eyes only that run alongside Slideshow mode.
Slideshow mode: Click the Slideshow button at the upper-right corner of the screen. Google Slides will expand to full-screen view and show the slide that’s currently in the main window. (If you want to start the slideshow from the first slide in your presentation, click the down arrow to the right of the Slideshow button and select Start from beginning .)

The control bar in Slideshow mode lets you click through the slides, turn on auto-play, use a laser pointer effect, and more. (Click image to enlarge it.)
When you move the on-screen pointer to the lower-left corner of your presentation, a control bar appears. You use this to click forward and back through the slides. Clicking the three-dot icon on the control bar opens a menu with other controls, such as starting auto-play and adjusting how quickly it moves from slide to slide.
On this menu, Turn on the laser pointer turns the mouse pointer into a simulated red laser dot. Captions preferences — available only if you’re using a Chrome browser or Chromebook — lets you turn on real-time, automatic transcribing of your words as you say them (English only) and shows them to your audience as on-screen captions. Open speaker notes takes your presentation out of full screen and opens a separate “Presenter view” window, as described below.
Presenter view mode: Click the down arrow to the right of the Slideshow button and select Presenter view . This shows the presentation in your browser window and launches a separate window that assists you while you’re giving your presentation.

Presenter view lets you (but not your audience) see your speaker notes while presenting. (Click image to enlarge it.)
From the Presenter view window, you can jump to any slide in your presentation, read the speaker notes you wrote for a slide, and control the Q&A feature. There’s also a timer that you can set to remind yourself how much time you’re spending showing a slide — or the entire presentation — to your audience.
Click the AUDIENCE TOOLS tab to use the Q&A feature, which lets you take questions from your audience. To open questions for a slideshow, click the Start new button. A web link appears at the top of your presentation. An audience member watching your presentation on their computer, phone, or tablet can click/tap that link, which will take them to a page where they can type a question for you. You’ll see the question in your Presenter view window, and you can choose whether to show their question to the rest of your audience during the presentation. To close questions for a presentation, turn the switch from ON to OFF .

Audience members can submit questions from their devices, and the presenter can decide whether to display them as part of the slideshow. (Click image to enlarge it.)
Present in Google Meet
Need to give a presentation during a Google Meet video meeting? As long as you’re using a Chromium-based browser (Chrome, Microsoft Edge, Opera, etc.), it’s easy: Toward the upper right of the Google Slides page, click the Google Meet icon. From the panel that opens, select a meeting that’s scheduled on your Google calendar today, start a new meeting, or type/paste in the web link or code that you have for another meeting.

Click the Meet icon to get started presenting to a video meeting.
If you start a new meeting, a sidebar for the meeting will open on the right. At the bottom of the sidebar, click the Present now icon (a box with an up arrow). On the panel that appears, select your presentation and click the Share button, and you’ll be presenting to the meeting.

Choose which tab or window you want to share and click the Share button. (Click image to enlarge it.)
If you join a scheduled meeting, you have two choices: “Join the call” and “Just present this tab.” If you click Join the call , a sidebar for the meeting will open on the right. Follow the same steps as above to present to the meeting. If you click Just present this tab , you’ll go directly to the panel where you select your presentation and click Share , but you won’t have a sidebar where you can follow the main meeting.
To stop sharing your presentation to the meeting, click the Stop sharing button at the top left of your browser window.
For more details about using Google Meet, see our Google Meet cheat sheet .
Download and export a presentation
Google Slides lets you download presentations for use offline. On the top menu, select File > Download and choose a file format. You can save your presentation to your PC as a PowerPoint (.pptx) file or in other formats such as PDF, or as JPG or PNG for an individual slide.
5 tips for working with Google Slides
Now that you’re comfortable working in Google Slides, try these intermediate tips.
Use the Google Slides mobile app
With the exception of the “Version history” tool, the Google Slides app for Android , iPhone , and iPad has many of the same features described in this guide.
When you have a slideshow open, the toolbar at the top of the screen lets you take a variety of actions:
- To present your slides on your phone or tablet, on a Chromecast device, or in a Google Meet meeting, tap the triangle icon.
- To share your presentation with other people, the headshot silhouette. (See “How to share from the Google Drive, Docs, Sheets, and Slides mobile apps” in our Google Drive cheat sheet .)
- To view all the comments in the presentation, tap the Comments icon (a chat balloon) if you see it in the toolbar, or tap the three-dot icon and select View comments from the menu that appears.
- The three-dot menu also lets you see the presentation’s Q&A history, export it, make it available offline, and more.

The Google Slides Android app.
To edit or comment on a slide: Tap the slide, and a menu will appear that lets you add or view comments for that slide or edit it. Tap an element on a slide, such as text or an image, and tools to edit that element will appear.
Any changes you make to your presentation in the mobile app are automatically saved and will appear the next time you open it in the Google Slides web app.
Get suggested slide layouts and content
Click the Explore icon at the lower-right corner of the screen. The Explore sidebar will open along the right side. In most cases, you’ll be presented with thumbnails of suggested layouts that Google Slides has automatically customized for the slide that’s open in the main window. Click the one you want, and it will be applied to the slide.

Use the Explore tool to get suggested layouts (left) and search for images (right).
At the top of the Explore sidebar is a search box. You can type in a word or phrase to find related content on the web or in your Google Drive. Search results appear on separate Web, Images, and Drive tabs in the sidebar. Click a web or Drive result to open it in a new browser tab. On the Images tab, click the + icon on the upper-right corner of an image to insert it onto your slide.
Create custom slide layouts to use as templates
You can design your own slide layouts to use as templates in any future presentation. First, open a new, blank presentation as described above. Then:
- On the menu bar over the blank presentation, select View > Theme builder .
- The main window switches to a layout editor. Toward the left you’ll see a column with the heading THEME on top and LAYOUTS just below that. Click the thumbnail of any layout in the LAYOUTS list. It will appear in the main window.
- You can remove objects that are already in any layout. For example, click on a block of text. A frame appears around the text. Without selecting the text itself, move the pointer to ward an edge of the frame, right-click, and select Delete from the menu that opens.

Creating a custom slide layout. (Click image to enlarge it.)
- Using the formatting toolbar above the slide, you can add new objects to the slide, including images, image placeholders, shapes, lines, and blocks for text. (Tip: enter placeholder words inside the text blocks.) When you click on any object, a frame appears around it. Drag and drop the frame to relocate it on the slide, or drag its edges to change its shape or size. You can also add or change the border and background colors for any object on the slide and/or change the background color for the whole slide.
- When you’re finished designing your layout, click the Rename button above the slide and give the layout a unique name.
- If you want to create another custom layout, click on the thumbnail of another layout under the column LAYOUTS and repeat the above steps starting from #3.
- When you are finished custom-designing all your layouts, click the X toward the upper-right of the slide layout in the main window.
- Along the top of the screen, click anywhere inside Untitled presentation and start typing. Tip: Use a name that indicates this is a template (e.g., “Annual Budget Presentation – Template”).
In the future, you can make new presentations starting from this template, and your custom slide layouts will be available.
- Open the template presentation you created in the steps above. On the menu bar, click File > Make a copy > Entire presentation . On the panel that opens, type in a name for the new presentation you want to create and click the Make a copy button. Google Slides will open this new presentation in a new browser tab.
- On the toolbar above the first slide of your new presentation, click Layout . From the panel of thumbnails that opens, select one of the layouts that you created. It will then be applied to the slide in the main window.
Collaborate on a presentation in Google Chat
An alternative way to collaborate on a presentation is to share it in Google Chat. Other people in your chat can add comments and help make changes to your presentation.
Start in Google Chat . To the left of the box where you type in your chat messages, click the + icon and select Drive file from the menu that opens. A panel will open over the screen listing the files in your Google Drive. Find and click your presentation to highlight it, then click INSERT on the lower-right corner.
You’ll be taken back to the chat message box. Click the blue right-pointing arrow to the right of the box, and a panel will open over the screen designating permissions for the shared presentation. By default, permissions are set to Comment. To change this, click Comment and select View or Edit . You can also allow the people in the chat to share a web link to your presentation with others outside of the chat by selecting Turn link sharing on .

You can share a presentation to individual or group chats in Google Chats. (Click image to enlarge it.)
After you’ve set the permissions, click SEND , and your message will appear in the chat stream with a large thumbnail of your presentation. To open a presentation in the chat, click the thumbnail. The presentation will open inside a large window that’s laid out alongside the right of the chat stream.
This is actually Google Slides running inside the chat window with your presentation loaded in it. Thus, most of the Slides commenting and editing tools are available for you and others in the chat to use on your presentation (if you granted them permission to comment or edit). The user interface is the same, except there’s no menu bar.

Collaborating on a presentation from within a Google Chat. (Click image to enlarge it.)
Use keyboard shortcuts
Save time in Slides by using keyboard shortcuts for common tasks. Below are some of the most useful to know. For more, select Help > Keyboard shortcuts from the top menu when you have a spreadsheet open or press Ctrl + / (Windows, Chrome OS) or ⌘ + / (macOS).
Handy Google Slides keyboard shortcuts
This story was originally published in September 2019 and updated in August 2022.
Related content
Nearly a third of women in tech jobs are considering leaving, is ai driving tech layoffs, 100 billion reasons apple is putting up a fight, the best ways to share files between windows pcs, from our editors straight to your inbox.
Howard Wen ( www.howardwen.com ) is a longtime contributor to Computerworld . He specializes in explainer guides, how-tos, and reviews of office applications and productivity tools.
More from this author
Google docs cheat sheet: how to get started, 8 highly useful slack bots for teams, microsoft onedrive cheat sheet, 9 chrome extensions that supercharge google drive, most popular authors.

- Howard Wen Contributing Writer
Show me more
Just how good is ai-assisted code generation.

Windows 11 Insider Previews: What’s in the latest build?
Tech layoffs in 2024: A timeline

Sam Bankman-Fried gets 25 years in prison

How to combat social media addiction

How social media companies are addicting adolescents

Got any suggestions?
We want to hear from you! Send us a message and help improve Slidesgo
Top searches
Trending searches

solar eclipse
25 templates

education technology
180 templates

32 templates

28 templates

thanksgiving
38 templates

The Numbers from 1 to 10
Premium template.
To keep enjoying the content of these slides, you must be a Premium user. Become Premium from €1.67 per month!
The Numbers from 1 to 10 Presentation
Premium google slides theme and powerpoint template.
Learning the numbers from 1 to 10 will be a fun task with our recently created Google Slides and PPT lesson. Teachers and designers have come together to create an interactive and engaging lesson for young learners. Not only does this lesson include real content, but it also includes printable exercises that encourage students to practice writing and identifying numbers. Students will be able to actively participate in this lesson and will leave feeling confident in their ability to count from 1 to 10.
Features of this template
- Designed for Elementary
- 100% editable and easy to modify
- 37 different slides to impress your audience
- Contains easy-to-edit graphics such as graphs, maps, tables, timelines and mockups
- Includes 500+ icons and Flaticon’s extension for customizing your slides
- Designed to be used in Google Slides and Microsoft PowerPoint
- A4 format optimized for printing
- Includes information about fonts, colors, and credits of the resources used
- Available in different languages
What are the benefits of having a Premium account?
What Premium plans do you have?
What can I do to have unlimited downloads?
Don’t want to attribute Slidesgo?
Gain access to over 22200 templates & presentations with premium from 1.67€/month.
Are you already Premium? Log in
Available in
Related posts on our blog.

How to Add, Duplicate, Move, Delete or Hide Slides in Google Slides

How to Change Layouts in PowerPoint

How to Change the Slide Size in Google Slides
Related presentations.

Unlock this template and gain unlimited access

Android Police
How to curve text in google slides.
Grab everyone's attention with curved text in presentation slides
Google Slides offers formatting options to tweak text, photos, videos, and other elements in a presentation. However, it lacks a few important add-ons. For instance, unlike PowerPoint, there isn't a built-in way to curve text in Google Slides. If you want to make your presentation stand out among the rest, use the tricks below to curve text in Google Slides.
Adding curved text is a neat way to elevate your presentation. Still, don't go overboard with curve text in Google Slides. It may create unnecessary distractions and make it hard for your audience to read a slide. Instead, highlight a few headings or text you want to separate from the other paragraphs.
Although Google Slides is available on mobile platforms like iPhone and Android phones , we focus on the web version in the steps below.
Curve text in Google Slides using PowerPoint
There are a couple of ways to curve text in Google Slides. If you have a Microsoft 365 subscription plan, use the PowerPoint desktop app to curve text and copy it into Google Slides. In another trick, you can use a web tool like Canva or InkPx to get the job done. Let's start with PowerPoint.
- Open Microsoft PowerPoint on Windows or Mac.
- Create a new presentation and go to any slide.
- Resize a text box and enter the text you want to add in Google Slides.
- Expand the text effects icon and click Transform .
- Check your curved text in action. Drag the white dots around the text box to resize it.
- Open a presentation in Google Slides and select a slide where you want to add curve text.
PowerPoint offers dozens of curved text styles. You'll have no trouble finding a style that matches your presentation tone and theme.
How to delete a text box in Google Slides
Use an online tool to curve text in google slides.
PowerPoint requires a paid Microsoft 365 plan. If you don't have a subscription, use the tools below to generate and upload curved text in Google Slides.
Curve text using Canva
Canva is one of the best graphic design tools available. The web app offers several editing tools to create curved text in a design. You can download the image with a transparent background and upload it to Google Slides. Follow the steps below.
- Use the top menu to tweak text style, color, size, and more.
The ability to download an image with a transparent background requires a Canva Pro subscription.
How to add transparency to an image in Google Slides
Curve text using inkpx.
InkPx is a web tool for creating curved text. You can make one and upload it on Google Slides.
- Visit InkPx .
- Enter text and pick a color, style, and size. Then, tweak the radius, spacing, and other details.
- Pick a PNG or JPG image type and save the image.
- Launch a presentation in Google Slides.
- Select your image and open it in Google Slides.
Unlike Microsoft PowerPoint and Canva, InkPx is free to download and use. And unlike other web tools, you don't need to create an account to use the service.
Make your presentation stand out
Aside from curve text, there are other ways to make an interesting pitch. However, creating an engaging presentation from scratch can be time-consuming. Check the top Google Slides templates to get started and complete an applaud-worthy presentation in no time.
Powerball winning numbers for April 3 drawing: Did anyone win $1.09 billion jackpot?
The Powerball jackpot has grown to $1.23 billion after there were no winners in Wednesday night's drawing.
At $1.09 billion, Wednesday's prize was the fourth-largest Powerball jackpot in the game's history and ninth-largest U.S. lottery jackpot, according to game officials.
The numbers were rolled and selected just after 11 p.m. ET on Wednesday, and we have the results below.
If there had been a winner after Wednesday's drawing and they chose the lump-sum payment option, they would've taken home $527.3 million after taxes, according to the lottery.
Here are the winning numbers for the Wednesday, April 3 drawing.
Feeling Lucky? Explore the Latest Lottery News & Results
Powerball winning numbers for April 3
The winning numbers from the Powerball drawing on Wednesday, April 3 are: 11, 38, 41, 62, 65 . Powerball: 15 . Power play: 3x.
Winning lottery numbers are sponsored by Jackpocket, the official digital lottery courier of the USA TODAY network .
Did anyone win Powerball?
There were no jackpot winners and no $2 million Match 5 + Power Play winners in Wednesday's drawing.
Multiple tickets in the following states won $1 million Match 5 prizes:
- California (2)
- Massachusetts (2)
- South Carolina
How to play Powerball
In order to purchase a $2 Powerball ticket, you'll have to visit your local convenience store, gas station or grocery store − and in a handful of states, you can purchase tickets online.
To play, you will need to pick six numbers in total to mark on your ticket. Five numbers will be white balls ranging from numbers 1 to 69. The Powerball is red and one number which is between 1 and 26.
If you want to increase your chances of winning, you can add a “Power Play” for $1 which increases the winnings for all non-jackpot prizes. This addition can multiply winnings by 2X , 3X , 4X , 5X , or 10X .
Players can also ask a cashier for a "Quick Pick" where a cashier will give you a computer generated numbers on a printed Powerball ticket.
Drawings are held on Monday, Wednesday and Saturday nights. If there's no jackpot winner, the cash prize will increase by millions.
Where to purchase lottery tickets
Tickets can be purchased in person at gas stations, convenience stores and grocery stores. Some airport terminals may also sell lottery tickets.
You can also order tickets online through Jackpocket, the official digital lottery courier of the USA TODAY Network , in these U.S. states and territories: Arizona, Arkansas, Colorado, Idaho, Massachusetts, Minnesota, Montana, Nebraska, New Hampshire, New Jersey, New Mexico, New York, Ohio, Oregon, Puerto Rico, Texas, Washington D.C. and West Virginia. The Jackpocket app allows you to pick your lottery game and numbers, place your order, see your ticket and collect your winnings all using your phone or home computer.
Jackpocket is the official digital lottery courier of the USA TODAY Network. Gannett may earn revenue for audience referrals to Jackpocket services. Must be 18+, 21+ in AZ and 19+ in NE. Not affiliated with any State Lottery. Gambling Problem? Call 1-877-8-HOPE-NY or text HOPENY (467369) (NY); 1-800-327-5050 (MA); 1-877-MYLIMIT (OR); 1-800-981-0023 (PR); 1-800-GAMBLER (all others). Visit jackpocket.com/tos for full terms.

5 Better Alternatives To Google Slides
I f you're looking to create a compelling presentation to showcase a new idea or persuade others, Google Slides may be the first option that comes to mind. But with few built-in templates, basic themes, and a limited graphics collection, you'll likely have a hard time making your presentation stand out against others.
If you want to make your presentation truly stand out, there are several alternatives to Google Slides that offer extra perks and features to give your presentations an edge. While Google focuses on integrating Slides with its other work-based apps like Sheets and Docs, other presentation apps focus more on design elements, transitions, and themes to help you convey your brand or personal image throughout your presentation.
We've tested these Google Slide alternatives to give you an idea of other available options to deliver impactful presentations. If you're looking for a way to make boring information more fun and engaging, here are the best presentation apps to replace Google Slides.
Read more: Major Graphics Card Brands Ranked Worst To Best
Microsoft PowerPoint
There's a reason so many businesses around the globe use Microsoft PowerPoint. Building its reputation as the go-to option for delivering high-quality presentations, the software generated $100 million in annual sales only three years after its initial release in 1990.
Microsoft PowerPoint may be Google Slides' largest competitor, but there are plenty of unique features that can add an extra flourish to your slides. PowerPoint excels in its impressive library of custom animations and slide transitions, which are fairly limited in Google Slides. Another unique feature is its AI-powered Designer tool. This provides professional design schemes that mirror the words used in your slides. For instance, if your title slide is named "Basketball Team 2024," Designer will automatically suggest pictures and slide layouts associated with basketball.
As PowerPoint has been in development longer than Google Slides, it naturally offers more nuanced features if you're looking for something specific. For example, you can save individual slides as an image file (using .png or .jpeg formats) or as a separate presentation file. There's also a large library of free PowerPoint templates designed to speed up your workflow. Moreover, PowerPoint integrates seamlessly with Microsoft Teams with its PowerPoint Live function, allowing you to easily share your presentation with your co-workers.
Prezi offers an innovative approach to showing presentations with its unique canvas feature. Unlike traditional presentation software, Prezi lets you zoom and pan around a flexible canvas. The canvas may feel distant to something of a presentation program, but there is still some linear order provided thanks to the Timeline view.
Finding ways to visualize data is one of the biggest challenges when dealing with presentation software. Prezi resolves this struggle with the help of its Story Blocks: a series of infographics available in multiple designs to visually represent data. You can easily edit infographics and even add animations to individual shapes. This can help add a story to your presentation and help you emphasize key points.
To further enhance your presentation visually, Prezi offers several topic path settings, which let you change how Prezi transitions from one topic to another. These options include subtopics, which are super helpful for breaking large chunks of information down. If you're looking for a unique, modern approach to presenting information, Prezi is a top pick.
If you're looking to create a professional presentation to convince potential clients about your business idea, Slidebean is a popular choice among professionals with plenty of customization options. One of the issues with Google Slides is its fairly limited template library, which is filled mostly with basic designs. Slidebean offers a better alternative with a broad selection of innovative templates split into categories for convenience.
The app's user interface is easy to navigate so that you can create slides in less time. Each slide has a dedicated Design and Outline tab. You can use the Outline tab to quickly edit the information on each slide without being distracted by all the visual elements. Another productivity-enhancing feature is the ability to generate a presentation theme from your website. Simply enter your URL, and Slidebean will automatically apply the theming to your presentation.
Slidebean is another presentation app to take advantage of AI. Using the Auto-Design feature, you can generate recommended slide layouts based on your existing content. It also features AI text suggestions designed to suit different industries. Overall, Slidebean offers a quicker, more efficient method for creating stunning presentations compared to Google Slides.
Canva is a well-known app among graphic designers, but it's also capable of making stunning presentations. The app also has mobile editions, so you can easily create and edit presentations on your Android phone , iOS device, or tablet. As long as you have an internet connection, you can modify your designs wherever you are.
To get started, head to Canva's online presentation maker . Canva offers a vast range of templates categorized by topic, which easily surpasses the simple templates in Google Slides . While some of the templates are only available to Canva Pro members, there is an ample amount of free templates to help you get started. You'll also find a large selection of stock photos, shapes, and illustrations to create beautiful customized slides.
Because Canva is built for graphic designers, you can access several features to give your presentation consistent theming. These include color palettes, font sets, and even a brand kit that allows you to add your company's fonts (available to Pro members only). One time-saving feature is Canva's Uploads tab, which lets you access recently uploaded media files. This offers a convenient way to copy content between different presentations.
Visme is a powerful visual design tool able to create videos, infographics, and presentations. One of the perks of using Visme is the company's free educational content, which offers advice on how to create impactful content to boost your brand. After signing up, the company also asks whether you're using Visme for your business, education purposes, or personal use to offer personalized tips.
In terms of charts and graphs, Visme offers some of the most impressive features we've seen from a presentation app, so you can effortlessly convey important statistics. From the Data tab, you can access dozens of graph styles to visually represent your data. Then, simply double-click a chart inside your presentation to edit the values instantly in a simple table format.
Another area that Visme excels in is collaboration. You can either generate a link to publish your presentation on the web or share your presentation privately with others. For each team member, you can choose who can view, edit, and comment slides for a seamless workflow. There's also a Slack integration that lets you receive messages whenever changes are made to your presentation. Visme is free for all users, with limited features available in its premium plans.
Read the original article on SlashGear .

REG - RBG Holdings PLC - Notice of Results & Investor Presentation
4 April 2024
RBG Holdings plc
("RBG", the "Group", or the "Company")
Notice of Results & Investor Presentation
RBG Holdings plc (AIM: RBGP), the legal services group, announces that its results for the 12 months ended 31 December 2023 will be published on Tuesday 30 April 2024.
CEO Jon Divers and CFO Kevin McNair will provide a live presentation relating to the results via Investor Meet Company on 30 April 2024 at 10.00am BST.
The presentation is open to all existing and potential shareholders. Questions can be submitted pre-event via your Investor Meet Company dashboard up until 29 April 2024, 09:00am BST, or at any time during the live presentation.
Investors can sign up to Investor Meet Company for free and add to meet RBG HOLDINGS PLC via:
https://www.investormeetcompany.com/rbg-holdings-plc/register-investor
Investors who already follow RBG HOLDINGS PLC on the Investor Meet Company platform will automatically be invited.
About RBG Holdings plc
· Further information about RBG Holdings plc is available at: www.rbgholdings.co.uk
· Further information about Rosenblatt (founded in 1989) is available at: www.rosenblatt.co.uk
· Further information about Memery Crystal (founded in 1979) is available at: www.memerycrystal.com
RNS may use your IP address to confirm compliance with the terms and conditions, to analyse how you engage with the information contained in this communication, and to share such analysis on an anonymised basis with others as part of our commercial services. For further information about how RNS and the London Stock Exchange use the personal data you provide us, please see our Privacy Policy. END NORZZGGDRFZGDZM
IMAGES
VIDEO
COMMENTS
Visit Google Slides, sign in, and open your presentation. To add numbers to all slides, select Insert > Slide Numbers from the menu. When the Slide Numbers box appears, mark the option for "On" and click "Apply." To number all slides except title slides, check the box for that option before you hit "Apply." Title slides are those that use the ...
Open your presentation in Google Slides. Click Insert → Slide numbers. Slide numbers option from Insert menu. A new window will open, where you can enable or disable slide numbering. Click "On" to enable slide numbering. Check "Skip title slides" if you don't want numbers to appear on title slides. Slide numbers window.
Click on Insert in the main menu. Click on Slide numbers from the dropdown menu that opens. The Slide numbers dialog box opens. Select the On option and click the Apply button. Slide numbers are added in the bottom right corner of each slide. Or. Check the Skip title slides checkbox and then click the Apply button.
Step 1: Open Your Google Slides Presentation. To begin, open the Google Slides presentation you're working on. This is where you'll implement the slide numbers for a more structured and user-friendly experience.
On your computer, open a presentation in Google Slides. In the menu at the top, click Insert Slide numbers. Click Apply. Note: If you don't want your title slide to be numbered, check the box next to "Skip title slides" when adding slide numbers. To number only certain slides: On your computer, open a presentation in Google Slides.
How to Add Slide Numbers in Google Slides. Open your slideshow. Click Insert. Select Slide numbers. Choose On, then click Apply. Our guide continues below with additional information on numbering Google Slides presentations, including pictures of these steps.
Open your presentation in Google Slides. Go to the Insert menu. Select Slide numbers from the bottom of the menu. A dialog will appear. In the Slide numbers dialog, select Apply if you want to number all slides. Otherwise, return to Google Slides and select the slides that you want to number and return to Slide numbers to select Apply to selected.
People using Google Slides can now add slide numbers to their presentations, providing a reference guide for both presenters and audiences. To add slide numb...
Step 4: Choose whether or not you wish to add the slide numbers to title slides, then click the blue Apply button. Note that there is an "Apply to selected" option if you only want to add slide numbers to some of the slides, instead of all of them. If so, then you will need to select those slides prior to step 2 above.
People using Google Slides can now add slide numbers to their presentations, providing a reference guide for both presenters and audiences. To add slide numbers, go to Insert > Slide numbers from the toolbar. You can then choose to apply slide numbers to all slides or selected slides. You can also choose to skip title slides: Release track:
Step 1: Click on 'Insert'. Click on the 'Insert' tab located in the top menu of your Google Slides presentation. In the 'Insert' dropdown menu, you'll see various options to add different elements to your slides, such as images, text boxes, and shapes. For our purpose, we're interested in the 'Slide numbers' option.
Follow these steps: 1) Go to Insert, then, select Slide numbers. 2) On the dialog box, click the On button. 3) Click Apply. Once successful, slide numbers will be shown on the bottom-left corner of each slide. Tip: To apply on selected slides, first select the slides you want to apply for slide numbers. Next, select Apply to selected.
Learn how to change slide layouts on individual slides and add page numbers to easily identify which Slide you are on in your presentation.
To add a Google Slides page number, scroll down to the Insert menu and select Slide Numbers. From the dialog box that appears, you can enable and (if already enabled) turn off slide numbers in Google Slides. You can skip the title slide for page numbering and choose whether you want the page numbers applied to one slide or the whole slide deck.
Step 1: Open the presentation in which slide numbers are enabled. Step 2: In Google Slides, you can edit the numbering just by changing the text in the textual box. You can edit all the numbers in one go by clicking Slide > Edit Theme. Step 3: Select the master slide (the parent/first slide) and click the box containing the '#' character at ...
Step-by-Step Guide to Adding Page Numbers in Google Slides: → Open Your Google Slides Presentation: Start by opening the Google Slides presentation to which you want to add page numbers. → Insert a Text Box: Click on the slide where you want to add the page numbers. In the toolbar at the top of the Google Slides window, click on "Text box ...
Step 1: Open the presentation in Google Slides, from which you want to remove headers and footers. Step 2: Click 'View' from the top menu and select "Master' from the dropdown menu. Step 3: Right Click to Delete the header or footer text. Step 4: Click the "X" button at the upper-right to exit the master view.
Use Google Slides to create online slideshows. Make beautiful presentations together with secure sharing in real-time and from any device.
Rename your presentation—Click Untitled presentation and enter a new name.. Add images—Click Insert Image to add images from your computer, the web, Google Drive, and more. You can also move, delete, or resize images. Add text—Click Insert Text box to add new text boxes. Then, click a text box to enter text. You can move, delete, or re-size text boxes.
Enabling page numbers in Google Slides only takes a few clicks: Open your Google Slides presentation. Click Insert > Slide Numbers in the top menu. In the Slide Numbers dialog box, click the On radio button. Click Apply. Page numbers will now appear on the bottom right corner of all slides, excluding title slides. Enabling page numbers.
From Google Slides or Drive: You also can use the search box at the top to find presentations in your Google Drive or shared with you. Enter words or numbers that may be in the presentation you ...
Free Number Slide Templates for an Engaging Slideshow. Make your data-driven presentations shine with a numbers PowerPoint template. Whether you're a business analyst, researcher, or student, these templates will help you convey your numerical information with clarity and impact. With a range of customizable slides, you can easily organize and ...
This adorable Google Slides & PowerPoint template with illustrated numbers comes with loads of ideas, matching and coloring activities and more to help the kids make the connection between the written digit and a number of objects. Easy to edit, almost ready to use and informative and entertaining to look at - what more can you ask?
Premium Google Slides theme and PowerPoint template. Learning the numbers from 1 to 10 will be a fun task with our recently created Google Slides and PPT lesson. Teachers and designers have come together to create an interactive and engaging lesson for young learners. Not only does this lesson include real content, but it also includes ...
How to autoplay your Google Slides presentation ... If you don't want to deal with these unusual pixel numbers, use 1080 x 1920 pixels in the page setup menu for vertical slides.
Google Slides offers a number of editing and formatting tools to help people make excellent presentations. You can even curve text in a slide. Throw a curve in your next Google Slides presentation
Powerball winning numbers for April 3. The winning numbers from the Powerball drawing on Wednesday, April 3 are: 11, 38, 41, 62, 65.Powerball: 15.Power play: 3x. Winning lottery numbers are ...
I f you're looking to create a compelling presentation to showcase a new idea or persuade others, Google Slides may be the first option that comes to mind. But with few built-in templates, basic ...
RNS Number : 2356J RBG Holdings PLC 04 April 2024 4 April 2024. RBG Holdings plc ("RBG", the "Group", or the "Company") Notice of Results & Investor Presentation. RBG Holdings plc (AIM: RBGP), the legal services group, announces that its results for the 12 months ended 31 December 2023 will be published on Tuesday 30 April 2024.
Nonpoint Source Program §319 Grants FY2025 Overview Presentation by MoDNR, April 2, 2024. File. Document Information. Areas of Focus. Water » Nonpoint Source Pollution and Grants. ... As Google's translation is an automated service it may display interpretations that are an approximation of the website's original content. You should not rely ...