
कंप्यूटर पर निबंध (Computer Essay in Hindi)

कम्प्यूटर आधुनिक तकनीक की एक महान खोज है। ये एक सामान्य मशीन है जो अपनी मेमोरी में ढेर सारे डाटा को सुरक्षित रखने की क्षमता रखती है। ये इनपुट (जैसे की-बोर्ड) और आउटपुट(प्रिंटर) के इस्तेमाल से काम करता है। ये इस्तेमाल करने में बेहद आसान है इसलिये कम उम्र के बच्चे भी इसे काफी आसानी से इस्तेमाल कर सकते हैं। ये बहुत ही भरोसेमंद है जिसे हम अपने साथ रख सकते है और कहीं भी और कभी भी प्रयोग कर सकते है। इससे हम अपने पुराने डेटा में बदलाव के साथ नया डेटा भी बना सकते है।
कंप्यूटर पर छोटे तथा बड़े निबंध (Long and Short Essay on Computer in Hindi, Computer par Nibandh Hindi mein)
निबंध 1 (300 शब्द) – computer par nibandh.
कंप्यूटर एक नवीनतम तकनीक है जो ज्यादातर जगहों पर इस्तेमाल किया जाता है। ये कम समय लेकर ज्यादा से ज्यादा कार्य को संभव बनाता है। ये कार्य स्थल पर व्यक्ति के श्रम को कम कर देता है अर्थात कम समय और कम श्रम शक्ति उच्च स्तर का परिणाम प्रदान करता है। आधुनिक समय में बिना कंप्यूटर के जीवन की कल्पना भी नही की जा सकती है।
हम लोग कंप्यूटर में इंटरनेट का इस्तेमाल कर सकते है जो बेहद कम समय में जरूरी जानकारी उपलब्ध कराता है। व्यक्ति के जीवन में इसका बड़ा योगदान है क्योंकि इसका प्रयोग अब हर क्षेत्र में है और ये हर क्षण हमारे सहायक के रुप में मौजूद रहता है। पहले के समय के कंप्यूटर कम प्रभावशाली तथा कार्य सीमित थे जबकि आधुनिक कंप्यूटर बेहद क्षमतावान, संभालने में आसान तथा ज्यादा से ज्यादा कार्यों को संपादित कर सकने वाले है, जिसके कारण यह लोगों में इतने लोकप्रिय होते जा रहे है।
जिंदगी हुआ आसान
भावी पीढ़ी के कंप्यूटर और प्रभावी होंगे साथ ही कार्यात्मक क्षमता भी बढ़ जाएगी। इसने हम सबके जीवन को आसान बना दिया है। इसके माध्यम से हम कुछ भी आसानी से सीख सकते है तथा अपने हुनर को और भी ज्यादे निखार सकते है। हम लोग चुटकियों में किसी भी सेवा, उत्पाद या दूसरी चीजों के बारे में जानकारी प्राप्त कर सकते है। कंप्यूटर में लगे इंटरनेट के द्वारा हम कुछ भी खरीदारी कर सकते है जिससे घर में बैठे-बैठे मुफ्त डिलिवरी प्राप्त कर सकते है। इससे हमारे स्कूल प्रोजेक्ट में भी खूब मदद मिलती है।
इंसानों के लिये कंप्यूटर के सैकड़ों फायदे है तो साइबर अपराध, अश्लील वेबसाइट, जैसे नुकसान भी शामिल है जिसकी पहुँच हमारे बच्चों और विद्यार्थियों तक आसानी से हो जाती है। हालांकि कुछ उपायों अपनाकर हम इसके कई नकारात्मक प्रभावों से बच भी सकते हैं।
निबंध 2 (400 शब्द) – कंप्यूटर का उपयोग व महत्व
पूरे मानव बिरादरी के लिये विज्ञान का अनोखा और पथप्रदर्शन करने वाला उपहार है कंप्यूटर। ये किसी भी प्रकृति का कार्य कर सकता है। किसी के भी द्वारा इसे संभालना सरल है और सीखने के लिये बहुत कम समय लगता है। अपने सुगमता और कार्य क्षमता के कारण इसका प्रयोग व्यापक तौर पर होता है जैसे- ऑफिस, बैंक, होटल, शिक्षण संस्थान, स्कूल, कॉलेज, दुकान, उद्योग आदि। कई लोग अपने बच्चों के लिये लैपटॉप और डेस्कटॉप खरीदते है जिससे अपनी पढ़ाई से संबंधित कार्य और कंप्यूटरीकृत विडियों गेमों का आनंद ले सकें।
विद्यार्थी के द्वारा कंप्यूटर का उपयोग
कंप्यूटर एक बड़ा शब्दकोश और बड़ा स्टोरेज डिवाइस है जो किसी भी तरह के डेटा को सुरक्षित रखने के लिये है जैसे- कोई भी जानकारी, पढ़ाई से संबंधित सामग्री, प्रोजेक्ट, फोटो, विडियो, गाना, खेल, आदि।
ये एक इलेक्ट्रॉनिक मशीन है जो गणना करने तथा बड़ी समस्याओं को सुलझाने में दक्ष है। ये हमारे कौशल को बढ़ाने में और आसानी से जानकारी प्राप्त करने में भी हमारी मदद करता है। ये एक डेटा आधारित मशीन है। ये हमें कई सारे टूल्स उपलब्ध कराता है जैसे- टेक्स्ट टूल्स, पेंट टूल्स आदि जो बच्चों के लिये बहुत फायदेमंद है और विद्यार्थी इसे अपमे स्कूली तथा प्रोजेक्ट कार्यों में काफी प्रभावपूर्ण रुप में उपयोग कर सकते हैं।
कंप्यूटर का महत्व
कार्य स्थल, शिक्षा के क्षेत्र में तथा निजी उपयोग के लिए कंप्यूटर का बहुत ही महत्व है। पुराने समय में हम सारे काम अपने हाथ से करते थे लेकिन आज कंप्यूटर की सहायता से खातों के प्रबंधन, डेटाबेस बनाने, आवश्यक जानकारी संग्रहीत करने जैसे विभिन्न उद्देश्यों को पूरा करने के लिए कंप्यूटर का उपयोग किया जाता है। आजकल हर कोई इंटरनेट के जरिये कंप्यूटर पर काम करना आसान मानता है। वास्तव में आज के समय कंप्यूटर हमारे जीवन का एक महत्वपूर्ण हिस्सा बन चुका है।
हम इसका प्रयोग बड़े और छोटे गणितीय गणनाओं के लिये सटीक ढंग से कर सकते है। इसका उपयोग मौसम की भविष्यवाणी, किताब, न्यूज पेपर, डाइग्नोजिंग बिमारी की छपाई आदि के लिये किया जा सकता है। इसका इस्तेमाल दुनिया के किसी भी कोने से ऑनलाइन रेलवे आरक्षण, होटल या रेस्टोरेंट की बुकिंग के लिये किया जाता है। बड़ी एमएनसी कंपनियों में भी इसका प्रयोग व्यापक है जिसमें खाता, इनवॉइस, पे-रोल, स्टॉक नियंत्रण आदि के लिये होता है।
निबंध 3 (500 शब्द) – कंप्यूटर: एक अद्भुत भेंट
तकनीकी उन्नति के आधुनिक संसार में, हमारे लिये विज्ञान के द्वारा कंप्यूटर एक अद्भुत भेंट है। इसने लोगों की जीवन शैली और आदर्श को बदल दिया है। कोई भी बिना कंप्यूटर के अपने जीवन की कल्पना भी नही कर सकता है क्योंकि यह कम समय बहुत से कार्यों को चुटकी में पूरा कर देता है। विकसित देशों के विकास में कंप्यूटर का एक बहुत बड़ा योगदान रहा है। ये केवल स्टोरेज और प्रौद्योगिकी डिवाइस नहीं है बल्कि ये किसी फरिश्ते की तरह है जो कुछ भी कर सकता है। कई लोगों द्वारा इसे मनोरंजन और संचार के लिये भी इस्तेमाल किया जाता है।
कम्प्यूटर क्या है ?
कम्प्यूटर एक यांत्रिक मशीन है, जिसमें अनेक प्रकार के गणित के सूत्रों एवं तथ्यों के आधार पर कार्य करता है। कम्प्यूटर बेहद ही कम समय में गणना करके तथ्यों को अपनी स्क्रीन पर दिखा देता है। कंप्यूटर आधुनिक युग के सबसे महत्वपूर्ण आविष्कारों में से एक है। आधुनिक युग को कंप्यूटर युग भी कहा जाता है। कंप्यूटर एक ऐसे यांत्रिक रचना का रूपात्मक , समन्वयात्मक योग और गुणात्मक समन्वय है जो तेज गति से कम-से-कम समय में ज्यादा-से-ज्यादा कार्य कर सकता है।
कम्प्यूटर के कार्य
कम्प्यूटर का मुख्य कार्य तो सूचनाओं को सहेजना और साझा करना ही है परन्तु आज कम्प्यूटर की सहायता से कई जटिल कार्य भी किये जाते हैं। यह विभिन्न कार्यों को तेज़ी से और अधिक सटीक रूप से पूरा करता है। ये कम समय लेकर ज्यादा से ज्यादा कार्य को संभव बनाता है। ये कार्य स्थल पर व्यक्ति के श्रम को कम कर देता है अर्थात कम समय और कम श्रम शक्ति पर उच्च स्तर का परिणाम प्रदान करता है।
ऊर्जा की बचत
ई-मेल, विडियो चैट, का उपयोग कर हम काफी कम समय में अपने मित्रों, रिश्तेदारों, माता-पिता या किसी भी व्यक्ति से जुड़ सकते है। कंप्यूटर में इंटरनेट का इस्तेमाल कर हम किसी भी विषय की जानकारी खोज या प्राप्त कर सकते है जो हमारे प्रोजेक्ट या शिक्षा संबंधी कार्यों के लिये मददगार हो। ये व्यापारिक लेनदेन के लिये भी बेहद आसान और सुरक्षित है। इसमें डेटा स्टोरेज की सुविधा की वजह से सरकारी, गैर-सरकारी, स्कूल, कॉलेज, आदि सभी जगहों पर कागजों की बचत होती है। इसके साथ ही कंमप्यूर द्वारा हम घर से ही ऑनलाइन खरीदारी, बिल जमा करना आदि जैसे कार्य कर सकते है, जिससे की हमारे समय तथा ऊर्जा दोनों की ही बचत होती है। जोंकि हमें इस बात का अहसास दिलाता है कि हम कमप्यूटर द्वारा उन कार्यों को भी तेजी से पूरा कर सकते हैं जोकि असंभव नही है लेकिन आसान भी नही है।
अपने पेशेवर जीवन में विद्यार्थियों की सहायता के साथ ही उनके कौशल को विकसित करने के लिये स्कूल, कॉलेज, और दूसरे शिक्षण संस्थानों में भारत सरकार द्वारा कंप्यूटर शिक्षा को अनिवार्य बना दिया गया है। आज के आधुनिक समय की नौकरियों के लिये कंप्यूटर का जानकारी होना लगभग अनिवार्य हो चुका है। इसमें दक्ष होने के लिये उच्च शिक्षा में नेटवर्क एडमिनिस्ट्रेशन, हार्डवेयर मेंटेनेंस, सॉफ्टवेयर इंस्टॉलेशन आदि विषय काफी लोकप्रिय है।
निबंध 4 (600 शब्द) – पहला मेकैनिकल कंप्यूटर, नई पीढ़ी के कंप्यूटर व कंप्यूटर के लाभ
कंप्यूटर के आविष्कार ने बहुतों के सपनों को साकार किया है यहाँ तक कि हम अपने जीवन की कल्पना बिना कंप्यूटर के नहीं कर सकते। सामान्यतः ये एक ऐसा डिवाइस है जिसका इस्तेमाल कई सारे उद्देश्यों के लिये किया जाता है जैसे- सूचनाओं को सुरक्षित रखना, ई-मेल, मैसेजिंग, सॉफ्टवेयर प्रोग्रामिंग, गणना, डेटा प्रौसेसिंग आदि। डेस्कटॉप कंप्यूटर पर कार्य करने के लिये सीपीयू, यूपीएस, कीबोर्ड, और माउस की जरूरत पड़ती है जबकि लैपटॉप में ये सब कुछ पहले से ही मौजूद रहता है। बड़ी मेमोरी के साथ ये एक इलेक्ट्रॉनिक डिवाइस है जो कोई भी डेटा को सुरक्षित रख सकता है। 21वीं सदी में हम एक प्रकार से कंप्यूटर की आधुनिक दुनिया में जी रहे है।
चार्ल्स बेबेज ने पहला मेकैनिकल कंप्यूटर बनाया
इससे पहले की पीढ़ीयों के कंप्यूटर बेहद सीमित कार्य क्षमता के थे जबकि आधुनिक समय के कंप्यूटर ढेर सारे कार्यों को अंजाम दे सकते हैं। चार्ल्स बेबेज ने पहला मेकैनिकल कंप्यूटर बनाया था जो आज के जमाने के कंप्यूटर से बहुत अलग था। कंप्यूटर के आविष्कार का लक्ष्य था एक ऐसी मशीन का निर्माण करना जो बहुत तेजी से गणितीय गणना कर सके। द्वितीय विश्व युद्ध के दौरान ऐसी मशीनों की जरुरत थी जोकि दुश्मनों के हथियारों की गति और दिशा का अनुमान तथा उनकी सही स्थिति का पता लगा सके, जोकि कंप्यूटरों के निर्माण का एक अहम कारण बना। आज के कंप्यूटर कृत्रिम बुद्धिमत्ता तकनीक से युक्त है जो जीवन के हर क्षेत्र में हमारे सहायता का कार्य करते है।
नई पीढ़ी के कंप्यूटर
नई पीढ़ी के कंप्यूटर अत्यधिक उन्नत होते है अर्थात वह छोटे, हल्के, और तेज होने के साथ ही कार्यक्षमता के मामले में बहुत ही शक्तिशाली भी होते है। आज के समय में इसका इस्तेमाल लगभग हर व्यवसाय में हो रहा है जैसे- परीक्षा, मौसम की भविष्यवाणी, शिक्षा, खरीदारी, ट्रैफिक नियंत्रण, उच्च स्तर की प्रोग्रामिंग, रेलवे टिकट बुकिंग, मेडिकल क्षेत्र, व्यापार आदि। इंटरनेट के साथ ये सूचना तकनीक का मुख्य आधार है और इसने साबित किया कि आज के समय में कुछ भी असंभव नहीं है। इंसानों के लिये कंप्यूटर के सैकड़ों फायदे है तो साइबर अपराध, अश्लील वेबसाइट, जैसे नुकसान भी शामिल है जिसकी पहुँच हमारे बच्चों और विद्यार्थियों तक आसानी से हो जाती है। कुछ उपायों के द्वारा हम इसके नकारात्मक प्रभावों से बच सकते है।
कंप्यूटर के लाभ
आज कंप्यूटर ने हमारे जीवन और काम को काफी आसान बना दिया है। वास्तव में कंप्यूटर आधुनिक तकनीक का एक बहुत बड़ा आविष्कार है।
- आज हम सभी बैंकों में कंप्यूटर के माध्यम से सारे कार्य आसानी से कर सकते है।
- प्रिंटिंग बुक और न्यूज पेपर जैसे कार्यों में कंप्यूटर बहुत ही ज्यादा आवश्यक हैं।
- बड़े शहरों में सड़कों के यातायात के नियम भी कंप्यूटर द्वारा नियंत्रित किये जाते है।
- आज के समय में अपराधियों के रिकॉर्ड रखने के लिए भी पुलिस कंप्यूटर का उपयोग करती है।
- कंप्यूटर का इस्तेमाल खातों, स्टॉक, चालान और पेरोल इत्यादि को बनाए रखने जैसे महत्वपूर्ण कार्यों के लिए भी किया जाता है।
आज के समय में मानव प्रजाति की कंप्यूटर तकनीक पर निर्भरता काफी तेजी से बढ़ती जा रही है। आज के समय में कोई भी व्यक्ति अपने जीवन की कल्पना बिना कंप्यूटर के नहीं कर सकता, क्योंकि इसने हर जगह अपने पैर पसार लिये है और लोग इसके आदि बन चुके है। यह हर विद्यार्थी के जीवन का भी एक महत्वपूर्ण हिस्सा बन चुका है। वो इसका इस्तेमाल प्रोजेक्ट बनाने के लिये, कविता सीखने के लिये, कहाँनियों के लिये, परीक्षा संबंधी नोट्स डाउनलोड करने के लिये, सूचना इकट्ठा करने आदि जैसे कार्यों के लिये बेहद कम समय में कर सकता है। ये विद्यार्थियों के कौशल विकास में बढ़ोत्तरी के साथ ही नौकरी पाने में सहायता करने में भी काफी सहायक होता है।

Related Information:
इंटरनेट पर निबंध
इंटरनेट का उपयोग पर निबंध
भारत के विकास में विज्ञान की भूमिका पर निबंध
FAQs: Frequently Asked Questions on Computer (कंप्यूटर पर अक्सर पूछे जाने वाले प्रश्न)
उत्तर- जापान का सुपर कंप्यूटर “फुगाकू”।
उत्तर- मल्टीपेटाफ्लोप्स सुपर कंप्यूटर प्रत्यूष।
उत्तर- आईबीएम (इंटरनेशनल बिजनेस मशीन)।
संबंधित पोस्ट

मेरी रुचि पर निबंध (My Hobby Essay in Hindi)

धन पर निबंध (Money Essay in Hindi)

समाचार पत्र पर निबंध (Newspaper Essay in Hindi)

मेरा स्कूल पर निबंध (My School Essay in Hindi)

शिक्षा का महत्व पर निबंध (Importance of Education Essay in Hindi)

बाघ पर निबंध (Tiger Essay in Hindi)
कंप्यूटर पर निबंध – Essay on Computer in Hindi
Essay on Computer in Hindi : दोस्तों आज हमने कंप्यूटर पर निबंध कक्षा 1, 2, 3, 4, 5, 6, 7, 8,9,10,11 & 12 के विद्यार्थियों के लिए लिखा है. इस निबंध की सहायता से सभी विद्यार्थी परीक्षाओं में निबंध लिख सकते है.
Computer आज लोगों की बेसिक जरूरत बन चुका है इसलिए वर्तमान में कंप्यूटर की जानकारी होना बहुत आवश्यक है खासकर विद्यार्थियों के लिए तो कंप्यूटर बहुत उपयोगी है इसीलिए उनको Computer par Nibandh लिखने लिया जाता है.

Get some Good Essay on Computer in Hindi for class 1, 2, 3, 4, 5, 6, 7, 8,9,10,11 & 12 Students
Essay on Computer in Hindi 100 Words
आधुनिक युग में विज्ञान की सहायता से मनुष्य ने कई आविष्कार किए हैं कंप्यूटर भी उन्हीं में से एक है. कंप्यूटर एक यांत्रिक मशीन है जो कि सभी प्रकार की गणना पलक झपकते ही कर लेता है.
कंप्यूटर का जनक चार्ल्स बैबेज को कहा जाता है. कंप्यूटर विज्ञान का अद्भुत आविष्कार है.
यह भी पढ़ें – डिजिटल इंडिया पर निबंध – Digital India Essay In Hindi
इसके उपयोग के कारण आज विज्ञान, कृषि, चिकित्सा, व्यवसायिक, बैंकिंग और अन्य क्षेत्रों में बहुत अधिक तेजी से विकास हुआ है.
आज Computer के द्वारा मौसम की जानकारी लेना, मनोरंजन की सामग्री, टिकट बुक करना, बैंक का कार्य करना बहुत आसान हो गया है. कंप्यूटर मानव द्वारा किया गया सर्वोत्तम अविष्कार है.
Latest Essay on Computer in Hindi 250 Words
प्रस्तावना –
कंप्यूटर मानव द्वारा किया गया सबसे महत्वपूर्ण और बेहतरीन आविष्कार है कंप्यूटर मानव के जीवन जीने के नजरिया है आज कंप्यूटर की सहायता से किसी भी प्रकार की जानकारी ली जा सकती है. इसकी गणना करने की तेजी ने मानव को भी तेज रफ्तार बना दिया है.
कंप्यूटर का आविष्कार सर्वप्रथम चार्ल्स बैबेज ने किया था इसके बाद इसमें नियंत्रण परिवर्तन होते रहे और आज यह दुनिया में परिवर्तन ला रहा है.
कंप्यूटर के उपयोग –
वर्तमान में कंप्यूटर पर देश दुनिया की सभी जानकारियां उपलब्ध है इसका उपयोग सभी कार्यालयों, बैंकों, अस्पतालों, स्कूलों और शोध के लिए वैज्ञानिकों द्वारा भी उपयोग किया जाता है.
इसके उपयोग के कारण आज हमें मौसम की सही जानकारी मिल जाती है साथ ही कंप्यूटर ने शिक्षा और व्यापार को भी आसान बना दिया है. चिकित्सा के क्षेत्र में तो क्रांतिकारी बदलाव आए है चिकित्सकों द्वारा बीमारियों के इलाज के लिए दवाइयां बनाना आसान हो गया है.
कंप्यूटर का उपयोग ऑनलाइन जानकारी का आदान प्रदान करने और अन्य स्थान पर व्यक्ति से घर बैठे बात भी कर सकते है. वैज्ञानिकों ने उसकी सहायता से कई उपलब्धियां प्राप्त की है उन्होंने अंतरिक्ष की जानकारी कंप्यूटर के माध्यम से ही प्राप्त की है कंप्यूटर एक बहुत उपयोगी वस्तु है.
निष्कर्ष –
कंप्यूटर मानव जीवन का अभिन्न अंग बन गया है इसके बहुत अधिक फायदे भी है तो कुछ नुकसान भी है इसलिए हमें इसका उपयोग सावधानी पूर्वक करना चाहिए. हमें यह हमेशा ध्यान रखना चाहिए कि कंप्यूटर अगर मानव जीवन को सुलभ बना सकता है तो यह उसे दुर्लभ भी बना सकता है.
Best Essay on Computer in Hindi 2000 Words
कंप्यूटर का आविष्कार एक अद्भुत आविष्कार है जिसने मानव सभ्यता को बदल कर रख दिया है आज कंप्यूटर के आविष्कार के कारण ही विज्ञान चिकित्सा कृषि मौसम इत्यादि सभी क्षेत्रों में बहुत तेजी से उन्नति हो रही है. 21वीं सदी में कंप्यूटर के बिना जीवन की कल्पना नहीं की जा सकती है.
आज Computer का उपयोग हर क्षेत्र में किया जा रहा है यह इतनी तेजी से कार्य करता है कि इंसान उस कार्य को करने में कई वर्ष का समय लगा देते है. कंप्यूटर का जनक चार्ल्स बैबेज को कहा जाता है उन्होंने ही सर्वप्रथम अबेकस नाम के कंप्यूटर का निर्माण किया था.
कंप्यूटर क्या है –
कंप्यूटर एक इलेक्ट्रिक मशीन है जिसको कमांड देने पर यह कार्य करती है कंप्यूटर जटिल से जटिल गणना को कुछ ही पूरा कर देता है. कंप्यूटर शब्द अंग्रेजी के “Compute” शब्द से बना है जिसका अर्थ है “गणना” करना होता है इसीलिए इसे गणक या संगणक भी कहा जाता है.
इसमें मुख्य रूप से एक सीपीयू होता है जिसमें प्रोसेसर, हार्ड डिस्क, रेम, मदरबोर्ड होते है इसके सीपीओ को कंप्यूटर का हार्ट भी कहा जाता है. एक मॉनिटर होता है जिसमें सभी क्रियाओं को हम देख सकते हैं कमांड देने के लिए इसमें की-बोर्ड और माउस को जोड़ा जाता है.
यह केवल 0 और 1 की भाषा ही समझता है लेकिन प्रोग्रामिंग लैंग्वेज की मदद से यह सभी भाषाओं को समझ लेता है.
कंप्यूटर का महत्व – Essay on Computer in hindi
वर्तमान में कंप्यूटर का महत्व में इतनी वृद्धि हो चुकी है कि अगर अब यह काम करना बंद कर दे तो सभी कार्य ठप पड़ जायेंगे. क्योंकि यह अकेला ही कई इंसानों के बराबर कार्य कर लेता है और इसके कार्य करने में त्रुटि होने की संभावना भी बहुत कम होती है.
आइए जानते है कि Computer के मुख्य रूप से क्या महत्व है –
(1) शिक्षा के क्षेत्र में –
कंप्यूटर के आविष्कार के बाद शिक्षा के क्षेत्र में जो क्रांति आई है वह बहुत ही चौंकाने वाली है. कंप्यूटर के माध्यम से अब शिक्षा ग्रहण करना बहुत आसान हो गया है हम अपने घर पर बैठकर दुनिया के किसी भी शिक्षक से इंटरनेट के माध्यम से शिक्षा ले सकते है.
आजकल हर विद्यालय में विद्यार्थियों को कंप्यूटर की शिक्षा दी जाती है इसके माध्यम से कई नए रोजगार क्षेत्र उपलब्ध हो गए है. कंप्यूटर प्रत्येक प्रकार की भाषा और शिक्षा को पूरे विश्व में कुछ ही समय में फैला दिया है.
(2) विज्ञान के क्षेत्र में –
कंप्यूटर विज्ञान का ही आविष्कार है लेकिन इसके आविष्कार के बाद विज्ञान में नए आयाम प्राप्त कर लिए है. कंप्यूटर विज्ञान के क्षेत्र में जो क्रांति लाई है उसको झुठलाया नहीं जा सकता क्योंकि आज इसी के बारे में हम नए-नए आविष्कार कर पा रहे है.
कंप्यूटर कि मदद से हम सटीक गणना कर पा रहे हैं इसके माध्यम से आज हम अंतरिक्ष का अध्ययन भी सुचारू रूप से कर पा रहे है.
(3) कृषि के क्षेत्र में –
जब से कंप्यूटर का उपयोग करके क्षेत्र में होना शुरू हुआ है तब से कृषि में काफी बदलाव आए है. कंप्यूटर के माध्यम से ही पता लगाया जा सकता है कि किस क्षेत्र की भूमि किस फसल के लिए अधिक कारगर है.
किसानों को भी इससे बहुत फायदा हुआ है उन्हें कंप्यूटरीकृत नई नई मशीनें मिली है जिनकी सहायता से वे आसान तरीकों से खेती कर सकते है. कौन से कीटनाशक का उपयोग कितनी मात्रा में करना है यह भी Computer की सहायता से आसानी से पता लगाया जा सकता है.
कंप्यूटर के आविष्कार के कारण कृषि क्षेत्र के लिए नई नई मशीनें तैयार की गई है जिसने कृषि करना और भी बना दिया है.
(4) चिकित्सा के क्षेत्र में –
वर्तमान में चिकित्सा के क्षेत्र में कंप्यूटर का उपयोग बहुत अधिक मात्रा में देखा गया है यह सिर्फ कंप्यूटर की तेजी और सटीकता के कारण हो पाया है इसीलिए आजकल अस्पताल के रिसेप्शन से लेकर ऑपरेशन थिएटर तक कंप्यूटर का उपयोग लिया जाता है.
पहले दिन बीमारियों की जांच में महीनों लग जाते थे आज वह कुछ ही मिनटों में हो जाती है. डॉक्टर अपने रोगी को कंप्यूटर द्वारा सलाह दे सकता है और उसका इलाज भी कर सकता है. आजकल तो कंप्यूटरीकृत रोबोट द्वारा इंसानों की सर्जरी भी की जाने लगी है.
कंप्यूटर के आ जाने से इलाज कराने के लिए विदेश नहीं जाना पड़ता है वहां के डॉक्टर कंप्यूटर के द्वारा ही हमारे देश के डॉक्टरों को सलाह देते है जिसके कारण इलाज में खर्च भी कम होता है.
कंप्यूटर से किसी भी बीमारी के उप भाव का पहले से ही आंकलन किया जा सकता है जिसे समय रहते हैं रोगी को बचाया जा सकता है. कंप्यूटर ने चिकित्सा को नए आयाम दिए है जिसके कारण आज चिकित्सा पद्धति बहुत सुलभ हो गई है.
(5) मौसम विज्ञान के क्षेत्र में –
वर्तमान में कंप्यूटर के द्वारा मौसम की जानकारी लेना सामान्य बात हो गई है लेकिन पहले के जमाने में मौसम की जानकारी नहीं होने के कारण कई प्रकार की दुर्घटनाएं हो जाती थी साथ ही किसानों की फसल भी खराब हो जाती थी लेकिन आजकल कंप्यूटर द्वारा पहले ही मौसम का अनुमान लगा लिया जाता है जिससे यह पता लग जाता है कि बारिश कब होगी.
इसके साथ ही कंप्यूटर द्वारा भूकंप, बाढ़, सुनामी, ज्वालामुखी का फटना इत्यादि की जानकारी हमें पहले से ही मिल जाती है जिससे इन सभी घटनाओं से बचा जा सकता है.
कंप्यूटर के द्वारा आंधी तूफान का भी पता लग जाता है हाल ही में भारत में आए फनी तूफान की जानकारी पहले से होने के कारण जान-माल की हानि बहुत कम हुई यह सब कंप्यूटर होने के कारण ही संभव हो पाया है.
(6) व्यवसायिक क्षेत्र में –
व्यवसाय क्षेत्र में कंप्यूटर में अद्भुत क्रांति ला दी है क्योंकि आज पूरा व्यवसाय ऑनलाइन हो चुका है. हम कहीं भी बैठ कर कोई भी व्यवसाय कर सकते है. आजकल तो ऑनलाइन ही सामान बेचा जाने लगा है जिससे ग्राहकों को घर बैठे ही समान मिल जाता है.
कंप्यूटर द्वारा शेयर मार्केट के भाव पर नजर रखी जा सकती है साथ ही शेयर खरीदे और बेचे भी जा सकते है. एक व्यापारी दूसरे व्यापारी को ईमेल भेजकर या फिर इंटरनेट द्वारा वीडियो कॉल करके ऑर्डर दे सकता है और ले सकता है.
Computer के कारण व्यापार करना बहुत सुलभ हो गया है एक देश के व्यापारी दूसरे देश के व्यापारी से मिनटों में व्यापार कर सकते है. कंप्यूटर व्यवसाय को इस तरह से बना दिया है कि आजकल तो कंप्यूटर से चलने वाली गाड़ी और बस भी आने लगी है जो कि स्वयं चलती है.
कंप्यूटर के कारण एवं व्यापार करने के लिए किसी दुकान या बाजार की जरूरत नहीं रह गई है यह दुनिया के किसी भी कोने में बैठ कर किया जा सकता है.
(7) बैंकिंग क्षेत्र में –
वर्तमान में कंप्यूटर के बिना बैंकिंग प्रणाली की कल्पना भी नहीं की जा सकती है क्योंकि आज पूरी बैंकिंग प्रणाली कंप्यूटर पर ही टिकी हुई है अगर यह खराब हो जाता है तो पूरा बैंकिंग सिस्टम गड़बड़ा जाएगा. कंप्यूटर के कारण आज हम घर बैठे बैंक में पैसे जमा करा सकते हैं और निकलवा भी सकते है.
कंप्यूटरीकृत एटीएम के कारण आज हमें पैसे निकालने के लिए बैंको की कतार में नहीं खड़ा होना पड़ता है. कंप्यूटर के कारण ही हम कुछ ही सेकंड में एक अकाउंट से दूसरे अकाउंट में पैसे भेज सकते है. और वर्तमान में तो ऑनलाइन समान खरीद सकते है और पेमेंट भी ऑनलाइन कर सकते है.
कंप्यूटर के दुष्परिणाम –
विज्ञान का कोई भी आविष्कार हो उसके फायदे है तो कुछ दुष्परिणाम भी होते है इसलिए कंप्यूटर के फायदे बहुत अधिक है और दुष्परिणाम कम है लेकिन इनके बारे में भी चर्चा करनी जरूरी है.
(1) यादाश्त कमजोर होना –
कंप्यूटर के अत्यधिक उपयोग के बारे में आजकल हम किसी भी चीज को याद नहीं रखते है सब कंप्यूटर की मेमोरी में स्टोर कर कर रखते है जिसके कारण हमारी याद करने की क्षमता पर है असर पड़ने लगा है. आजकल छोटे से छोटा काम करने के लिए हम कंप्यूटरीकृत मोबाइल या कंप्यूटर का उपयोग करने लगे है.
जैसे गणना करना, मोबाइल नंबर, घर का जरूरी कार्य और अन्य कार्य के लिए हम मोबाइल में फीड करके रखते है याद करने की जहमत तक नहीं उठाते है जिससे हमारी याददाश्त कमजोर हो गई है.
(2) आंखों का खराब होना-
कंप्यूटर का अत्यधिक उपयोग करने के कारण लोगों की आंखें आजकल जल्दी ही खराब हो जाती हैं जिसके कारण आपको ज्यादातर लोग चश्मा लगाए नजर आते है.
कंप्यूटर की ऑनलाइन दुनिया और उसने पड़े गेम्स के कारण लोगों को कंप्यूटर की लत पड़ गई है और वे सुबह शाम बस कंप्यूटर पर ही टाइम पास करते रहते हैं जिससे उनकी आंखों पर बुरा प्रभाव पड़ रहा है.
(3) डिप्रेशन का शिकार होना –
कंप्यूटर का अत्यधिक उपयोग डिप्रेशन का कारण भी बन सकता है क्योंकि कंप्यूटर पर इंटरनेट के माध्यम से कई प्रकार के लोग जुड़े हुए होते है वह हमें किसी भी प्रकार से ऐसी बातों में उलझा देते हैं जिससे हम डिप्रेशन का शिकार हो जाते है.
आजकल बच्चे कंप्यूटर पर गेम खेलते है और उसमें सफल नहीं होने पर अपने आप को कोसते हैं और डिप्रेशन का शिकार हो जाते हैं
(4) विद्यार्थियों पर कुप्रभाव पढ़ना –
विद्यार्थियों के लिए कंप्यूटर बहुत आवश्यक है लेकिन इसका उपयोग जितनी जरूरत हो उतना ही करना चाहिए अगर इससे ज्यादा किया जाता है तो यह बहुत अधिक वह प्रभाव भी डाल सकता है
क्योंकि आजकल Computer से इंटरनेट जुड़ा होता है और वहां पर कई प्रकार की सामग्री उपलब्ध होती है. कुछ सामग्री ऐसी होती है जो कि बच्चों के लिए नहीं होती लेकिन अगर बच्चे देख लेते है तो उन पर गलत असर पड़ता है. साथ ही कंप्यूटर पर नए नए गेम्स आ रहे है
जो कि बच्चों को बहुत लुभाते है लेकिन इन गेम्स के कारण बच्चे हिंसक और चिड़चिडे बन जाते है इससे उनकी पढ़ाई भी बाधित हो जाती है जिससे वे डिप्रेशन का शिकार भी हो जाते है.
(5) समय का दुरुपयोग –
एक बार कोई कंप्यूटर का उपयोग करना चालू कर दे तो उसकी ही दुनिया में खो जाता है जिसके कारण समय का बहुत दुरुपयोग होता है. वर्तमान में लोग ऑनलाइन चेटिंग साइटों पर घंटों यूं ही बात करते हुए बिता देते है.
जिससे जरूरी कार्य बाधित हो जाता है और सबसे बड़ी बात समय का सदुपयोग नहीं हो पाता है इससे उन्हें आगे चलकर कठिनाइयों का सामना करना पड़ता है.
(6) अनिद्रा –
कंप्यूटर के अत्यधिक उपयोग के कारण नींद नहीं आने की समस्या भी अब आम हो गई है क्योंकि लगातार कंप्यूटर का उपयोग करने के कारण आंखों पर बुरा प्रभाव पड़ता है और मनुष्य का मस्तिक दिन और रात के बीच भेद नहीं कर पाता है जिससे लोग अनिद्रा के शिकार हो जाते है.
(7) एकाग्रता की कमी –
कंप्यूटर के बहुत अधिक उपयोग के कारण एकाग्रता में भी कमी आ जाती है इसका ज्यादा प्रभाव विद्यार्थियों पर पड़ता है क्योंकि कंप्यूटर पर नई-नई मनोरंजन की सामग्री उपलब्ध रहती है इसलिए विद्यार्थी इसकी और आकर्षित होते हैं और पढ़ाई में ध्यान नहीं दे पाते है जिससे उनकी एकाग्रता में कमी आ जाती है.
(8) अनावश्यक बिजली की खपत –
कंप्यूटर द्वारा बिजली की खपत अधिक मात्रा में होती है क्योंकि इसका उपयोग आजकल हर घर में किया जाने लगा है.
वर्तमान में लोग बिना किसी कार्य के भी कंप्यूटर चलाते रहते है जिससे उनकी स्वास्थ्य को तो हानि होती ही होती है साथ ही अनावश्यक बिजली की खपत भी होती है जो कि हमारे पर्यावरण के लिए भी हानिकारक है.
(9) डाटा खराब होना –
आजकल कंप्यूटर बहुत ही स्मार्ट हो गए हैं उनमें डेटा के खराब होने की संभावना बहुत कम होती है लेकिन फिर भी डाटा के खराब होने की संभावना बनी रहती है. वर्तमान में सभी प्रकार का लेखा-जोखा कंप्यूटर में ही होता है अगर यह खराब हो जाता है तो बहुत नुकसान हो सकता है.
(10) डाटा चोरी होना –
वर्तमान में Computer के डाटा चोरी होना एक बहुत गंभीर समस्या बन चुकी है क्योंकि जिस प्रकार कंप्यूटर का उपयोग है बढ़ा है उसी प्रकार वायरस की संख्या भी बढ़ गई है जिससे आपके पर्सनल और बैंकिंग डाटा चुराए जा सकते है.
डाटा चोरी होने के कारण वर्तमान में लोगों को काफी समस्या का सामना करना पड़ रहा है क्योंकि आजकल बैंकिंग प्रणाली ऑनलाइन होने के कारण लोगों के पैसे कोई और व्यक्ति डाटा हैक करके निकाल लेता है.
कंप्यूटर ने मानव जीवन को बदल कर रख दिया है आज अगर कंप्यूटर में होता तो हम इस टेक्नोलॉजी भरी दुनिया की कल्पना भी नहीं कर सकते थे. कंप्यूटर ने मानव के जीवन जीने का तरीका ही बदल कर रख दिया है इसके उपयोग से मानव को बहुत अधिक फायदा हुआ है.
आज हर क्षेत्र में Computer का उपयोग बहुलता से हो रहा है . इसका उपयोग और दुरुपयोग दोनों हो रहे है लेकिन उपयोग अत्यधिक होने के कारण दुरुपयोग की तरफ ध्यान नहीं जाता है.
Best Important Essay on Computer in Hindi
यह भी पढ़ें –
मोबाइल फोन पर निबंध – Essay on Mobile Phone in Hindi
समाचार पत्र पर निबंध – Essay on Newspaper in Hindi
गर्मी की छुट्टी पर निबंध – Summer Vacation Essay in Hindi
इंटरनेट पर निबंध – Essay on Internet in Hindi
नारी शिक्षा पर निबंध – Essay on Nari Shiksha in Hindi
हम आशा करते है कि हमारे द्वारा Essay on Computer in Hindi पर लिखा गया निबंध आपको पसंद आया होगा। अगर यह लेख आपको पसंद आया है तो अपने दोस्तों और परिवार वालों के साथ शेयर करना ना भूले। इसके बारे में अगर आपका कोई सवाल या सुझाव हो तो हमें कमेंट करके जरूर बताएं।
6 thoughts on “कंप्यूटर पर निबंध – Essay on Computer in Hindi”
Sch a NYC.. essayyy on computer…..☺️☺️ .
Thank You, Niya for appreciation.
Very good essay
Thank you mahek for appreciation, we glad you like our content.
Computer ke bare mein janne ke liye Computer bahut mahatva mahatva hai computer bahut sata karta hai
Dhanyawad Himanshu Yadav, aise hi nibandh padhne ke liye hindiyatra par aate rahe.
Leave a Comment Cancel reply
25,000+ students realised their study abroad dream with us. Take the first step today
Here’s your new year gift, one app for all your, study abroad needs, start your journey, track your progress, grow with the community and so much more.

Verification Code
An OTP has been sent to your registered mobile no. Please verify

Thanks for your comment !
Our team will review it before it's shown to our readers.

- Hindi Grammar /
Essay on Computer in Hindi: जानिए कंप्यूटर पर परीक्षाओं में पूछे जाने वाले निबंध
- Updated on
- दिसम्बर 26, 2023

Essay on Computer in Hindi: आज की टेक्नोलॉजी की दुनिया में डिजिटल लिट्रेसी के लिए कंप्यूटर को समझना महत्वपूर्ण है। कंप्यूटर में डिजिटल उपकरणों, सॉफ्टवेयर और ऑनलाइन प्लेटफ़ॉर्म को प्रभावी ढंग से उपयोग और नेविगेट करने की क्षमता शामिल है। कंप्यूटर इंटरनेट के माध्यम से बड़ी मात्रा में जानकारी तक पहुंच प्रदान करते हैं। छात्र रिसर्च करने, शैक्षिक संसाधनों को प्राप्त करने और वर्तमान घटनाओं पर अपडेट रहने के लिए कंप्यूटर का उपयोग कर सकते हैं। इसलिए कई बार छात्रों को कंप्यूटर पर निबंध तैयार करने को दिया जाता है। Essay on Computer in Hindi के बारे में जानने के लिए इस ब्लॉग को अंत तक पढ़ें।
कंप्यूटर पर निबंध 100 शब्दों में
कंप्यूटर एक इक्विपमेंट है जो सूचनाओं को स्टोर, डिस्प्ले और मैनेज करता है। कंप्यूटर नए अपडेट और सुधारों के साथ विकसित हुए हैं। कंप्यूटर के तीन मुख्य प्रकार होते हैं: एनालॉग, डिजिटल और हाइब्रिड, प्रत्येक की गति और सटीकता अलग-अलग होती है। कंप्यूटर केवल डेटा को संभालने के अलावा भी विभिन्न उद्देश्यों की पूर्ति करते हैं, वे मशीनों को नियंत्रित करते हैं, व्यवसायों को व्यवस्थित करते हैं, बिक्री की सुविधा प्रदान करते हैं और शैक्षणिक गतिविधियों में भी समर्थन करते हैं। अपनी अत्यधिक उपयोगिता और बहुमुखी प्रतिभा के कारण कंप्यूटर हमारे दैनिक जीवन का एक अभिन्न अंग बन गया है।
कंप्यूटर पर निबंध 200 शब्दों में
अब कंप्यूटर के बिना जीवन की कल्पना करना असंभव है। कंप्यूटर के आविष्कार ने कई सपनों को हकीकत में बदल दिया है। कंप्यूटर विभिन्न उद्देश्यों को पूरा करते हैं जैसे जानकारी संग्रहीत करना, प्रोग्रामिंग, सॉफ्टवेयर विकास, गणना, ईमेल और बहुत कुछ।
एक कंप्यूटर में मॉनिटर, कीबोर्ड, माउस, सीपीयू और यूपीएस जैसे आवश्यक भाग होते हैं, और यह अपने विशाल भंडारण के लिए जाना जाता है। लोग टेक्नोलॉजी पर बहुत अधिक निर्भर हो गए हैं, और कंप्यूटर का उपयोग हर क्षेत्र में किया जाता है, छात्रों से लेकर शैक्षणिक उद्देश्यों के लिए कार्यालय कर्मचारी तक अपने कार्यों के लिए इसका उपयोग करते हैं।
कंप्यूटर छात्रों को पेशेवर कौशल सुधारने और सीखने में बहुत मदद करता है। 21वीं सदी में, अधिक उन्नत कंप्यूटरों में रुचि बढ़ रही है जो हल्के, छोटे, शक्तिशाली और उच्च गति और सटीकता वाले हैं। कंप्यूटर केवल स्कूल और कार्यालय के काम के लिए नहीं हैं, उनका उपयोग यातायात को नियंत्रित करने, मौसम का पूर्वानुमान लगाने, शैक्षिक और चिकित्सा उद्देश्यों, अंतरिक्ष यान डिजाइन, संचालन, परीक्षा, अपराध का पता लगाने और बहुत कुछ के लिए किया जाता है।
जैसे-जैसे लोगों की ज़रूरतें और मांगें विकसित हो रही हैं, कंप्यूटर ने गति बनाए रखी है। हमारी सभी आवश्यकताओं को पूरा करने और संतुष्ट करने के लिए यह लगातार विकसित हो रहा है।
कंप्यूटर पर निबंध 500 शब्दों में
Essay on Computer in Hindi 500 शब्दों में नीचे दिया गया है-
कंप्यूटर हमारी रोजमर्रा के कार्यों का एक महत्वपूर्ण हिस्सा बन गया है और पिछले दशक में इसका उपयोग काफी बढ़ गया है। आज की दुनिया में, कंप्यूटर लगभग हर ऑफिस का एक अभिन्न अंग है, चाहे वह निजी क्षेत्र हो या सरकारी। मनुष्य कई दशकों से कंप्यूटर पर निर्भर रहा है, और उनका अनुप्रयोग, कृषि, डिज़ाइन, मशीनरी निर्माण, रक्षा और अन्य विभिन्न क्षेत्रों तक फैला हुआ है। सबसे महत्वपूर्ण बात यह है कि कंप्यूटर ने पूरी दुनिया में क्रांतिकारी परिवर्तन ला दिया है।
कंप्यूटर का इतिहास
कंप्यूटर की उत्पत्ति के बारे में सटीकता से कहना तो मुश्किल है, लेकिन विशेषज्ञ बताते हैं कि द्वितीय विश्व युद्ध के समय यह अस्तित्व में आया था। उस समय, कंप्यूटर का उपयोग मुख्य रूप से डेटा भंडारण के लिए किया जाता था। इसका पूरी तरह से सरकारी उद्देश्यों के लिए उपयोग किया जाता था, जनता के लिए नहीं। प्रारंभिक चरण में, कंप्यूटर विशाल और वजनदार मशीनें थीं।
कंप्यूटर का कार्य करना
कंप्यूटर तीन-चरणीय चक्र के माध्यम से चलता है जिसे इनपुट, प्रोसेस और आउटपुट के रूप में जाना जाता है। कंप्यूटर के प्रत्येक कार्य के लिए इसी प्रक्रिया को फॉलो किया जाता है, जिसे करने के लिए कंप्यूटर को निर्देश दिया जाता है। सीधे शब्दों में कहें तो जब हम कंप्यूटर को जानकारी देते हैं तो वह इनपुट होता है। इस पूरी कार्य प्रणाली में सीपीयू सबसे अधिक आवश्यक होता है यह कार्य करता है, कंप्यूटर जो परिणाम प्रदान करता है वह आउटपुट है।
कंप्यूटर के प्रकार
एक बुनियादी कंप्यूटर सीपीयू, मॉनिटर, माउस और कीबोर्ड से बना होता है। इसके अतिरिक्त, कई अन्य भागों को इससे जोड़ा जा सकता है, जैसे प्रिंटर, लेजर पेन, स्कैनर, और बहुत कुछ।
कंप्यूटर के प्रकार होते हैं, जैसे सुपर कंप्यूटर, मेनफ्रेम, पर्सनल कंप्यूटर (डेस्कटॉप), PDA, लैपटॉप और यहां तक कि मोबाइल फोन भी कंप्यूटर के रूप में योग्य हैं क्योंकि वे सभी आवश्यक मानदंडों को पूरा करते हैं।
विभिन्न क्षेत्रों में कंप्यूटर का उपयोग
जैसे-जैसे कंप्यूटर का उपयोग बढ़ा, यह लगभग हर क्षेत्र में आवश्यक हो गया, जिससे संचालन अधिक कुशल हो गया। बहुत सारे ऐसे महत्वपूर्ण क्षेत्र हैं जहां कंप्यूटर दैनिक कार्यों में महत्वपूर्ण भूमिका निभाते हैं-
- चिकित्सा क्षेत्र: कंप्यूटर का उपयोग चिकित्सा के क्षेत्र में बीमारियों का उपचार करने, परीक्षण करने और विभिन्न बीमारियों का इलाज खोजने के लिए किया जाता है। उन्होंने चिकित्सा प्रगति और घातक बीमारियों के उपचार की खोज में महत्वपूर्ण योगदान दिया है।
- रिसर्च: वैज्ञानिक, अंतरिक्ष और सामाजिक अनुसंधान में कंप्यूटर बहुत उपयोगी है। वे पर्यावरण की निगरानी, अंतरिक्ष की खोज और अध्ययन करने में सहायता करते हैं। उदाहरण के लिए, स्पेस रिसर्च ने गैलेक्सीज की खोज को सक्षम बनाया है। यह साइंटिफिक रिसर्च में भी पृथ्वी पर वैलुएबल रिसोर्सेज का पता लगाने में मदद करता है।
- रक्षा: रक्षा क्षेत्र में, कंप्यूटर किसी देश की सुरक्षा और संरक्षा के लिए महत्वपूर्ण हैं। वे संभावित खतरों का पता लगाने और दुश्मनों पर निगरानी रखने में सुरक्षा एजेंसियों की सहायता करते हैं। राष्ट्र की सुरक्षा के लिए रक्षा उद्योग की क्षमता को बनाए रखने में कंप्यूटर महत्वपूर्ण भूमिका निभाते हैं।
कंप्यूटर के प्रतिकूल प्रभाव
कंप्यूटर अब बहुत जरूरी हो गए हैं, लेकिन वे खतरे भी पैदा करते हैं, मुख्य रूप से हैकरों से जो प्राइवेट डेटा को चुरा सकते हैं और ऑनलाइन आपकी जानकारी लीक कर सकते हैं। इससे महत्वपूर्ण जोखिम पैदा होता है, इसके अतिरिक्त, वायरस, स्पैम, बग और कई अन्य मुद्दे कंप्यूटर से संबंधित मुश्किलें बढ़ती हैं। व्यक्तिगत जानकारी से छेड़छाड़ का खतरा अनधिकृत पहुंच और दुर्भावनापूर्ण गतिविधियों से सुरक्षा के लिए मजबूत साइबर सुरक्षा उपाय आवश्यक है। कंप्यूटर हमारे जीवन में एक महत्वपूर्ण भूमिका निभाते हैं, इसलिए एक सुरक्षित और संरक्षित डिजिटल वातावरण सुनिश्चित करने के लिए इन खतरों के बारे में जागरूक होने महत्वपूर्ण हो जाता है।
कंप्यूटर एक महत्वपूर्ण मशीन है जो हमारे जीवन में महत्वपूर्ण भूमिका निभाती है। इसके दोहरे प्रभाव हैं, एक अनुकूल और एक प्रतिकूल, यह इस बात पर निर्भर करता है कि इसका उपयोग कैसे किया जाता है। कंप्यूटर का नियंत्रण पूरी तरह से आपके हाथ में होता है। भविष्य में एक समय ऐसा भी आ सकता है जब मानव सभ्यता कंप्यूटर पर हमारी अत्यधिक निर्भरता के कारण कंप्यूटर के बिना नहीं पनप सकेगी। अब तक, यह एक उल्लेखनीय मानवीय खोज है जिसने अनगिनत लोगों की जान बचाई है। इसके फायदे और चुनौतियों दोनों को पहचानते हुए, कंप्यूटर का जिम्मेदार और विचारशील उपयोग हमारे जीवन पर उनके सकारात्मक प्रभाव को सुनिश्चित करने की कुंजी है।
कंप्यूटर पर 10 लाइंस
Essay on Computer in Hindi जानने के बाद अब कंप्यूटर पर 10 लाइंस जान लेते हैं, जो नीचे दी गई हैं-
- कंप्यूटर एक इलेक्ट्रॉनिक उपकरण है जो विभिन्न कार्यों को करने के लिए डेटा को प्रोसेस और संग्रहीत करता है।
- यह इनपुट, प्रोसेसिंग और आउटपुट के एक चक्र के माध्यम से संचालित होता है, जो इसे अपने कार्यों में बहुमुखी बनाता है।
- कंप्यूटर के प्रमुख घटकों में सेंट्रल प्रोसेसिंग यूनिट (सीपीयू), मॉनिटर, कीबोर्ड और माउस शामिल हैं।
- पिछले कुछ वर्षों में कंप्यूटर बड़ी, भारी मशीनों से कॉम्पैक्ट और शक्तिशाली उपकरणों में विकसित हुए हैं।
- इनका व्यापक रूप से शिक्षा, व्यवसाय, चिकित्सा, अनुसंधान और मनोरंजन जैसे क्षेत्रों में उपयोग किया जाता है।
- कंप्यूटर के आविष्कार ने संचार में क्रांति ला दी है, जिससे कार्य तेज़ और अधिक कुशल हो गए हैं।
- कंप्यूटर वैज्ञानिक अनुसंधान में महत्वपूर्ण भूमिका निभाते हैं, जटिल डेटा की खोज और विश्लेषण में सहायता करते हैं।
- इंटरनेट के आने के साथ, कंप्यूटर विश्व स्तर पर लोगों को जोड़ते हैं, जिससे सूचनाओं के आदान-प्रदान में सुविधा होती है।
- साइबर सुरक्षा एक चिंता का विषय है क्योंकि कंप्यूटर वायरस, हैकिंग और डेटा उल्लंघनों जैसे खतरों से जानी पंहुचायी जा सकती है।
- कंप्यूटर का निरंतर विकास हमारे रहने और काम करने के तरीके को आकार देता है, जो आधुनिक समाज के विभिन्न पहलुओं को प्रभावित करता है।
कंप्यूटर एक इलेक्ट्रॉनिक उपकरण है जो विभिन्न कार्यों को करने के लिए डेटा को प्रोसेस करता है। इसमें सेंट्रल प्रोसेसिंग यूनिट (सीपीयू), मॉनिटर, कीबोर्ड और माउस जैसे हार्डवेयर डिवाइस शामिल हैं।
कंप्यूटर इनपुट, प्रोसेसिंग और आउटपुट की प्रक्रिया का पालन करते हैं। यूजर्स डेटा इनपुट करते हैं, सीपीयू इसे प्रोसेस करता है, और आउटपुट के रूप में परिणाम प्रदर्शित होते हैं।
कंप्यूटर विभिन्न प्रकार के आते हैं, जिनमें पर्सनल कंप्यूटर (डेस्कटॉप और लैपटॉप), सर्वर, मेनफ्रेम, सुपर कंप्यूटर और स्मार्टफोन और टैबलेट जैसे मोबाइल डिवाइस शामिल हैं।
कंप्यूटर सुरक्षा खतरों में वायरस, मैलवेयर, फ़िशिंग हमले, रैंसमवेयर और अनधिकृत पहुंच शामिल हैं। इन खतरों से बचाव में एंटीवायरस सॉफ़्टवेयर, फ़ायरवॉल का उपयोग करना और सुरक्षित ऑनलाइन प्रयोग करना शामिल है।
आशा है कि आपको इस ब्लाॅग में Essay on Computer in Hindi के बारे में पूरी जानकारी मिल गई होगी। इसी प्रकार के अन्य कोर्स और सिलेबस से जुड़े ब्लॉग्स पढ़ने के लिए Leverage Edu के साथ बने रहें।

Team Leverage Edu
प्रातिक्रिया दे जवाब रद्द करें
अगली बार जब मैं टिप्पणी करूँ, तो इस ब्राउज़र में मेरा नाम, ईमेल और वेबसाइट सहेजें।
Contact no. *

Leaving already?
8 Universities with higher ROI than IITs and IIMs
Grab this one-time opportunity to download this ebook
Connect With Us
25,000+ students realised their study abroad dream with us. take the first step today..

Resend OTP in
Need help with?
Study abroad.
UK, Canada, US & More
IELTS, GRE, GMAT & More
Scholarship, Loans & Forex
Country Preference
New Zealand
Which English test are you planning to take?
Which academic test are you planning to take.
Not Sure yet
When are you planning to take the exam?
Already booked my exam slot
Within 2 Months
Want to learn about the test
Which Degree do you wish to pursue?
When do you want to start studying abroad.
September 2024
January 2025
What is your budget to study abroad?

How would you describe this article ?
Please rate this article
We would like to hear more.
कंप्यूटर पर निबंध 10 lines (Essay On Computer in Hindi) 100, 150, 200, 250, 300, 500 words Short and Long Essay

कंप्यूटर पर निबंध(Essay On Computer in Hindi) – कंप्यूटर एक इलेक्ट्रॉनिक उपकरण है जो मैसेजिंग, गणना, डेटा स्टोरेज, प्रिंटिंग आदि जैसे कई कार्य कर सकता है। कंप्यूटर का विकास 1940 के दशक में हुआ था। आजकल कंप्यूटर का उपयोग हर जगह किया जाता है- घर, स्कूल, कॉलेज, कार्यालय, होटल, रेलवे स्टेशन, हवाई अड्डे, दुकान आदि।
कंप्यूटर कई प्रकार के होते हैं जैसे पॉकेट कंप्यूटर, लैपटॉप, पर्सनल कंप्यूटर आदि।
साथ ही कंप्यूटर के विभिन्न रंग और आकार होते हैं। मेरे पास भी घर पर एक computer है, जिसमें एक कीबोर्ड, एक माउस, एक सीपीयू (कंप्यूटर का दिमाग), एक स्क्रीन या मॉनिटर और एक यूपीएस है।
कंप्यूटर पर निबंध 10 लाइन (Essay on Computer 10 lines in Hindi)
- 1) कंप्यूटर एक इलेक्ट्रॉनिक डिवाइस है जो यूजर द्वारा दिए गए कमांड पर काम करता है।
- 2) उपयोगकर्ता द्वारा कंप्यूटर को दिए गए निर्देशों के सेट को “प्रोग्राम” कहा जाता है।
- 3) पहला यांत्रिक कंप्यूटर “चार्ल्स बैबेज” द्वारा विकसित किया गया था जिसे “विश्लेषणात्मक इंजन” कहा जाता है; इसलिए, उन्हें “कंप्यूटर के पिता” के रूप में जाना जाता है।
- 4) कंप्यूटर एक ऐसे सिस्टम में काम करता है जिसमें एक इनपुट डिवाइस, एक आउटपुट डिवाइस, एक सेंट्रल प्रोसेसिंग यूनिट (सीपीयू) और एक स्टोरेज डिवाइस होता है।
- 5) कंप्यूटर में डाले गए कच्चे डेटा और सूचना को “इनपुट” कहा जाता है।
- 6) प्रोसेसिंग उपयोगकर्ता द्वारा दिए गए निर्देशों के अनुसार डेटा का संचालन और प्रबंधन है, यह पूरी तरह से कंप्यूटर की एक आंतरिक प्रक्रिया है।
- 7) उपयोगकर्ता द्वारा दिए गए कमांड को प्रोसेस करने के बाद कंप्यूटर द्वारा निर्दिष्ट एनालिटिक्स को “आउटपुट” कहा जाता है।
- 8) कंप्यूटर शब्द लैटिन शब्द “कम्प्यूटारे” से लिया गया है जिसका अर्थ है “गणना करना”।
- 9) इनपुट डिवाइस जैसे माउस, कीबोर्ड आदि और आउटपुट डिवाइस जैसे प्रिंटर, मॉनिटर आदि को “पेरिफेरल” कहा जाता है।
- 10) उपयोग के आधार पर कंप्यूटर तीन प्रकार के होते हैं, जैसे- एनालॉग, डिजिटल और हाइब्रिड।
कंप्यूटर पर निबंध 20 लाइन (Essay on Computer 20 lines in Hindi)
- 1) कंप्यूटर एक मशीन है जो अंकगणितीय और तार्किक संचालन करता है।
- 2) एक कंप्यूटर के दो मुख्य घटक होते हैं – हार्डवेयर और सॉफ्टवेयर।
- 3) इंटरनेट कंप्यूटरों पर चलता है, दुनिया भर के अरबों कंप्यूटरों को आपस में जोड़ता है।
- 4) एक कंप्यूटर कमांड इनपुट लेता है, इसे कमांड के अनुसार प्रोसेस करता है और आउटपुट प्रदान करता है।
- 5) प्रोग्रामेबल कंप्यूटर की अवधारणा का आविष्कार सबसे पहले चार्ल्स बैबेज ने किया था।
- 6) कंप्यूटर अपनी उच्च प्रसंस्करण गति और कम्प्यूटेशनल क्षमताओं के कारण बेहद लोकप्रिय हैं।
- 7) आज लगभग हर जगह कंप्यूटर का उपयोग किया जाता है- कार्यालय, अस्पताल, स्टेशन, स्कूल आदि।
- 8) आज के सबसे शक्तिशाली कंप्यूटर को सुपर कंप्यूटर कहा जाता है।
- 9) कंप्यूटर की सेंट्रल प्रोसेसिंग यूनिट और रैंडम एक्सेस मेमोरी इंटीग्रेटेड सर्किट हैं।
- 10) आज विश्व की केवल 10% मुद्रा भौतिक है, बाकी सब कंप्यूटर पर मौजूद है।
- 11) 1980 से अब तक का सबसे भारी डेस्कटॉप कंप्यूटर IBM 5120 था।
- 12) हमारे स्मार्टफोन में एक कंप्यूटर भी होता है, जो पहले से काफी सस्ता और स्मार्ट होता है।
- 13) 2005 के बाद से किसी भी इंसान ने उच्च विनिर्देश कंप्यूटर के खिलाफ शतरंज का खेल नहीं जीता है।
- 14) DOOM नाम का एक वीडियो गेम कंप्यूटर में सबसे पहले सबसे ज्यादा इंस्टॉल किया जाने वाला सॉफ्टवेयर था।
- 15) कम्प्यूटर में कार्य करते समय अत्यधिक गरम होने से बचाने के लिए पंखे लगे हैं।
- 16) Apple का पहला कंप्यूटर, Apple I पहली बार 1976 में बिक्री के लिए आया था।
- 17) बेबीलोन में 500 ईसा पूर्व में अविष्कार किया गया पहला बेसिक कंप्यूटर अबेकस था।
- 18) कंप्यूटर की हार्ड डिस्क कंपन के प्रति बहुत संवेदनशील होती है।
- 19) कंप्यूटर आज सभी वैज्ञानिक उपकरणों में आवश्यक घटक बन गए हैं।
- 20) कंप्यूटर का व्यापक रूप से मौसम की भविष्यवाणी और चिकित्सा उपकरणों के लिए उपयोग किया जाता है।
इनके बारे मे भी जाने
कंप्यूटर पर लघु निबंध (Short essay on computer in Hindi)
Essay On Computer – यह विज्ञान का युग है। विज्ञान ने हमें कई महत्वपूर्ण चीजें दी हैं जिससे हमारा जीवन आरामदायक हो जाता है। कंप्यूटर उनमें से एक है। कंप्यूटर एक इलेक्ट्रॉनिक मशीन है जो बहुत तेजी से काम करती है। यह कई अंकगणितीय और तर्क संचालन सहित पर्याप्त संगणना कर सकता है। आज कंप्यूटर का उपयोग हर क्षेत्र में किया जाता है।
आजकल कंप्यूटर एक आम बात है। इसका उपयोग कार्यालयों, कारखानों और अंतरिक्ष प्रौद्योगिकी में किया जाता है। यह बहुत तेजी से गणना कर सकता है।
कंप्यूटर के भौतिक घटकों को हार्डवेयर के रूप में जाना जाता है। एक सेट प्रोग्राम जिसे हम कंप्यूटर पर चलाते हैं, सॉफ्टवेयर कहलाता है। हम डेटा डालते हैं, जिसे इनपुट कहा जाता है। इनपुट कंप्यूटर में सूचना में बदल जाता है। फिर कंप्यूटर प्रोसेसिंग करता है और परिणाम देता है जिसे आउटपुट कहा जाता है।
आजकल टेलीफोन बिल और बिजली बिल जो हमें मिलते हैं, वे सभी कंप्यूटर द्वारा तैयार किए जाते हैं। लोगो में कई प्रिमिटिव का इस्तेमाल किया गया है। आदिम वे आदेश हैं जो कंप्यूटर को दिए गए थे। भारतीय कंप्यूटर उद्योग तीव्र गति से बढ़ रहा है। यह अच्छा है अगर हर कोई कंप्यूटर पर काम करना जानता है।
आजकल हर जगह कंप्यूटर का इस्तेमाल होता है। सरकारी विभागों के सभी कम्प्यूटरीकृत हैं। कंप्यूटर के आविष्कार से बैंकिंग आसान हो गई।
इसलिए, कंप्यूटर दुनिया के लिए बहुत महत्वपूर्ण चीज है। कंप्यूटर के बिना कुछ भी नहीं है। इसका उपयोग हम मानव कल्याण के लिए करें।
कंप्यूटर पर निबंध 100 शब्द (Essay on Computer 100 words in Hindi)
Essay On Computer – डेटा को स्टोर करने, प्रदर्शित करने और प्रोसेस करने के लिए उपयोग किए जाने वाले इलेक्ट्रॉनिक उपकरण को कंप्यूटर के रूप में जाना जाता है। कंप्यूटर अधिक आधुनिक अपडेट और उन्नति के साथ गुजरते दिनों के साथ बहुत उभरा है।
कंप्यूटर तीन प्रकार के होते हैं, जिनमें एनालॉग, डिजिटल और हाइब्रिड कंप्यूटर शामिल हैं। गति, साथ ही प्रत्येक कंप्यूटर की सटीकता को वर्गीकृत किया गया है। डेटा को प्रोसेस करने और स्टोर करने के अलावा कंप्यूटर के कई कार्य हैं। यह मशीन को नियंत्रित करने, व्यवसाय को व्यवस्थित करने, सेवाओं और उत्पादों को बेचने और निश्चित रूप से शैक्षणिक उद्देश्यों के लिए मदद करता है। कंप्यूटर ने अपनी महान उपयोगिता से हमारे दैनिक जीवन में अपना स्थान बना लिया है।
कंप्यूटर पर निबंध 150 शब्द (Essay on computer 150 words in Hindi)
Essay On Computer – कंप्यूटर एक इलेक्ट्रॉनिक गैजेट है जिसका उपयोग सूचनाओं को प्रोसेस करने और स्टोर करने और दिखाने के लिए किया जाता है। किसी भी मामले में, यह गैजेट के रूप में एक कंप्यूटर के अत्यधिक सरलीकरण का एक कार्य है जो उपरोक्त चित्रण को पार करने वाली कुछ अलग-अलग क्षमताओं को चलाने के लिए विकसित हुआ है।
कंप्यूटर को आमतौर पर तीन प्रकारों में बांटा जाता है, जो इस बात पर निर्भर करता है कि वे डेटा को कैसे प्रोसेस करते हैं। इसके लिए उन्होंने सरल, डिजिटल और हाइब्रिड कंप्यूटर सौंपे हैं। यह लक्षण वर्णन हर कंप्यूटर की गति और सटीकता को तय करता है।
एक कंप्यूटर सूचनाओं को संग्रहीत करने और तैयार करने की विशिष्ट क्षमता के अलावा कुछ क्षमताओं को पूरा कर सकता है। उनमें से कुछ हैं मशीन और हार्डवेयर को नियंत्रित करना, व्यवसाय और साहसिक कार्य की व्यवस्था करना, वस्तुओं और सेवाओं को बेचना, विद्वानों के उद्देश्यों के लिए अनुसंधान को निर्देशित करना, और बहुत कुछ।
कंप्यूटर अब हमारे दैनिक जीवन का एक सदस्य है। नवाचार ने हमारे जीवन के सभी हिस्सों में अपना रास्ता खोज लिया है। अंत तक कंप्यूटर प्रत्येक क्षेत्र में मूल्यवान रहेगा।
कंप्यूटर पर निबंध 200 शब्द (Essay on Computer 200 words in Hindi)
कंप्यूटर पर निबंध – अब हमारे जीवन में कंप्यूटर के बिना कल्पना करना भी असंभव है। कंप्यूटर के आविष्कार ने कई लोगों के सपनों को हकीकत में बदलने में मदद की। बहुत सारे उद्देश्यों के लिए, कंप्यूटर का उपयोग सूचनाओं को संग्रहीत करने, प्रोग्रामिंग करने और सॉफ़्टवेयर विकसित करने, गणना और ईमेल उद्देश्यों, और बहुत कुछ के लिए किया जा सकता है।
एक कंप्यूटर में एक मॉनिटर, एक कीबोर्ड, एक माउस, एक सीपीयू और एक यूपीएस आवश्यक भागों के रूप में होता है। एक कंप्यूटर अपने प्रचुर भंडारण स्थान के लिए जाना जाता है।
मानव अब ज्यादातर तकनीक पर निर्भर है, और कंप्यूटर का उपयोग हर क्षेत्र में पाया जा सकता है, छात्रों से लेकर उनके शैक्षणिक उद्देश्यों के लिए कार्यालय के कर्मचारियों तक उनके काम के लिए।
पेशेवर कौशल में सुधार और सीखने के लिए, कंप्यूटर छात्रों की बहुत मदद करता है। 21वीं सदी में, लोगों को हल्के, छोटे और शक्तिशाली उच्च गति और सटीकता वाले अधिक उन्नत कंप्यूटरों में रुचि दिखाई दे रही है। न केवल स्कूल और कार्यालय के काम के उद्देश्य, बल्कि कंप्यूटर का उपयोग यातायात को नियंत्रित करने, मौसम की भविष्यवाणी करने, शैक्षिक और चिकित्सा उद्देश्यों, अंतरिक्ष यान के मार्गदर्शन और डिजाइन, संचालन के उद्देश्यों, परीक्षा के उद्देश्यों, अपराध का पता लगाने और सूची के लिए भी किया जा सकता है। लोगों की उन्नत आवश्यकताओं और मांगों के साथ, कंप्यूटर भी समय के साथ विकसित हुआ है और हमें सभी जरूरतों को पूरा करता है।
कंप्यूटर पर निबंध 250 शब्द (Essay on Computer 250 words in Hindi)
Essay On Computer – कंप्यूटर मनुष्य की सर्वश्रेष्ठ कृतियों में से एक है। यह विज्ञान और नवाचार का सबसे ताज़ा परिणाम है जिसने हमारे जीवन को इतना आसान बना दिया है। कंप्यूटर सर्वव्यापी हो रहे हैं क्योंकि हम कहीं से भी कंप्यूटर पा सकते हैं, जैसे घरों, स्कूलों, विश्वविद्यालयों, कार्यस्थलों, अनुसंधान केंद्रों से लेकर पुस्तकालयों, प्रदर्शनी हॉलों और यहां तक कि आपातकालीन क्लीनिकों तक।
कंप्यूटर एक ऐसी मशीन है जो बड़ी मात्रा में जानकारी को स्टोर कर सकता है और लोगों की तुलना में बहुत कम समय में विभिन्न जिम्मेदारियों को पूरा कर सकता है। यह उपयोगकर्ताओं से योगदान एकत्र करता है, इसे संसाधित करता है और आउटपुट के रूप में सामान्य परिणाम बताता है।
प्राथमिक यांत्रिक कंप्यूटर चार्ल्स बैबेज द्वारा बनाया गया था। कंप्यूटर के महत्वपूर्ण भाग हैं – माउस, कीबोर्ड, सेंट्रल प्रोसेसिंग यूनिट (सीपीयू) और मॉनिटर।
इस दिन और उम्र में, लोग कंप्यूटर के इतने आदी हो गए हैं कि उनके लिए इसके बिना जीना अकल्पनीय है। जो चीज कंप्यूटर को इतना महत्वपूर्ण बनाती है वह है इसका उपयोग, उत्पादकता और शुद्ध खुलापन। कंप्यूटर के आश्चर्यजनक लाभ इसे सबसे आवश्यक नवप्रवर्तन बनाते हैं।
कंप्यूटर शिक्षा के क्षेत्र में अविश्वसनीय उपयोग के हैं। यह प्रशिक्षकों को कार्यशालाओं के लिए परिचय की योजना बनाने में सहायता करता है; छात्रों को लगता है कि कंप्यूटर का उपयोग करके अपने घरों से अपनी परियोजनाओं पर काम करना आसान है। हर एक पैसे से संबंधित लेन-देन, प्रतिनिधि रिकॉर्ड कीपिंग, बिजनेस फॉर्म कंप्यूटर के माध्यम से किया जाता है। एक्स-रे, सीटी स्कैन, एमआरआई जांच आदि जैसे नैदानिक तरीकों को निर्देशित करते समय कंप्यूटर का उपयोग किया जाता है। पीसी रक्षा कार्यालय के लिए एक सहायता हैं क्योंकि वे आने वाले रॉकेटों की पहचान करने में मदद करते हैं, इस तरह से बमों का निदान जीवन बचाने में मदद करते हैं।
कंप्यूटर मनुष्य द्वारा मानवता का समर्थन करने के लिए बनाया गया विज्ञान का एक शानदार उपहार है। कंप्यूटर वर्तमान वास्तविकता को प्रशासित कर रहे हैं, और इसने निश्चित रूप से व्यक्तियों की जीवन शैली और राष्ट्र निर्माण की स्थिति को बदल दिया है।
कंप्यूटर पर निबंध 300 शब्द (Essay on Computer 300 words in Hindi)
Essay On Computer – कंप्यूटर एक इलेक्ट्रॉनिक उपकरण है। इसका उपयोग जटिल गणना करने और कई कार्यों को करने के लिए किया जाता है जो न केवल कठिन हैं बल्कि मानव मन के लिए प्रभावी ढंग से पूरा करना असंभव है।
कंप्यूटर आधुनिक तकनीक के सर्वश्रेष्ठ आविष्कारों में से एक है। पहला कंप्यूटर मैकेनिकल था, जिसे चार्ल्स बैबेज ने बनाया था।
कंप्यूटर के चार मूल भाग सीपीयू (सेंट्रल प्रोसेसिंग यूनिट), मॉनिटर, कीबोर्ड और हाउस हैं। CPU को कंप्यूटर के दिमाग के रूप में जाना जाता है जो सभी कार्यों को प्रोसेस करता है।
मॉनिटर कंप्यूटर के आउटपुट डिवाइस हैं जो परिणाम दिखाते हैं जबकि कीबोर्ड और पॉइंटिंग डिवाइस माउस इनपुट डिवाइस हैं जिनका उपयोग कमांड देने के लिए किया जाता है।
एक computer ने न केवल इनपुट और आउट डिवाइस को प्रोसेस किया है। इसमें एक नियंत्रण और अंकगणितीय इकाई और मेमोरी इकाई होती है जो डेटा को संग्रहीत करती है, प्रिंटर, स्पीकर और कैमरा जैसे कुछ अन्य परिधीय उपकरणों को इसके साथ जोड़ा जा सकता है।
ये सभी आउटपुट डिवाइस हैं। इस डिजिटल दुनिया में, कंप्यूटर का हमारे जीवन में महत्वपूर्ण स्थान है। इसने हमारा काम आसान कर दिया है।
यह हमारे समय की बचत करता है और हमारे प्रयास को कम करता है। कंप्यूटर का उपयोग कार्यालयों, बैंकों, अस्पतालों, रेलवे स्टेशनों, रक्षा, शैक्षणिक संस्थानों आदि में किया जाता है।
यह उन्हें अपना असाइनमेंट और प्रेजेंटेशन बनाने और विभिन्न विषयों के बारे में जानकारी खोजने में मदद करता है।
कंप्यूटर मनुष्य द्वारा मानव जाति की सहायता के लिए बनाया गया विज्ञान का एक अद्भुत उपहार है। लैपटॉप और डेस्कटॉप कंप्यूटर के ऐसे रूप हैं जो आज दुनिया पर राज कर रहे हैं और इसने निश्चित रूप से लोगों की जीवन शैली और विकासशील देशों की स्थिति को बदल दिया है।
- Myself Essay
- My Teacher Essay
- My Favourite Teacher Essay
कंप्यूटर पर निबंध 500 शब्द (Essay on Computer 500 words in Hindi )
Essay On Computer in Hindi – कंप्यूटर पर इस निबंध में हम कंप्यूटर के बारे में कुछ उपयोगी बातों पर चर्चा करने जा रहे हैं। आधुनिक समय का कंप्यूटर हमारे दैनिक जीवन का एक महत्वपूर्ण हिस्सा बन गया है। साथ ही, पिछले दशक के दौरान उनका उपयोग कई गुना बढ़ गया है। आजकल वे प्राइवेट हो या सरकारी हर ऑफिस में कंप्यूटर का इस्तेमाल करते हैं। मानव जाति अब कई दशकों से कंप्यूटर का उपयोग कर रही है। साथ ही, उनका उपयोग कृषि, डिजाइनिंग, मशीनरी बनाने, रक्षा और कई अन्य क्षेत्रों में किया जाता है। इन सबसे ऊपर, उन्होंने पूरी दुनिया में क्रांति ला दी है।
कंप्यूटर का इतिहास
कंप्यूटर की सही उत्पत्ति का पता लगाना बहुत मुश्किल है। लेकिन कुछ विशेषज्ञों के अनुसार द्वितीय विश्व युद्ध के समय कंप्यूटर मौजूद था। साथ ही उस समय इनका इस्तेमाल डाटा रखने के लिए किया जाता था। लेकिन, यह केवल सरकारी उपयोग के लिए था न कि सार्वजनिक उपयोग के लिए। इन सबसे ऊपर, शुरुआत में, कंप्यूटर एक बहुत बड़ी और भारी मशीन थी।
कंप्यूटर का कार्य करना
कंप्यूटर तीन चरणों वाले चक्र अर्थात् इनपुट, प्रोसेस और आउटपुट पर चलता है। साथ ही, कंप्यूटर इस चक्र का पालन हर उस प्रक्रिया में करता है, जिसे करने के लिए उसे कहा गया था। सरल शब्दों में इस प्रक्रिया को इस प्रकार समझाया जा सकता है। जो डेटा हम कंप्यूटर में फीड करते हैं वह इनपुट होता है, सीपीयू जो काम करता है वह प्रोसेस होता है और जो परिणाम कंप्यूटर देता है वह आउटपुट होता है।
कंप्यूटर के घटक और प्रकार
साधारण कंप्यूटर में मूल रूप से सीपीयू, मॉनिटर, माउस और कीबोर्ड होते हैं। साथ ही, कंप्यूटर के सैकड़ों अन्य पुर्जे हैं जिन्हें इससे जोड़ा जा सकता है। इन अन्य भागों में एक प्रिंटर, लेजर पेन, स्कैनर आदि शामिल हैं।
कंप्यूटर को सुपर कंप्यूटर, मेनफ्रेम, पर्सनल कंप्यूटर (डेस्कटॉप), पीडीए, लैपटॉप इत्यादि जैसे कई अलग-अलग प्रकारों में वर्गीकृत किया गया है। मोबाइल फोन भी कंप्यूटर का एक प्रकार है क्योंकि यह कंप्यूटर होने के सभी मानदंडों को पूरा करता है।
विभिन्न क्षेत्रों में कंप्यूटर का उपयोग
जैसे-जैसे कंप्यूटर का उपयोग बढ़ता गया, लगभग हर क्षेत्र में अपने कार्यों के लिए कंप्यूटर का उपयोग करना एक आवश्यकता बन गया। साथ ही, उन्होंने काम करना और चीजों को छांटना आसान बना दिया है। नीचे हम कुछ ऐसे महत्वपूर्ण क्षेत्रों का उल्लेख कर रहे हैं जो अपने दैनिक कार्यों में कंप्यूटर का उपयोग करते हैं।
चिकित्सा क्षेत्र
वे रोगों का निदान करने, परीक्षण चलाने और घातक बीमारियों का इलाज खोजने के लिए कंप्यूटर का उपयोग करते हैं। साथ ही, कंप्यूटर की वजह से वे कई बीमारियों का इलाज भी ढूंढ़ लेते हैं।
चाहे वह वैज्ञानिक अनुसंधान हो, अंतरिक्ष अनुसंधान हो या कोई सामाजिक अनुसंधान कंप्यूटर इन सभी में मदद करता है। साथ ही उनकी वजह से हम पर्यावरण, अंतरिक्ष और समाज पर नजर रख पाते हैं। अंतरिक्ष अनुसंधान ने हमें आकाशगंगाओं का पता लगाने में मदद की। जबकि वैज्ञानिक अनुसंधान ने हमें पृथ्वी से संसाधनों और विभिन्न अन्य उपयोगी संसाधनों का पता लगाने में मदद की है।
किसी भी देश के लिए, उसकी रक्षा उसके लोगों की सुरक्षा और सुरक्षा के लिए सबसे महत्वपूर्ण है। साथ ही इस क्षेत्र में कंप्यूटर देश की सुरक्षा एजेंसियों को ऐसे खतरे का पता लगाने में मदद करता है जो भविष्य में हानिकारक हो सकता है। इन सबसे ऊपर, रक्षा उद्योग उनका उपयोग हमारे दुश्मन पर निगरानी रखने के लिए करते हैं।
कंप्यूटर से खतरा
कंप्यूटर एक आवश्यकता भी बन गए हैं, वे एक खतरा भी बन गए हैं। ऐसा हैकर्स की वजह से होता है जो आपका निजी डेटा चुराकर इंटरनेट पर लीक कर देते हैं। साथ ही इस डेटा को कोई भी एक्सेस कर सकता है। इसके अलावा, अन्य खतरे जैसे वायरस, स्पैम, बग और कई अन्य समस्याएं भी हैं।
कंप्यूटर एक बहुत ही महत्वपूर्ण मशीन है जो हमारे जीवन का एक उपयोगी हिस्सा बन गया है। इसके अलावा, कंप्यूटर के एक तरफ जुड़वां चेहरे होते हैं, यह एक वरदान है और दूसरी तरफ, यह अभिशाप है। इसका उपयोग पूरी तरह आप पर निर्भर करता है। इसके अलावा, भविष्य में एक दिन ऐसा आएगा जब मानव सभ्यता कंप्यूटर के बिना जीवित नहीं रह पाएगी क्योंकि हम उन पर बहुत अधिक निर्भर हैं। अब तक यह मानव जाति की एक महान खोज है जिसने हजारों-लाखों लोगों की जान बचाने में मदद की है।
कंप्यूटर पर अक्सर पूछे जाने वाले प्रश्न (FAQs)
कंप्यूटर का आविष्कार सर्वप्रथम किसके द्वारा किया गया था.
चार्ल्स बैबेज कंप्यूटर के आविष्कारक हैं जो मैकेनिकल इंजीनियरिंग के क्षेत्र में एक अंग्रेज इंजीनियर थे। उन्होंने प्रोग्राम करने योग्य कंप्यूटर अवधारणा विकसित की।
पहले कंप्यूटर का नाम बताइए।
जॉन डब्ल्यू मौचली और जे प्रेस्पर एकर्ट द्वारा खोजा गया विशाल ENIAC मशीन कंप्यूटर पहला कंप्यूटर था। इसे संयुक्त राज्य अमेरिका में बनाया गया था। यह कोलोसस के समान था। यह बहुत तेज़ और बहुत लचीला भी था।
ENIAC का पूर्ण रूप समझाइए।
इलेक्ट्रिकल न्यूमेरिकल इंटीग्रेटर एंड कैलकुलेटर ENIAC का पूर्ण रूप है, जिसमें बाइनरी के बजाय दस दशमलव अंकों के शब्दों का उपयोग किया जाता है।
कंप्यूटर के लिए सबसे पहला वायरस कौन सा था ?
क्रीपर सिस्टम कंप्यूटर के लिए पहला वायरस था, जिसे 1971 में जारी किया गया था। यह कंप्यूटर की हार्ड ड्राइव को भर रहा था, और इसे संयुक्त राज्य अमेरिका में बीबीएन प्रौद्योगिकियों द्वारा विकसित किया गया था।

कंप्यूटर: आज की आवश्यकता पर निबंध | Essay on Computer | कंप्यूटर पर अनुच्छेद | Anuched on Computer
नीचे कंप्यूटर और उसकी हमारे जीवन में महत्तता के बारे में एक संक्षेप में अनुच्छेद दिया गया है। कैसे हमारा जीवन कंप्यूटर से सरल व सफल हो सकता है, इसके बारे में लिखा गया है। यह निबंध छात्र या विद्यार्थी किसी भी प्रकार के कार्य के लिये प्रयोग कर सकते हैं जैसे कि गृहकार्य, अभ्यास अथवा किसी प्रतियोगिता में भाग लेने के लिये।
यदि आपके पास कोई सुझाव, टिप्पणी अथवा संशय है तो कृपया हमें कमेंट्स के द्वारा लिखें।
Essay on Computer-

वर्तमान युग कंप्यूटर युग है। यदि भारतवर्ष पर नज़र दौड़ाकर देखें तो हम पाएँगे कि जीवन के लगभग सभी क्षेत्रों में कंप्यूटर का प्रवेश हो गया है। बैंक, रेलवे स्टेशन, हवाई अड्डे, डाक खाने, बड़े-बड़े उद्योग-कारखाने व्यवसाय हिसाब-किताब, रुपये गिनने तक की मशीनें कंप्यूटरीकृत हो गई हैं। अब भी यह कंप्यूटर का प्रारंभिक प्रयोग है।
आने वाला समय इसके विस्तृत फैलाव का संकेत दे रहा है प्रश्न उठता है कि क्या कंप्यूटर आज की जरूरत है? इसका उत्तर है- कंप्यूटर जीवन की मूलभूत अनिवार्य वस्तु तो नहीं है, किन्तु इसके बिना आज की दुनिया अधूरी जान पड़ती है। सांसारिक गतिविधियों, परिवहन और संचार उपकरणों आदि का ऐसा विस्तार हो गया है कि उनहे सुचार रूप से चलाना अत्यंत कठिन होता जा रहा है।
पहले मनुष्य जीवन-भर में अगर सौ लोगों के संपर्क में आता था तो आज वह दो-हज़ार लोगों के संपर्क में आता है। पहले दिन में पाँच-दस लोगों से मिलता था तो आज पचास-सौ लोगों से मिलता है। पहले वह दिन में काम करता था तो आज राते भी व्यस्त रहती हैं। आज व्यक्ति के संपर्क अढ़ रहे हैं, व्यापार बढ़ रहे हैं, गतिविधियाँ बढ़ रही हैं, आकांक्षाएँ बढ़ रही हैं, साधन बढ़ रहे हैं इस अनियंत्रित गति को सुव्यवस्था देने की समस्या आज की प्रमुख समस्या है। कहते हैं आवश्यकता आविष्कार की जननी है, इस आवश्यकता ने अपने अनुसार निदान ढूंढ लिया है।
कंप्यूटर एक ऐसी स्वचालित प्रणाली है जो कैसी भी अव्यवस्था को व्यवस्था में बदल सकती है। हड़बड़ी में होने वाली मानवीय भूलों के लिए कंप्यूटर राम बाण औषधि है। क्रिकेट के मैदान में अंपायर की निर्णायक भूमिका हो या लाखों करोड़ों की लंबी-तबी गणनाएँ कंप्यूटर पलक झपकते ही आपकी समस्या हल कर सकता है। पहले इन कामों को करने वाले कर्मचारी हड़बड़ाकर काम करते थे, एक भूल से घबराकर और अधिक गड़बड़ी करते थे। परिणामस्वरूप काम कम, तनाव अधिक होता था। अब कंप्यूटर की सहायता से काफी सुविधा हो गई है।
Also visit- https://whyhindi.com/how-to-upload-a-video-on-youtube-in-hindi-how-to-upload-a-video-on-youtube-in-android-youtube/

Related Posts
Who should i write my essay about.
No matter what course you decide to take at college or university, writing assignments are one of the most important elements of the studying process. When preparing…

Essay on Importance of Yoga | योग और उसके लाभों पर अनुच्छेद | Topic on importance of Yoga
Below is the Topic on importance of Yoga??♂️ Let us know about your views and comments through comment box. Hindi Version योग शब्द संस्कृत भाषा से लिया…

Why does the Moon rise late on Karva Chauth? In Hindi | करवा चौथ के दिन चंद्रमा देर से क्यों उगता है?
पूर्णिमा के दिन, चंद्रमा बिल्कुल सूर्यास्त के समय उगता है। चंद्रमा को पृथ्वी के चारों ओर एक बार यात्रा करने में 27.3 दिन लगते हैं और यह…
Anuched on Problem of Pollution in Hindi
प्रदूषण सम्पूर्ण जीव-जगत को प्रभावित करता है और मनुष्य ही है जो पृथिवी पर प्रदूषण फैलाता है। लाखों लोग प्रति वर्ष प्रदूषण के कारण मृत्यु को प्राप्त…
Anuched on My Favorite Festival in Hindi
सभी बच्चों को त्योहार बहुत पसंद होते हैं और लगभग सभी बच्चों का कोई ना कोई पसंदीदा त्योहार होता है। इसी संबंधित इस अनुच्छेद में हमनें एक…
Anuched on Importance of Games in Hindi
खेलों का हमारे जीवन में महत्व तथा स्थान हमें सहज ही समझ में आता है। यदि बच्चे खेलें-कूदें ना तो उनका जीवन नीरस सा हो जाये। इस…
Leave a Reply Cancel reply
कंप्यूटर पर निबंध

कंप्यूटर पर निबंध : Essay on Computer in Hindi :- आज के इस लेख में हमनें ‘कंप्यूटर पर निबंध’ से सम्बंधित जानकारी प्रदान की है।यदि आप कंप्यूटर पर निबंध से सम्बंधित जानकारी खोज रहे है? तो इस लेख को शुरुआत से अंत तक अवश्य पढ़े। तो चलिए शुरू करते है:-
कंप्यूटर पर छोटे तथा बड़े निबंध : Long & Short Essay on Computer in Hindi [Computer Par Nibandh Hindi Mein]
प्रस्तावना :-
यह युग बहुत अधिक तेज व आधुनिक हो गया है। आज पहले के मुकाबले सभी काम बहुत तेजी से हो रहे है। आज आप घर बैठे-बैठे सभी काम कर सकते है। इस आधुनिक युग के पीछे यदि सबसे बड़ा हाथ किसी का है, तो वह है:- कंप्यूटर।
आवश्यकता ही अविष्कार की जननी होती है। इसी आवश्यकता ने कम्प्यूटर को जन्म दिया। कंप्यूटर के महत्व को आज कौन नही समझ सकता है? आज कंप्यूटर के बिना इस दुनिया की कल्पना करना भी बहुत मुश्किल है।
आज कंप्यूटर ने हमारे बहुत से काम आसान कर दिए है। आज कंप्यूटर की मदद से किसी भी काम को पहले के मुकाबले कम समय में व कम मेहनत के किया जा सकता है।
कंप्यूटर की खोज :-
कंप्यूटर विज्ञान का एक महान अविष्कार है। इसने विज्ञान की दुनिया को पूरी तरह से ही बदल कर रख दिया। कंप्यूटर एक इलेक्ट्रॉनिक उपकरण है। कंप्यूटर की खोज चार्ल्स बेबेज द्वारा 19वीं शताब्दी में की गई थी।
माना जाता है कि 1622 ईस्वी में अबेकस ने एक यंत्र की खोज की थी, जिसे कंप्यूटर कहा जा सकता है। लेकिन, इस आधुनिक युग में हम जिस कंप्यूटर का उपयोग करते है, उसकी खोज चार्ल्स बेबेज द्वारा ही की गई थी।
शुरूआती पीढ़ी का कंप्यूटर वर्तमान पीढ़ी के कंप्यूटर की भांति छोटा नही हुआ करता था। शुरुआती पीढ़ी का कंप्यूटर पूरे कमरे की बराबर हुआ करता था।
कंप्यूटर क्या है?
कंप्यूटर एक प्रकार का एक इलेक्ट्रॉनिक उपकरण है, इसमें आप अपने डाटा व सूचनाओं को सुरक्षित रख सकते है। यह किसी भी प्रकार की गणना को बहुत आसानी से कर सकता है। इसके द्वारा किसी भी काम को आसानी से कम समय में पूरा किया जा सकता है।
कंप्यूटर कैसे काम करता है?
कंप्यूटर एक उपकरण है, जो हमारे निर्देशों पर कार्य करता है। यह इनपुट, प्रोसेसिंग व आउटपुट पर काम करता है। इसमें एक उपयोगकर्ता द्वारा कंप्यूटर को कुछ इनपुट दिया जाता है।
उसके पश्चात कंप्यूटर उसे प्रोसेस करता है और उससे जुड़ी सूचना व गणना को उपयोगकर्ता को आउटपुट देता है। यह प्रोसेस बहुत ही कम समय में होती है, जिसका हमें पता भी नही चलता है। कंप्यूटर मशीनी भाषा पर काम करता है, जिसे बाइनरी कहते है। इसमें 0 व 1 होते है।
कंप्यूटर का महत्व :-
वर्तमान समय में कंप्यूटर के बिना जीवन की कल्पना करना भी बहुत मुश्किल है। आज लगभग प्रत्येक क्षेत्र में इसका उपयोग किया जाता है। यह बहुत उपयोगी उपकरण है। इसका उपयोग निम्नलिखित क्षेत्रों में किया जाता है:-
शिक्षा क्षेत्र में :-
आज शिक्षा के क्षेत्र में कंप्यूटर का उपयोग लगातार बढ़ता ही जा रहा है। आज बच्चों को कंप्यूटर के माध्यम से बहुत सारी जानकारियां उपलब्ध कराई जा सकती है।
आज कंप्यूटर के माध्यम से बच्चों को प्रायोगिक तरीकों से पढ़ाया जा सकता है। जिससे उनका विकास बहुत तेज़ी से हो सकता है। किताबों के माध्यम से इतनी अधिक जानकारी उपलब्ध करवा पाना नामुमकिन है।
कंपनियों में :-
वर्तमान समय में कंपनियों का सम्पूर्ण कार्य कंप्यूटर के माध्यम से ही किया जा रहा है। क्योंकि, कंप्यूटर के माध्यम से अधिक काम को कम समय में आसानी से किया जा सकता है।
इसके माध्यम से डाटा को आसानी से अधिक समय के लिए सुरक्षित रखा जा सकता है और समय आने पर इसे आसानी से ढूँढा भी जा सकता है व उपयोग में लिया जा सकता है।
व्यापार क्षेत्र में :-
आज व्यापार क्षेत्र में भी कंप्यूटर का उपयोग अधिक बढ़ गया है। आज गूगल जैसी कंपनियां इसी आधार पर चल रही है। आज कंप्यूटर व इंटरनेट के माध्यम से व्यापार को देश ही नहीं बल्कि विदेशों तक भी आसानी से पहुंचाया जाता है।
चिकित्सा क्षेत्र में :-
आज कंप्युटर के माध्यम से चिकित्सा क्षेत्र में भी बहुत बदलाव देखने को मिले है। आज अस्पतालों में इसका उपयोग लगातार बढ़ता जा रहां है। इससे मरीजों की जानकारी आसानी से रखी जा सकती है।
कंप्यूटर के दुष्प्रभाव :-
प्रत्येक वस्तु के कुछ फायदे होने के साथ-साथ कुछ नुकसान भी है। ठीक, इसी प्रकार कंप्यूटर के भी काफ़ी अधिक फायदे है। जबकि, नुकसान नहीं के बराबर है। कंप्यूटर के लगातार बढ़ते उपयोग के कारण ही आज मनुष्य के स्वास्थ्य पर बहुत बुरा प्रभाव पड़ रहा है।
कंप्यूटर से लोगों को रोजगार मिला है, तो बहुत लोगों का रोजगार उनसे छीन भी गया है। आज मनुष्य की इस पर लगातार निर्भरता बढ़ती जा रही है। कंप्यूटर के माध्यम से आज कोई भी जानकारी प्राप्त करना कोई मुश्किल बात नही है।
वर्तमान समय में कंप्यूटर बहुत उपयोगी उपकरण है, जो हमारे लिए बहुत ही आवश्यक हो गया है। हमें इसका उपयोग शिक्षा , चिकित्सा आदि क्षेत्रों में और अधिक बढ़ाना होगा।
लेकिन, इसकी उपयोगिता के साथ-साथ हमें इससे होने वाले दुष्परिणामों को भी नजरअंदाज नही करना होगा। हमें इन दोनों के मध्य सामंजस्य बैठाना होगा और इसका सही उपयोग करना होगा।
कंप्यूटर से सम्बंधित अक्सर पूछे जाने वाले प्रश्न
विश्व के सबसे तेज कंप्यूटर का क्या नाम है.
विश्व के सबसे तेज कंप्यूटर का नाम “ फुगाकू ” है, जो कि जापान का सुपर कंप्यूटर है।
भारत के सबसे तेज कंप्यूटर का क्या नाम है?
भारत के सबसे तेज कंप्यूटर का नाम “ मल्टीपेटाफ्लोप्स सुपर कंप्यूटर प्रत्यूष ” है।
विश्व की सबसे बड़ी कंप्यूटर निर्माता कंपनी का क्या नाम है?
विश्व की सबसे बड़ी कंप्यूटर निर्माता कंपनी का नाम “ आईबीएम (इंटरनेशनल बिजनेस मशीन) ” है।
अंत में आशा करता हूँ कि यह लेख आपको पसंद आया होगा और आपको हमारे द्वारा इस लेख में प्रदान की गई अमूल्य जानकारी फायदेमंद साबित हुई होगी।
अगर इस लेख के द्वारा आपको किसी भी प्रकार की जानकारी पसंद आई हो तो, इस लेख को अपने मित्रों व परिजनों के साथ फेसबुक पर साझा अवश्य करें और हमारे वेबसाइट को सबस्क्राइब कर ले।

नमस्कार, मेरा नाम सूरज सिंह रावत है। मैं जयपुर, राजस्थान में रहता हूँ। मैंने बी.ए. में स्न्नातक की डिग्री प्राप्त की है। इसके अलावा मैं एक सर्वर विशेषज्ञ हूँ। मुझे लिखने का बहुत शौक है। इसलिए, मैंने सोचदुनिया पर लिखना शुरू किया। आशा करता हूँ कि आपको भी मेरे लेख जरुर पसंद आएंगे।
Similar Posts

मृदा प्रदूषण पर निबंध
मृदा प्रदूषण पर निबंध : Essay on Soil Pollution in Hindi:- आज के इस महत्वपूर्ण लेख में हमनें ‘मृदा प्रदूषण पर निबंध’ से सम्बंधित सम्पूर्ण जानकारी प्रदान की है।

होली 2023 पर निबंध
होली पर निबंध : Essay on Holi 2023 in Hindi:- आज के इस महत्वपूर्ण जानकारी से परिपूर्ण लेख में हमनें ‘होली पर निबंध’ से सम्बंधित सम्पूर्ण जानकारी प्रदान की है।

फुटबॉल पर निबंध
फुटबॉल पर निबंध: Essay on Football in Hindi:- आज के इस महत्वपूर्ण जानकारी से परिपूर्ण लेख में हमनें ‘फुटबॉल पर निबंध’ से सम्बंधित सम्पूर्ण जानकारी प्रदान की है।

स्वच्छता भक्ति से बढ़कर है पर निबंध
स्वच्छता भक्ति से बढ़कर है पर निबंध : Cleanliness is Next to Godliness Essay in Hindi:- यहाँ स्वच्छता भक्ति से बढ़कर है पर निबंध से सम्बंधित जानकारी प्रदान की है।

एकता में बल है पर निबंध
एकता में बल है पर निबंध : Essay on Unity is Strength in Hindi:- आज के इस महत्वपूर्ण लेख में हमनें ‘एकता में बल है पर निबंध’ से सम्बंधित जानकारी प्रदान की है।

बेटी बचाओ बेटी पढ़ाओ पर निबंध
बेटी बचाओ बेटी पढ़ाओ पर निबंध : Essay on Beti Bachao Beti Padhao in Hindi:- इस लेख में ‘बेटी बचाओ बेटी पढ़ाओ पर निबंध’ से सम्बंधित जानकारी प्रदान की है।
Leave a Reply Cancel reply
Your email address will not be published. Required fields are marked *
Save my name, email, and website in this browser for the next time I comment.
- Computer Fundamentals in Hindi – कंप्यूटर फंडामेंटल्स को समझें
What is Computer in Hindi – कंप्यूटर क्या है? [PDF]
Computer essay in hindi – कंप्यूटर पर निबंध लिखें [pdf], history of computer in hindi – कंप्यूटर का इतिहास भारत में.
- कंप्यूटर के फायदे (Advantages of Computer in Hindi)
- कंप्यूटर के नुकसान (Disadvantages of Computer in Hindi)
- Computer Generation in Hindi – कंप्यूटर की जनरेशन (पीढ़ियां)
- कंप्यूटर की विशेषताएं (Characteristics of Computer in Hindi)
- Components of Computer in Hindi – कंप्यूटर के घटकों
- हार्डवेयर क्या है (What is Hardware in Hindi)? पूरी जानकारी
- हार्डवेयर के प्रकार (Types of Hardware in Hindi)
- सीपीयू क्या है (What is CPU in Hindi)
- कंप्यूटर मेमोरी क्या है (Computer Memory in Hindi)
- प्राथमिक मेमोरी क्या है (Primary Memory in Hindi)? और प्रकार
Secondary Memory in Hindi – सेकेंडरी मेमोरी क्या है? इसके प्रकार
- हार्ड डिस्क क्या है (What is Hard Disk in Hindi)
- Motherboard in Hindi – मदरबोर्ड क्या है? और इसके प्रकार को जानें
- Input Device in Hindi (कंप्यूटर इनपुट डिवाइस और प्रकर)
- What is Output Device in Hindi – आउटपुट डिवाइस क्या है? [PDF]
- What is Number System in Hindi – नंबर सिस्टम क्या है?
- Decimal Number System in Hindi – डेसीमल नंबर सिस्टम क्या है?
- Binary Number System in Hindi – बाइनरी नंबर सिस्टम क्या है?
- MS Word in Hindi – एमएस वर्ड क्या है? पूरी जानकारी
- एमएस वर्ड की विशेषताएं – Features of MS Word in Hindi
- MS Word Ribbon in Hindi – रिबन क्या है? पूरी जानकारी
- MS Word Home Tab in Hindi – होम टैब का उपयोग करना सीखें
- MS Word Insert Tab in Hindi: Insert टैब का उपयोग करें
- वेब डेवलपर कैसे बने? (2023 में Web Developer बनने की जानकारी)
- वेब डिज़ाइनर कैसे बने? 2023 (3 महीने में Web Designer बनें)
- What is Bootstrap in Hindi – बूटस्ट्रैप क्या है? इसका उपयोग
- प्रोग्रामिंग लैंग्वेज क्या है (Programming Language in Hindi)?
- प्रोग्रामिंग भाषा के प्रकार (Types of Programming Languages)
- High Level Language in Hindi (उच्च स्तरीय कंप्यूटर भाषा क्या है)
- Low Level Language in Hindi – लो लेवल लैंग्वेज क्या है?
- Machine Language in Hindi (मशीनी भाषा क्या है)?
- इंटरप्रेटर क्या है (What is Interpreter in Hindi)? पूरी जानकारी
- कम्पाइलर क्या है (Compiler in Hindi)? पूरी जानकारी
- Assembly Language in Hindi – असेम्बली भाषा को समझें
- Object Oriented Programming in Hindi (OOPs in Hindi)
- Inheritance in Hindi – इनहेरिटेंस क्या है? पूरी जानकारी
- Polymorphism in Hindi – पॉलीमोरफ़िज्म क्या है? पूरी जानकारी
- Abstraction in Hindi – एब्स्ट्रेक्शन क्या है? इसके प्रकार
- Encapsulation in Hindi – एनकैप्सुलेशन क्या है? इसके प्रकार
- Code in Hindi – कोड क्या है? इसके प्रकार और उपयोग
- कोडिंग क्या है (What is Coding in Hindi)? पूरी जानकारी
- कोडिंग कैसे सीखे (How to Learn Coding)? पूरी जानकारी
- React JS Tutorial in Hindi (Full React Course in Hindi PDF)
- React JS क्या है (What is React JS in Hindi)?
- Install React JS in Hindi – React JS Install करें (Win, Mac, Linux)
- JSX in Hindi – React में JSX क्या है
- React में Component क्या है हिंदी में जानें
- State in React in Hindi (ReactJS में State क्या है)
- Props in React js in Hindi (Props का उपयोग कैसे करें)
- Events Handling in React Js in Hindi (उपयोग कैसे करें)
- React Fragments in Hindi (रिएक्ट फ्रैगमेंट को समझें)
- Hooks in React in Hindi (Hooks की पूरी जानकारी)
- डेटाबेस की पूरी जानकारी
- डेटाबेस के प्रकार
- डीबीएमएस क्या है
- DBMS के प्रकार हिंदी में
- रिलेशनल डेटाबेस की पूरी जानकारी
- डेटा मॉडल और इसके प्रकार
- Data independence in DBMS in Hindi
- DBMS Architecture in Hindi
- Three Level Architecture of DBMS in Hindi
- ER Model in Hindi (Entity Relationship)
- Keys in DBMS in Hindi (DBMS में Keys क्या है)?
- Types of Keys in DBMS in Hindi (Keys के प्रकार)
- Primary Key in DBMS in Hindi (प्राथमिक कुंजी)
- Super Key in DBMS in Hindi (with Example)
- Candidate Key in DBMS in Hindi (with Example)
- Foreign Key in DBMS in Hindi (विदेशी कुंजी)
- Alternate Key in DBMS in Hindi (with Example)
- Composite key in DBMS in Hindi (with Example)
- Unique Key in Hindi with Example
- Normalization in DBMS in Hindi (नॉर्मलाइजेशन क्या है)?
- SQL क्या है (What is SQL in Hindi)? पूरी जानकारी
- Syntax of SQL in Hindi – SQL का सिंटैक्स को समझें
- SQL Commands in Hindi – SQL कमांड क्या है? और प्रकार
- SQL Data Types in Hindi – SQL डेटा प्रकार को समझें
- वेबसाइट डिजाइनिंग क्या है? – What is Web Design in Hindi
- वेब ब्राउज़र क्या है (Web Browser in Hindi) पूरी जानकारी
- What is Domain in Hindi – डोमेन क्या है? पूरी जानकारी
- वेबसाइट क्या है (What is Website in Hindi)?
- What is Hosting in Hindi – होस्टिंग क्या है? पूरी जानकारी
- जावा क्या है (What is Java in Hindi)।
- Core Java In Hindi – कोर जावा क्या है? हिंदी में सीखें
- History of Java in Hindi – जावा का इतिहास हिंदी में जानें
- Features of Java in Hindi – जावा की विशेषताएं [2024]
- सी लैंग्वेज क्या है – What is C Language in Hindi [PDF]
- History of C Language in Hindi – C का इतिहास
- Features of C Language in Hindi (सी भाषा की विशेषताएं)
- Tokens in C in Hindi (टोकन क्या है)? पूरी जानकारी
- वेरिएबल क्या है (Variables in C in Hindi)
- Data Types in C in Hindi – C के Data Types समझें
- Functions in C in Hindi (सी में फंक्शन क्या है)
- Decision Making in C in Hindi (if, else, Nested, Switch)
- What is Loop in C in Hindi (लूप क्या है)?
- Array in C in Hindi – सी में ऐरे क्या है? पूरी जानकारी
- Pointer in C in Hindi – सी में पॉइंटर क्या है?
- Recursion in C in Hindi – C में रिकर्सन क्या है? और प्रकार
- Structure in C in Hindi – सी स्ट्रक्चर क्या है? पूरी जानकारी
- C++ क्या है (What is C++ in Hindi)? पूरी जानकारी
- सॉफ्टवेयर इंजीनियरिंग क्या है? Software Engineering in Hindi
- SDLC क्या है (What is SDLC in Hindi)? पूरी जानकारी
- Waterfall Model in Hindi (वाटरफॉल मॉडल क्या है)? जानें
- COMPUTER FUNDAMENTALS
यह कंप्यूटर पर निबंध (Computer Essay in Hindi), आपको कंप्यूटर पर 1000 शब्द का निबंध (Essay on Computer in Hindi) लिखने में मदद करेगा।
Computer Essay in Hindi : कंप्यूटर एक इलेक्ट्रॉनिक प्रोग्राम करने योग्य मशीन है जो डेटा को प्रोसेस कर सकता है, जानकारी को स्टोर और पुनर्प्राप्त कर सकता है, और कई प्रकार के अन्य कार्य कर सकता है। यह सेंट्रल प्रोसेसिंग यूनिट (सीपीयू) , मेमोरी , स्टोरेज और इनपुट / आउटपुट डिवाइस सहित कई घटकों से बना है।
इस कंप्यूटर पर निबंध (Computer Essay in Hindi) में, हम कंप्यूटर के विकास, हमारे जीवन में उनकी भूमिका और समाज पर उनके प्रभाव का पता लगाएंगे।
चाहे आप एक तकनीकी विशेषज्ञ हों या एक जिज्ञासु शुरुआती, यह लेख आपको कंप्यूटर की दुनिया की गहन समझ प्रदान करने के लिए निश्चित है।
- कंप्यूटर की बेसिक (Basics of Computer) पूरी जानकारी और कंप्यूटर फंडामेंटल्स को समझें ।
Table of Contents
कंप्यूटर पर निबंध (Computer Essay in Hindi)

कंप्यूटर एक इलेक्ट्रॉनिक उपकरण है जो उपयोगकर्ता से इनपुट लेता है और इन डेटा को निर्देशों के एक सेट (जिसे प्रोग्राम कहा जाता है) के नियंत्रण में संसाधित करता है और आउटपुट देता है और भविष्य में उपयोग के लिए save करता है। कंप्यूटर निर्देशों के अनुसार कई प्रकार के कार्य कर सकता है।
नोट : कंप्यूटर के बारे में अधिक जानने के लिए हमारा विस्तृत लेख “ कंप्यूटर क्या है, इसके प्रकार और यह कैसे काम करता है आदि ” पढ़ें।
मूल रूप से, पहला कंप्यूटर 1940 और 1950 के दशक में बनाया गया था, और ये बहुत बड़ी मशीनें थीं जो पूरे कमरे को घेर लेती थीं। वे मुख्य रूप से सरकारों और बड़े निगमों द्वारा वैज्ञानिक और सैन्य अनुप्रयोगों के लिए उपयोग किए जाते थे।
वर्षों से, कंप्यूटर छोटे, अधिक शक्तिशाली और अधिक किफायती हो गए हैं। आज, कंप्यूटर डेस्कटॉप, लैपटॉप, टैबलेट और स्मार्टफोन सहित विभिन्न रूपों में पाए जा सकते हैं।
कंप्यूटर का उपयोग व्यवसाय, शिक्षा, मनोरंजन और व्यक्तिगत उपयोग सहित कई उद्देश्यों के लिए किया जाता है। कुल मिलाकर कंप्यूटर ने दुनिया को अनगिनत तरीकों से बदल दिया है।
इसने हमारे लिए संवाद करना, सूचनाओं तक पहुंचना और कई प्रकार के कार्यों को ऐसे तरीकों से करना संभव बना दिया है जो कभी अकल्पनीय थे।
जैसे-जैसे तकनीक आगे बढ़ रही है, संभावना है कि कंप्यूटर भविष्य को आकार देने में महत्वपूर्ण भूमिका निभाता रहेगा।
आइए अब Computer Essay in Hindi में लिखने के लिए इसके बारे में अधिक जानकारी लेते है –
कंप्यूटर के बारे में क्या लिखें (What to write about Computer)?
जब कंप्यूटर की बात आती है तो आप कई अलग-अलग विषयों पर लिख सकते हैं। कुछ संभावित विचारों में शामिल हैं:
- कंप्यूटर का इतिहास और विकास लिखें ।
- समाज पर कंप्यूटर का प्रभाव लिख सकते है।
- कंप्यूटर के विभिन्न प्रकार और उनके उपयोग लिखें ।
- साइबर सुरक्षा और व्यक्तिगत जानकारी की सुरक्षा पर लिखें।
- कंप्यूटिंग और नई प्रौद्योगिकियों (technology) का भविष्य लिखें।
- ओपन-सोर्स सॉफ्टवेयर का महत्व लिख सकते है।
- कंप्यूटर उद्योग पर इंटरनेट का प्रभाव क्या है लिखें।
- कंप्यूटर प्रौद्योगिकी में AI और मशीन लर्निंग का उपयोग लिखें।
- उद्योग (industry) में क्लाउड कंप्यूटिंग की भूमिका लिखें।
- कंप्यूटर प्रौद्योगिकी (technology) के नैतिक (ethical) प्रभाव लिखें।
कंप्यूटर पर 10 लाइन में निबंध लिखने के लिए यहाँ कंप्यूटर निबंध है:
यदि आपसे 10 लाइन में कंप्यूटर पर निबंध लिखने के लिए कहा जाए तो यह दिए गए कंप्यूटर निबंध (Computer Essay) लिखें:
कंप्यूटर पर निबंध 10 लाइन (Computer Essay in 10 lines Hindi)
यहाँ 10 लाइन में कंप्यूटर पर निबंध है:
- कंप्यूटर इलेक्ट्रॉनिक मशीन हैं जो डेटा को प्रोसेस और स्टोर करते हैं।
- कंप्यूटर आधुनिक समाज में एक आवश्यक उपकरण हैं।
- इसका उपयोग विभिन्न प्रकार के कार्यों जैसे संचार, अनुसंधान और मनोरंजन के लिए किया जा सकता है।
- इनमें एक सेंट्रल प्रोसेसिंग यूनिट (सीपीयू) , मेमोरी और इनपुट/आउटपुट डिवाइस होते हैं।
- दक्षता और उत्पादकता में सुधार के लिए वे कई उद्योगों में व्यापक रूप से उपयोग किए जाते हैं।
- कंप्यूटर के उपयोग से नई तकनीकों का विकास हुआ है और नए उद्योगों का निर्माण हुआ है।
- कंप्यूटर के अत्यधिक उपयोग से आंखों पर तनाव और लत जैसे नकारात्मक प्रभाव पड़ सकते हैं।
- यह हमारे जीने और काम करने के तरीके को बहुत प्रभावित किया है।
- कंप्यूटर के उपयोग ने हर क्षेत्र में डिजिटल क्रांति ला दी है।
- यह नई तकनीक के साथ विकसित और आगे बढ़ते रहते हैं, जिससे वे अधिक शक्तिशाली और बहुमुखी बनते हैं।
यदि आपको कंप्यूटर पर 1000 शब्दों में निबंध लिखना है तो नीचे दिया गया निबंध शीर्षक सहित लिखें:
- यह भी पढ़े: कंप्यूटर की विशेषताएं (Characteristics of Computer in Hindi)
कंप्यूटर पर निबंध 250 शब्द (Computer Essay in Hindi 250 Words)
यहां 250 शब्दों में कंप्यूटर पर निबंध लिख के समझाया गिया है, आप अपनी परीक्षा के लिए इस प्रकार का उत्तर लिख सकते हैं:
कंप्यूटर एक इलेक्ट्रॉनिक उपकरण है जो डेटा को प्रोसेस और स्टोर करता है। इसमें सेंट्रल प्रोसेसिंग यूनिट (सीपीयू), मॉनिटर, कीबोर्ड और माउस जैसे हार्डवेयर घटक शामिल हैं। ये उपकरण सॉफ़्टवेयर से निर्देशों को निष्पादित करते हैं, जिससे गणना, डेटा हेरफेर और संचार जैसे कार्य सक्षम होते हैं।
कंप्यूटर इनपुट प्राप्त करके, एल्गोरिदम का उपयोग करके इसे संसाधित करके और आउटपुट उत्पन्न करके संचालित होते हैं। कंप्यूटर वर्ड प्रोसेसिंग ( MS वर्ड) , इंटरनेट ब्राउजिंग, गेमिंग और जटिल संगणना सहित विभिन्न कार्यों को सुविधाजनक बनाते हैं, जो शिक्षा, व्यवसाय, अनुसंधान और मनोरंजन में आधुनिक जीवन में अभिन्न भूमिका निभाते हैं।
सरल शब्दों में, कंप्यूटर अद्भुत मशीनें हैं जिन्होंने दुनिया को बदल दिया है। उनके पास स्क्रीन, कीबोर्ड और मस्तिष्क जैसे विभिन्न भाग होते हैं जिन्हें सीपीयू कहा जाता है। कंप्यूटर बहुत सारी जानकारी संग्रहीत करते हैं और काम को बहुत तेजी से कर सकते हैं। हम कंप्यूटर का उपयोग हर जगह करते हैं – स्कूल में, घर पर और कार्यालयों में।
कंप्यूटर हमें सीखने, गेम खेलने, होमवर्क करने और दोस्तों से ऑनलाइन बात करने में मदद करते हैं। कंप्यूटर पर इंटरनेट हमें प्रश्नों के उत्तर ढूंढने और वीडियो देखने की सुविधा देता है।
मेरा मानना है कि कंप्यूटर आज अत्यंत महत्वपूर्ण हैं। कंप्यूटर जीवन को आसान बनाते हैं. हम उन पर लिख सकते हैं, चित्र बना सकते हैं और गणित की समस्याएं हल कर सकते हैं।
कंप्यूटर वैज्ञानिकों, डॉक्टरों और फिल्म निर्माताओं को भी अपना काम करने में मदद करते हैं! मेरे शिक्षक सोचते हैं कि कंप्यूटर आवश्यक हैं।
मेरा मानना है कि कंप्यूटर को समझना महत्वपूर्ण है क्योंकि वे हमारे दैनिक जीवन का हिस्सा हैं।
कंप्यूटर पर निबंध लिखें 1000 शब्द (Essay on Computer in Hindi)

कंप्यूटर एक इलेक्ट्रॉनिक उपकरण है जो डेटा या सूचना में हेरफेर करता है। इसमें डेटा को स्टोर करने, प्रोसेस करने, पुनर्प्राप्त करने और हटाने की क्षमता है। कंप्यूटर का उपयोग निर्देशों के कुछ क्रम को तेजी से और सही तरीके से करने के लिए किया जाता है।
वास्तव में, कंप्यूटर ने हमारे जीने और काम करने के तरीके में क्रांति ला दी है। कंप्यूटर आधुनिक जीवन का एक अनिवार्य हिस्सा हैं। हमारे जीवन के लगभग हर पहलू पर इसका गहरा प्रभाव पड़ता है, हम कैसे संवाद करते हैं, हम जानकारी तक कैसे पहुँचते हैं, हम कैसे व्यवसाय करते हैं। कंप्यूटर ने दक्षता, उत्पादकता और कनेक्टिविटी में काफी वृद्धि की है।
यह निबंध 1000 शब्दों में कंप्यूटर के इतिहास और विकास के साथ-साथ उनके वर्तमान और संभावित उपयोग और समाज पर प्रभाव का पता लगाएगा।
मूल रूप से, कंप्यूटर 20वीं शताब्दी के मध्य में उनके आविष्कार के बाद से काफी विकसित हुए हैं। बड़ी, महंगी मशीनों से लेकर छोटी, सस्ती और व्यापक रूप से सुलभ डिवाइस तक।
आज, कंप्यूटर संचार, मनोरंजन और कार्य के लिए आवश्यक उपकरण हैं। इंटरनेट के आगमन के साथ, कंप्यूटर दुनिया भर में लोगों और सूचनाओं को जोड़ते हैं।
AI और क्लाउड कंप्यूटिंग जैसी नई प्रौद्योगिकियां (technologies) हमारे द्वारा कंप्यूटर का उपयोग करने के तरीके को बदल रही हैं। वे हर दिन अधिक शक्तिशाली और बहुमुखी होते जा रहे हैं।
कंप्यूटर पर निबंध लिखने के लिए आपको इसके विकास से शुरू करना चाहिए –
कंप्यूटर का विकास (Evolution of Computers)
कंप्यूटर का इतिहास प्रारंभिक यांत्रिक उपकरणों जैसे अबेकस से शुरू होता है, और इलेक्ट्रॉनिक कंप्यूटर, माइक्रोप्रोसेसर और टैबलेट और स्मार्टफोन जैसे आधुनिक उपकरणों के विकास के माध्यम से आगे बढ़ता है।
इन प्रगति के कारण तेजी से छोटे, तेज और अधिक शक्तिशाली कंप्यूटरों का निर्माण हुआ, जिससे वे लोगों और उद्योगों की एक विस्तृत श्रृंखला के लिए सुलभ हो गए।
आज, आर्टिफिशियल इंटेलिजेंस और क्लाउड कंप्यूटिंग जैसी नई तकनीकों को शामिल करने के साथ, कंप्यूटर का विकास और सुधार जारी है।
- कंप्यूटर का इतिहास (History of Computer) को समझें ।
अबैकस और मैकेनिकल कैलकुलेटर
अबैकस और मैकेनिकल कैलकुलेटर जैसे शुरुआती कम्प्यूटेशनल उपकरणों ने इलेक्ट्रॉनिक कंप्यूटरों के विकास की नींव रखी। ये उपकरण, जबकि आधुनिक कंप्यूटरों की तुलना में सरल थे, बुनियादी गणितीय संचालन करने में सक्षम थे और इलेक्ट्रॉनिक कंप्यूटिंग के आगमन से पहले सदियों तक उपयोग किए जाते थे।
इन शुरुआती उपकरणों में प्रयुक्त तकनीक ने इलेक्ट्रॉनिक कंप्यूटरों के विकास को प्रभावित किया और अधिक उन्नत मशीनों के लिए मार्ग प्रशस्त किया।
इन प्रारंभिक उपकरणों में प्रयुक्त तकनीक ने इलेक्ट्रॉनिक कंप्यूटरों के विकास को प्रभावित किया और अधिक उन्नत मशीनों के लिए मार्ग प्रशस्त किया।
- कंप्यूटर की जनरेशन (Computer Generation) को समझें ।
पहला इलेक्ट्रॉनिक कंप्यूटर (First Electronic Computers)
ENIAC और UNIVAC जैसे पहले इलेक्ट्रॉनिक कंप्यूटर, जॉन डब्ल्यू मौचली और जे. प्रेस्पर एकर्ट द्वारा विकसित किए गए थे, जिन्होंने कंप्यूटिंग के क्षेत्र में क्रांति ला दी।
ये मशीनें, जो 1940 और 1950 के दशक में विकसित की गई थीं, अपने यांत्रिक पूर्ववर्तियों की तुलना में तेज़ और अधिक शक्तिशाली थीं और वैज्ञानिक और सरकारी अनुसंधान के लिए उपयोग की जाती थीं।
इन पहले इलेक्ट्रॉनिक कंप्यूटरों का प्रभाव बहुत अधिक था, उन्होंने गणना के तरीके को बदल दिया और विज्ञान, उद्योग और सरकार में एक मौलिक उपकरण बन गए।
उन्होंने कंप्यूटर युग की शुरुआत को चिह्नित किया और पर्सनल कंप्यूटर और आधुनिक सूचना युग के विकास के लिए मंच तैयार किया।
- यह भी पढ़े: मदरबोर्ड (Motherboard) क्या है? और इसके प्रकार को जानें ।
माइक्रोप्रोसेसर और पर्सनल कंप्यूटर
1970 के दशक में माइक्रोप्रोसेसर के आविष्कार से पर्सनल कंप्यूटर का विकास हुआ, जिससे शक्तिशाली कंप्यूटिंग संसाधन व्यक्तियों और छोटे व्यवसायों के लिए सुलभ हो गए।
माइक्रोप्रोसेसर, एक छोटा एकीकृत सर्किट, कॉम्पैक्ट और किफायती कंप्यूटरों के निर्माण को सक्षम बनाता है, जिससे वे व्यापक रूप से उपलब्ध और लोकप्रिय हो जाते हैं।
इस आविष्कार का हमारे जीने, काम करने और संवाद करने के तरीके पर महत्वपूर्ण प्रभाव पड़ा और इसने कंप्यूटिंग उद्योग को हमेशा के लिए बदल दिया।
- यदि आप कंप्यूटर का विस्तृत इतिहास जानना चाहते हैं तो इस विस्तृत लेख को पढ़ें: कंप्यूटर का इतिहास (कैलकुलेटर की शुरुआत से AI तक) ।
- कंप्यूटर के घटकों (Components of Computer) को भी समझें ।
समाज पर कंप्यूटर का प्रभाव (Impact on Society)
कंप्यूटर ने संचार, व्यवसाय, शिक्षा और मनोरंजन में क्रांति लाकर समाज को कई तरह से बदल दिया है। उन्होंने जानकारी को अधिक व्यापक रूप से उपलब्ध कराया है और कई कार्यों की गति और दक्षता में वृद्धि की है।
कंप्यूटर हमारे बातचीत करने और एक-दूसरे से जुड़ने के तरीके को भी बदल दिया है और नए उद्योग और रोजगार सृजित किए हैं।
1. संचार (Communication)
कंप्यूटर और इंटरनेट ने संचार में क्रांति ला दी है, जिससे लोग ऐसे तरीकों से जुड़ने में सक्षम हो गए हैं जो पहले कभी संभव नहीं थे। ईमेल, इंस्टेंट मैसेजिंग, सोशल मीडिया और अन्य डिजिटल संचार उपकरणों ने लोगों के लिए दोस्तों, परिवार और सहकर्मियों के संपर्क में रहना आसान बना दिया है, चाहे वे दुनिया में कहीं भी हों।
इन तकनीकी प्रगति ने व्यवसायों और संगठनों के अपने ग्राहकों और कर्मचारियों के साथ संवाद करने के तरीके को भी बदल दिया है, और संचार और सहयोग के नए रूपों का निर्माण किया है।
2. व्यापार और वाणिज्य (Business and Commerce)
कंप्यूटर और इंटरनेट ने विकास और नवाचार के नए अवसर पैदा करके व्यापार और वाणिज्य को बदल दिया है। ई-कॉमर्स के उदय ने सभी आकारों के व्यवसायों के लिए दुनिया भर के ग्राहकों तक पहुंचना संभव बना दिया है, और नए उत्पादों और सेवाओं के निर्माण को सक्षम बना दिया है।
इंटरनेट ने वैश्विक अर्थव्यवस्था के विकास में भी महत्वपूर्ण भूमिका निभाई है और व्यवसायों के लिए दुनिया भर के भागीदारों और आपूर्तिकर्ताओं के साथ संचार और सहयोग करना आसान बना दिया है।
3. शिक्षा और सीखना (Education and Learning)
2023 में, कंप्यूटर और इंटरनेट ने शिक्षा देने के तरीके को बदल दिया है। कंप्यूटर और टैबलेट जैसी तकनीक अब आमतौर पर कक्षाओं में छात्रों को इंटरैक्टिव और आकर्षक सीखने के अनुभव प्रदान करने के लिए उपयोग की जाती है।
ऑनलाइन लर्निंग प्लेटफॉर्म छात्रों को सीखने के तरीके में अधिक लचीलापन प्रदान करते हुए शिक्षकों को पाठ्यक्रम सामग्री ऑनलाइन वितरित करने में सक्षम बनाता है।
इसके अतिरिक्त, इंटरनेट ने ऑनलाइन शिक्षण को अधिक लोकप्रिय बना दिया है, जिससे छात्र किसी भी समय कहीं से भी कक्षाएं लेने में सक्षम हो गए हैं।
हालांकि, यह सुनिश्चित करने के लिए पारंपरिक शिक्षण विधियों के साथ प्रौद्योगिकी के उपयोग को संतुलित करना महत्वपूर्ण है कि छात्र महत्वपूर्ण सोच कौशल विकसित करें और मानव संपर्क प्राप्त करें।
4. मनोरंजन (Entertainment)
कंप्यूटर और इंटरनेट ने लोगों के मनोरंजन के तरीके को बदल दिया है, जिससे यह पहले से कहीं अधिक सुलभ और सुविधाजनक हो गया है।
स्ट्रीमिंग सेवाएं और ऑनलाइन गेमिंग लोगों के लिए संगीत, फिल्मों और वीडियो गेम का आनंद लेने के लोकप्रिय तरीके बन गए हैं, और इससे मनोरंजन के नए रूपों का निर्माण हुआ है।
- यह भी पढ़े: कंप्यूटर के फायदे (Advantages of Computer in Hindi)
कंप्यूटर प्रौद्योगिकी में वर्तमान विकास (Current Developments)
कंप्यूटर प्रौद्योगिकी (technology) में हाल की प्रगति में कृत्रिम बुद्धिमत्ता, मशीन लर्निंग और क्वांटम कंप्यूटिंग शामिल हैं, जिनमें कई उद्योगों में क्रांति लाने और हमारे जीने और काम करने के तरीके को बदलने की क्षमता है।
ये प्रौद्योगिकियां (technologies) मशीनों और कंप्यूटरों को अधिक बुद्धिमान और सक्षम बना रही हैं, और स्वास्थ्य, परिवहन और वित्त (finance) जैसे क्षेत्रों में जटिल समस्याओं को हल करने में मदद कर रही हैं।
आर्टिफिशियल इंटेलिजेंस और मशीन लर्निंग (AI and Machine Learning)
दक्षता में सुधार, प्रक्रियाओं को स्वचालित करने और बेहतर भविष्यवाणियां करने के लिए AI (आर्टिफिशियल इंटेलिजेंस) और ML (मशीन लर्निंग) का उपयोग स्वास्थ्य सेवा, वित्त, परिवहन और विनिर्माण जैसे विभिन्न उद्योगों में किया जा रहा है।
उनके पास नए उत्पादों, सेवाओं और नौकरियों को सृजित करने और तकनीक के साथ हमारे इंटरैक्ट करने के तरीके को बदलने की भी क्षमता है।
हालाँकि, नौकरी के विस्थापन, गोपनीयता और नैतिक मुद्दों के बारे में भी चिंताएँ हैं जिन्हें संबोधित करने की आवश्यकता है।
कंप्यूटर सीखें हिंदी में
यदि आप कंप्यूटर सीखना चाहते हैं तो यहां कंप्यूटर के बारे में हमारा विस्तृत कोर्स ट्यूटोरियल है। नीचे दिए गए लिंक से अभी सीखना शुरू करें:
कंप्यूटर सीखें
क्वांटम कम्प्यूटिंग (Quantum Computing)
क्वांटम कंप्यूटिंग कंप्यूटर विज्ञान का एक क्षेत्र है जिसका उद्देश्य पारंपरिक कंप्यूटरों की तुलना में तेजी से और अधिक कुशलता से संगणना करने के लिए क्वांटम यांत्रिकी के गुणों का उपयोग करना है।
यह अभी भी विकास के शुरुआती चरण में है लेकिन इसमें क्रिप्टोग्राफी, ड्रग डिस्कवरी और मशीन लर्निंग जैसे क्षेत्रों में जटिल समस्याओं को हल करने की क्षमता है।
यह हमारे द्वारा प्रौद्योगिकी के साथ बातचीत करने के तरीके को बदल सकता है और विभिन्न उद्योगों पर इसका बड़ा प्रभाव पड़ सकता है।
Download Computer Essay in Hindi PDF [FREE]
यदि आप फ्री कंप्यूटर निबंध पीडीएफ डाउनलोड करना चाहते हैं, तो कंप्यूटर और प्रोग्रामिंग नोट्स तक फ्री में लेने के लिए हमारे official टेलीग्राम चैनल से जुड़ें! शामिल होने के लिए यहां क्लिक करें और अपने नोट्स मुक्त में डाउनलोड करना शुरू करें!
Download Computer Essay PDF Hindi
इस लेख (Computer Essay in Hindi) में, AI और क्वांटम कंप्यूटिंग में प्रारंभिक कम्प्यूटेशनल उपकरणों से लेकर आधुनिक प्रगति तक, कंप्यूटर प्रौद्योगिकी (Technology) के इतिहास और वर्तमान स्थिति पर चर्चा की गई। इसने संचार, व्यवसाय, शिक्षा और मनोरंजन पर प्रभाव सहित उन तरीकों की भी जांच की जिसमें कंप्यूटर ने समाज को बदल दिया है।
कंप्यूटर प्रौद्योगिकी के भविष्य में और भी अधिक प्रगति और परिवर्तन लाने की उम्मीद है, लेकिन समाज पर संभावित प्रभावों पर विचार करना और नैतिक चिंताओं को दूर करना महत्वपूर्ण है।
मुझे उम्मीद है कि यह कंप्यूटर पर निबंध (Computer Essay in Hindi) आपको कंप्यूटर के बारे में गहराई से समझने में मदद करेगा।
संबंधित लेख लेखक से और अधिक
कोई जवाब दें जवाब कैंसिल करें.
अगली बार टिप्पणी के लिए इस ब्राउज़र में मेरा नाम, ईमेल और वेबसाइट सहेजें
Please enter an answer in digits: one + 4 =
- Get in Touch
- Privacy Policy
कंप्यूटर पर निबंध Computer Essay in Hindi
by StoriesRevealers | May 10, 2020 | Essay in Hindi | 0 comments

Computer Essay in Hindi : आधुनिक समय में कंप्यूटर एक आवश्यक तकनीक है, इसमें व्यापक डेटा संग्रहीत किया जा सकता है। यह एक महान आविष्कार है। और इसे इसतेमान करना भी आसान है। कंप्यूटर एक बहुत ही विश्वसनीय उपकरण है जो लोगों को इसमें व्यापक डेटा स्टोर करने में मदद करता है। कंप्यूटर का उपयोग कार्यालयों, बैंको, शैक्षणिक संस्थान, आदि में किया जाता है। कंप्यूटर ने लागो के प्रयास और जीवन को आसान बना दिया हैं।
Read More: Digital India Essay in Hindi
कंप्यूटर दुनिया में विभिन्न प्रकार की चीजों के बारे में जानकारी देता है। यह इंटरनेट के माध्यम से लोगों को जोड़ने में मदद करता है। कंप्यूटर कम समय में अधिक काम कर सकता है। यह भविष्य की पीढ़ी के लिए एक अनिवार्य उपकरण है
Computer Essay in Hindi
इसमें बहुत सारी कार्यप्रणाली है। कंप्यूटर विज्ञान मानव बिरादरी के लिए एक उपहार से कम नहीं है। यह मानव की तुलना में तेजी से काम करता है। कंप्यूटर का उपयोग गणना, मुद्रण, आदि के लिए किया जा सकता है। आज, हम सब अपना अधिकांश काम कंप्यूटर द्वारा करते है।
कंपनीयों में कंप्यूटर का उपयोग
एमएनसी कंपनियों ने इसका उपयोग लेखांकन उद्देश्यों के लिए किया, चालान, नियंत्रण, और जानकारी इकट्ठा करने के लिए भी कंप्यूटर का उपयोग किया जाता है। आधुनिक दिनों में कंप्यूटर के बिना जीवन कठिन होगा। भारत सरकार ने अपने भविष्य के लाभों के लिए स्कूलों, कॉलेजों और अन्य शैक्षणिक संस्थानों में कंप्यूटर शिक्षा अनिवार्य कर दी है।
Read More: Dr. APJ Abdul Kalam Essay in Hindi
इसका उपयोग व्यावसायिक उद्देश्यों के लिए भी जाता है। कंप्यूटर के माध्यम से हम ऑनलाइन लेनदेन और ऑनलाइन खरीद, बिक्री कर सकते है। कंप्यूटर में, कंपनी अपना व्यावसायिक कार्य जल्दी से कर सकती है और दुनिया भर की प्रक्रियाए कर सकती है। अब दिन में, कंप्यूटर के माध्यम से विभिन्न ऑनलाइन पोर्टल्स से शॉपिंग कर सकते है, जैसे अमेजॅन, फ्लिप कार्ट, आदि।
कंप्यूटर में दो महत्वपूर्ण चीजें हैं हार्डवेयर और सॉफ्टवेयर। कंप्यूटर कभी भी गलत नहीं हो सकता जब तक कि उसे चलाने वाला कोई गलती न करे। आम तौर पर, इसमें एक प्रसंस्करण इकाई होती है जिसे केंद्रीय प्रसंस्करण इकाई कहा जाता है। कंप्यूटर किसी भी जानकारी को स्टोर कर सकता है। और वह जानकारी तब तक उसमे रहेगी जब तक आप खुद वह जानकारी को मिटा नहीं देते।
शिक्षा में कंप्यूटर की भूमिका
अब विज्ञान और प्रौद्योगिकी इस युग में और अधिक उन्नत हो गए हैं, कंप्यूटर स्टोर में आप पुस्तकों का संग्रह कर सकते है और उन पुस्तकों के ज्ञान का प्रसार कर सकता है। दूसरे शब्दों में, कंप्यूटर हमारे सीखने के तरीके और ज्ञान को संग्रहीत करने के तरीके को बदल रहा हैं।
कंप्यूटर के माध्यम से छात्र पंजीकरण, कक्षा निर्धारण, परीक्षा परिणामों का प्रसंस्करण, छात्रों की शिक्षा के व्यक्तिगत भंडार को कंप्यूटर द्वारा तेज और प्रभावी तरीके से लागू किया जा सकता है। अब परीक्षा परिणाम कंप्यूटर द्वारा संसाधित किए जा रहे है।
कंप्यूटर के इसके अलावा भी विभिन्न लाभ हैं। जैसे ट्रेन, विमान, पानी के जहाज़ों को कंप्यूटर द्वारा नियंत्रित किया जा सकता है। कंप्यूटर में पेंट, वीएलसी मीडिया, आदि जैसी अलग विशेषताएँ होती है जो हमारा दैनिक कार्याें को असान बनाती है।
Read More: Swachh Bharat Abhiyan Essay in Hindi
कंप्यूटर का मनोरंजन के लिए भी उपयोग किया जा सकता है। इसमें विभिन्न मल्टीमीडिया जैसे कि संगीत, वीडियो आदि देखे वह सुने जा सकते है, हम इस पर गेम भी खेल सकते हैं और गेम्स के असीमित विकल्प हैं। कंप्यूटर में नुकसान भी हैं जो केवल एक साक्षर व्यक्ति द्वारा संचालित किए जा सकते हैं। इसके परिणामस्वरूप अधिक रोज़गार सृजन हो सकता है।
कंप्यूटर आज की पीढ़ी में सबसे महत्वपूर्ण तकनीक है।
Thanks for Reading: Computer Essay in Hindi
Recent Posts

Recent Comments
- StoriesRevealers on Diwali Essay in Hindi
- Ramadhir on Diwali Essay in Hindi
- Ram on Swachh Bharat Abhiyan Essay in Hindi
- Srikanth on ए.पी.जे. अब्दुल कलाम पर निबंध Dr. APJ Abdul Kalam Essay in Hindi
- aduq on Global Warming Essay in Hindi 500+ Words
Our website is made possible by displaying online advertisements to our visitors. Please consider supporting us by whitelisting our website.


कंप्यूटर पर निबंध | Essay on Computer in Hindi 1000 Words
Essay on computer in hindi.
Essay on Computer in Hindi (कंप्यूटर पर निबंध ) कंप्यूटर एक ऐसा मशीन है जो कि आज कि दुनिया में एक बहुत ही महत्वपूर्ण भूमिका निभाता है। इसका इस्तेमाल करना आज के समय में सभी के लिए बहुत ही जरुरी है। क्यूंकि आज सभी काम कंप्यूटर के माध्यम से आसान हो गया है आइये जानते है कि यह क्या और कैसे इस्तेमाल होता है तथा यह किस तरह से चलता है और इसके क्या – क्या अंग है।
कंप्यूटर क्या है ?
कंप्यूटर वह इलेक्ट्रॉनिक उपकरण है, जो यूज़र दवारा निर्देश प्राप्त करता है और तय कार्यक्रम के उपयोग से संख्यात्मक आंकड़े या अन्य प्रकार की जानकारी यूज़र को देता है।
यह संचित प्रोग्राम अवधारणा पर अर्थार्त दिए गए अनुदेशों पर कार्य करता है।
कंप्यूटर का इतिहास क्या है ?
कंप्यूटर के विकास की दिशा में प्रथम प्रयास 19 वी शताब्दी में चार्ल्स बैबेज के द्वारा किया गया था। इसलिए उन्हें कंप्यूटर का पितामह (फादर ऑफ़ कंप्यूटर ) कहा जाता है। विश्व का प्रथम कंप्यूटर मार्क का विकास वर्ष 1944 में हॉवर्ड विश्वविधालय में किया गया था। भारत में निर्मित प्रथम कंप्यूटर सिद्धार्थ है।
वर्ष 1945 में डॉ वॉन न्यूमैन ने कंप्यूटर क्रांति को सही दिशा दी, उन्हेने कंप्यूटर के कार्य के लिए बाइनरी सिस्टम का उपयोग किया। न्यूमैन द्वारा बनाया गया की-बोर्ड, सेंट्रल प्रोसेसर यूनिट पर आधारित था। इसमें इनपुट, आउटपुट, मैमोरी, अर्थमेटिक एंड लॉजिक यूनिट, और कण्ट्रोल यूनिट थ।
वर्ष 1946 में विश्व का पहली पूरी तरह से इलेक्ट्रॉनिक डिजिटल कंप्यूटर ENIAC (लेक्ट्रॉनिक नूमेरिकल इंटीग्रेटर एन्ड कैलकुलेटर बना।
पहली पीढ़ी का ये कंप्यूटर वेक्यूम ट्यूब टेक्नोलॉजी पर आधारित था, लेकिन वर्तमान में कंप्यूटर द्विधारी पद्धति (बाइनरी सिस्टम) पर आधारित होते है।
कंप्यूटर के कार्य क्या है ?
कंप्यूटर के बहुत से कार्य होते है पर मुख्य रूप से कंप्यूटर के चार प्रकार के कार्य करने में महारत हासिल है।
- (Collection and Input) डाटा का संकलन तथा निवेशन
- (Storage) डाटा का संचयन
- (Processing) डाटा संशाधन
- डाटा/इनफार्मेशन (Information) का निर्गम या पुनर्निर्गम(Retrieval)
ये भी देखें – Essay on poverty in India in Hindi
कंप्यूटर के अंग क्या है ?
इनपुट युक्ति
इस युक्ति का उपयोग आंकड़े, तथ्यों व् निर्देशन को कंप्यूटर के अंदर सम्प्रेषित करने के लिए किया जाता है, जो की कई माध्यम से किया जाता है। जैसे – की बोर्ड, ऑप्टिकल करेक्टर रीडर, लाइट पैन, स्कैनर, मार्क रीडर मेगनेटिक इंक करेक्टर रीडर आदि।
ऑउटपुर युक्ति
कंप्यूटर द्वारा संशाधित परिणामो को इन युक्ति के जरिये प्रदर्शित या प्राफ्त किया जाता है, जैसे – विडिओ डिस्प्ले यूनिट, प्रिंटर आदि।
यह कंप्यूटर का सबसे महत्वपूर्ण भाग है सेंट्रल प्रोसेसिंग यूनिट (सीपीयू ), जो की निर्देशों का प्रयोग कर के सम्पूर्ण कंप्यूटर प्रणाली को संचालित करता है। यह कंप्यूटर का ह्रदय या मस्तिष्क कहलाता है और सीपीयू मुखता तीन भागो में विभक्त होता है।
अर्थमेटिक लॉजिक यूनिट यह कंप्यूटर के अंकगणितीय व् तार्किक कार्यो को करने के लिए उतरदाई है। अंकगणितीय कार्य संख्याओं की तुलना करने तथा “कम ” एवं “बराबर “, ” अधिक ” को शामिल करने के लिए प्रयुक्त किया जाता है।
कण्ट्रोल यूनिट
यह निर्देशों को सही उपयोग तथा उनको कण्ट्रोल करने का कार्य करता है।
यह सामग्री (आंकड़े) तथा कार्यक्रम को संचालित करने के लिए प्रयुक्त की जाती है। सम्पूर्ण स्मृति संग्रह को दो भागो में विभाजित किया जाता है।
प्राइमरी यूनिट – यह कंप्यूटर का स्मृति संग्रह है जहा जानकारी को संचित किया जाता है। इस स्मृति के दो स्पष्ट रूप है।
रोम – यह एक स्थायी स्मृति है, जो कंप्यूटर के निर्माण में समय की स्थापित कर दी जाती है। इसमें मौजूद डाटा को केवल पढ़ा जा सकता है, इसलिए से रीड ओनली मैमोरी कहते है।
रेम – यह एक परिवर्तनशील स्मृति संग्रह है। यह कंप्यूटर की मेन मैमोरी का एक महत्वपूर्ण हिस्सा होता है। कंप्यूटर में सम्प्रेषित सभी डाटा सीधे रेम में ही जमा होता है।
सेकंडरी मैमोरी – यह सुचना को स्थायी रूप से संग्रह करने के काम आती है। विभिन प्रकार की संग्रह पद्धतियों पर आधारित ये मुख्य रूप से निम्नलिखित है | हार्ड डिस्क, फ्लॉपी डिस्क, सीडी, डीवीडी आदि।
ये भी देखें – My best friend essay in Hindi
इसका तात्पर्य विभिन्न कंप्यूटर को परस्पर जोड़ना है| जिसमे ये सर्वर से जुड़े होते है तथा प्रत्येक कंप्यूटर का अपना प्रोसेसर होता है।
नेटवर्किंग के फायदे की बात करे तो इसे कई फायदे है | जैसे – डाटा का आदान प्रदान, फाइलों का स्थानांतरण फ्लोपीज़ के बिना संभव होना, चिकित्सा, डाटा सुरक्षा, कम मैमोरी का उपयोग, सामान्य हार्डवेयर, सॉफ्टवेयर संसाधन।
नेवटर्किंग में मुख्यता तीन प्रकार के नेटवर्क होते है।
LAN- स्थानीय क्षेत्र (लोकल एरिया नेटवर्क)
MAN- महानगर क्षेत्र (मेट्रोपोलिटन एरिया नेटवर्क)
WAN- व्यापक क्षेत्र (वाइड एरिया नेटवर्क)
सुचना प्रोधोगिकी की जीवन रेखा “इंटरनेट” विश्व के विभिन्न स्थानों पर स्थापित टेलीफोन लाइन के सहयोग से एक-दुसरो के साथ जुड़े कंप्यूटर का ऐसा नेटवर्क है| जो सुचना लेने एव उसके अदन प्रदान के लिए विश्वस्तरीय आंकड़ा- सुचना सेवा उपलब्ध करता है।
इंटरनेट के माध्यम से सूचनाओं के आदान- प्रदान के लिए कुछ स्थापित नियमो के समूह होते है| जिन्हे इंटरनेट प्रोटोकॉल कहा जाता है।
ये भी देखें – Morning walk essay in Hindi
जैविक कंप्यूटर
इसराइल स्थित वेजमान इंस्टिट्यूट और साइंस के वैज्ञानिक एहुद शॉप्रियो के नितृत्व में पहला जैविक कंप्यूटर तैयार किया गया। जिसमे इनपुट एंड ऑउटपुर दोनों जिवंत है। डीएनए प्रयुक्त ये नैनो कंप्यूटर जीवित प्रणाली से संचालित है।
इसमें डीएनए चिप का प्रयोक होता है। और ये जैविक अणु द्वारा ऊर्जा प्राप्त करता है। यह कंप्यूटर केवल कोशिकाद्रव्य की मदद से शरीर के पनपते रोगो की सुचना देने में सक्षम है।
निष्कर्ष :-
आज के युग में कंप्यूटर तकनीक पर निर्भरता लोगो कि काफी तेजी से बढ़ती जा रही है। कोई भी व्यक्ति आज के समय में अपने जीवन की कल्पना बिना कंप्यूटर के नहीं कर सकता,
कंप्यूटर ने हर जगह अपने पैर फैला लिये है और हम सभी इसके आदि बन चुके है। यह हर विद्यार्थी का भी एक महत्वपूर्ण हिस्सा बन चुका है। वो इसका इस्तेमाल कहाँनियों के लिये, परीक्षा संबंधी त्यारी, आदि जैसे कार्यों के लिये बेहद कम समय में कर सकता है।
आशा करते है यह Essay on computer in Hindi जानकारी आप को पसंद आई होगी | हमारी वेबसाइट पर आने के लिए धन्यवाद !
Related Articles

मेरी माँ पर निबंध | Essay On My Mother In Hindi 500 Words | PDF

Muft Shiksha Par Nibandh | Essay on Education Should Be Free in Hindi

Essay On Patriotism In Hindi 500 Words | देशभक्ति पर निबंध | PDF

होली पर निबंध | Essay on Holi in Hindi 1000 Words | PDF
Leave a reply cancel reply.
Your email address will not be published. Required fields are marked *
Save my name, email, and website in this browser for the next time I comment.
ESSAY KI DUNIYA
HINDI ESSAYS & TOPICS
Essay on Computer in Hindi – कंप्यूटर पर निबंध
December 17, 2017 by essaykiduniya
यहां आपको सभी कक्षाओं के छात्रों के लिए हिंदी भाषा में कंप्यूटर पर निबंध मिलेगा। Here you will get Paragraph and Short Essay on Computer in Hindi Language/ Essay on Importance of Computer in Hindi for students of all Classes in 100, 150, 200, 300 and 500 words. Learn about computer in Hindi Language.

Paragraph and Short Essay on Computer in Hindi – कंप्यूटर पर निबंध ( 100 Words )
कम्पयुटर एक मशीन है जिसका प्रयोग हम सब रोज करते है। यह मानव मस्तिष्क का विकसित रूप हैं। इसने लोगों की जिंदगी को सरल कर कार्य को गति प्रदान की है। बिना कम्पयुटर के आज के समय में कोई भी कार्य नहीं किया जा सकता है। हर क्षेत्र में कम्पयुटर की जरूरत है। सभी कार्यालयों में कम्पयुटर से ही हिसाब किताब किया जाता है और सभी डाटा इसमें रखे जाते हैं। मनोरंजन के लिए भी इसका प्रयोग किया जाता है। यह हमारे लिए बहुत ही लाभदायक है पर अप्रत्यक्ष रूप से यह हमारे स्वास्थय पर नकारात्मक प्रभाव डालता है।
Short Essay on Computer in Hindi Language – कंप्यूटर पर निबंध ( 150 Words )
कंप्यूटर आधुनिक इलेक्ट्रॉनिक मशीन हैं जिनका उपयोग विभिन्न कार्यक्रमों के लिए किया जाता है। कंप्यूटर का संचालन करने वाला व्यक्ति निर्देश देता है और इस तरह कंप्यूटर काम करता है। कंप्यूटर एक इलेक्ट्रॉनिक उपकरण है जो डेटा को एक रूप में लेता है और इसे दूसरे रूप में देता है। कंप्यूटर एक इनपुट लेता है, इसे एक आउटपुट में संसाधित करता है जो स्टोरेज डिवाइस में संग्रहीत होता है। इसकी स्मृति में एक कंप्यूटर स्टोर की जानकारी और जब भी इसकी आवश्यकता होती है, उपयोग करता है। वह व्यक्ति कंप्यूटर में एक ऐसी भाषा में निर्देश देता है जिसे कंप्यूटर समझता है। सबसे आम कंप्यूटर पीसी हैं वे दुनिया भर में घरों, स्कूल और कार्यालय में पाए जाते हैं। पीसी के मुख्य भाग एक डिस्क ड्राइव, कीबोर्ड मॉनिटर, प्रिंटर और एक स्कैनर के साथ एक केंद्र प्रोसेसर हैं। कंप्यूटर हमारे जीवन का एक महत्वपूर्ण हिस्सा बन गए हैं।
New Essay on Computer in Hindi Language – कंप्यूटर पर निबंध ( 200 Words )
कम्पयुटर तकनीक का एक अद्भुत आविष्कार है जिसका प्रयोग हम रोज करते हैं। सबसे पहले कम्पयुटर को 1822 में इंग्लैंड के चार्लस बैबेज ने बनाया था। कम्पयुटर ने लोगों का कार्य सरल कर दिया है और उन्हें विकास की राह पर अग्रसर किया है। कम्पयुटर कै माध्यम से करोड़ों की गणना सैकिंडों में की जा सकती है। इसने लोगों के कार्य को गति प्रदान करके समय की बचत की है। आधुनिक युग में सभी काम कम्पयुटर के जरिए किए जाते हैं। शिक्षा से लेकर चिकित्सा तक हर क्षेत्र में कम्पयुटर की आवश्यकता पड़ती है।
हर स्कूल घर और कार्यालयों में कम्पयुटर देखने को मिलते हैं। इसकी वजह से बहुत से लोगों को रोजगार भी मिला है। भारत के आईटी इंजीनियर की माँग पूरे विश्व में है। यह हमारे मस्तिष्क का ही विकसित रूप है। कम्पयुटर को प्रयोग मनोरंजन के लिए भी किया जाता है। सभी एनिमेशन मूवी कम्पयुटर से ही बनती है। कम्पयुटर में सभी प्रकार के डाटा को संभाल कर रखा जाता हैं। हर महीने कम्पयुटर के 5000 वायरस तैयार किए जाते हैं। कम्पयुटर के स्वास्थय पर नकारात्मक प्रभाव पड़ते हैं। लगातार इसके प्रयोग से कमर का दर्द बढ़ता है और आँखे कमजोर होती है।
Short Essay on Computer in Hindi Language – कंप्यूटर पर निबंध (300 Words)
कम्पयुटर विग्यान का बहुत ही अनोखा आविष्कार है। यह एक अद्भुत मशीन है और इसके आविष्कार से देश में क्रांति आ गई है। सबसे पहला कम्पयुटर 1822 में चार्ल्स बेब्ज ने बनाया था। कम्पयुटर ने मनुष्य के कार्य को सरल कर दिया है और गति भी प्रदान की है। कम्पयुटर ने गणना को कुछ सैकिंडो का काम बना दिया है। कम्पयुटर की मदद से हम रेलवे और हवाई जहाज की टिकट बुक कर सकते हैं। कम्पयुटर में हम अपना सारा डाटा, फोटो, विडियो आदि को रख सकते है। कम्पयुटर से ही आज के समय में सभी खातों आदि का काम होता है। बिजली, पानी आदि को बिलों को कम्पयुटर से जोड़ दिया गया है जिससे कि भ्रष्टाचार पर लगाम लगी है। कम्पयुटर के बिना शेयर बाजार नहीं चल सकता है। इसकी वजह से बहुत से लोगों को रोजगार मिला है। यह मानव के दिमाग का ही एक विकल्प है।
आज के समय में कम्प्यूटर का महत्व
आज के समय में कम्पयुटर केवल कार्यालयों में ही नहीं बल्कि हर गली हर घर में पाए जाते हैं। बच्चे उनका प्रयोग अपने कार्य और मनोरंजन के लिए करते हैं। एनिमेशन फिल्में कम्पयुटर पर ही बनाई जाती है। कम्पयुटर संचार का भी माध्यम है। कम्पयुटर की वजह से इंटरनेट को भी बढ़ावा मिला जो कि सभी कम्पयुटर को जोड़ता है। कम्पयुटर की वजह से आकड़ो में छेड छाड़ भी नहीं हो सकती है। कम्पयुटर के प्रयोग से राष्ट्र जल्दी विकसित होता जा रहा है। कम्पयुटर की स्पीड बहुत ही तेज होती है। यह एक सैकंड में 38 ट्रीलियन तक की गणना कर सकता है। हमें ज्यादा से ज्यादा कम्पयुटर को प्रयोग में लाना चाहिए और नए नए डिजाईन बनाने सिखने चाहिए। कम्पयुटर को आप जब भी चलाऐंगे कुछ न कुछ नया ही सीखेंगें। हमें लंबे समय तक कम्पयुटर पर नहीं लगे रहना चाहिए क्योंकि इससे स्वास्थय संबंधी परेशानियाँ उत्पन्न होती है। कम्पयुटर का सही तरीके से प्रयोग आपको सफलता और ग्यान प्रदान करता है।
Long Essay on Computer in Hindi Language – कंप्यूटर पर निबंध (500 Words)
कंप्यूटर विज्ञान के सबसे शानदार उपहारों में से एक है। यह उपकरण मूल रूप से चार्ल्स बबेज द्वारा विकसित किया गया था। बीसवीं सदी के उत्तरार्ध में हमने संचार, गणना, परिवहन और घरेलू उपकरणों और गैजेट के क्षेत्र में नए और उन्नत तरीके विकसित किए हैं। उनमें से एक कंप्यूटर है यह हमारे जटिल और जटिल गणितीय समस्याओं को किसी समय में हल करने में सहायता करता है। कंप्यूटर का निवेश करने का श्रेय चार्ल्स बबेज को जाता है, उन्होंने इस वैज्ञानिक उपलब्धि को हासिल करने के लिए लगातार और बहुत मेहनत की। कंप्यूटर की प्रणाली खुफिया बनायी हुई है हम कंप्यूटर में कुछ डेटा फ़ीड करते हैं, बटन दबाएं और सबसे सटीक उत्तर प्राप्त करें। यह पहले से ही विकसित वस्तुओं की भविष्य की संभावनाओं को खोजने में मदद करता है|
वैज्ञानिक यह जानने के लिए कंप्यूटर का उपयोग कर रहे हैं कि क्या हम इस ग्रह पर मनुष्य के अस्तित्व के लिए बेहतर परिणाम प्राप्त कर सकते हैं जिससे मनुष्य का जीवन और अधिक आसान बनाने में मदद मिलेगी। आज, हमें पहले और भूकंप के बारे में बताएं, एक दुर्घटना जो वायु या पानी में होती है मौसम का पूर्वानुमान कंप्यूटर द्वारा किया जाता है समय बीतने के साथ, कंप्यूटर का उपयोग बढ़ रहा है। डेटा इकट्ठा करने में, प्रक्रिया और अंतिम परिणाम पर पहुंचती है। यह बड़े पैमाने पर एक आंकड़ा काम कर सकता है सभी बड़ी चिंताओं, बड़े बैंक, एलआईसी कंपनियों, सरकारी कार्यालय आदि कंप्यूटरों को अपने पेरोल और अन्य आंकड़े के काम के लिए इस्तेमाल करते हैं।
कंप्यूटर सिस्टम के मूल भाग हैं:
1- मॉनिटर 2- सीपीयू (केंद्रीय प्रसंस्करण इकाई) 3- कीबोर्ड 4- माउस 5- स्पीकर्स 6- प्रिंटर
भारतीय रेलवे , हवाई यातायात विभाग, रक्षा प्रतिष्ठान, यूटीआई और अन्य वित्तीय संस्थानों ने अपने कार्यों को विभिन्न विभागों में कम्प्यूटरीकृत किया है। सभी समृद्ध और विकसित देशों ने अपने जलवायु, औद्योगिक, वाणिज्यिक वित्तीय और अन्य जटिल समस्याओं को हल करने के लिए कंप्यूटर का उपयोग किया है। अब उन्नत और विकसित देशों में कंप्यूटर की मदद से नियंत्रित और नियंत्रित ट्रैफिक। हालांकि, कंप्यूटर मानव ट्रेन की जगह नहीं ले सकता। मूल सोच मानव मस्तिष्क द्वारा किया जाता है-वह कार्य जिसे एक परिष्कृत और उन्नत कंप्यूटर द्वारा भी नहीं किया जा सकता। कंप्यूटर हमें नतीजे देता है जब हम उसमें एक निश्चित तिथि खिलाती हैं। एक कंप्यूटर की कोई भावनाएं नहीं हैं। यह रोजगार पैदा नहीं करता है| यह आशंका है कि यह एक दिन बेरोजगारी बनाएगा।
50 वर्षों से भी कम समय में कंप्यूटर ने व्यावहारिक रूप से गतिविधि के हर क्षेत्र को प्रभावित किया है। आज की कई नियमित गतिविधियां कंप्यूटर द्वारा की जाती हैं। कंप्यूटरों के उपयोग से कागजी कार्रवाई कम हो गई है। अब ज्यादातर काम कंप्यूटर पर सीधे किया जाता है। बड़े शहरों में यातायात कंप्यूटर द्वारा नियंत्रित किया जाता है बैंकों और रेलवे स्टेशनों में स्वचालन को जनता और कर्मचारियों को समान रूप से राहत मिली है। अग्रिम टिकट लेना अधिक कुशल और सुविधाजनक बन गए हैं| कंप्यूटर पर शतरंज और कार्ड जैसे विभिन्न प्रकार के खेल भी खेला जा सकता है।
इसलिए, हम सभी के लिए कंप्यूटर के बारे में जागरूकता महत्वपूर्ण है| कंप्यूटर का नकारात्मक पक्ष भी है साइबर अपराध का उदय, अश्लील चर्चा के लिए चैट रूम का उपयोग, कुछ वेबसाइटें, जो अश्लील सामग्री में काम करती हैं, उन्हें देखा गया है। लेकिन फायदे और महत्व नुकसान से अधिक है। कंप्यूटरीकरण के माध्यम से, दुनिया आज वैश्विक बन गई है।
हम आशा करते हैं कि आप इस निबंध ( Essay on Computer in Hindi – कंप्यूटर पर निबंध )को पसंद करेंगे।
More Articles :
Essay on Cyber Crime in Hindi – साइबर अपराध पर निबंध
Essay on Email in Hindi – ईमेल पर निबंध
इंटरनेट पर निबंध – Internet Essay in Hindi
Essay on My Hobby in Hindi – मेरी रुचि पर निबंध
Make in India Essay in Hindi – मेक इन इंडिया निबंध
कंप्यूटर पर निबंध | Computer Essay in Hindi

Computer Essay in Hindi : अगर आप कंप्यूटर पर निबंध जानने के लिए इस लेख पर आये है तो आप बिलकुल सही जगह पर है यहाँ आपको Computer Par Essay 400 Words, 1000 Worlds और 20 Lines में उपलब्ध कराएँगे।
वर्तमान समय में सायद ही ऐसे कोई व्यक्ति होगा जो कंप्यूटर के बारे में न जानता हो आज के समय में स्कूल, कॉलेज, हॉस्पिटल, सरकारी कार्यालय आदि जगहों पर आसानी से देखने को मिल जाता है।
आज के समय में दिन प्रतिदिन कंप्यूटर को तकनीक से विकसित किया जा रहा है जो पहले से ज्यादा बेहतर होता जा रहा है। अक्सर जो छात्र हिंदी विषय से पढाई करते है उन्हें अक्सर परीक्षाओ में कंप्यूटर पर निबंध लिखने को मिलता है।
Table of Contents
कंप्यूटर पर निबंध (200 शब्द) – Computer Essay in Hindi
कंप्यूटर एक ऐसा मशीन है जो कम्प्यूटर प्रोग्रामिंग या कंप्यूटर विज्ञानं से संबंधित कार्यों को संपादित और संचालित करने में मदद करता है। यह एक आदर्श उपकरण है जो हमारे दैनिक जीवन में बहुत सारे तरीकों से उपयोग किया जाता है।
कंप्यूटर के बिना हमारा जीवन बहुत ही मुश्किल हो जाता है। वह हमारे सभी कार्यों को आसानी से संपादित और संचालित करने में मदद करता है। कंप्यूटर हमारी शिक्षा, व्यवसाय, संपर्क और संचार जैसे बहुत सारे क्षेत्रों में उपयोग माना जाता है कंप्यूटर हमारे जीवन को आसान बनाने के साथ हमारे कई कामो को आसान बना दिया है।
कंप्यूटर हमारे जीवन में बहुत ही महत्वपूर्ण भूमिका निभाता है इसका उपयोग आज कई फैसलों और कार्यों में होता है, जैसे डाटा प्रसंस्करण, सामग्री संपादन, समय पर समाधान और संचार जैसे कार्यों में किया जाता है।
कंप्यूटर एक स्मार्ट मशीन है जो हमारी जानकारी, सामग्री और डाटा को संग्रहीत और प्रसंस्करण करने की क्षमता रखता है इसके अंदर एक सूत्रधारक होता है जो संभवतः हाई-स्पीड प्रोसेसर होता है जो संभवतः हमारे कंप्यूटर के सारे कार्यों का निर्माण और निर्माण करने में मदद करता है।
कंप्यूटर पर निबंध (300 शब्द)
कम्प्यूटर एक इलेक्ट्रॉनिक संसाधन है, यह कमोबेश मानव-मस्तिक के समान कार्य करती है और आश्चर्यजनक तीव्र गणना करता है। यह स्वचलन के युग में प्रवेश है।
कम्प्यूटर की मुख्य विशेषता है कि यह इनपुट पर तार्किक संक्रियाएँ करता है और प्रोगाम किए गए निर्देशों के अनुसार उत्तर देता है 20वीं शताब्दी के अंतिम दो दशकों के दौरान विश्व में कम्प्यूटर क्रान्ति आ गई जिसमें सूचना संसाधन और पुनःप्राप्ति अविश्वसनीय गति से की जा रही है।
चार्ल्स बैबेज पहले व्यक्ति थे जिन्होंने उन्नीसवीं शताब्दी के मध्य में लघुगणक सारणियों को संग्रहित करने वाली मशीन के बारे में सोचा, वर्तमान में कम्प्यूटर हमारे औद्योगिक विकास की आधारशिला बन गया है इसने केवल औद्योगिक उत्पादन की वृद्धि में ही सहायता प्रदान नहीं की है बल्कि इंटरनेट और सूचना-हाइवे ने लोगों के कमरे तक सूचना के परिस्रवण और प्रेषण में सहायता प्रदान की है। रोबोट का उपयोग सक्रिय ज्वालामुखी, समुद्र-विज्ञान और अंतरिक्ष अनुसंधान के क्षेत्र में किया जा रहा है जहाँ मानव का पहुँचना संभव नहीं है।
किन्तु कम्प्यूटर अभिशाप है या वरदान? इस प्रश्न पर मतांतर है। कम्प्यूटर उन क्षेत्रों के लिए विशिष्ट होगा जिसमें विकास मानव-शरीर की सीमाओं से बाधित हो गया है कम्प्यूटर ऊर्जा-संकट, एड्स, कैंसर अनुसंधान इत्यादि में काम करने के लिए प्रोगाम किए गए मशीनों जैसी मानवता के सर्वाधिक ज्वलंत समस्याओं को हल कर सकता है और उनका समाधान कर सकता है जो वर्तमान में हमारे लिए अवैध नहीं है।
इसमें कोई संदेह नहीं है कि कम्प्यूटर एक महान कृति है किन्तु हमें यह भी स्मरण रखना चाहिए कि “मानव का अस्तित्व संवेदना और ज्ञान रूपी दो स्तम्भों पर आधारित है, ज्ञान के बिना संवेदना अप्रभावी है और संवेदना के बिना ज्ञान अमानवीय है” हमारे मस्तिष्क में प्रोटोप्लाज्मिक कम्प्यूटर के लिए चल रही सोच-प्रक्रिया यहाँ नहीं रुकेगी, बल्कि मानव-क्षमताओं के विकास और पृथ्वी पर मानव का जीवन बेहतर और सुखमय बनाने तक जारी रहेगी।
कंप्यूटर पर निबंध (400 शब्द)
आज सभी शिक्षित व्यक्ति कंप्युटर से परिचित है याँहा तक की स्कूली बच्चे भी कंप्युटर के विषय में सबकुछ जानते है वे जानते है की वह क्या है और कैसे कार्य करता है अन्य विषयों के साथ साथ कंप्युटर का शिक्षा भी दी जाती है वे इसके लाभ से बहुत कुछ सिख रहे है कंप्युटर के बारे में मौलिक जानकारी चलर्स बैबेज के द्वारा दी गई और इन्हे कंप्युटर का जनक मन जाता है कंप्युटर का कार्यक्षमता बड़ी तेजी से बढ़ रही है।
एक कंप्युटर के की भाग होते है इसे अंग्रेजी कई – बोर्ड द्वारा चलाया जाता जाता है यह एक टाईप – राईटर की तरह होता है और इसके साथ अन्य काम भी हो सकता है यह एक केन्द्रीय व्यववस्था इकाई है जिसे सी. पी. यू. कहा जाता है। कंप्युटर के मेमोरी में असंख्य सूचनाओ को समाहित किया जा सकता है एक छोटे से कंप्युटर के डिस्क में बहुत ही सारी पुस्तक को संग्रहीत किया जा सकता है। प्रोग्राम को इसके इन – पूट में डाला जाता है इसका परिणाम इसके मॉनिटर स्क्रीन पर आता है यह एक छोटे टेलीविजन की तरह होता है।
आधुनिक कंप्युटर के चिप्स विकसित हो गए है इन्हे बगैर की – बोर्ड को संपर्क किए भी चलाया जा सकता है इन्हें एक स्विचनुमा व्यवस्ता के द्वारा चलाया जाता है उसे माऊस कहा जाता है कोई चाहे तो कंप्युटर से प्रिंटर को जोड़कर मन चाहे चित्र बना सकते है। आज के यूग में कंप्युटर मानव जीवन के विभिन्न यंग बन गया है कार्यालयों एवं संस्थाओ में कार्य के बोझ से छुटकारा पाने हेतु कंप्युटर को व्यवस्थित किया जा रहा है।
यह मानव कार्य के क्षमता से काफी ज्यादा तेज एवं विश्वसनीय है अब कंप्युटर का प्रयोग हर क्षेत्र में ( यानि विज्ञान, व्यापार, सांख्यिकी, कला, और मनोरंजन ) किया जा रहा है शिक्षा के क्षेत्र में इसने एक महत्वपूर्ण भूमिका निभाई है। अमेरिका एवं जापान जैसे विकसित राष्ट्र अधिक से अधिक शक्तिशाली अच्छे कंप्युटर विकसित कर रहे है विकाशशील देशों में कंप्युटर ट्रेनिंग तेजी से बढ़ रहा है।
कंप्युटर प्रशिक्षण केंद्र और संस्थाए तेजी से स्थापित हो रहा है बड़ें पैमाने पर उन्नत एवं विशिष्ट प्रोग्राम की शिक्षा दी जा रही है कंप्युटर ट्रेनिंग एक अच्छा व्यवसाय बन गया है यह नियोजन की गारंटी है कंप्युटर सभी के लिए वक आवश्यक साधन बन गया है यह एक गणितज्ञ के लिए कठिन प्रश्नों को हल करने का साधन है एक कवि या लेखक इसके द्वारा छंद,अलंकार, समानार्थक एवं विपरीतार्थक शब्दों साधन है इसके द्वारा पूरी दुनिया को शयन कक्ष में समेत जा सकता है।
- दुर्गा पूजा पर निबंध
- मोबाइल फोन पर निबंध
- हमारा प्रिय खेल क्रिकेट पर निबंध
- दिवाली पर निबंध
- गणतंत्र दिवस पर निबंध
- हजाम पर निबंध
- मेरा विद्यालय पर निबंध
- सरस्वती पूजा पर निबंध
कंप्यूटर पर निबंध (1000 शब्द)
कंप्युटर मानव द्वारा किया गया सबसे महत्वपूर्ण और बेहतरीन आविष्कार है कंप्युटर मानव के जीवन जीने के नजरिया है आज कंप्युटर की सहायता से किसी भी प्रकार की जानकारी ली जा सकती है इसकी गणना करने की तेजी नए मानव को भी तेज रफ्तार बना दिया है। कंप्युटर का आविष्कार सर्वप्रथम चार्ल्स बैबेज ने किया था इसके बाद इसमे नियंत्रण परिवर्तन होते रहे और आज यह दुनिया में परिवर्तन ला रहा है।
कंप्युटर क्या है?
कंप्यूटर बिजली से चलने वली एक इलेक्ट्रॉनिक मशीन है जो की इनपुट के रूप में देता को अपने अन्दर ग्रहण करता है और सॉफ्टवेयर या प्रोग्राम के अनुसार उसे प्रोसेस करके हमें आउटपुट के रूप में रिजल्ट प्रदान करता है।
कंप्युटर के उपयोग
वर्तमान में कंप्युटर पर देश दुनिया की सभी जानकारियाँ उपलब्द है इसका उपयोग सभी कार्यालयों, बैंकों, अस्पतालों, स्कूलों, और शोध के लीये वैजीनिक द्वारा भी उपयोग किया जाता है इसके उपयोग के कारण आज हमें मौसम की सही जानकारी मिल जाती है साथ ही कंप्युटर नए शिक्षा और व्यापार को भी आसानी बना दिया है चिकित्सा के क्षेत्र में तो क्रांतिकारी बदलाओ आए है चिकित्सकों द्वारा बीमारियों के इलाज के लिए दवाईयाँ बनाना आसान हो गया है।
या है कंप्युटर का उपयोग आनलाइन जानकारी का आदान प्रदान करने और व्यक्ति से घर बैठे बात भी कर सकते है वैज्ञानिक नए उसकी सहायता से कई उपलब्धियाँ प्राप्त की है उन्होंने अंतरिक्ष की जानकारी कंप्युटर के मध्यान से ही प्राप्त की है कंप्युटर एक बहुत उपयोगी वस्तु है।
कंप्यूटर की पीढ़ियों – Generation of Computer in Hindi
हम यह नहीं कह सकते की कंप्यूटर का बदलाव कब-कब हुआ तो हम Official रूप से Generation of Computer को पांच भागो में बाँटा गया है।
- कंप्यूटर की पहली पीढ़ी(1946-1956)
- कम्प्यूटर की दूसरी पीढ़ी (1956-1964)
- कंप्यूटर की तृतीय पीढ़ी (1964-1971)
- कंप्यूटर की चौथी पीढ़ी (1971-1985)
- कंप्यूटर की पांचवीं पीढ़ी (1985-वर्तमान)
1. कंप्यूटर की पहली पीढ़ी (1946 से 1956)
इस कंप्यूटर हम hardware के बारे में बात करे तो इसमे Vacuum Tubes , Plugs, Wires, Relays उपयोग किया गया था इसमें Storage की सुविधा नहीं थी यह ENIC later on EDSAC का भी इस्तमाल हुआ था इसके Software की तो इसमें केवल Binary Digit का प्रयोग किया गया इससे काफी मुश्किल होती थी।
क्योकि बाइनरी भाषा में समस्त निर्देश 0 और 1 के प्रयोग करके लिखे जाते हैं जिनमे जो भी गलतियों होती उनको पहचानना बहुत ही मुश्किल होता था यह कंप्यूटर आकार में काफी बड़ा होता था इसे एक स्थान से दुसरे स्थान तक ले जाने में काफी मुश्किल होती थी और यह एक बार में एक ही काम कारता था।
2. कंप्यूटर की दूसरी पीढ़ी (1956 से 1964)
इस पीढ़ी में पहले वाले पीढ़ी से कुछ बेहतर बनाया गया था इसमे Hardware के बारे में बात करे तो इसमे Transistors उपयोग किया गया था पहले से Upgrade होने के कारण Lesser Size और Power Consumption भी कम किया गया था इस लिए यह पहले वाले से कुछ ठीक था इसमे Storage के लिए Semi Conductor का प्रयोग किया गया था।
और अगर हम बात करे इसके Software की तो इसमें Assembly Language (जोड़, घटाव, गुणा, भाग) का प्रयोग किया गया Assembly भाषा में अंग्रेजी के शब्द के अक्षरों को प्रयोग में लिया जाता था इस पीढ़ी में Input के लिए कार्ड का इस्तमाल किया था और Output के लिए Print Out का उपयोग किया जाता था यह काफी गर्म हो जाती थी।
3. तीसरी पीढ़ी (1964 से 1971)
तीसरी पीढ़ी में Integrated Circuit उपयोग किया गया था पहले से Upgrade होने पर Size पहले से कुछ छोटा और काफी तेज हो गया और अगर हम Software बात करे तो इसमें Cobol, Fortran, Basic, Pascal, C-Language का प्रयोग किया गया।
Assembly भाषा में अंग्रेजी के शब्द के अक्षरों को प्रयोग में लिया जाता था और Computer POP – Procedure Oriented Programming Language पर काम करते थे इस पीढ़ी में Input के लिए Keyboard का और Output के लिए Moniter का उपयोग किया जाता था इस में ही Operating System का प्रयोग किया गया था और इसमे Transistors के स्थान पर I.C का प्रयोग किया गया था।
4. चौथी पीढ़ी (1971 से 1985)
चौथी पीढ़ी में Hardware के बारे में बात करे तो इसमे VLSL – Very Large Scale Integration Micro-Processors उपयोग किया गया था Micro-Processors एक सिलकन से बना हुआ चिप था और अगर हम Software के बारे में बात करे तो इसमें High-level language जैसे, C और C ++, Java, .Net, C# जैसे भाषा का इस्तमाल किया गया इस पीढ़ी में Operating System का शुरुआत हुआ था जो चलाने में बहुत ही आसान था और इसी पीढ़ी में Mouse का प्रयोग शुरू हुआ।
5. पाचवीं पीढ़ी (1985 से वर्तमान)
यह वर्तमान पीढ़ी है इसमे Hardware के बारे में बात करे तो इसमे Molecular और Biological Chips उपयोग किया गया है और Software के बारे में बात करे तो इसमें Artificial Intelligence और Export System का प्रयोग किया जा रहा है यह कंप्यूटर बाकि सारे कंप्यूटर से अच्छा चल रहा है।
निष्कर्ष :-
कंप्युटर मानव जीवन का अभिन्न अंग बन गया है इसके बहुत अधिक फायदे भी है तो कुछ नुकसान भी है इसलिए हमें इसका सावधानी पूर्वक करना चाहिए हमें यह हमेशा ध्यान रखना चाहिए की कंप्युटर अगर मानव जीवन को सुलभ बना सकता है तो यह उसे दुर्लभ भी बना सकता है।
आधुनिक युग में विज्ञान की मदद से मनुष्य ने कई महत्वपूर्ण आविष्कार कए है कंप्युटर इनमे से एक प्रमुख आविष्कार है यह आदमी के दिमाग की तरह कार्य करता है इसमे देश दुनिया की सभी आवश्यक जानकारीयाँ सभी होती है इन जानकारीयों को कंप्युटर याद रखता है तथा मांगे जाने पर तुरंत प्रदर्शित भी कर देती है बड़ी से बड़ी गणनाएँ यह पलक झपकते कर सकता है जिसे करने में आदमी को घटों लग जाएँ।
कंप्युटर के आविष्कार के परिणामस्वरूप दुनिया में क्रांति आ गई है सभी कार्यालीयों, बैंकों, सार्वजनिक संस्थानों आदि में इसका उपयोग किया जा रहा है रेल और हवाई यात्रा के लिए टिकटों की बुकिंग में यह प्रमुख भूमिका निभाता है।
कंप्युटर सूचना क्रांति का अग्रदूत बन बन गया है विद्यालयों में कंप्युटर शिक्षा अनिवार्य सी होती जा रही है व्यापार और उद्योग में इसके उपयोग के बिना अब काम नहीं चल सकता कंप्युटर आज की एक आवश्यक वस्तु बन गई है।
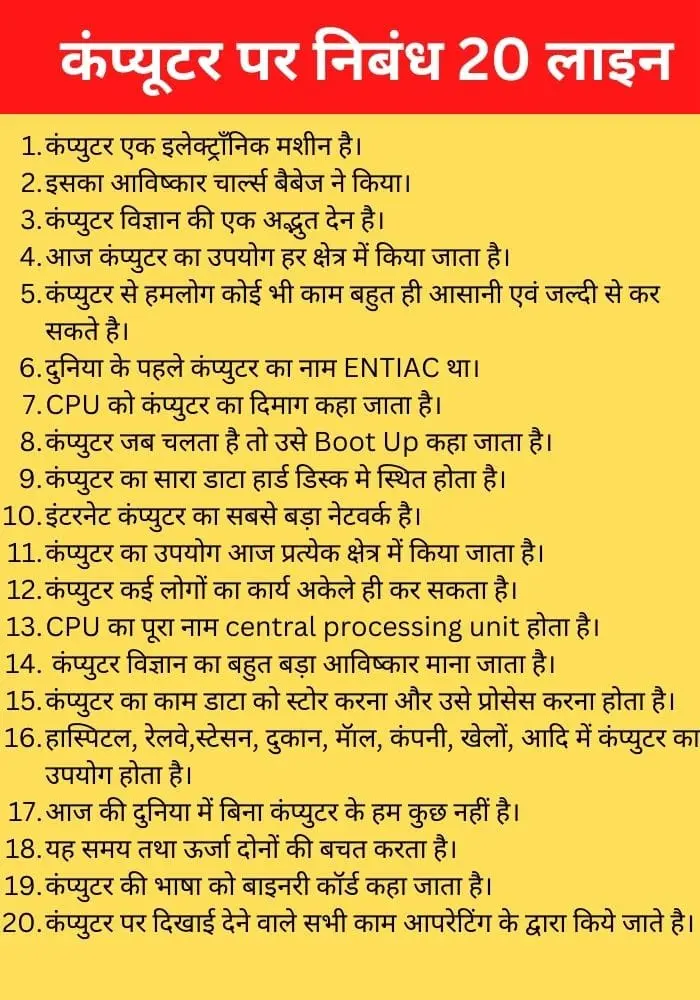
कंप्यूटर पर निबंध 20 लाइन
- कंप्युटर एक इलेक्ट्राँनिक मशीन है।
- इसका आविष्कार चार्ल्स बैबेज ने किया।
- कंप्युटर विज्ञान की एक अद्भुत देन है।
- आज कंप्युटर का उपयोग हर क्षेत्र में किया जाता है।
- कंप्युटर से हमलोग कोई भी काम बहुत ही आसानी एवं जल्दी से कर सकते है।
- दुनिया के पहले कंप्युटर का नाम ENTIAC था।
- CPU को कंप्युटर का दिमाग कहा जाता है।
- कंप्युटर जब चलता है तो उसे Boot Up कहा जाता है।
- कंप्युटर का सारा डाटा हार्ड डिस्क मे स्थित होता है।
- इंटरनेट कंप्युटर का सबसे बड़ा नेटवर्क है।
- कंप्युटर का उपयोग आज प्रत्येक क्षेत्र में किया जाता है।
- कंप्युटर कई लोगों का कार्य अकेले ही कर सकता है।
- CPU का पूरा नाम central processing unit होता है।
- कंप्युटर विज्ञान का बहुत बड़ा आविष्कार माना जाता है।
- कंप्युटर का काम डाटा को स्टोर करना और उसे प्रोसेस करना होता है।
- हास्पिटल, रेलवे,स्टेसन, दुकान, मॅाल, कंपनी, खेलों, आदि में कंप्युटर का उपयोग होता है।
- आज की दुनिया में बिना कंप्युटर के हम कुछ नहीं है।
- यह समय तथा ऊर्जा दोनों की बचत करता है।
- कंप्युटर की भाषा को बाइनरी कॉर्ड कहा जाता है।
- कंप्युटर पर दिखाई देने वाले सभी काम आपरेटिंग के द्वारा किये जाते है।
Q : दुनिया के सबसे तेज कम्प्यूटर का क्या नाम है?
Ans : जापान (फुगाकू) सुपर कंप्यूटर
Q : कंप्यूटर का हिंदी अर्थ क्या है?
Ans : गणना करने वाला
Q : भारत के सबसे तेज कम्प्यूटर का क्या नाम है?
Ans : PARAM Siddhi-AI
Q : कंप्यूटर का जनक कौन है?
Ans : चार्ल्स बैबेज
Q : दुनिया के पहले कंप्यूटर का नाम बताइए ?
Ans : जॉन डब्ल्यू मौचली और जे प्रेस्पर एकर्ट ने दुनिया का पहला कंप्यूटर खोजा था।
Related Article :-
- मेरा प्रिय कवि पर निबंध
- मेरी पाठशाला पर निबंध
- भारतीय किसान पर निबंध
- निबंध, निबंध लेखन, हिंदी निबन्ध
- महात्मा गाँधी पर निबंध
- आतंकवाद पर निबंध
Leave a Comment Cancel reply
Save my name, email, and website in this browser for the next time I comment.

Essay on Computer in Hindi- कंप्यूटर पर निबंध
इस लेख / निबंध में आप कंप्यूटर के बारे में बहुमूल्य जानकारी प्राप्त करेंगे और कंप्यूटर का महत्व समझ पाएंगे। Here we provide an essay on Computer in Hindi- you will get valuable information about computer Hindi.
भूमिका-मनुष्य के जीवन में विज्ञान का प्रवेश और योगदान इस सीमा तक बढ़ गया है कि आज मानव जीवन और इतिहास की विज्ञान के बिना कल्पना ही नहीं की जा सकती है। विगत दो दशकों में हुई वैज्ञानिक प्रगति ने अनेक नए आयाम जोड़े हैं। आज भविष्य की संभावनाओं के प्रति अधिक सतर्क होकर वैज्ञानिक अनेक नवीन आविष्कारों की ओर उन्मुख हुआ है। तीव्रगति से भागते हुए जीवन और उपकरणओं की गति का नियंत्रण विज्ञान से ही संभव है। आंकड़ों के इकट्ठे होते हुए ढेर की संभाल अब कागज के पन्नों पर संभव नहीं। उठते और गिरते ग्राफ तथा अनेक क्षेत्र के लेखाजोखा का आंकलन अब कम्प्यूटर के द्वारा ही संभव हो सकता है। मानव मस्तिष्क का सहायक कम्प्यूटर अब नई दिशाओं की ओर बढ़ रहा है।
इतिहास (History of computer in Hindi) – सभ्यता के शुरू से ही मानव गणना की समस्या को दूर करने के लिए काफी संघर्ष करता रहा है। शुरू में 400 बी. सी. में मानव गणना के लिए अपनी उगंलियों का प्रयोग करता था। जापान और चीन के व्यापारियों ने ‘एबकस’ का प्रयोग गणना के लिए किया। 1645 ई. में मि. नेपियल ने एक गणना यन्त्र की खोज की जिसे यांत्रिक गणक के नाम से जाना जाता है। 1840 ई. में चाल्र्स बैबेज ने विश्लेषणात्मक इंजन का निर्माण रॉयल सोसाइटी की प्रार्थना पर गणना के लिए किया। चाल्र्स बैबेज को आधुनिक कम्प्यूटर का जनक माना जाता है और लेडी ऐडा को कम्प्यूटर की जननी माना जाता है। मि. हर्मन हॉलरथ ने एक मशीन का निर्माण किया जिसे पंच कार्ड मशीन या पंच कार्ड रीडर या हॉलरथ कार्ड के नाम से भी जाना जाता है। 1900 ई. में मि. हॉलरथ ने अपने कार्य का व्यवसायीकरण किया और टेबुलेटिंग मशीन कम्पनी (टी. एम. सी.) को स्थापित किया। 1924 ई में मि. बॉटसन इस कम्पनी के अध्यक्ष बने और उन्होंने इस कम्पनी को नया नाम दिया जो कि इंटरनैशनल बिजनैस मशीन (आई. बी. एम.) के नाम से जाना जाता है।
कम्प्यूटर तकनीक में पिछले चार दशकों से काफी उन्नति हुई है। 1944 ई. में प्रोफैसर एकिन्स और उनकी टीम ने हारवर्ड विश्वविद्यालय, अमेरिका में पहले कम्प्यूटर का आविष्कार किया जिसे मार्क-1 के नाम से जाना जाता है। आज विश्व कम्प्यूटर क्रांति के प्रवेश द्वार पर खड़ा है और आने वाले दशकों में कम्प्यूटर बहुत महत्वपूर्ण भूमिका अदा करेंगे। आज ऐसा कोई भी स्थान नहीं है जहां कम्प्यूटर सहायक न हो।
कम्प्यूटर की विभिन्न भाषाएं – आधुनिक कम्प्यूटर में विभिन्न भाषाएं हैं। इनमें बेसिक, कबोल, फोरट्रॉन, एलगोल पास्कल, डी-बेस, आदि प्रमुख हैं। कम्यूटर सीखने के लिए सबसे पहले बेसिक भाषा का उपयोग किया जाता है। बेसिक कम्प्यूटर की सबसे आसान और सरल भाषा है। उद्योगों में बेसिक भाषा का उपयोग नहीं किया जा सकता। इसलिए उद्योगों में कबोल भाषा का प्रयोग किया जाता है। वैज्ञानिकों और गणितज्ञों के लिए फोरट्रॉन का उपयोग होता है। कम्प्यूटर की अलग-अलग भाषाओं में किसी भी प्रश्न का समाधान अलग-अलग तरीके से होता है। सभी तरीके भाषा के अनुसार ही होते हैं।
अब वैज्ञानिक महान् वैयाकरण याणिनी की अष्टाध्यायी के सूत्रों के आधार पर नई कम्प्यूटर भाषा का निर्माण कर रहे हैं। वैज्ञानिकों का कहना है कि पाणिनी के सूत्र वैज्ञानिक नियमों पर रचे गए है अत: इन से विकसित कम्प्यूटर भाषा अत्यधिक सटीक होगी।
बेसिक भाषा समझने में सरल है और इसमें प्रोग्राम कम्प्यूटर पर बनाते हुए इसकी गलतियां निकल जाती हैं। इस भाषा का उपयोग माइक्रो और मिन्नी कम्प्यूटर में बहुत अधिक होता है। कबोल भाषा अंग्रेज़ी की तरह होती है जो कि पढ़ने और समझने में काफी आसान होती है। यह भाषा व्यापार के लेखा-जोखा के तथ्यों से सम्बन्धित होती है। फोरट्रान भाषा का उपयोग गणित में अधिक होता है। यह भाषा काफी कम्प्यूटरों पर उपलब्ध है और अन्य भाषाओं की सापेक्षिक समझने में आसान है।
कम्प्यूटर में पांच अंग होते हैं – इनपुट डिवाइस या आन्तरिक यंत्र, मैमोरी यूनिट या स्मरण यन्त्र, कन्ट्रोल यूनिट या नियंत्रण यन्त्र, अंकगणित इकाई तथा आउटपुट डिवाइस या बाह्य यात्र।
सूचनाओं को एकत्र करने के लिए पहले संकेत भरे जाते हैं और फिर सूचनाओं को कम्प्यूटर भाषा में परिवर्तित कर इन्हें बिट्स में बदल देते हैं। इसके परिणाम कम्प्यूटर टर्मिनल पर छपकर बाहर आ जाते हैं।
कम्प्यूटर के सम्बन्ध में आशंकाएं – कम्प्यूटर के सम्बन्ध में लोगों में काफी आशंकाएं पाई जाती हैं। सबसे पहली आशंका यह है कि कम्प्यूटर गल्तियां करता है अर्थात् प्रोग्रामिंग में गल्तियां होती हैं। लोग समझते हैं कि कम्प्यूटर सीखने के लिए गणित समझना बहुत आवश्यक है। कई लोगों का यह विचार है कि कम्प्यूटर बेरोजगारी का मूल है। जो काम दस व्यक्ति करते हैं वही काम एक कम्प्यूटर बड़ी आसानी से कर सकता है।
उपरोक्त आशंकाएं जो कम्प्यूटर के सम्बन्ध में पाई जाती है वे लगभग सभी निर्मूल है। लोगों के विचार में कम्प्यूटर गल्तियां करता है परन्तु ऐसा नहीं है। जो व्यक्ति कम्प्यूटर पर प्रोग्राम लिखता है वही गलियां करता है न कि कम्प्यूटर। कम्प्यूटर सीखने के लिए गणित को समझना भी कोई आवश्यक नहीं है। कई लोगों का विचार है कम्प्यूटर बेरोजगारी फैलाता है पर हमें यह नहीं भूलना चाहिए की उसके साथ ही यह कई लोगो को रोज़गार भी देता है।
कम्प्यूटर के उपयोग (Uses of computer in hindi) – आधुनिक कम्प्यूटर से मानव को काफी लाभ है। आज ऐसा कोई भी क्षेत्र नहीं है जहां पर कम्प्यूटर का प्रयोग न किया जाता हो। प्रतिदिन हमें कम्प्यूटर के नए-नए उपयोग प्राप्त हो रहे हैं। कम्प्यूटर आज मनुष्य को कृषि, उद्योग धन्धे, वैज्ञानिक खोज, मशीन निर्माण, अन्तरिक्ष अनुसंधान, यातायात नियन्त्रण तथा चिकित्सा विज्ञान के क्षेत्र में पूर्व योगवान दे रहा है। अब तो वह साल बानक कथा क्षेता में भी सहावाक से रह्य हो।
व्यापार और उद्योग धन्धों में कम्प्यूटर बहुत ही आवश्यक हो गया है। अस्तपाल, पैट्रोल पम्प, बैंक, रेलवे स्टेशन, कार्यालयों तथा व्यापारिक प्रतिष्ठानों में, आज कम्प्यूटर कार्य करता हुआ नज़र आता है।” भीड़-भरे रेलवे स्टेशनों में आज आरक्षण कार्यालय वातानुकूलित बन रहे हैं तथा कम्प्यूटर के सामने बैठे क्लर्क आरक्षण की टिकटों पर लिखते हुए नज़र आते हैं। बड़े-बड़े व्यवसायों में कम्प्यूटर फाइलों के ढेर को तथा महत्वपूर्ण आंकड़ों को सुरक्षित रखते हैं तथा उनसे व्यापारी अपनी व्यापार नीति को नियन्त्रित करते हैं। आरम्भ में जो काम केवल मनुष्य द्वारा होने ही सम्भव थे आज वे स्वचलित कम्प्यूटरों के द्वारा हो रहे हैं।
चिकित्सा के क्षेत्र में आज कम्प्यूटर के द्वारा बीमारियों का सही पता लगाया जा सकता है। मनुष्य के शरीर के अंग-प्रत्यंगों को कम्प्यूटर के परदे पर देखा जा सकता है और सरलता से कैसर जैसी भयानक बीमारियों का पता भी लगाया जा सकता है। शरीर के किसी भी अंग में होने वाली अनियमितता का पता बताने के बाद कम्प्यूटर फिर बीमारी की पहचान करने में भी अपने परीक्षणों के द्वारा सहायक सिद्ध होता है। अनेक आनुवांशिक बीमारियों का पता भी लग जाता है। गुण सूत्र और जीन को समझने में कम्प्यूटर सहायता करता है।
अन्तरिक्ष अभियान में पिछले कई वर्षों से निरन्तर सफलताएं मनुष्य ने प्राप्त की हैं। ऐसा अब असम्भव नहीं लगता है कि मनुष्य दूसरे ग्रहों और उपग्रहों में भी अपना आवास बना लेगा और यह कम्प्यूटर की सहायता के बिना सम्भव नहीं था। दूर-संचार के साधनों में सेटेलाइट्स प्रमख रूप से उपयोगी सिद्ध हो रहा है। इससे आज हज़ारों मील दूर स्थित दूसरे देशों में होने वाले प्रोग्राम आसानी से हर देशों में प्रसारित किए जाते हैं और इनमें भी कम्प्यूटर ही महत्वपूर्ण भूमिका अदा करता है।
मौसम की जानकारी के लिए सेटेलाइट्स द्वारा भेजे गए चित्र बहुत उपयोगी होते हैं क्योंकि इससे मौसम सम्बन्धी खतरों के बारे में पूर्व जानकारी मिलने से आवश्यक कदम उठाए जा सकते हैं।
उपसंहार -आधुनिक युग में कम्प्यूटर और रोबट निश्चय ही क्रांतिकारी सिद्ध होंगे। इनसे मानव इतिहास में एक नया अध्याय जुड़ रहा है। रोबट सभी प्रकार के काम करने में समर्थ हो रहा है और कम्प्यूटर उसकी सहायता के लिए तैयार है। कम्प्यूटर और रॉबट दोनों संवेदन शून्य है, मस्तिष्क शून्य है, वे केवल यन्त्र मात्र है। अत: आवश्यक है कि इन्हें संवेदनाओं और भावनाओं से नियन्त्रित किया जाए। इनका दुरुपयोग भी तो उतना ही विनाशक हो सकता है जितना लाभकारी इनका उपयोग होता है|
हिंदी में कंप्यूटर पर निबंध- Long essay on computer in Hindi.
ध्यान दें – प्रिय दर्शकों essay on computer in Hindi आपको अच्छा लगा तो जरूर शेयर करे ।
Leave a Comment Cancel Reply
Your email address will not be published. Required fields are marked *

कंप्यूटर पर निबंध हिंदी में – Essay On Computer In Hindi
Table of Contents
कंप्यूटर निबंध प्रस्तावना
कंप्यूटर शब्द की उत्पत्ति, कंप्यूटर की परिभाषा हिंदी में, कम्प्यूटर के लाभ और हानि, कम्प्यूटर के लाभ.
- आज हर जगह कंप्यूटर का उपयोग बडें पैमाने पर किया जा रहा है, इससे का सबसे बडा कारण यह है कि मनुष्य के मुकाबले बहुत तेजी सेे काम करता है, यह बहुत बडी गणना को कुछ सेकेण्ड में कर सकता हैै
- आज हर चीज कंप्यूटर पर उपलब्ध है, आप बहुत सारा डाटा कंप्यूूटर में स्टोर कर सकते हैं और उसे कभी भी उपयोग में ला सकते हैं और अगर आपके पास इंटरनेट की सुविधा भी है तो आप क्लाउड स्टोरेज का उपयोग कर इंटरनेट पर भी अपने डाटा काे सुरक्षित रख सकते हैं।
- आप कभी-भी और कहीं भी अपने दोस्तों के सम्पर्क में वीडियो कॉल, ईमेल, सोशल नेटवर्किंग जैसे सुविधाओं केे माध्यम सेे जुडें रह सकते हैं।
- आप इंटरनेट पर कोई भी जानकारी प्राप्त कर सकते हैं।
- बैंकिग जैसी सुविधाओं में कंंप्यूटर तकनीक का जबाब नहीं है, आप घर बैठे-बैठे अपने मोबाइल फोन से या कंंप्यूटर से किसी को भी रूपये ट्रांसफर कर सकते हैं।
- आज मोबाइल रीचार्ज, बिजली का बिल से जमा करने से लेकर ऑनलाइन शॉपिग यहॉ तक कि हवाई जहाज तक कंप्यूटर द्वारा उडाये जा रहेे हैं वह भी बिना कोई गलती किये।
- शिक्षा और चिकित्सा के क्षेत्र में कंप्यूटर ने दुनियांं को बदल दिया है आप घर बैठे-बैठे ही बेस्ट टीचर्स/संस्थाओं से शिक्षा प्राप्त कर सकते हैं और चिकित्सा की बात करें तो दुनियॉ के बेहतरीन डाक्टर्स से इंटरनेट पर परामर्श ले सकते हैं और अब तो मैडीकल स्टोर जाने की भी जरूरत नहीं है आप घर बैठे ही दवाईयॉ भी आर्डर कर सकते हैं, चाहे वह आपके शहर में मिलती हों या नहीं।
कम्प्यूटर की हानि
- जहॉ एक और कंंप्यूूटर लोगों को स्मार्ट बना रहा है वहीं दूसरी और इसका जरूरत से ज्यादा प्रयोग बीमार भी बना रहा है
- कंप्यूटर और मोबाइल का अधिक प्रयोग स्वास्थ्य के लिए हानिकारक साबित हो रहा है
- मोबाइल और कंंप्यूटर स्क्रीन पर ज्यादा लगातार देखते रहने से सबसे ज्यादा नुकसान आंखों को होता है
- लोगों का मिलना जुलना बंद हो गया है, ज्यादा लोग किसी के घर जाकर मिलने से बेहतर उनसे सोशन नेटवर्किंग साइट जैसे फेसबुक और व्हाट्सएप चैट करना ज्यादा पंंसद करते हैं, यहॉ तक कि एक घर में रह रहे 4 व्यक्ति भी अपने-अपने मोबाइल फोन से ही चिपके रहते हैं।
- बडी-बडी कंंपनियों और फैट्रियों में कई-कई मजदूरों का काम कंप्यूटर और रोबोट करने लगे हैं, जिससे बेरोजगारी भी बढी है
- इंटरनेट बैंकिग का उपयोग सावधानी से न करने पर आपके पर्सनल डाटा चोरी रखने का खतरा रहता है, जिससे कई यूजर्स को आर्थिक नुकसान उठाना पडता है
- इसी प्रकार सोशन नेटवर्किंंग साइट पर भी सावधानी से काम न करने पर भी होता है
- इंटरनेट के माध्यम से ठगी बहुत बडे पैमाने पर बढ गयी है
शिक्षा के क्षेत्र में कंप्यूटर का योगदान
- आज आप घर बैठे ही ऑनलाइन किसी भी विषय के बारे में जानकारी प्राप्त कर सकते हैं, जिससे वह बच्चे और विद्यार्थी जिसके शहर में वह कोर्स उपलब्ध नहीं हैं या जो बाहर जाकर पढाई नहीं कर सकते हैं वह भी शिक्षा प्राप्त कर सकते हैं
- Computer भंडारण और डेटा प्रबंधन के लिए सबसे बढ़िया साधन है। कंप्यूटर में आप अनेकों पुस्तकों को डिजिटल फार्मेट में अपने साथ रख सकते हैं और कभी पढ सकते हैं
- विद्यार्थी अपने लिये जरूरी नोट्स तैयार करने में माइक्रोसॉफ्ट ऑफिस के टूल्स Microsoft Office Word, Excel, और PowerPoint की सहायता ले सकते हैं
- शिक्षक भी विद्यार्थी को प्रभावी ढंग से किसी भी विषय को समझाने के लिये पॉवर पॉइंट प्रेजेंटेशन बनाकर उन्हें समझा सकते हैैंं, लेकिन इसके लिये प्रोजेक्टर, इंटरनेट आदि व्यावहारिक ज्ञान लेना आवश्यक होगा
- आप कभी-भी और कहीं भी अपने दोस्तों के सम्पर्क में वीडियो कॉल, ईमेल, सोशल नेटवर्किंग जैसे सुविधाओं केे माध्यम सेे जुडें रह सकते हैं और किसी भी विषय पर चर्चा कर सकते हैं
- कंप्यूटर शिक्षा का एक अच्छा स्रोत है। शिक्षा के क्षेत्र में कंप्यूटर का बड़ा योगदान है। आज हर स्कूल व् कॉलेज में कंप्यूटर लैब है। कम्यूटर के माध्यम से अध्यापकों को भी छात्रों को पढने में सहायता मिलती है।
कंप्यूटर उपसंहार
Related posts:.
- नैनोटेक्नोलॉजी क्या है What Is Nanotechnology In Hindi 2024
- Top AI Tools In Hindi 2024
- ली-आयन और ली-पॉली बैटरी में क्या अंतर है What Is The Difference Between…
- Best Online Photo Editing Website In 2024
- सामग्री प्रबंधन प्रणाली क्या है What Is Content Management System In Hindi…
- Blog क्या होता है और Blogging कैसे करते हैं - What is Blog and How To Start…
- फिंगरप्रिंट सेंसर क्या है और कैसे काम करता है What Is Fingerprint Sensor…
- टच स्क्रीन क्या है और कैसे काम करता है What Is Touch Screen And How Does It…
- क्या है Chat GPT और यह कैसे काम करता है What Is Chat GPT And How Does It…
- स्मार्टफोन में कैमरे के क्या उपयोग हैं What Are The Uses Of Camera In…
- टैली क्या होता है What is Tally in Hindi
- i3, i5 और i7 क्या है और इनमें क्या अंतर है What Are i3, i5 And i7 And What…
- दसवीं के बाद किए जाने वाले कंप्यूटर कोर्स Computer Courses After 10th in…
- VPN क्या है और कैसे काम करता है What Is VPN And How It Works In Hindi
- कंप्यूटर की जानकारी हिंदी में pdf - Computer information pdf in hindi
- 7 Best Free Photo Editors In Hindi 2024
- बेसिक कंप्यूटर कोर्स क्या होता है - What Is Basic Computer Course in Hindi
- इंटरनेट ऑफ थिंग्स क्या है What Is Internet Of Things
- माइक्रोसॉफ्ट एक्सेल क्या है - What is MS Excel in Hindi
- Bootloader, Kernel, Recovery और ROM क्या है एवं इसके क्या उपयोग हैं |
- क्रिप्टोकरेंसी क्या और कितने प्रकार की होती है - What is Cryptocurrency
- मोबाइल में कितने प्रकार के सेंसर होते हैं How Many Types Of Sensors Are…
- WordPad क्या है और WordPad कैसे यूज करें
- कैश मेमोरी क्या है और कैसे काम करती है What Is Cache Memory And How Does It…
- टॉप 5 ग्राफिक डिजाइनिंग सॉफ्टवेयर - Top 5 Graphic Designing Software in…
Leave a Comment Cancel reply
Save my name, email, and website in this browser for the next time I comment.
- Computer Tips & Tricks
- Internet Tips and Tricks
- Phone Tips & Trick
- Facebook Tips
- Youtube Tips & Tricks
- For Android
- Amazing Software
- Computer Hindi Quiz

केंद्र एव राज्य की सरकारी योजनाओं की जानकारी in Hindi
कंप्यूटर पर निबंध (300, 500, 10000 शब्द) Short & Long Essay on computer in hindi
कंप्यूटर पर निबंध (300, 500, 10000 शब्द) : कंप्यूटर आज की तारीख में दुनिया का एक अहम हिस्सा है इसके माध्यम से आज हम देश दुनिया कहीं पर भी आपस में बातचीत या कोई भी लेनदेन कर सकते हैं | इसके अलावा कंप्यूटर आज हमारे शिक्षा पाठ्यक्रम का भी एक महत्वपूर्ण भाग है क्योंकि आज की तारीख में ऐसा कोई छात्र नहीं है जो कंप्यूटर के बारे में जानता ना हो क्योंकि कंप्यूटर के द्वारा ही कोई भी विधार्थी अपनी पढ़ाई लिखाई काफी अच्छी तरह से कर सकता है | ऐसे में आप छात्र हैं और कंप्यूटर के ऊपर निबंध लिखना चाहते हैं लेकिन आपको समझ में नहीं आ रहा है कि आप निबंध की शुरुआत कैसे करें तो इस आर्टिकल में मैं आपको Essay on Computer in Hindi : से संबंधित चीजों के बारे में विस्तार पूर्वक जानकारी दूंगा इसलिए आपसे अनुरोध है कि आर्टिकल पूरा पढ़े-
Essay on Computer in Hindi
Also Read: स्टूडेंट्स को मिलेगी 4 से 6 लाख छात्रवृत्ति | योग्यता, दस्तावेज, चयन प्रक्रिया
कंप्यूटर पर निबंध Short Essay on computer in Hindi (300 शब्द)
कंप्यूटर विज्ञान के नवीनतम टेक्नोलॉजी है जिसका इस्तेमाल आज की तारीख में सभी क्षेत्रों में किया जा रहा है क्योंकि इसके बिना दुनिया का कोई भी काम कर पाना संभव नहीं है अगर कंप्यूटर ना हो तो दुनिया के बहुत सारे ऐसे काम है जो पूरी तरह से बंद हो सकते हैं और अगर उन कामों को करने की कोशिश की गई तो उसमें समय अधिक लगेगा यही वजह है कि कंप्यूटर विज्ञान की सबसे अनोखी देन है इसके द्वारा ही आज हम सभी लोग काफी कम समय में कई प्रकार के चीजों का आनंद उठा पा रहे हैं | कंप्यूटर के द्वारा आप इंटरनेट का इस्तेमाल करते हैं और इंटरनेट के द्वारा आप दुनिया के किसी भी कोने में बातचीत कर सकते हैं और चाहे तो आप वहां पर कोई भी पैसे का लेन देन कर सकते हैं यही वजह है कि कंप्यूटर हमारे जीवन का सबसे अहम हिस्सा है इसके बिना हम अपने जीवन की कल्पना भी नहीं कर सकते हैं आज के समय के आधुनिक कंप्यूटर बेहद क्षमतावान, संभालने में आसान तथा ज्यादा से ज्यादा कार्यों को संपादित कर सकने वाले है, जिसके कारण यह लोगों में इतने लोकप्रिय होते जा रहे है।
जिंदगी हुआ आसान
कंप्यूटर के द्वारा हमारा जीवन काफी आसान हो चुका है क्योंकि आज की तारीख में आपको ऑनलाइन कोई भी चीज घर बैठे कंप्यूटर का मातम समरा करते हैं इसके अलावा अगर आपको कहीं भी घूमने जाना है तो उसकी टिकट बुकिंग में आप कंप्यूटर के माध्यम से कर सकते हैं इसके लिए आपको कहीं जाने की जरूरत नहीं है | इसके अलावा छोटे बच्चे अपने स्कूल के सभी जरूरी प्रोजेक्ट कंप्यूटर के माध्यम से काफी कम समय में पूरा कर सकते हैं यही वजह है कि शिक्षा के क्षेत्र में भी कंप्यूटर का काफी योगदान है|
Also Read: अक्षय तृतीया 2023 : सोने की खरीददारी का शुभ मुहूर्त
कंप्यूटर पर निबंध (500 शब्द) | Short Essay on Computer in Hindi
विद्यार्थी के द्वारा कंप्यूटर का उपयोग.
विद्यार्थियों के द्वारा कंप्यूटर का इस्तेमाल सबसे अधिक किया जाता है क्योंकि आज की तारीख में शिक्षा आधुनिक हो गई है ऐसे में ऑनलाइन अगर उन्हें कोई भी चीज प्राप्त करनी है तो उसके लिए कंप्यूटर का इस्तेमाल करना होगा जैसा कि आप लोगों को मालूम है कि जब देश और दुनिया में कोरोना महामारी का प्रकोप चल रहा तो ऐसे में छात्रों को ऑनलाइन तरीके से शिक्षा प्रदान की जा रही थी | कंप्यूटर द्वारा कोई भी सवाल चंद मिनटों के अंदर सुलझाया जा सकता है यही वजह है कि कई छात्र गणित के जटिल से जटिल प्रश्नों को सुलझाने के लिए कंप्यूटर का इस्तेमाल करते हैं इसलिए कह सकते हैं कि विद्यार्थियों के द्वारा कंप्यूटर का उपयोग सबसे अधिक होता है | कंप्यूटर के माध्यम से विद्यार्थी अपने स्कूल से संबंधित प्रोजेक्ट कम समय में पूरा कर सकते हैं |
कंप्यूटर के द्वारा ऊर्जा की बचत होती है
कंप्यूटर के माध्यम से ई-मेल, विडियो चैट, का उपयोग कर हम काफी कम समय में अपने मित्रों, रिश्तेदारों, माता-पिता या किसी भी व्यक्ति से जुड़ सकते है। जैसा कि आप लोग को मालूम है कि कंप्यूटर को चलाने के लिए इंटरनेट की जरूरत पड़ती है ऐसे में आप इंटरनेट के माध्यम से कोई भी कोई बात नहीं देते हैं घर बैठे कर सकते हैं इसके अलावा अगर आपको कहीं भी पैसा भेजना है तो आप कंप्यूटर के माध्यम से काफी कम समय में भेज सकते हैं | computer द्वारा हम घर से ही ऑनलाइन खरीदारी, बिल जमा करना आदि जैसे कार्य कर सकते है, जिससे की हमारे समय तथा ऊर्जा दोनों की ही बचत होती है।
कंप्यूटर पर निबंध (1000 शब्द) | Full Essay on Computer in Hindi
कंप्युटर क्या है computer kya hai.
कंप्यूटर बिजली से चलने वली एक इलेक्ट्रॉनिक मशीन है जो की इनपुट के रूप में डाटा को अपने अन्दर ग्रहण करता है और सॉफ्टवेयर या प्रोग्राम के अनुसार उसे प्रोसेस करके हमें आउटपुट के रूप में रिजल्ट हमारे सामने प्रस्तुत करता है |
कंप्यूटर का इतिहास क्या है ? History Of Computer
कंप्यूटर के इतिहास के बारे में बात करें तो सबसे पहले कंप्यूटर का अविष्कार चार्ल्स बैबेज के द्वारा किया गया था। इसलिए उन्हें कंप्यूटर का पितामह (फादर ऑफ़ कंप्यूटर ) कहा जाता है। विश्व का प्रथम कंप्यूटर 1944 में हार्वर्ड विश्वविद्यालय में किया गया था भारत जैसे देश में प्रथम कंप्यूटर का नाम सिद्धार्थ था | वर्ष 1945 में डॉ वॉन न्यूमैन कंप्यूटर के क्षेत्र में क्रांतिकारी बदलाव लाया | इनके द्वारा
बोर्ड, सेंट्रल प्रोसेसर यूनिट बनाया था इसमें इनपुट, आउटपुट, मैमोरी, अर्थमेटिक एंड लॉजिक यूनिट, और कण्ट्रोल यूनिट था।
कंप्युटर के उपयोग | C omputer Usage
आज की तारीख में कंप्यूटर का इस्तेमाल दुनिया के सभी क्षेत्रों में क्या जाता है जैसे बैंक हॉस्पिटल की स्कूल विज्ञानिक लैबोरेट्री इत्यादि इसके अलावा मौसम के बारे में भी सही जानकारी लेने के लिए कंप्यूटर का इस्तेमाल होता हैं साथ में ही कंप्युटर नए शिक्षा और व्यापार को भी आसानी बना दिया है | कंप्यूटर के क्षेत्र में क्रांतिकारी बदलाव लाएं जिसके कारण कम से कम बीमारियों का इलाज कर पाना संभव हुआ है |
कंप्यूटर के माध्यम से वैज्ञानिक कई उपलब्धियाँ प्राप्त की है उन्होंने अंतरिक्ष की जानकारी कंप्युटर के मध्यान से ही प्राप्त की है कंप्युटर एक बहुत उपयोगी वस्तु है।
कंप्यूटर की पीढ़ियों – Generation of Computer in Hindi
हम यह नहीं कह सकते की कंप्यूटर का बदलाव कब-कब हुआ तो हम Official रूप से Generation of Computer को पांच भागो में बाँटा गया है।
कंप्यूटर की पहली पीढ़ी(1946-1956)
कम्प्यूटर की दूसरी पीढ़ी (1956-1964)
कंप्यूटर की तृतीय पीढ़ी (1964-1971)
कंप्यूटर की चौथी पीढ़ी (1971-1985)
कंप्यूटर की पांचवीं पीढ़ी (1985-वर्तमान)
1. कंप्यूटर की पहली पीढ़ी (1946 से 1956)
इस प्रकार के कंप्यूटर के हार्डवेयर को बनाने के लिए Vacuum Tubes, Plugs, Wires, Relays उपयोग किया गया था इसमें Storage की सुविधा नहीं थी यह ENIC later on EDSAC का भी इस्तमाल हुआ था इसके Software की तो इसमें केवल Binary Digit इस्तेमाल होता था जिसके कारण इसमें भाषा संबंधित कई प्रकार की खामियां थी और इसका आकार भी काफी बड़ा था जिसके कारण है इसे रखना काफी मुश्किल था |
2. कंप्यूटर की दूसरी पीढ़ी (1956 से 1964)
इस प्रकार के कंप्यूटर के हार्डवेयर को बनाने के लिए Transistors उपयोग किया गया था इस प्रकार के कंप्यूटर में Engry Consumption भी कम किया गया था इस लिए यह पहले वाले से कुछ ठीक था इसमे Storage के लिए Semiconductor का प्रयोग किया गया था।
इस प्रकार के कंप्यूटर के सॉफ्टवेयर में Assembly Language (जोड़, घटाव, गुणा, भाग) का प्रयोग किया गया Assembly भाषा में अंग्रेजी के शब्द के अक्षरों को प्रयोग में लिया जाता था
3. तीसरी पीढ़ी (1964 से 1971)
इस प्रकार के कंप्यूटर में Integrated Circuit उपयोग किया गया था दूसरी पीढ़ी के कंप्यूटर के मुकाबले आकार में पहले से कुछ छोटा और काफी तेज हो गया और अगर हम Software बात करे तो इसमें Cobol, Fortran, Basic, Pascal, C-Language का प्रयोग किया गया। इस प्रकार के कंप्यूटर में Assembly अंग्रेजी के शब्द के अक्षरों को प्रयोग में लिया जाता था और इस प्रकार का कंप्यूटर POP – Procedure Oriented Programming Language पर काम करते थे इस पीढ़ी के कंप्यूटर में Input के लिए Keyboard का और Output के लिए Moniter का उपयोग किया जाता था इस में ही Operating System का प्रयोग किया गया था और इस जनरेशन के कंप्यूटर में Transistors के स्थान पर I.C का प्रयोग किया गया था
4. चौथी पीढ़ी (1971 से 1985)
इस प्रकार के कंप्यूटर के Hardware के बारे में बात करे तो इसमे VLSL – Very Large Scale Integration Microprocessors उपयोग किया गया था अगर हम Software के बारे में बात करे तो इसमें High-level language जैसे, C और C ++, Java, .Net, C# जैसे भाषा का का इस्तमाल किया गया इस प्रकार के कंप्यूटर में Operating System इस्तेमाल होता है जो चलाने में बहुत ही आसान था और इसी पीढ़ी में Mouse का प्रयोग शुरू हुआ।
5. पाचवीं पीढ़ी (1985 से वर्तमान)
यह वर्तमान पीढ़ी है इसमे Hardware के बारे में बात करे तो इसमे Molecular और Biological Chips उपयोग किया गया है और Software के बारे में बात करे तो इसमें Artificial Intelligence और Export System का प्रयोग किया जा रहा है यह कंप्यूटर बाकि सारे कंप्यूटर से अच्छा चल रहा है।
Essay on Computer in Hindi PDF
कंप्यूटर पर निबंध 10 लाइन | essay on computer in hindi for class 3,4,5.
- आज के वक्त में कंप्यूटर एक स्मार्टफोन जितना जरूरी है |
- यह विज्ञान और प्रौद्योगिकी अविष्कार है
- इसके द्वारा कोई भी काम कम समय में किया जा सकता है |
- इसके द्वारा जानकारी दो संग्रह, व्यवस्थित और ढूंढ सकता है.
- कंप्यूटर के द्वारा दुनिया को आपस में जोड़ा जा सकता है |
- आज के समय को हम कंप्यूटर का युग कहते हैं.
- कंप्यूटर का प्रयोग जीवन के हर क्षेत्र में सभी प्रकार के कार्यों के लिए किया जाता है.
- कंप्यूटर भौतिक चीजों को हार्डवेयर के रूप में जाना जाता है.
- कंप्यूटर के प्रोग्राम को सॉफ्टवेयर के रूप में जाना जाता है.
- एक कंप्यूटर इंसान से ज्यादा कुशल है.
इस ब्लॉग पोस्ट पर आपका कीमती समय देने के लिए धन्यवाद। इसी प्रकार के बेहतरीन सूचनाप्रद एवं ज्ञानवर्धक लेख easyhindi.in पर पढ़ते रहने के लिए इस वेबसाइट को बुकमार्क कर सकते हैं
Leave a reply cancel reply.
Your email address will not be published. Required fields are marked *
Save my name, email, and website in this browser for the next time I comment.
Related News

गाय पर निबंध। Essay On Cow In Hindi Gaay Par Nibandh In Hindi

मुख्यमंत्री चिरंजीवी योजना पर निबंध | Essay On Mukhyamantri Chirenjivi Swasthya Bima Yojana in Hindi

विश्व स्वास्थ्य दिवस पर निबंध | World Health Day Essay in Hindi | World Health Day Hindi Essay PDF Download

राष्ट्रीय मतदाता दिवस पर निबंध हिंदी में | National Voters Day Essay in Hindi

कंप्यूटर पर निबंध
आधुनिक युग में कंप्यूटर एक ऐसा साधन बन चुका है इसका इस्तेमाल आज हर कोई कह रहा है. आज घर घर में लोग कंप्यूटर का इस्तेमाल कर रहे हैं. कंप्यूटर विज्ञान की एक ऐसी देन है जो हमेशा से लोगों का कल्याण करते आए हैं और आगे भी कर रही हैं.
कंप्यूटर के कारण हर दिन आज नए नए आविष्कार हो रहे हैं और दुनिया तरक्की की ओर बढ़ रही है. इसलिए आज हर किसी को कंप्यूटर के विषय में जानकारी होना जरूरी है.” कंप्यूटर पर निबंध ” शिक्षकों का सबसे पसंदीदा टॉपिक है. इसीलिए इस टॉपिक पर बार बार परीक्षा में निबंध दिए जाते हैं.
छोटे बच्चों से लेकर बड़े बच्चे तक सभी इस टॉपिक पर लिखते हैं. तो आप समझ ही सकते हैं कि यह टॉपिक कितना ज्यादा जरूरी है. आज के हमारे इस लेख में हम “ कंप्यूटर का निबंध हिंदी में ” विषय पर पूरी जानकारी देने की कोशिश करेंगे।

कंप्यूटर पर हिंदी निबंध (500 शब्दों में)
कंप्यूटर का आविष्कार हो जाने के बाद लोगों के जीवन में इतना बदलाव आया है कि आज बिना कंप्यूटर के लोग अपने जीवन की कल्पना भी नहीं कर सकते हैं. कंप्यूटर का उपयोग करके बड़े से बड़ा काम चुटकी में किया जा सकता है. अमेरिका जापान जैसे टेक्नोलॉजी में विकसित देशों के विकसित होने के पीछे का बहुत बड़ा कारण कंप्यूटर ही हैं।
अगर कंप्यूटर ना होता तो गूगल फेसबुक जैसी कंपनियां कभी बनती ही नहीं. कंप्यूटर का ही कमाल है कि आज टेक्नोलॉजी इतनी ज्यादा विकसित हो चुकी हैं कि लोग अब मंगल ग्रह में अपनी बस्ती में जाने के बारे में सोच रहे हैं।
कंप्यूटर क्या है?
कंप्यूटर एक ऐसा इलेक्ट्रॉनिक डिवाइस है जो उपयोगकर्ता द्वारा दिए गए डाटा और सूचनाओं को ग्रहण करने के बाद उपयोगकर्ता द्वारा दिए गए निर्देश के अनुसार उसे प्रोसेस करता है और प्रोसेस होने के बाद रिजल्ट को यूजर तक पहुंचता हैं. यह एक ऐसा उपकरण है जिसका इस्तेमाल करके बड़े से बड़ा काम कम समय में किया जा सकता है।
कंप्यूटर का उपयोग
कंप्यूटर का उपयोग अलग-अलग लोग अलग-अलग कार्यों में करते हैं. शिक्षा के क्षेत्र में कंप्यूटर का इस्तेमाल बच्चों को कंप्यूटर सिखाने और नए-नए चीजों के बारे में बच्चों को बताने के लिए किया जाता है. वहीं विज्ञान और टेक्नोलॉजी के क्षेत्र में कंप्यूटर का उपयोग नई-नई खोज करने के लिए किया जाता है.
घरों में कंप्यूटर का उपयोग टिकट बुकिंग करने के लिए, बिजली का बिल भरने के लिए, प्रोजेक्ट आदि बनाने के लिए किया जाता है।
कंप्यूटर का महत्व
कंप्यूटर का इस्तेमाल आज हर क्षेत्र में किया जा रहा है. टेक्नोलॉजी के क्षेत्र में तो कंप्यूटर का इस्तेमाल किया जा ही रहा है. साथ ही साथ शिक्षा के क्षेत्र में और दूसरे कार्य स्थलों में भी कंप्यूटर का उपयोग किया जा रहा है.
कंप्यूटर का उपयोग बड़े-बड़े और कॉम्प्लिकेटेड डाटा को स्टोर करने के लिए व मैनेज करने के लिए भी किया जाता है. इंटरनेट कंप्यूटर की सबसे बड़ी देन है. जिसका इस्तेमाल आज हर छोटे-बड़े को कार्य करने में किया जाता है।
कंप्यूटर का कार्य
कंप्यूटर का मुख्य कार्य यूजर द्वारा दिए गए जानकारियों को स्टोर करना है और फिर निर्देशानुसार डाटा को प्रोसेस करके उसका परिणाम यूजर तक पहुंचाना है. कंप्यूटर का उपयोग जटिल कामों को कम समय में और कम मेहनत में करने के लिए किया जाता है.
यही कारण है कि अधिकतर ऑफिसों में उनके काम कंप्यूटर से ही किए जाते हैं. इसके अलावा कंप्यूटर से चैटिंग की जा सकती है. कंप्यूटर के इस्तेमाल करके नए नए सॉफ्टवेयर बनाए जा सकते हैं।
कंप्यूटर का निबंध हिंदी में (800 शब्दों में)
आधुनिक टेक्नोलॉजी में कंप्यूटर एक ऐसी तकनीक है, जिसका इस्तेमाल आज हर क्षेत्र में किया जा रहा है. कंप्यूटर का उपयोग करके बड़े से बड़े काम को कम समय में किया जा सकता हैं. कंप्यूटर का इस्तेमाल करके लोग अपनी मेहनत को बहुत हद तक बचा सकते हैं.
कंप्यूटर में इंटरनेट का उपयोग करके जैसी चाहे वैसी जानकारी कुछ ही सेकंड में प्राप्त की जा सकती हैं. पहले कंप्यूटर की कार्य करने की क्षमता थोड़ी सीमित थी लेकिन आधुनिक कंप्यूटर की कार्य करने की क्षमता बहुत ही ज्यादा होती है।
कंप्यूटर का अर्थ
कंप्यूटर शब्द का हिंदी अर्थ गणना करना होता है . यह शब्द लैटिन भाषा के compute के शब्द से लिया गया हैं. कंप्यूटर का आविष्कार चार्ल्स बैबेज ने किया था और उस समय कंप्यूटर बड़ी और जटिल समस्याओं का समाधान करने के लिए बनाया गया था. इसीलिए कंप्यूटर का नाम compute शब्द से लेकर कंप्यूटर रखा गया था।
कंप्यूटर के लाभ और हानि
वैसे तो कंप्यूटर एक सिंपल से इलेक्ट्रॉनिक मशीन है लेकिन इसकी उपयोगिता के कारण इसे किसी वरदान से कम नहीं समझा जा सकता है. कंप्यूटर के कई लाभ हैं जहां इसके इतने लाभ है वहां से कुछ हानि भी है।
कंप्यूटर के लाभ
- कंप्यूटर बड़े से बड़ा काम तेजी से कुछ ही समय में कर देता है.
- कंप्यूटर में जिन जानकारियों में को डाला जाता है वह उसमें स्टोर रहता है. जिसे फ्यूचर में भी इस्तेमाल किया जा सकता है.
- कंप्यूटर का उपयोग करके आप आसानी से किसी व्यक्ति को ईमेल या मैसेज सेंड कर सकते हैं. ना सिर्फ मैसेज अब आप चाहे तो कंप्यूटर का इस्तेमाल करके किसी के साथ भी वीडियो कॉल कर सकते हैं.
- बैंकिंग के क्षेत्र में भी कंप्यूटर का इस्तेमाल किया जाता है. ऑनलाइन बैंकिंग के आ जाने के कारण आजकल सभी कार्य कंप्यूटर व मोबाइल से आसानी से हो जाते हैं.
- कंप्यूटर का उपयोग करके छोटे-मोटे काम जैसे टिकट बुकिंग करना, प्रोजेक्ट बनाना, बिल भरना आदि आसानी से घर बैठे किया जा सकता हैं.
कंप्यूटर की हानियां
कंप्यूटर के बहुत सारे लाभ हैं वहीं कंप्यूटर से कई हानि भी होती हैं. कंप्यूटर से होने वाली हानियां
- कंप्यूटर लोगों के कार्य को आसान बना देता है जिसके कारण आजकल लोग कंप्यूटर पर ही पूरी तरह निर्भर हो गए हैं. कंप्यूटर का अधिक इस्तेमाल स्वास्थ्य के लिए हानिकारक हो सकता है.
- कंप्यूटर की स्क्रीन पर ज्यादा देर देखने से कई बार इन लोगों की आंखें खराब हो जाती हैं.
- कंप्यूटर के कारण टेक्नोलॉजी इतनी बढ़ गई है कि बड़ी बड़ी मैन्युफैक्चरिंग कंपनियों में इंसानों के जगह रोबोट काम कर रहे हैं जिसे बेरोजगारी बढ़ती जा रही हैं.
- कंप्यूटर में लोग अपनी सारी जानकारियां छोड़ देते हैं और हैकर उन जानकारियों को प्राप्त करें इसका गलत इस्तेमाल करते हैं.
भारत के सबसे तेज कम्प्यूटर का क्या नाम है?
भारत के सबसे तेज कम्प्यूटर का नाम है PARAM Siddhi-AI .
विश्व के सबसे तेज कम्प्यूटर का क्या नाम है?
विश्व के सबसे तेज कम्प्यूटर का नाम है Frontier .
आज आपने क्या सीखा?
दोस्तों इस लेख में हमने आपको कंप्यूटर पर निबंध विषय पर हर महत्वपूर्ण जानकारी प्रदान की है. इस निबंध में हमने कंप्यूटर से जुड़ी ज्यादा से ज्यादा जानकारी देने की कोशिश की है. यह पोस्ट आपको कैसा लगा नीचे कमेंट करके जरूर बताइए।
अगर आपको हमारा यह लेख “ Essay on Computer in Hindi ” पसंद आया हो तो इसे अपने दोस्तों के साथ सोशल मीडिया में जरूर शेयर कीजिए ताकि उन्हें मैं एक अच्छा निबंध पढ़ने का मौका मिल सके और उनकी जानकारी भी बढ़ सके.
इस तरह की दूसरे निबंध हमने अपने ब्लॉग में लिखे हैं, तो आप चाहे तो उन्हें भी पढ़ सकते हैं और अपनी जानकारी को बढ़ा सकते हैं. अगर आपके मन में इस पोस्ट से जुड़ा कोई सवाल है, तो आप उसे नीचे कमेंट करके पूछ सकते हैं धन्यवाद।
About the Author

Prabhanjan Sahoo
मैं Prabhanjan, HindiMe का Technical Author & Co-Founder हूँ। Education की बात करूँ तो मैं एक Enginnering Graduate हूँ। मुझे नयी नयी Technology से सम्बंधित चीज़ों को सीखना और दूसरों को सिखाने में बड़ा मज़ा आता है।
https://hindime.net
Related Posts
कंप्यूटर वायरस क्या है: प्रकार, बचाव के उपाय, और क्या करें, कंप्यूटर का उपयोग किन किन क्षेत्रों में किया जाता है, storage device क्या है और कितने प्रकार के है, mechanical keyboard क्या है और इसे कैसे चुने, animation क्या है और कैसे बनाये, leave a comment cancel reply, comments (7).
Top ki knowledge se
Very useful
Nice information excellent work
Nibandh bhtao
nice article
Chandan ji namase. very useful knowledge sir.
कंप्यूटर पर निबंध। computer essay in hindi

कम्यूटर आधुनिक युग की एक महतवपूर्ण खोज है। यदि यु कहा जाये की आज का मानव पूरी तरह से कंप्यूटर पर निर्भर हो गया है तो यह कोई अतिश्योक्ति नहीं होगी। कार्य के हर क्षेत्र में कंप्यूटर का प्रचलन बहुत तेजी से बड़ा है और बढ़ता जा रहा है। आज हम आपके लिए इस पोस्ट में computer essay in hindi ले कर आये है । कंप्यूटर पर निबंध आजकल स्कूल और कॉलेज में जरूर पुछा जाता है। इस हिंदी निबंध को आप essay on computer in hindi for class 1, 2, 3 4, 5, 6, 7, 8, 9, 10, 11, 12 तक के लिए थोड़े से संशोधन के साथ प्रयोग कर सकते है।
Table of Contents
Computer Essay in Hindi
Computer meaning in hindi.
“कंप्यूटर” को हिंदी में संगणक कहा जाता है। वैसे आमतौर पर लोग इसे कंप्यूटर ही बोलते है। कंप्यूटर इसकी समझ पूरी दुनिया मे 90 प्रतिशत से भी ज़्यादा लोगो को है। कंप्यूटर ने हमारी ज़िंदगी को कोड कर दिया है, याने की बांध दिया है। हमारे जीवन मे हर छोटे से लेकर बड़े काम कंप्यूटर के माध्यम से होते है।सुबह का टाइम टेबल नोटपैड पर लिख कर रखना। उठते से कंप्यूटर में देख कर ही जीवन की शुरुवात करना मानो जीवन में रोज़ की दिनचर्या का आम हिस्सा है।हमने दिन को गिनने वाले कैलेंडर को भी आज की डेट में कंप्यूटर में ही देखना शुरू कर दिया है। पहले हम कैलेंडर को घर के कमरे में लगा कर रखते थे। विचित्र तो नही है आज यह सब कुछ क्योंकि आज के युग में हर कोई इसी तरह से चल रहा है। कोई किसी से भी पीछे नही हटना चाहता है।जीवन की दौड़ में जितना आखिर इस ज़माने में कौन नही चाहता। कंप्यूटर ने हमे अपने जीवन को नई नई तकनीकों से जुड़े रहना सीखाया है।
Computer History in Hindi
प्रस्तावना- चार्ल्स बैबेज ने 1822 में मैकेनिकल कंप्यूटर बनाया। उन्होंने पहला कंप्यूटर बनाया था। पहले के समय मे कंप्यूटर विशेष रूप से चलन में नही आये थे। आज जो हम अपनी आंखों के सामने कंप्यूटर देखते है उसे यह तक पहुंचने में सालो की यात्रा तय करनी पड़ी। जिस तरीके का या जिस आकार का आप अभी अपने सामने कंप्यूटर देखते है, वह आकार महज कुछ वर्ष पूर्व का ही है। पहले कंप्यूटर का आकार थिएटर के समान बड़ा हुआ करता था। लेकिन जैसे जैसे मांग व समझ बड़ी, वैसे वैसे कंप्यूटर के आकार भी बदलते गए। वह धीरे धीरे छोटे आकार में होते गए। नई नई विंडोज आयी हर एक मे एक के बाद एक अलग सुधार किए गए। आज हमारे सामने जो कंप्यूटर है उसे यहां तक आने में वर्षों लगे है। चाहे बदलाव आकार में हो या चाहे तकनीकों में कंप्यूटर ने अपने अस्तित्व को यहां तक पहुँचने में अनगिनत योगदान दिए है।थिएटर के आकार से आज कंप्यूटर हमारे मेज़ पर रखने के आकार का हो गया। जितना आकार छोटा हुआ उतने लोगो ने इसे खरीदा। जिससे वो आसानी से कही भी रख पाए और इस्तेमाल कर पाए।
Computer full Form in Hindi
कंप्यूटर जिसे आज बच्चो से लेकर बुजुर्ग वर्ग के लोग भी इस्तेमाल कर रहे है। कंप्यूटर का पूरा नाम “ Commonly Operated Machine Particularly Used in Technical and Educational Research ” है ।
Parts of Computer in Hindi
प्रसंस्करण आधार- (कंप्यूटर किस तरह से काम करता है।)
कंप्यूटर गणित के अल्गोरिथम पर आधारित है। कंप्यूटर का प्रसंस्करण कंप्यूटर की अलग भाषा से होता है। अगर सामान्य तौर पर देखा जाए तो कंप्यूटर शून्य व एक (0,1) की भाषा समझता है।हम जो भी कंप्यूटर पर टाइप करते है उसे वह शून्य व एक कि भाषा मे परिवर्तिव करके हमे जवाब देता हैं। कंप्यूटर जिस भाषा को समझता है उसे हम बाइनरी लैंग्वेज या बाइनरी भाषा कहते है। कंप्यूटर उसकी भाषा मे पहले समझता है और फिर हमें उत्तर देता है। पूरा प्रसंस्करण बाइनरी भाषा मे होता है। कंप्यूटर का एक हिस्सा सीपीयू होता है। सीपीयू को कंप्यूटर का दिमाग बोला जाता है। जिसके अंदर कंप्यूटर की सारी फ़ाइल की जानकारी रहती है।कंप्यूटर की जिस स्क्रीन पर हमें सब कुछ दिखता है उसे डेस्कटॉप बोला जाता हैं।जिससे हम कंप्यूटर को संचालित करते है उसे माउस बोला जाता हैं। कंप्यूटर के हिस्से को हम हार्डवेयर बोलते हैं। अर्थात जो कुछ भी हम छु कर महसूस कर सकते है उसे हम हार्डवेयर बोलते है। एवं जो कंप्यूटर के अंदर होता है या जो प्रोग्राम हमे दिखता है उसे हम सॉफ्टवेयर कहते है।
प्रसंस्करण का सबसे महत्वपूर्ण हिस्सा है सॉफ्टवेयर।कंप्यूटर का प्रसंस्करण सॉफ्टवेयर के आधार पर होता है। जितने भी प्रोग्राम कंप्यूटर पर संचालित होते है सब सॉफ्टवेयर से बने होते है। और सॉफ्टवेयर में कोडिंग होती है।सॉफ्टवेयर कोड करने के लिए अलग अलग भाषा होती है। आज के युग मे सॉफ्टवेयर कोडिंग भाषा की बहुत मांग है। हर क्षेत्र में यह काम आती हैं। इसके लिए विभिन्न प्रकार के कोर्स भी चलते है। जिसमे बच्चे कोडिंग सीखते है। सॉफ्टवेयर और हार्डवेयर कंप्यूटर के काम करने के लिए बेहद आवश्यक है।सी प्लस प्लस, जावा, पाइथन इस प्रकार की भाषा का इस्तेमाल किया जाता है। इसी भाषा की मदद से सॉफ्टवेयर बनते है। पहले के मुकाबले आज बच्चे इन भाषाओं को ज़्यादा सीखते है। वे इसमे अपना कैरियर सोचते है।वे गहराई से कंप्यूटर के प्रसंस्करण को सीखते है।
Importance of Computer in Hindi
आधुनिक जीवन में क्रांति- पहले कंप्यूटर 100 में से एक घर मे इस्तेमाल किया जाता था। अब ये संख्या काफी बढ़ गयी है। जैसे जैसे कंप्यूटर ने लोगो की सोच को आधुनिक किया वैसे वैसे ज्यादा से ज़्यादा लोगो ने कंप्यूटर को खरीदा। लोगो ने कंप्यूटर को अपने निजी जीवन का हिस्सा बनाया। अपनी जरूरतों में जब लोगो को कंप्यूटर का महत्व लगा तब जिनके पास पैसे थे उन्होंने कंप्यूटर खरीदा, और जो उस वक़्त नही खरीद सकते थे वे इंटरनेट कैफ़े पर जाया करते थे। इस प्रकार काफी लोगो को रोज़गार भी मिले। कंप्यूटर का इस पीढ़ी में आगमन होने से इसका उपयोग हर क्षेत्र में विस्तारपूर्वक होने लगा।हर क्षेत्र में कंप्यूटर की उतनी ही मांग बढ़ी जितनी कि गढ़ी को चलने में पेट्रोल की होती है। आधुनिक प्रकार से लोगो ने कंप्यूटर के नव जीवन को स्वीकार किया।उद्योग में कंप्यूटर काम आता है, हर छोटे बड़े दफ्तरों में कंप्यूटर ने अपनी जगह बनाई। जहां पहले कागज़ में लिख कर कोई ज़रूरी जानकारी सहेजी जाती थी वही आज कंप्यूटर में सारी जानकारी फाइलों के माध्यम से सहेजी जाती है। कंप्यूटर में बड़ी से बड़ी फ़ाइल सहेजने का स्थान भी काफी रहता है। कंप्यूटर ने चिकित्सा के क्षेत्र में क्रांति ला दी थी। जहाँ कोई विशेष जानकारी या रिपोर्ट पाने में 3 से 4 दिन या एक हफ्ते का समय लगता था, कंप्यूटर की मदद से वह जानकारी चंद मिनटों वो घंटो में निकल आती है। इससे इलाज में फुर्ती आयी। बड़ी मात्रा में लाखों लोगों की जानकारी सहेजी जा सकी।
अधिक से अधिक लोग ने कंप्यूटर का इस्तेमाल रोजमर्रा की ज़िंदगी मे किया।सरकारी व निजी क्षेत्र में कंप्यूटर ने अपनी भूमिका सुनिश्चित की। आम लोगो का जीवन भी इसमें प्रभावित हुआ। लोग सुबह से लेकर रात तक कंप्यूटर से ग्रसित रहते है।
Advantage of Computer in Hindi
रोज़गार, शिक्षा एवं मनोरंजन के क्षेत्र में – कंप्यूटर ने रोज़गार, शिक्षा एवं मनोरंजन के क्षेत्र में क्रांति पैदा की।वर्तमान स्थिति की बात करे तो कोरोना काल मे शिक्षा एवं रोजगार दोनो ही क्षेत्र में कंप्यूटर का विशेष योगदान रहा। कंप्यूटर ने मीलों दूर बैठे लोगों को जोड़ने का काम किया। ये कंप्यूटर की विशेषता है। अगर ऐसी परिस्थिति में कंप्यूटर नही होता तो आम लोगो का जीवन बुरी तरह से प्रभावित होता। हालहि के डेटा से जानकारी प्राप्त हुई कि एक लाख चालीस हजार लोगों ने लोकडाउन के चलते आत्म हत्या की, ना जाने कितने लोग डिप्रेशन का शिकार हुए। ये संख्या और भी ज़्यादा हो सकती थी परंतु कंप्यूटर के जगत ने इस पीढ़ी को जीवन दान दिया। हज़ारों लोगों को इसके कारण रोज़गार मुहैया हुआ। सभी लोग जब एक साथ कंप्यूटर की दुनिया मे आये तो कंप्यूटर से जुडे रोज़गार की मांग भी बड़ी। वही अगर शिक्षा के क्षेत्र की बात की जाए तो शिक्षा के क्षेत्र में भी उछाल कंप्यूटर की बदौलत आया।बच्चों को यूट्यूब के मध्याम से हर जानकारी पढ़ाई से जुड़ी मिल जाती है। वे घर बैठे बिना रुकावट के शिक्षा हासिल करते है। इसके लिए सिर्फ इंटरनेट की आवश्यकता होती है जो कि हर तीसरे व्यक्ति के पास उपलब्ध है।बच्चों के मनोरंजन के रूप में भी कंप्यूटर उभर कर आया है। आज कल कंप्यूटर का आकार छोटा हो गया है। साथ ही लैपटॉप भी बिल्कुल कंप्यूटर की ही तरह काम करते है। लैपटॉप में ये सुविधा होती है कि हम इसे एक स्थान से दूसरे स्थान पर आसानी से ले जा सकते है। वैसे ही टेबलेट्स आते है, और आज कल मोबाइल भी लोग कंप्यूटर की भांति ही इस्तेमाल करते है। उसमें सुविधाएं अलग होती है परंतु लोग उसे छोटे स्तर पर तो इस्तेमाल करते ही है। ये सब चार्ज करके घंटो तक चलाये जा सकते है। बच्चे कंप्यूटर की मदद से नए नए कोर्स सीखते है। अपने आप को विकसित करते है।
उपसंहार- बेशक कंप्यूटर ने हमारे जीवन को आसान कर दिया है। हमारी उंगलियों पर दुनिया की हर जानकारी लाकर रखी है, परंतु हमे इससे होने वाली हानि से भी बचके रहने का प्रयास करना चाहिए।जैसे जैसे इंटरनेट एवं कंप्यूटर का उपयोग बढ़ता रहा है वैसे वैसे डिजिटल क्राइम भी बढ़ते रहे है। हमे सावधानी से इसका इस्तेमाल करना चाहिए। साथ ही अपनी आंखों को भी आराम देना चाहिए।समयबद्ध तरीके से इसका उपयोग करना चाहिए। वरना कोई भी चीज के फायदे के साथ नुकसान भी होते है। जो हमे चिंतित कर सकते है। कंप्यूटर का आगमन आधुनिक जीवन मे वरदान के रूप में उभरा है।हमे इसे अभिशाप होने नही देना है। सुरक्षा से इसका इस्तेमाल करना है एवं दुसरो को भी इसकी सीख देनी है।
हमें आशा है आपको computer essay पसंद आया होगा। आप my computer essay निबंध को importance of computer essay या फिर advantage of computer essay के रूप में भी प्रयोग कर सकते है। इस निबंध को paragraph on computer के लिए भी प्रयोग कर सकते है ।
Essay On Computer In Hindi | कंप्यूटर पर निबंध : आधुनिक युग की तकनीकी महाशक्ति
Table of Contents
Essay On Computer In Hindi: कंप्यूटर, जिन्हें हम आजकल अपने जीवन का महत्वपूर्ण हिस्सा मानते हैं, एक ऐसा उपकरण है जिसने आधुनिक दुनिया को परिवर्तित कर दिया है। यह तकनीकी महाशक्ति हमारे समय के जीवन को सरल और सुखमय बना दिया है। कंप्यूटर का उपयोग विभिन्न क्षेत्रों में किया जा रहा है, जैसे कि विज्ञान, शिक्षा, व्यवसाय, संचालन, मनोरंजन, और और भी अनगिनत कार्यों में। इस लेख में, हम कंप्यूटर के बारे में विस्तार से चर्चा करेंगे और उसकी महत्वपूर्ण भूमिका को समझेंगे।

कंप्यूटर का इतिहास (Essay On Computer In Hindi)
कंप्यूटर का इतिहास बहुत ही रोचक है और यह दिखाता है कि मानवता किस तरह से तकनीक के क्षेत्र में प्रगति कर रही है। कंप्यूटर का जन्म 20वीं सदी के प्रारंभ में हुआ था। लेकिन इसका विकास और प्रगति आजके समय तक ही हुआ है।
पहले कंप्यूटर बहुत बड़े और महंगे थे और उनका उपयोग सिर्फ सरकारी और वैज्ञानिक उद्देश्यों के लिए होता था। पहले कंप्यूटर ज्यादातर संख्याओं को गणना करने के लिए उपयोग होते थे। इनमें ENIAC (Electronic Numerical Integrator and Computer) और UNIVAC (Universal Automatic Computer) शामिल हैं, जो 1940 के दशक में विकसित किए गए थे। इन कंप्यूटरों के आकार विशाल थे और उनके संचालन के लिए बड़ी ताक़त की आवश्यकता होती थी।
कंप्यूटर के विकास में महत्वपूर्ण घटनाएं
कंप्यूटर के विकास में कई महत्वपूर्ण घटनाएं हुई हैं, जिनमें निम्नलिखित घटनाएं शामिल हैं:
1. ट्रांजिस्टर की खोज (1947):
ट्रांजिस्टर ने वैक्यूम ट्यूब्स की जगह ले ली और कंप्यूटरों को छोटे, सुरक्षित, और अधिक शक्तिशाली बनाया।
2. पहला व्यक्तिगत कंप्यूटर (1970):
इसके बाद, पहला व्यक्तिगत कंप्यूटर, Altair 8800, मार्केट में आया, जिसने कंप्यूटर को घरों तक पहुंचाया।
3. पहला माइक्रोप्रोसेसर (1971):
इंटेल ने 4004 माइक्रोप्रोसेसर का विकास किया, जिससे कंप्यूटरों को और भी मिनीएट्यूराइज़ किया गया।
4. पर्सनल कंप्यूटर का आगमन (1980):
IBM PC और Apple II जैसे पर्सनल कंप्यूटर ने आम लोगों के लिए कंप्यूटिंग को आसान बना दिया।
5. इंटरनेट का आगमन (1990):
इंटरनेट का आगमन ने कंप्यूटर को एक ग्लोबल जाल में जोड़ा और दुनिया भर में जानकारी के आदान-प्रदान को संभव बनाया।
6. स्मार्टफोन की आवश्यकता (2000):
स्मार्टफोन्स ने कंप्यूटिंग को हमारे जीवन का हिस्सा बना दिया है और हमें दुनिया से जुड़े रहने में मदद की है।
कंप्यूटर के प्रकार
कंप्यूटर कई प्रकार के होते हैं, और वे उनके कार्यों और उपयोग के आधार पर विभिन्न श्रेणियों में आते हैं। ये श्रेणियां निम्नलिखित हैं:
1. पर्सनल कंप्यूटर:
ये कंप्यूटर व्यक्तिगत उपयोग के लिए होते हैं और आमतौर पर घरों और ऑफिसों में पाए जाते हैं। इनमें डेस्कटॉप कंप्यूटर्स और लैपटॉप्स शामिल हैं।
2. सर्वर:
सर्वर कंप्यूटर बड़े नेटवर्क्स को प्रबंधित करने के लिए होते हैं और डेटा संग्रहण के लिए उपयोग किए जाते हैं।
3. सुपरकंप्यूटर:
सुपरकंप्यूटर अत्यधिक गति और शक्ति के साथ काम करते हैं और वैज्ञानिक और अन्य अनुसंधान कार्यों के लिए उपयोग होते हैं।
4. टैबलेट और स्मार्टफोन:
ये हमारे हाथ में होते हैं और हमें इंटरनेट, गेम, और अन्य उपयोगों के लिए उपयोगकर्ता अनुभव प्रदान करते हैं।
कंप्यूटर के घटक
कंप्यूटर के मुख्य घटक निम्नलिखित होते हैं:
1. सेंट्रल प्रोसेसिंग यूनिट (CPU):
CPU कंप्यूटर का मस्तिष्क होता है, जो कंप्यूटर के सभी कार्यों को कंट्रोल करता है। यह कार्यों को प्रोसेस करने, डेटा को संगठित करने, और परिणाम प्रदान करने के लिए जिम्मेदार होता है।
2. मेमोरी:
मेमोरी कंप्यूटर के डेटा और इन्स्ट्रक्शन्स को स्टोर करने के लिए उपयोग होती है। RAM ( Random Access Memory ) और ROM (Read-Only Memory) कंप्यूटर की दो प्रमुख प्रकार की मेमोरी होती हैं।
3. स्टोरेज:
स्टोरेज कंप्यूटर के डेटा को दीर्घकालिक रूप से संग्रहित करने के लिए उपयोग होती है। हार्ड ड्राइव, SSD, और एक्स्टर्नल ड्राइव जैसे विभिन्न प्रकार की स्टोरेज उपलब्ध हैं।
4. इनपुट डिवाइस:
इनपुट डिवाइस कंप्यूटर को इनपुट देने के लिए उपयोग होते हैं, जैसे कि कीबोर्ड, माउस, टचस्क्रीन, और माइक्रोफ़ोन।
5. आउटपुट डिवाइस:
आउटपुट डिवाइस कंप्यूटर से जानकारी और परिणाम प्राप्त करने के लिए उपयोग होते हैं, जैसे कि मॉनिटर, प्रिंटर, और स्पीकर्स।
कंप्यूटर के उपयोग
कंप्यूटर के विभिन्न उपयोग हैं, और यह उनके समय के साथ बढ़े हैं।
1. विज्ञान और अनुसंधान:
कंप्यूटर विज्ञान, गणित, फिजिक्स, और अन्य विज्ञानों में अनुसंधान के लिए उपयोग होते हैं। वैज्ञानिक अनुसंधान के लिए सुपरकंप्यूटर भी प्रयोग किए जाते हैं।
2. व्यवसाय:
कंप्यूटर व्यवसायों को प्रबंधन, लेन-देन, और संचालन के लिए महत्वपूर्ण हैं। ERP (Enterprise Resource Planning) सॉफ़्टवेयर और अन्य उपकरण व्यवसायों के लिए बेहद महत्वपूर्ण हैं।
3. शिक्षा:
कंप्यूटर शिक्षा के क्षेत्र में एक महत्वपूर्ण भूमिका निभाते हैं। विद्यार्थियों को ऑनलाइन शिक्षा, डिजिटल सामग्री, और वीडियो वाणिज्य की सुविधा प्रदान करते हैं।
4. आर्ट और डिज़ाइन:
कंप्यूटर आर्ट, ग्राफ़िक्स डिज़ाइन, और मल्टीमीडिया के क्षेत्र में भी उपयोग होते हैं।
5. मनोरंजन:
कंप्यूटर खेल, फिल्में, म्यूज़िक, और अन्य मनोरंजन कार्यों के लिए भी उपयोग होते हैं।
कंप्यूटर के फायदे
कंप्यूटर के उपयोग से कई फायदे होते हैं:
1. गति और दक्षता:
कंप्यूटर कार्यों को बड़े गति से करते हैं और अधिक दक्ष होते हैं।
2. संगठन और प्रबंधन:
व्यवसायों और संगठनों के लिए कंप्यूटर संगठन और प्रबंधन को सरल बनाते हैं।
3. संवाद:
कंप्यूटर और इंटरनेट के माध्यम से लोग आसानी से एक-दूसरे से संवाद कर सकते हैं, जिससे दुनिया भर में जुड़ाई बढ़ जाती है।
4. शिक्षा:
कंप्यूटर शिक्षा को इंटरैक्टिव और आकर्षक बनाते हैं और छात्रों को नए तरीकों से सीखने का अवसर प्रदान करते हैं।
5. आर्थिक विकास:
कंप्यूटर से ऑनलाइन व्यापार, फ्रीलांसिंग, और वित्तीय कार्यों के लिए नौकरियां और व्यापारिक अवसर प्राप्त होते हैं।
कंप्यूटर के नकारात्मक प्रभाव
हालांकि कंप्यूटर के कई फायदे हैं, वे नकारात्मक प्रभावों को भी पैदा कर सकते हैं:
1. सुरक्षा समस्याएँ:
कंप्यूटर और इंटरनेट के साथ आने वाली सुरक्षा समस्याएँ बढ़ गई हैं, जैसे कि हैकिंग, वायरस, और ऑनलाइन फिशिंग।
2. नैतिकता की समस्याएँ:
इंटरनेट पर अवगुणित सामग्री और कंप्यूटर खेलों का अधिक उपयोग नैतिकता की समस्याओं को बढ़ा सकता है।
3. कंप्यूटर का उपयोग नष्ट करने में:
यदि कंप्यूटर का उपयोग गलत तरीके से किया जाए, तो यह व्यक्तिगत और पेशेवर जीवन को प्रभावित कर सकता है।
कंप्यूटर के भविष्य का दृष्टिकोण
कंप्यूटर के भविष्य में भी और भी अधिक रोचक होने की संभावना है। निम्नलिखित कुछ विकल्प हैं:
1. क्वांटम कंप्यूटिंग:
क्वांटम कंप्यूटिंग कंप्यूटर की गति और क्षमता को और भी बढ़ा सकता है, जिससे वैज्ञानिक अनुसंधान में महत्वपूर्ण गगनाना हो सकता है।
2. आर्टिफिशियल इंटेलिजेंस (AI):
AI कंप्यूटर को अनुकूलित और स्वायत्त करने की क्षमता प्रदान कर सकता है, जिससे व्यक्तिगत सेवाएं और उत्पाद विकसित किए जा सकते हैं।
3. इंटरनेट ऑफ थिंग्स (IoT):
IoT कंप्यूटर को विभिन्न डिवाइस्स के साथ जोड़कर हमारे जीवन को संयंत्रित बना सकता है, जैसे कि स्मार्ट होम्स और स्मार्ट सिटीज़।
4. मशीन लर्निंग:
मशीन लर्निंग कंप्यूटर को अपने आप सीखने की क्षमता प्रदान कर सकता है, जिससे उसकी क्षमता और भी महत्वपूर्ण हो सकती है।
Essay On Computer In Hindi : कंप्यूटर आधुनिक युग की तकनीकी महाशक्ति है और हमारे समय के समग्र विकास का महत्वपूर्ण हिस्सा है। इसका उपयोग विभिन्न क्षेत्रों में किया जा रहा है और यह हमारे जीवन को सरल, सुखमय, और समृद्धि की ओर बढ़ा रहा है। हालांकि कंप्यूटर के कई फायदे हैं, हमें सुनिश्चित करना होगा कि हम उन्हें सावधानीपूर्वक और नैतिकता के साथ उपयोग करते हैं ताकि हम उनके नकारात्मक प्रभावों से बच सकें। कंप्यूटर के भविष्य में और भी अनगिनत संभावनाएँ हैं, जिनसे हमारे जीवन को और भी सरल और बेहतर बनाया जा सकता है।
कंप्यूटर क्या है?
कंप्यूटर एक इलेक्ट्रॉनिक डिवाइस है जिसका उपयोग डेटा प्रोसेसिंग, संचयन, और प्रेजेंटेशन के लिए किया जाता है।
कंप्यूटर के प्रकार क्या हैं?
कंप्यूटर विभिन्न प्रकार के होते हैं, जैसे कि पर्सनल कंप्यूटर, लैपटॉप, सर्वर, मेनफ्रेम कंप्यूटर, और सुपरकंप्यूटर।
कंप्यूटर के कितने प्रमुख भाग होते हैं?
कंप्यूटर मुख्यत: हार्डवेयर (हार्डडिस्क, प्रोसेसर, मॉनिटर, कीबोर्ड, आदि) और सॉफ़्टवेयर (ऑपरेटिंग सिस्टम, एप्लिकेशन सॉफ़्टवेयर) से मिलकर बनता है।
प्यूटर का इतिहास क्या है?
कंप्यूटर का इतिहास बहुत लंबा है, लेकिन पहला ईलाक्ट्रॉनिक कंप्यूटर ENIAC 1946 में बना था।
कंप्यूटर कैसे काम करता है?
कंप्यूटर डेटा को प्रोसेस करने के लिए डिज़ाइन किया गया है, जिसमें सिस्टम हार्डवेयर प्रोसेसर द्वारा इनपुट डेटा को प्रोसेस करता है और आउटपुट डेटा तैयार करता है।
कंप्यूटर वायरस क्या है?
कंप्यूटर वायरस एक कंप्यूटर प्रोग्राम होता है जो अनवांछित रूप से कंप्यूटर सिस्टम में क्षति पहुँचाता है।
कंप्यूटर की सुरक्षा के लिए क्या उपाय हैं?
कंप्यूटर सुरक्षा के लिए अच्छा एंटीवायरस सॉफ़्टवेयर, फ़ायरवॉल, अपडेट की नियमित जाँच, और स्ट्रॉन्ग पासवर्ड उपयोग करना जरूरी है।
कंप्यूटर में डेटा सहेजने के लिए सबसे अच्छा तरीका क्या है?
कंप्यूटर में डेटा सुरक्षित रूप से सहेजने के लिए एक बैकअप डिवाइस जैसे कि एक्सटर्नल हार्ड ड्राइव या क्लाउड स्टोरेज का उपयोग किया जा सकता है।
कंप्यूटर के लिए कौन-कौन से ऑपरेटिंग सिस्टम हैं?
कुछ प्रमुख ऑपरेटिंग सिस्टम हैं: Microsoft Windows, macOS, Linux, और Android।
कंप्यूटर नेटवर्क क्या होता है?
कंप्यूटर नेटवर्क एक संचालनीक तंत्र होता है जिसमें कई कंप्यूटर एक-दूसरे से कनेक्ट होते हैं ताकि वे डेटा और संचालना साझा कर सकें।
यह भी पढ़ें:-
- Disaster Management in Hindi PDF Notes 2023
- Indian Polity PDF Notes: Unlocking the Secrets of India’s Governance
Share this:
Leave a comment cancel reply.
Save my name, email, and website in this browser for the next time I comment.
Notify me of follow-up comments by email.
Notify me of new posts by email.

Computer Essay in Hindi: कंप्यूटर पर निबंध
क्या आप भी “Computer Essay in Hindi” की तलाश कर रहे हैं? यदि हां, तो आप इंटरनेट की दुनिया की सबसे बेस्ट वेबसाइट essayduniya.com पर टपके हो. यदि आप Computer Ka Mahatva, Computer Essay in Hindi, Essay on Computer in Hindi, Computer Par Nibandh, Computer Par Essay, Computer Par Essay Hindi mai, Computer Ka Mahatva Essay in Hindi, Computer ka Avishkar Essay in Hindi यही सब सर्च कर रहे हैं तो आपका इंतजार यही पूरा होता है.
Computer Essay in Hindi
यहां हम आपको “Computer Essay in Hindi” उपलब्ध करा रहे हैं. इस निबंध/ स्पीच को अपने स्कूल या कॉलेज के लिए या अपने किसी प्रोजेक्ट के लिए उपयोग कर सकते हैं. इसके साथ ही यदि आपको किसी प्रतियोगिता के लिए भी Essay on Computer in Hindi तैयार करना है तो आपको यह आर्टिकल पूरा बिल्कुल ध्यान से पढ़ना चाहिए.
Computer Essay in Hindi 100 Words
कंप्यूटर विज्ञान की सबसे अद्भुत खोज है। यह एक मशीन है, जो एक साथ कई सारे काम कर सकता है। कंप्यूटर अपनी मेमोरी में ढेर सारे डेटा को स्टोर कर सकता है। आज कंप्यूटर की शिक्षा लगभग सभी के लिए जरूरी हो गई है। आज स्कूलों में छोटी कक्षा के काम आयु में ही कम्प्यूटर की शिक्षा दी जा रही है। कंप्यूटर का उपयोग करना बहुत ही आसान है। इसे हर उम्र का व्यक्ति चला सकता है। यह एक साथ कई काम करने में निपुण है। इसलिए कंप्यूटर ने आज मनुष्य के कई काम आसान कर दिए हैं। कंप्यूटर मनुष्य के लिए किसी वरदान से कम नहीं है।
Computer Essay in Hindi 150 Words
कंप्यूटर एक जटिल मशीन है। जिसने मानव के काम आसान कर दिए हैं। शुरुआत में यह केवल गणना का ही काम करता था। लेकिन आज विज्ञान ने इतनी तरक्की कर ली है, की वर्तमान में कंप्यूटर कई लोगों का कम एक साथ करने में सक्षम हो गया है। कंप्यूटर कई सालों का काम कुछ ही देर में कर सकता है। इसके इस्तेमाल ने मानव जाति का जीवन आसान बना दिया है। कंप्यूटर आज लगभग का इस्तेमाल शिक्षा के क्षेत्र, चिकित्सा के क्षेत्र, अर्थव्यवस्था के क्षेत्र लगभग हर एक क्षेत्र में किया जाता है।
इसके योगदान से आज मनुष्यों का जीवन एक अलग जो स्तर पर जा पहुंचा है। आज के समय में कंप्यूटर के बिना आधुनिक दुनियां का बने रहना संभव नहीं है। आज मानव केवल सामान्य कंप्यूटर तक ही सीमित नहीं है, बल्कि एआई (आर्टिफिशियल इंटेलिजेंस) को बनाकर आज आधुनिक दुनियां को एक अलग ही सीमा तक पहुंचा दिया है।
Computer Essay in Hindi 2 00 Words
कंप्यूटर के बिना आधुनिक समय की कल्पना भी नहीं की जा सकती है। कंप्यूटर आधुनिक समय का सबसे बुनियादी जरूरत है। आज हर क्षेत्र और स्वचलित वस्तुओं में कंप्यूटर का प्रयोग होता है। आज अगर दुनियां में एक दिन के लिए भी सभी कंप्यूटर के उपयोग पर प्रतिबंध लगा दिया जाए, तो अर्थव्यवस्था डगमगा जायेगी और सालों का काम प्रभावित हो जायेगा। स्कूल, चिकित्सालय, कंपनियों में बिना कंप्यूटर के कोई कार्य करना संभव नहीं है। यहां तक की अब अधिकांश घरों में भी अब कंप्यूटर का प्रयोग होने लगा है। कंप्यूटर आज लोगों के दैनिक जीवन का हिस्सा बन चुका है।
हॉस्पिटल में मरीजों के इलाज के लिए इस्तेमाल होने वाली मशीनों में भी एडवांस कंप्यूटर का प्रयोग किया जाता है, ताकि मरीजों का इलाज बेहतर ढंग से किया जा सके। एडवांस मशीनें मरीजों की ऐसी बीमारियों का पता लगा लेती हैं, जो शायद आम तौर पर किसी के लिए पता लगाना मुश्किल हो। इसके साथ ही स्कूलों में बच्चों को बेहतर और आधुनिक शिक्षा प्रदान करने के लिए स्मार्ट क्लासेस का उपयोग किया जाता है। कोरोना के समय में लाखों घर बैठे लोगों ने कम्प्यूटर के माध्यम से ही अपने रोजगार को जारी रखा। कंप्यूटर सच में इंसानों के लिए किसी वरदान से कम नहीं है।
Essay on Computer in Hindi 300 Words
आधुनिक समय में हर कहीं वैज्ञानिक खोजों का बोलबाला है। कंप्यूटर इन्हीं खोजों में से एक है। कंप्यूटर को आधुनिक दुनियां के वैज्ञानिकों की सबसे बड़ी खोज मानी जाती है। कंप्यूटर एक ऐसी मशीन है, जो इंसानों द्वारा दिए गए निर्देशों को जल्द से जल्द पूरा करने का काम करती है। कंप्यूटर का उपयोग काफी लंबे समय से किया जा रहा है। यह एक ऐसा उपकरण है, जो बड़ी से बड़ी जटिल समस्या को चुटकियों में हल कर देता है।
कंप्यूटर क्या है?
कंप्यूटर एक विद्युत उपकरण (electrical device) है। इसका उपयोग मुख्य रूप से गणित की बड़ी समस्याओं को हल करने के लिए किया जाता है। कंप्यूटर का आविष्कार इंग्लैंड के एक साइंटिस्ट चार्ल्स बेबेज ने किया था। चार्ल्स बैबेज ने दुनियां का सबसे पहला मैकेनिकल कंप्यूटर बनाया था। कंप्यूटर एक ऐसा यंत्र है, जो अनेकों प्रकार की गणित की घटनाओं को सूत्रों के आधार पर हल करके बेहद कम समय में आपको उसका जवाब स्क्रीन पर दिखाता है।
कम्प्यूटर का महत्व
आधुनिक युग के लिए कंप्यूटर एक वरदान के समान है। कंप्यूटर को सुपर फास्ट मशीन भी कहा जाता है क्योंकि यहां कम से कम समय में ज्यादा से ज्यादा काम करता है। इसके अलावा व्यक्ति की व्यक्तिगत जानकारियों को सुरक्षित रखने का काम भी करता है। कंप्यूटर एक ऐसा उपकरण है, जिसका उपयोग सभी कार्य क्षेत्रों में किया जा रहा है।
आधुनिक युग में कंप्यूटर का इस्तेमाल काफी ज्यादा बढ़ चुका है। कंप्यूटर का उपयोग सभी कार्य क्षेत्रों में काफी बड़े स्तर पर किया जा रहा है। आज सभी सरकारी और प्राइवेट विभागों का काम कंप्यूटर के माध्यम से ही किया जा रहा है।कंप्यूटर के आने के बाद कागजी कार्यवाही का काम पूरी तरह बंद हो गया है। कंप्यूटर ने आधुनिक दुनिया में काफी बड़ा बदलाव लाया है। वर्तमान में सभी लोगों कि कंप्यूटर पर निर्भरता काफी ज्यादा बढ़ती जा रही है। आजकल छोटे से छोटा और बड़े से बड़ा काम कंप्यूटर पर किया जा रहा है।
चंद्रयान 3 पर निबंध पुस्तकों का महत्व पर निबंध पर्यावरण प्रदूषण पर निबंध Essay on Dr Babasaheb Ambedkar in Hindi वृक्षारोपण पर निबंध
स्वच्छ भारत अभियान पर निबंध
समाचार पत्र पर निबंध
Computer Ka Mahatva Essay in Hindi 500 Words
कम्प्यूटर आज मानव जीवन का एक महत्वपूर्ण हिस्सा बन चुका है। शुरुआत में कंप्यूटर को एक कैलकुलेटर के रूप में मौजूद था, जो चीज़ों का हिसाब करने के अनुसार बनाया गया था। लेकिन आज इसका रूप और कार्य दोनों ही बहुत बदल चुके हैं। शुरुआत में कंप्यूटर को जब बनाया गया, तो यह कमरे के आकार जितने बड़े होते थे। जिनका रख-रखाव करना और उन्हें सही ढंग से चलाना काफी मुश्किल काम होता था। जिस तरह से समय के साथ-साथ मानव जाति का विकास होता गया, उसी तरह कंप्यूटर का भी विकास होता गया। आधुनिक युग के नए-नए वैज्ञानिकों ने कंप्यूटर में नई-नई खोज कर उसे छोटा और सरल उपकरण बना दिया है।
कंप्यूटर का आविष्कार
पुराने समय में कंप्यूटर काफी सीमित क्षमता वाले हुआ करते थे, जो अधिक समय में कम काम किया करते थे। लेकिन आधुनिक समय में कंप्यूटर अब एक साथ कई सारे कामों को कर सकता है। इंग्लैंड के गणितज्ञ और वैज्ञानिक चार्ल्स बैबेज को कंप्यूटर का खोजकर्ता कहा जाता है। चार्ल्स बैबेज ने दुनिया का पहला मैकेनिकल कंप्यूटर बनाया था। कंप्यूटर का आविष्कार मुख्य रूप से बड़ी गणितीय गणना को करने के लिए किया गया। वर्तमान में कंप्यूटर कृत्रिम बुद्धिमत्ता तकनीक से परिपूर्ण है, जो हमारे जीवन के घर क्षेत्र में हमारी सहायता कर रहा है।
कंप्यूटर के कार्य
कंप्यूटर का मुख्य काम बड़ी से बड़ी गणित गणना को कम समय में हल करना है। द्वितीय विश्व युद्ध के दौरान कंप्यूटर का आविष्कार किया गया था। द्वितीय विश्व युद्ध के दौरान सभी देशों को ऐसी मशीन की आवश्यकता थी, जो कि दुश्मनों के हथियार की गति एवं दुश्मनों की दिशा का पता जल्द से जल्द लगा सके। लेकिन आज के समय में कंप्यूटर का उपयोग ना सिर्फ दुश्मनों स्थिति का पता लगाने के लिए किया जाता है, बल्कि बाकी अन्य कई महत्वपूर्ण कामों के लिए भी किया जाता है। वर्तमान में कंप्यूटर का कार्य गणना करना, सुरक्षित डाटा ट्रांसफर करना, महत्वपूर्ण जानकारी को सुरक्षित रखना, किसी व्यक्ति विशेष की निजी जानकारियों को गोपनीय रखना इत्यादि है।
कंप्यूटर आज की जरूरत
आधुनिक युग में कंप्यूटर एक बहुत जरूरी उपकरण बन चुका है। कंप्यूटर का उपयोग सभी कार्य क्षेत्रों में काफी तेजी से किया जा रहा है। आज चिकित्सा के क्षेत्र में, सुरक्षा के क्षेत्र में ,यातायात के क्षेत्र में, शिक्षा के क्षेत्र में, विज्ञान के क्षेत्र में कंप्यूटर की उपयोगिता काफी ज्यादा बढ़ चुकी है। कंप्यूटर का उपयोग आज छोटे से छोटे कार्यालय से लेकर बड़े-बड़े सरकारी दफ्तरों में हो रहा है। कंप्यूटर के आने के बाद कागजी कार्यवाही पूरी तरह बंद हो गई है। अब सारा काम कंप्यूटर पर ही होता है। आज जिस तरह से देश की आबादी बढ़ती जा रही ऐसे में कागज पर सभी चीजों का हिसाब रख पाना बेहद मुश्किल है, लेकिन कंप्यूटर पर सभी चीजों का हिसाब आसानी से हमेशा के लिए सुरक्षित रखा जा सकता है।
विज्ञान और उसकी खोजें मानव जीवन को बेहतर ढंग से जीने और उसे आरामदायक बनाने के लिए की गई हैं। लेकिन आज मनुष्य इन अविष्कारों का उपयोग इतने बुरे और बेतरतीब ढंग से कर रहा है, की वह आने वाले कुछ समय में अपने जीवन को बत्तर बना लेगा। विज्ञान और उसके अविष्कार का सही उपयोग न करने के कारण आज विश्व प्रदूषण और अन्य मानसिक बीमारियों जैसी परेशानियों को झेल रहा है। इसलिए हमने इनका इस्तेमाल सावधानी और जरूरत के अनुसार करना चाहिए। कंप्यूटर एक मशीन है, जो कि इंसानों के लिए लाभदायक भी है और नुकसानदायक भी।
Computer Par Essay 1000 Words
कंप्यूटर का इस्तेमाल आप हर तरह के कार्य क्षेत्र में कर सकते हैं। यह एक ऐसा उपकरण है, जिससे आप बड़ी से बड़ी अंक गणना आसानी से कर सकते हैं। इसके अलावा किसी तरह कि मोबाइल एप्लीकेशन को या प्रोग्राम को बनाने के लिए आप इसमें कोडिंग भी कर सकते हैं। आज कम्प्यूटर में आप किसी भी तरह की तकनीक को बनाने से पहले उसका प्रतिरूप कंप्यूटर में बना कर देख सकते हैं। कंप्यूटर द्वारा व्यक्ति का कौशल भी काफी विकसित हो रहा है। व्यक्ति कंप्यूटर के माध्यम से रोजगार पाने में भी सक्षम है। कंप्यूटर से व्यक्ति दूर बैठे लोगों से भी बात कर सकता है, और आज के समय में इंटरनेट ने कंप्यूटर की दुनिया में काफी बड़ा बदलाव किया है। इंटरनेट के आने के बाद कंप्यूटर की उपयोगिता हद से ज्यादा बढ़ चुकी है।
कंप्यूटर के उपयोग
पुराने समय में कंप्यूटर का उपयोग सिर्फ गणित की घटनाओं को हल करने के लिए किया जाता था। लेकिन वर्तमान में कंप्यूटर काफी ज्यादा विकसित हो चुका है, और अब कंप्यूटर के साथ इंटरनेट भी जुड़ चुका है। इंटरनेट और कंप्यूटर ने साथ में मिलकर मानव के जीवन में एक बहुत बड़ी क्रांति लाई है। आज कंप्यूटर और इंटरनेट के माध्यम से व्यक्ति घर बैठे सारे दुनिया की जानकारी प्राप्त कर सकता है। इसके अलावा दुनिया के किसी भी कोने में बैठे व्यक्ति से संपर्क भी कर सकता है। कंप्यूटर का उपयोग व्यक्तियों द्वारा बिल भरने के लिए, डॉक्टर से अपॉइंटमेंट लेने के लिए, फीस भरने के लिए, यातायात के लिए चिकित्सा के लिए, शिक्षा के लिए किया जा रहा है। कंप्यूटर का उपयोग हम कई सारे कामों को एक साथ करने के लिए करते हैं।
कंप्यूटर के महत्व
हमारे जीवन में आज कंप्यूटर बहुत अधिक महत्वपूर्ण बन चुका है। वर्तमान में शिक्षा के क्षेत्र में, कार्यस्थल में, सुरक्षा के क्षेत्र में एवं निजी उपयोग के लिए भी कंप्यूटर हमारे लिए बेहद महत्व रखता है। पुराने समय मे हम अपने सभी छोटे-बड़े काम अपने हाथों से किया करते थे। कई काम तो ऐसे हुआ करते थे, जिन्हें करने में सारा दिन लग जाता था। लेकिन आज कंप्यूटर के माध्यम से हम सारे छोटे-बड़े काम काफी कम समय में कर लेते हैं। कंप्यूटर के आने के बाद व्यक्ति की काम के प्रति चिंता काफी कम हुई है। आज हम कंप्यूटर में अपना सारा हिसाब रख सकते हैं, कंप्यूटर में आवश्यक जानकारी सुरक्षित रख सकते हैं। अलग-अलग तरह के कामों को कंप्यूटर से कर सकते हैं, लेन-देन के खातों का प्रबंधन कर सकते हैं। कंप्यूटर के माध्यम से हम ऑनलाइन पैसों का लेनदेन भी कर सकते हैं।
वर्तमान में कंप्यूटर
वर्तमान में कंप्यूटर एक ऐसा उपकरण बन चुका है, जिसे व्यक्ति अपने साथ कहीं भी ले जा सकता है। कंप्यूटर को कहीं भी इस्तेमाल किया जा सकता है अब कंप्यूटर का आकार इतना छोटा हो चुका है, कि व्यक्ति उसे अपने बैग में रखकर कहीं भी ले जा सकता है। वर्तमान में कंप्यूटर का उपयोग हर छोटी से छोटी दुकान से लेकर बड़े से बड़े मॉल में किया जा रहा है। वर्तमान में विद्यार्थियों द्वारा भी कंप्यूटर का उपयोग नई चीजें सीखने के लिए जानकारी इकट्ठी करने, परीक्षा संबंधित तैयारी करने के लिए किया जा रहा है। सभी निजी एवं सरकारी दफ्तरों में भी कागजी कार्यवाही को करने के लिए एवं महत्वपूर्ण दस्तावेजों को सुरक्षित रखने के लिए कंप्यूटर का इस्तेमाल किया जा रहा है।
कंप्यूटर के लाभ-हानि
कम्प्यूटर के कई सारे लाभ हैं तो हानियां भी हैं।
कंप्यूटर से लाभ
- आज कम्प्यूटर ने मानव का काम बहुत आसान कर दिया है।
- कंप्यूटर की सहायता से कई दिनों का काम कुछ ही समय में किया जा सकता है।
- स्वचालित मशीनों में एडवांस कंप्यूटर का प्रयोग किया जाता है।
- इन मशीनों में एक बार प्रोग्राम अपलोड करने के बाद इन्हें बार-बार देखने की जरूरत नहीं है। एक बार स्टार्ट करने के बाद यह स्वचालित मशीनें प्रोग्राम के अनुसार अपना काम करती रहती हैं।
- हॉस्पिटल में कई गंभीर बीमारियों की जांच एवं उनके उपचार के लिए जो एडवांस मशीनें इस्तेमाल की जाती हैं, उनमें भी कंप्यूटर और प्रोग्रामिंग की जाती है।
- सुरक्षा के क्षेत्र में भी कंप्यूटर के माध्यम से दुश्मनों की गतिविधियों का पता लगाया जा रहा है।
- कंप्यूटर का इस्तेमाल शिक्षा के क्षेत्र में भी किया जा रहा है आजकल ऑनलाइन ही सारी परीक्षाएं कंप्यूटर पर ली जा रही हैं।
कंप्यूटर की हानियां
- कंप्यूटर की सबसे बड़ी हाने यह है कि उसके आने के बाद व्यक्ति की निर्भरता कंप्यूटर पर बहुत ज्यादा बढ़ चुकी है।
- यह एक इलेक्ट्रिक उपकरण है जिसे आसानी से हैक किया जा सकता है।
- कंप्यूटर में रखा हुआ डेटा अगर पुरी तरह से मिट जाए तो उसे वापस लाना मुश्किल है।
- कंप्यूटर का उपयोग आपको नेत्रों से संबंधित बीमारियां भी हो सकती है।
- बच्चों द्वारा कंप्यूटर का इस्तेमाल गलत तरीके से किया जा रहा है।
- कंप्यूटर एक बिजली पर चलने वाला उपकरण है, बिना बिजली के यह काम नहीं कर सकता।
- कंप्यूटर के आने के बाद मानव की कार्य क्षमता काफी कम हुई है।
- कंप्यूटर के कारण बेरोजगारी बढ़ रही है, क्योंकि एक मशीन ही 10 लोगों का काम कर रही है।
आज के इस आधुनिक युग में बच्चों से बड़े उम्र के लोगों द्वारा कंप्यूटर का उपयोग काफी अधिक किया जा रहा है। लोगों की कंप्यूटर के ऊपर निर्भरता काफी तेजी से बढ़ रही है। विद्यार्थियों द्वारा भी कंप्यूटर का उपयोग कई तरह से किया जा रहा है कोई इसे प्रोजेक्ट बनाने के लिए ,कविता सीखने के लिए, कहानियां सुनने के लिए, परीक्षा संबंधित नोट्स डाउनलोड करने के लिए या फिर अन्य तरह की सूचना इकट्ठा करने के लिए इस्तेमाल कर रहे हैं। उसे अपने महत्वपूर्ण निजी कामों को करने के लिए कंप्यूटर की आवश्यकता होती ही है। वर्तमान में ऐसी स्थिति बन चुकी है, कि बिना कंप्यूटर के व्यक्ति के जीवन की कल्पना नहीं की जा सकती। व्यक्ति बिना कंप्यूटर के अपने आप को अधूरा समझता है।
FAQs related to Computer Essay in Hindi
कंप्यूटर का आपके जीवन में क्या महत्व है?
दैनिक जीवन में कंप्यूटर ने सभी के जीवन में एक एहम स्थान ले लिया है। यह ऑफिस के काम काज के साथ, बच्चों की पढ़ाई, मनोरंजन और तकनीकी शिक्षा प्राप्त करने में सहायक है।
कंप्यूटर का फुल फॉर्म क्या है?
कंप्यूटर का फुल फॉर्म Common Operating Machine purposely used for Technological and Educational Research है।
कंप्यूटर का जनक कौन है?
चार्ल्स बैबेज को कंप्यूटर का जनक माना कहा है।
कंप्यूटर की कितनी पीढ़ियां है?
कंप्यूटर को विकसित होने के आधार पर पांच पीढ़ियों में बांटा गया है। अभी वर्तमान और भविष्य में कृत्रिम बुद्धि आधारित कंप्यूटर का उपयोग किया जाएगा।
Computer Ka Mahatva Essay in Hindi
हमारे सभी प्रिय विद्यार्थियों को इस “Computer Essay in Hindi” जरूर मदद हुई होगी यदि आपको यह Essay on Computer in Hindi अच्छा लगा है तो कमेंट करके जरूर बताएं कि आपको यह Computer Essay in Hindi कैसा लगा? हमें आपके कमेंट का इंतजार रहेगा और आपको अगला Essay या Speech कौन से टॉपिक पर चाहिए. इस बारे में भी आप कमेंट बॉक्स में बता सकते हैं ताकि हम आपके अनुसार ही अगले टॉपिक पर आपके लिए निबंध ला सकें.
मेरा प्रिय कवि सूरदास पर निबंध पुस्तकों का महत्व पर निबंध पर्यावरण प्रदूषण पर निबंध Essay on Dr Babasaheb Ambedkar in Hindi वृक्षारोपण पर निबंध
समाचार पत्र पर निबंध सड़क सुरक्षा पर निबंध
Leave a Comment Cancel reply
Save my name, email, and website in this browser for the next time I comment.
- Now Trending:
- Nepal Earthquake in Hind...
- Essay on Cancer in Hindi...
- War and Peace Essay in H...
- Essay on Yoga Day in Hin...
HindiinHindi
कंप्यूटर पर निबंध essay on computer in hindi.
Let’s talk about computer in Hindi कंप्यूटर पर निबंध – Essay on Computer in Hindi. Hello, guys today we will discuss about short paragraph on computer in Hindi or essay on computer in Hindi. Computer ka mahatva/ importance of computer in Hindi language will help you computer education in Hindi. How to write computer in hindi is our basic focus and you give you computer information in Hindi. Essay on computer in Hindi for class 5 was asked in many competitive exams. Read an essay on computer in Hindi/ computer par nibandh to get better results in your exams.
Essay on Computer in Hindi कंप्यूटर पर निबंध

Essay on Computer in Hindi 200 Words
जीवन में कंप्यूटर की उपयोगिता – विचार – बिंदु – • कंप्यूटर-युग • गणनाओं में सुविधा • रेल-सेवाओं में आसानी • मुद्रण में क्रांति • संचार-क्रांति में सहायक • रक्षा-उपकरणों में उपयोगिता • स्वास्थ्य-सेवा में सहयोग • कंप्यूटर की हानियाँ।
आज हम कंप्यूटर-युग में जी रहे हैं। कंप्यूटर के पास ऐसा मशीनी मस्तिष्क है जो लाखों, करोड़ों गणनाएँ पलक झपकते ही कर देता है। ये गणनाएँ निर्दोष और साफ-सुथरी होती हैं। आप रेलवे बुकिंग-केंद्र पर जाएँ। अब कंप्यूटर की कृपा से आप देश की किसी भी कंप्यूटरीकृत खिड़की से कहीं से कहीं की टिकट बुक करा सकते हैं। पूरा देश कंप्यूटर द्वारा जुड़ गया है। मुद्रण क्षेत्र में आएँ। मुद्रण इतना कलात्मक, साफ-सुथरा और वैविध्य-भरा हो गया है कि पुरानी मशीनें अब बाबा आदम के जमाने की लगती हैं। संचार-क्षेत्र में कंप्यूटर ने क्रांति उपस्थित कर दी है।
टेलीफोन, फैक्स, पेजिग, मोबाइल के बाद इंटरनेट ने मानो सारा संसार आपके ड्राईंग रूम में कैद कर दिया है। रक्षा के उन्नत उपकरणों में, हवाई-यात्राओं में कंप्यूटर-प्रणाली अत्यंत उपयोगी सिद्ध हुई है। भारत ने परमाणु-विस्फोट अत्यंत उन्नत कंप्यूटर प्रणाली से किया। स्वास्थ्य के क्षेत्र में कंप्यूटर ने अद्भुत सेवाएँ प्रदान की हैं। बीमारी की जाँच करने, संपूर्ण स्वास्थ्य परीक्षण करने, हृदय-गति मापने आदि में उसकी महत्त्वपूर्ण भूमिका है। आज सॉफ्टवेयर उद्योग में भारत विश्व के अग्रणी देशों में गिना जाता है।
Essay on Computer in Hindi 250 Words
कम्प्यूटर एक ऐसा उपकरण है। जिसने हमारे जीवन को आसान बना दिया है। यह एक समय में कई काम कर सकता है। कम्प्यूटर के कारण हमारा पूरा काम आसान हो गया है। हम हार्डवेयर, सॉफटवेयर, कीबोर्ड और माउस की मदद से कम्प्यूटर चला सकते है। कम्प्यूटर में एक सी0पी0यू0 होता है जिसे सेन्ट्रल प्रोसेसिंग यूनिट कहा जाता है। सी0पी0यू0 को कम्प्यूटर का मस्तिष्क भी कहा जाता है। कम्प्यूटर में रैम होती है जो कम्प्यूटर को तेजी से चलाने में मदद करती है।
रैम को रेन्डम एक्सेस मेमोरी भी कहा जाता है। डाटा जो हम कीबोर्ड की मदद से कम्प्यूटर में डालते है उसे इनपुट डाटा कहा जाता है और जब हम प्रिंटर की मदद से प्रिंट आउट लेते है तो वह आउटपुट डेटा कहा जाता है। कम्प्यूटर में एक यू.एस.बी. पोर्ट भी होता है, हम इसमें यू.एस.बी. पेन ड्राईव डाल सकते है और यू.एस.बी. ड्राइव में अपना डेटा स्टोर कर सकते है। कम्प्यूटर में हार्ड डिस्क होती है जहाँ पर हम अपना डेटा स्टोर कर सकते है। कम्प्यूटर में एक सी.डी. रोम भी होता है जो संगीत और वीडयो चलाता है।
हम कम्प्यूटर पर गेम भी खेल सकते है और इंटरनेट की मदद से कम्प्यूटर में वीडियो कॉलिंग भी कर सकते है। हम इंटरनेट का उपयोग कर दुनिया में कही भी अपने दोस्तों और रिश्तेदारों से बात कर सकते है और उन्हें देख सकते है। हम अपने आफिस और स्कूल का काम घर पर कम्प्यूटर की मदद से कर सकते है। हम इंटरनेट का उपयोग करके अपने घर का बिजली और पानी का बिल भी दे सकते है।
Essay on tv in Hindi
Essay on Newspaper in Hindi
Essay on Computer in Hindi 300 Words

कंप्यूटर पर निबंध
कंप्यूटर एक ऐसी आदुनिक मशीन है जिसके अविष्कार कि वजह से दुनिआ मे क्रांति आ गयी। कंप्यूटर के अविष्कार ने सभी के सपनो को साकार करके विज्ञान और तकनीकी कि दुनिया मे अवल्ल स्थान प्राप्त किया है। आजकल के दौर मे हम कंप्यूटर के बिना जीवन कि कल्पना कर ही नहीं सकते, यह एक ऐसा डिवाइस है जो हमारे लिए बहुत ही लाभदायक है।
कंप्यूटर डिवाइस को चलने के लिए हमे सीपीयू, यूपीएस, कीबोर्ड, और माउस कि जरूरत पड़ती है। सभी को सीपीयू के साथ जोड़ कर इसे इस्तेमाल किया जाता है। लैपटॉप कंप्यूटर कि तरह ही होता है परन्तु लैपटॉप मे हमे हमे सीपीयू, यूपीएस, कीबोर्ड, और माउस कि जरूरत नहीं पड़ती क्योकि यह लैपटॉप मे पहले से ही मौजूद होते है। कंप्यूटर का इस्तेमाल कई सारे उदेश्यो के लिए किया जाता है जैसे कि सूचनाओ को सुरक्षित रखना, ई-मेल, मैसेजिंग, सॉफ्टवेयर प्रोग्रामिंग, गणना, डेटा प्रौसेसिंग आदि।
21 वीं सदी से पहले कंप्यूटर का इस्तेमाल सीमित जगहों पर ही किया जाता था जैसे कि फ़ौज और हस्पतालो मे, परन्तु आजकल कंप्यूटर हर किसी के घर मे अपनी जगह बना चूका है। कंप्यूटर का शिक्षा, वैज्ञानिक, व्यवसाय, प्रकाशन, मनोरंजन, सरकारी-गैर सरकारी क्षेत्रों मे बोल बाला है जिसकी वजह से इसका इस्तेमाल परीक्षा, मौसम की भविष्यवाणी, शिक्षा, खरीदारी, ट्रैफिक नियंत्रण, उच्च स्तर की प्रोग्रामिंग, रेलवे टिकट बुकिंग, मेडिकल क्षेत्र, व्यापार आदि मे किया जाता है। पहले यह मशीन पर्सनल कम्प्यूटर्स के रूप मे हमारे घर मे आई और आज कंप्यूटर हमारी जिंदगी का एक एहम हिस्सा बन चूका है।
नई पढ़ी के कंप्यूटर विज्ञान और तकनीकी के कारन पहले से और भी छोटे, हल्के, तेज, और बहुत शक्तिशाली है। कंप्यूटर जटिल से जटिल काम पलक झपकते ही पूरा कर देता है। आज का समय कंप्यूटर का ही समय है, जिसका जादू सभी के सिर बढ़-चढ़ कर बोल रहा है।
Essay on Computer in Hindi 350 Words
आधुनिक युग में विज्ञान की सहायता से मनुष्य ने कई आविष्कार किए हैं कंप्यूटर भी उन्हीं में से एक है। कंप्यूटर एक यांत्रिक मशीन है जो कि सभी प्रकार की गणना पलक झपकते ही कर लेता है। कंप्यूटर मानव द्वारा किया गया सबसे महत्वपूर्ण और बेहतरीन आविष्कार है। कंप्यूटर की सहायता से किसी भी प्रकार की जानकारी ली जा सकती है। इसकी गणना करने की तेजी ने मानव को भी तेज रफ्तार बना दिया है। कंप्यूटर का आविष्कार सर्वप्रथम चार्लस बैबेज ने किया था इसके बाद इसमें निरंतर परिवर्तन होते रहे और आज यह दुनिया में परिवर्तन ला रहा है।
वर्तमान में कंप्यूटर पर देश दुनिया की सभी जानकारियां उपलब्ध है। इसका सभी कार्यालयों, बैंकों, अस्पतालों, स्कूलों और शोध के लिए वैज्ञानिकों द्वारा भी उपयोग किया जाता है। इसके उपयोग के कारण आज हमें मौसम की सही जानकारी मिल जाती है साथ ही कंप्यूटर ने शिक्षा और व्यापार को भी आसान बना दिया है। चिकित्सा के क्षेत्र में तो क्रांतिकारी बदलाव आए है। चिकित्सकों द्वारा बीमारियों के इलाज के लिए दवाइयां बनाना आसान हो गया है।
कंप्यूटर का उपयोग ऑनलाइन जानकारी का आदान प्रदान करने और अन्य स्थान पर व्यक्ति से घर बैठे बात करने मे भी कर सकते है। वैज्ञानिकों ने उसकी सहायता से कई उपलब्धियां प्राप्त की है। उन्होंने अंतरिक्ष की जानकारी कंप्यूटर के माध्यम से ही प्राप्त की है। कंप्यूटर एक बहुत उपयोगी वस्तु है। निष्कर्ष इंसानों के लिये कंप्यूटर के सैकड़ों फायदे है तो साइबर अपराध, अश्लील वेबसाइट, जैसे नुकसान भी शामिल है, जिसकी पहुँच हमारे बच्चों और विद्यार्थियों तक आसानी से हो जाती है।
हालांकि कुछ उपायों अपनाकर हम इसके कई नकारात्मक – प्रभावों से बच भी सकते हैं। कंप्यूटर मानव जीवन का अभिन्न अंग बन गया है। इसके बहुत अधिक फायदे भी है तो कुछ नुकसान भी है इसलिए हमें इसका उपयोग सावधानी पूर्वक करना चाहिए। हमें यह हमेशा ध्यान रखना चाहिए कि कंप्यूटर अगर मानव जीवन को सुलभ बना सकता है तो यह उसे दुर्लभ भी बना सकता है।
Essay on Computer in Hindi 500 Words
आज सर्वत्र कम्प्यूटर की चर्चा है। समाचार पत्र, दूरदर्शन, रेडियो आदि सभी इसके प्रचार-पसार में अग्रसर हैं। निर्विवाद रूप से कंप्यूटर आधुनिक विज्ञान की सबसे बड़ी देन है। ज्यों-ज्यों विविध क्षेत्रों में विज्ञान का प्रसार हो रहा है, कंप्यूटर की उपयोगिता, उसकी व्यापकता, लोकप्रियता और आवश्यकता हमारे समस्त सामाजिक-व्यापारिक जीवन में बढ़ती जा रही है।
कंप्यूटर विज्ञान ने आज साधारण से साधारण और उच्च से उच्च व्यक्ति तथा वर्ग को इतना प्रभावित किया है कि प्रत्येक के मन में उसके बारे में जानने या उसे सीखने की इच्छा पैदा हो गई है। परिणामस्वरूप देश के सभी छोटे-बड़े शहरों में हर स्तर पर कंप्यूटर-प्रशिक्षण के संस्थान खुल गए हैं। स्कूलों के पाठ्यक्रम में कंप्यूटर कोर्स को विशेष स्थान मिल रहा है। समाचार-पत्रों और रोजगार समाचारों में कंप्यूटर प्रशिक्षितों के लिए रिक्त स्थान के विज्ञापन भरे रहते हैं। इस बढ़ती आवश्यकता को पूरा करने के लिए छोटे बड़े सभी स्तर के कंप्यूटरों का निर्माण भारत में हो रहा है।
कंप्यूटर क्या है ? वस्तुत: कंप्यूटर ऐसे यांत्रिक मस्तिष्कों का रूपात्मक और समन्वयात्मक योग है, जो तीव्र गति से कम से कम समय में अधिक से अधिक काम कर सकता है। गणना के क्षेत्र में इसका विशेष महत्त्व है। विज्ञान ने अनेक गणक यंत्रों का आविष्कार किया है, किंतु कंप्यूटर की तुलना किसी से भी संभव नहीं है। चार्ल्स बेवेज पहले व्यक्ति थे जिन्होंने गणित की गणना को सुनकर करने वाला यह यंत्र बनाया। कंप्यूटर मनुष्य का ऐसा आज्ञाकारी सेवक है कि इसे मनुष्य जितना और जैसा काम करने को कहता है, वह उसे उतना ही सही रूप में करता है।
आज कंप्यूटर की उपयोगिता सर्वत्र व्याप्त है। कल-कारखानों, व्यापारिक संस्थानों, उत्पादन केंद्रों, रेलवे-स्टेशनों, हवाई अड्डों से लेकर शैक्षिक संस्थाओं और चिकित्सा केंद्रों में कंप्यूटर ने अपनी उपयोगिता की धाक जमा ली है। बैंकों के खातों के संचालन से लेकर समाचार-पत्रों तथा पुस्तकों के प्रकाशन में भी कंप्यूटर विशेष भूमिका का निर्वाह कर रहा है। कंप्यूटर संचार का भी एक महत्त्वपूर्ण साधन है। कंप्यूटर नेटवर्क (इंटरनेट) ने विश्व के समस्त देशों को आपस में जोड़ दिया है। आज घर बैठे ही विश्व के किसी भी कोने में बैठे व्यक्ति से बात करना या संदेश भेजना कंप्यूटर के कारण ही संभव हुआ है। अंतरिक्ष विज्ञान और मौसम विज्ञान में भी कंप्यूटर की अहम भूमिका है। अंतरिक्ष के व्यापक चित्र लेने तथा उनका विश्लेषण करने का काय कंप्यूटर ही करता है।
फ़ाइलिंग की समस्या बैंक प्रणाली का सिरदर्द रही है, किंतु आज कंप्यूटर ने इस सिरदर्दी को दूर कर दिया है। फ़ाइलिंग का स्थान कंप्यूटर फ्लॉपी ने ले लिया है। एक अलमारी में यदि सौ फ़ाइलें आती हैं तो इतने ही स्थान में एक सहस्त्र फ्लॉपी रखी जा सकती हैं। भवन-निर्माण, क्षेत्र विकास, परिसर-नियोजन आदि इन सबके लिए चाहिए एक शिल्पकार और शिल्पकार को चाहिए पर्याप्त समय। कंप्यूटर का डिजाइनिंग प्रोग्राम क्षेत्र की लंबाई, चौड़ाई और आँकड़ों के अनुसार कुछ ही घंटों में नक्शा तैयार कर देता है। इतना ही नहीं, नवीन मौलिक डिजाइन की उद्भावना में तो कंप्यूटर एक कलाकार की भूमिका निभाता है। चिकित्सा क्षेत्र में कंप्यूटर जीवन-रक्षक कवच बनकर अवतरित हुआ है। शरीर में रासायनिक परिवर्तन, स्नायुओं की गतिविधि, रोगों का निदान और औषधियों का विधान, शल्यक्रिया और अंगरोपणों का निरीक्षण सब कंप्यूटर की ज़िम्मेदारी है। कंप्यूटर को रॉबोट जैसी मशीन से जोड़कर कई श्रम साध्य कार्य भी कराए जा सकते हैं, जैसे वैल्डिंग, पेंटिंग, कचरा साफ़ करना, परमाणु भट्टी के पास काम करना, भारी सामान को सँभालना आदि। युद्ध-क्षेत्र में छोटे-छोटे कंप्यूटर बड़ी कुशलता से जासूसी का कार्य कर रहे हैं।
हाल के वर्षों में कम्प्यूटर का बड़ी तेजी से विकास हुआ है। कम्प्यूटर में मानव मस्तिष्क के कई गुण हैं। यह मानव द्वारा संचालित एक अद्भुत आविष्कार है। अब यह प्रयत्न किए जा रहे हैं कि कम्प्यूटर में मानव मस्तिष्क और स्वभाव के अधिक से अधिक गुणों को समाहित किया जाए।
यह कहना गलत नहीं होगा कि कंप्यूटर आज के युग की अनिवार्यता है। फिर भी कंप्यूटर केवल एक यंत्र है, जिसके निर्माण के पीछे मानव मस्तिष्क ही कार्य करता है।
Essay on advertisement in Hindi
Information Technology in Hindi
Computerization in India
विज्ञान और तकनीक के क्षेत्र में मनुष्य ने पिछले कुछ वर्षों में अनेक सफलताएं प्राप्त की हैं। आज इन्हीं आविष्कारों के फलस्वरूप मनुष्य अपनी अनेक कल्पनाओं को साकार करने में समर्थ हो सका है। मनुष्य हमेशा कुछ नया प्राप्त करने की चेष्टा करता आया है जो उसे अधिक आराम व सुख-सुविधा प्रदान कर सके। इस चेष्टा में समय के साथ वह सफलताओं के नए आयाम स्थापित करता आया है। कंप्यूटर की खोज इसी कड़ी की एक सबसे महत्त्वपूर्ण खोज समझी जा सकती है जिसने सम्पूर्ण विश्व की कायापलट कर दी है।
वैसे तो सन् 1854 ई। में ‘जार्ज बूले’ ने ‘लेज़िक’ की खोज कर ली थी जो कि आधुनिक कंप्यूटर का आधार है। परन्तु सर्वप्रथम व्यावसायिक कंप्यूटर का प्रयोग 1951 ई। में किया गया जब अमेरिका की एक व्यावसायिक कंपनी रेमिंगटन ने सर्वप्रथम अपना कंप्यूटर एनिएक के नाम से निकाला। इसके बाद ‘ट्रांजिस्टर’ तथा ‘इंटिग्रेटेड सर्किट’ की खोज के बाद तो इस क्षेत्र में क्रांति आ गई। विश्व के सभी देश प्रमुखतः जो विकसित हैं उनमें कोई भी ऐसा क्षेत्र नहीं बचा होगा जो कंप्यूटर के प्रयोग से अछूता हो।
भारत में कंप्यूटर का प्रचलन प्रधानमंत्री स्व। राजीव गाँधी के प्रयासों से शुरू हुआ। 90 के दशक में प्रवेश के पश्चात् कंप्यूटर ने आज लगभग सभी क्षेत्रों में अपना स्थान बना लिया है। चाहे वह शिक्षा का क्षेत्र हो या फिर रेल सेवाओं का, मौसम की जानकारी प्राप्त करनी हो अथवा चिकित्सा परीक्षण, सभी क्षेत्रों में कंप्यूटर एक हिस्सा बन गया है। कंप्यूटर आज विलासिता अथवा सम्मान का ही नहीं अपितु धीरे-धीरे एक आवश्यकता बनता जा रहा है।
भारत में कंप्यूटरीकरण तीव्र प्रगति पर है। देश की सभी प्रमुख सेवाओं का कंप्यूटरीकरण किया जा रहा है। विभिन्न कार्यों को पूरा करने के लिए हमारे पास आज कंप्यूटर उपलब्ध हैं। कंप्यूटर द्वारा आज देश भर में रेल तथा हवाई सेवाओं में आरक्षण हो रहा है। इसके द्वारा राडार तथा मिसाइल बनाए जा रहे हैं। इसके अतिरिक्त बैंकिग तथा बीमा आदि सेवाओं को पूरी तरह कंप्यूटर से जोड़ा जा रहा है। इसके अतिरिक्त मौसम की जानकारी, अंतरिक्ष में होने वाले परिवर्तनों का अध्ययन, नाभिकीय कार्यक्रमों का विस्तार, ‘डाटा प्रोसेसिंग’ और तथ्यों को एकत्र कर उन्हें भविष्य में रचनात्मक कार्यों के लिए प्रयोग आदि में कंप्यूटर का विशेष रूप से प्रयोग हो रहा है।
हमारे देश ने कम्प्यूटर के क्षेत्र में पिछले कुछ दशकों में जो सफलताएं प्राप्त की हैं उसका आज सम्पूर्ण विश्व लोहा मानता है। आज हमारे कम्प्यूटर विशेषज्ञों की मांग विश्व भर में सबसे अधिक है। आज कम्प्यूटर उद्योग में अन्य क्षेत्रों की तुलना में विशेष रूप से प्रगति हो रही है। हमारे पास ऐसे ‘सुपर कम्प्यूटर’ उपलब्ध हैं जो विश्व के गिने-चुने देशों के पास ही हैं।
यातायात के क्षेत्र में भी कम्प्यूटर की विशेष उपयोगिता है। हवाई मार्गों का निर्धारण एवं नियंत्रण, महानगरों की ‘रेड लाइट सिग्नल’ प्रणाली आदि कम्प्यूटर की ही देन है। इसके अतिरिक्त अंतरिक्ष अनुसंधान, मौसम संबंधी जानकारी, मुद्रण आदि में कम्प्यूटर का विशेष योगदान है।
इस प्रकार हम देखते हैं कि आधुनिक युग में कम्प्यूटर मनुष्य के जीवन के हर क्षेत्र से प्रत्यक्ष या परोक्ष रूप से जुड़ा हुआ है। विज्ञान के इस अदभुत उपहार को नकारना संभव नहीं है। यह आज की आवश्यकता है। शुरू-शुरू में अवश्य ही यह एक विशिष्ट जनसमूह तक सीमित था परन्तु सरकार के सकारात्मक रुख के कारण यह धीरे-धीरे विस्तार ले रहा है।
परिणामस्वरूप यह हजारों मध्यवर्गीय लोगों की जरूरत बन गया है। हमारे देश में जहां बेरोजगारी व आर्थिक संकट के घने बादल हैं, ऐसे वातावरण में निस्संदेह कम्प्यूटर का विस्तार समय लेगा। परन्तु जिस प्रकार इसकी आवश्यकता बढ़ रही है अथवा जिस तेज गति से कम्प्यूटरीकरण हो रहा है। उसे देखते हुए यह अनुमान लगाया जा सकता है कि बहुत जल्दी ही यह दूरदर्शन की भांति सभी घरों में अपना स्थान बना लेगा।
देश में कम्प्यूटर को जन-जन तक पहुंचाने के अपने लक्ष्य की ओर सरकार बड़ी ही तेज गति से कार्य कर रही है। आज देश के सभी विद्यालयों में धीरे-धीरे कम्प्यूटर की शिक्षा दी जा रही है। सरकार ने देश के सभी विद्यालयों में कम्प्यूटर उपलब्ध कराने हेतु बहुत बड़ी राशि राज्य सरकारों को दी है। इसके अतिरिक्त आज छोटे-बड़े, सरकारी तथा गैर सरकारी सभी कार्यालयों में कार्य कम्प्यूटर के द्वारा किया जा रहा है।
नि:संदेह हमारे देश में कम्प्यूटर का भविष्य बहुत उज्जवल है। देश में प्रतिवर्ष बढ़ती हुई कम्प्यूटर स्नातकों और विशेषज्ञों की संख्या तथा विदेशों में हमारे विशेषज्ञों की प्रबल मांग इसका साक्षात प्रमाण है। भारत का संपूर्ण साफ्टवेयर उद्योग कंप्यूटर के बलबूते ही चमक रहा है। इस क्षेत्र में रोजगार की अपार संभावनाएं हैं, अत: भारत में कंप्यूटरीकरण और भी जरूरी हो गया है।
More Essay in Hindi
Essay on Technical Education in Hindi
Advantages and Disadvantages of Computer essay in Hindi
Thank you reading. Don’t for get to give us your feedback.
अधिक जानकारी प्राप्त करने के लिए हमारे फेसबुक पेज को लाइक करे।
Share this:
- Click to share on Facebook (Opens in new window)
- Click to share on Twitter (Opens in new window)
- Click to share on LinkedIn (Opens in new window)
- Click to share on Pinterest (Opens in new window)
- Click to share on WhatsApp (Opens in new window)
About The Author

Hindi In Hindi
Your email address will not be published. Required fields are marked *
Email Address: *
Save my name, email, and website in this browser for the next time I comment.
Notify me of follow-up comments by email.
Notify me of new posts by email.

- Cookie Policy
- Google Adsense
कम्प्यूटर पर निबंध प्रस्तावना और उपसन्हार सहित हिंदी में

कम्प्यूटर पर निबंध लिखे. कम्प्यूटर पर निबंध कैसे लिखते है? कम्प्यूटर पर प्रस्तावना सहित एक छोटा यानि संक्षिप्त निबंध लिखें.
इस तरह के सवाल गूगल बाबा से अक्सर पूछे जाते है. क्योंकि आज कल गूगल को ही ज्ञानकोश मान लिया गया है. खासकर आज के बच्चे तो गूगल से ही अपने सवाल पूछ रहे है.
यदि आप भी कम्प्यूटर पर निबंध (Computer Essay in Hindi) लिखना चाहते है. लेकिन, आपको कुछ नहीं सूझ रहा है. तो यह लेख आपके लिए ही है.
क्योंकि इस लेख में हम आपको कम्प्यूटर पर निबंध कैसे लिखते है? इस सवाल का जवाब तो देंगे ही साथ ही कम्प्यूटर विषय पर छोटा एवं बड़ा निबंध भी लिखकर देंगे. जिन्हे आप स्कुल/कॉलेज प्रोजेक्ट में आसानी से इस्तेमाल कर सकेंगे.

कम्प्यूटर पर निबंध कैसे लिखते है प्रस्तावना सहित?
निबंध लेखन एक बहुत ही जरूरी और काम आने वाला कौशल है. जिसके बिना आपका स्कुली ज्ञान अधूरा समझा जाएगा. इसलिए आपको निबंध लिखने की जानकारी होना जरूरी है.
नीचे हम कम्प्यूटर पर निबंध लिखने से संबंधित कुछ महत्वपूर्ण बिंदुओं की चर्चा कर रहे है. जो आपके निबंध लेखन कौशल में वृद्धि करेंगे. और आप एक बेहतर निबंधकार बनने की ओर अग्रसर होंगे.
- निबंध लिखने से पहले कम्प्यूटर टॉपिक का चुनाव करें. यानि आप कम्प्यूटर से जुड़े हुए किस विषय पर लिखना चाहते है. टॉपिक का चुनाव करते समय अपनी रुची को प्राथमिकता दी जा सकती है.
- टॉपिक चुनने के बाद पर्याप्त शोध करें तथा सहायक सामग्री इकट्ठा करने की तैयारी करें. ताकि आप अपनी बात मजबूती के साथ रख सके.
- इसके बाद निबंध की रूपरेखा (Essay Outline) बनाए. इस काम में ज्यादा कांट-छांट ना करें और जो बिंदु दिमाग में आए उन्हे लिखते जाए.
- फिर इन बिंदुओं को उचित क्रम तथा टॉपिक के अनुसार क्रमानुसार सजाएं. यानि एक मुख्य टॉपिक फिर उसके उप-बिन्दु ओर उप-बिंदु के उप-उप-बिंदु. आप जितनी अंदर जा सकते है उतने बिंदुओं तक जाएं.
- इसके बाद अपनी रुपरेखा के अनुसार पहला ड्राफ्ट लिखें.
- पहला ड्राफ्ट लिखने के बाद कुछ देर बाद इसे संपादित करें और भाषा संबंधी त्रुटियों के साथ तथ्यों को सुधारें.
- इस तरह आपका अंतिम लेख तैयार हो जाएगा.
अब आपने निबंध लिखना तो सीख लिया है. आइए, अब कम्प्यूटर पर कुछ सेंपल निबंध पढ़ लेते है.
ध्यान दें:- नीचे हमने शब्द सीमा को ध्यान में रखते हुए अलग-अलग टॉपिक्स पर निबंध लिखें हैं. आप अपनी जरुरत और टॉपिक के अनुसार निबंध को चुनकर पढ़ सकते है और अपने प्रोजेक्ट के लिए इसका उपयोग कर सकते है.
कम्प्यूटर पर निबंध – Essay on Computer in Hindi
कम्प्युटर पर लघु निबंध (short essay on computer in hindi) [शब्द सीमा 100].
कम्प्यूटर एक इलेक्ट्रॉनिक डिवाइस है. जिसका आविष्कार माननीय चार्ल्स बैबेज ने किया था. इन्हे ही कम्प्यूटर का जनक (Father of Computer) माना गया है.
कम्प्यूटर विभिन्न उपकरणों से मिलकर बना होता है. की-बोर्ड , माउस , स्कैनर को इनपुट डिवाइस कहते है. इनके द्वारा कम्प्यूटर को निर्द्श देते है. मॉनिटर, प्रिंटर , स्पीकर को आउटपुट डिवाइस कहा जाता है. इन डिवाइसों के द्वारा कम्प्युटर परिणाम प्रदर्शित करता है.
कम्प्यूटर का उपयोग हम बहुत सारे कामों के लिए करते है. जैसे; कम्प्यूटर के द्वारा हम गेम खेल सकते है. पढ़ाई कर सकते है. विडियों देख सकते है और गाने भी सुन सकते है. इसलिए कम्प्यूटर मुझे बहुत पसंद है.
कम्प्यूटर का महत्व पर निबंध (Essay on Computer Importance in Hindi) [शब्द सीमा 300]
कम्प्यूटर का आविष्कार माननीय चार्ल्स बैबेज ने किया था. यह एक इलेक्ट्रॉनिक उपकरण होता है. जिसका उपयोग आज विभिन्न कामों के लिए किया जा रहा है.
दफ्तर से लेकर किराना की दुकान वाले भी कम्प्यूटर के द्वारा अपना काम कर रहे है. स्कुलों में भी कम्प्यूटर का उपयोग कार्यालय तथा कक्षाओं में होता है. बहुत सारे उद्योग धंधों में रोबोट्स के रूप में इसने हम इंसानों की जगह ले रखी है.
कम्प्यूटरीकृत मशीने दिन पे दिन बनाई जा रही है. और इनका उपयोग अस्पतालों, विश्वविद्यालयों, इंडस्ट्रीज तथा सैनिकों के लिए खूब किया जा रहा है. जिसके कारण नए-नए कौशलों की आवश्यकता हो रही है. और नए तरह के रोजगार भी निर्मित हो रहे है.
इसलिए, कम्प्यूटर शिक्षा का महत्व भी बढ़ गया है. और स्कुल से ही कम्प्यूटर का ज्ञान दिया जा रहा है. कॉलेज तथा विश्वविद्यालयों में पेशेवर कोर्स कराए जा रहे है. साथ ही डिग्री कोर्स भी विकसित किए गए है. जिनमे कोई भी स्टुडेंट्स एडमिशन लेकर पढ़ाई कर सकता है.
इस कम्प्यूटर युग में हम सभी लोगों को कम्प्यूटर पर काम करना सीखना चाहिए. ताकि नए जमाने के साथ चला जा सके. यदि हम खुद को बदलते जमाने तथा नई तकनीक के साथ नही बदलेंगे तो हम पिछड जाएंगे. जिसके कारण हमारी नौकरी भी जा सकती है और कोई नया काम भी नही मिलेगा.
कम्प्यूटर आज की जरूरत बन चुका है. इस बात से इनकार नहीं किया जा सकता. और इसके बिना हमारा काम करना मुश्किल ही नही नामुमकिन दिखाई देने लगा है. इस इल्केट्रॉनिक मशीन पर इंसानों की निर्भरता बढ़ती ही जा रही है.
यदि कम्प्यूटर पर हमारी निर्भरता का ग्राफ इसी रफ्तार से बढ़ता रहा तो मशीनों की गुलामी का दिन दूर नहीं. हम सिर्फ हुकुम बजाने के लिए जीवित रहे! जो हमारे भविष्य के लिए अच्छा संकेत नहीं है.
कम्प्यूटर की उपयोगिता पर निबंध [शब्द सीमा 500]
हम कहीं भी चले जाए. हमें कम्प्यूटर रखा हुआ मिल जाएगा. स्कुल, कॉलेज, दफ्तर, सरकारी कार्यालय, फैक्ट्रीयाँ, घर इन सभी जगहों पर इस इलेक्ट्रॉनिक उपकरण की उपस्थिति नजर आती है. कम्प्यूटर ने हमारा जीवन बहुत ही आसान और तेज कर दिया है. जिसके कारण इसका महत्व बढ़ता ही जा रहा है.
कम्प्यूटर की लोकप्रियता का अंदाजा हम कम्प्यूटर की विशेषताओं से भी लगा सकते है.
- कम्प्यूटर एक इलेक्ट्रोनिक एवं स्वचालित मशीन है.
- इसके द्वारा हम इंसानों से तेज और शुद्ध काम किए जा सकते है. आपने सुना होगा कि, “ इंसान तो गलतियों का पुतला है. ” यह कहावत इंसानों के लिए तो सही है, मगर कम्प्यूटर पर इसे लागु नही किया जा सकता है. क्योंकि यह हर काम को इनपुट के आधार पर सही ही करता है.
- कम्प्यूटर बिना थके हुए लगातार 24 घंटे काम कर सकता है. क्योंकि कम्प्यूटर को लगातार सही काम करने के लिए ही विकसित किया गया है.
- यह एक ही काम को बार-बार समान परिणाम में निपटा देता है. हम, इंसान तो एक काम को करके ऊब जाते है. मगर, कम्प्यूटर एक ही काम को लगातार बिना ऊबे करता रहता है.
- यह एक बहुक्रियात्मक मशीन है. जिसके द्वारा विभिन्न प्रकार के काम पूरे किए जा सकते है.
कम्प्यूटर की जितनी तारीफ की जाए उतनी कम है. हम इसे शब्दों में नहीं बांध सकते है. क्योंकि कम्प्यूटर का उपयोग करने वाले इंसान के लिए यह उस इंसान के लायक हर सम्भव सुविधाएं तथा टूल्स मुहैया कराता है. इसलिए, यह एक टाइपिस्ट के लिए टाइपराइटर बन जाता है और गेम खेलने वाले बच्चों के लिए विडियों गेम मशीन बन जाता है. यानि जितने काम उतने नाम वाली बात हो जाती है.
कम्प्यूटर के गुणों को जानने के बाद इसके उपयोगों की चर्चा करने पर हमें कम्प्यूटर का महत्व पता चल जाएगा.
- कम्प्यूटर का घरों में उपयोग आम बात हो गई है. आजकल टेलिविजन के स्थान पर कम्प्यूटर आ गए है. क्योंकि, टीवी का काम भी कम्प्यूटर आसानी से निपटा देता है. आप विडियों, गाने, मूवीज आदि सुन व देख सकते है. साथ ही विडियों गेम खेल सकते है. होमवर्क में मदद प्राप्त कर सकते हैं. इंटरनेट से जुड़कर दुनिया के किसी भी कोने की खबर घर बैठे-बैठे ही प्राप्त कर सकते है. और बिजली का बिल, पानी का बिल, रेल टिकट, बस टिकट, गैस बुकिंग आदि घरेलु काम भी अपनी मेज से निपटा सकते है.
- कम्प्यूटर का बिजनेस में उपयोग इसके जन्म से ही हो रहा है. क्योंकि इसे काम करने के लिए ही बनाया गया था. शुरुआत में इसकी कीमत अधिक होने के कारण भी पहले इसे बड़े-बड़े बिजनेस संस्थानों ने खरिदा था. आज एक छोटा सा दफ्तर भी कम्प्यूटर के बिना अधूरा है. कार्यालय का अधिकतर काम डिजिटल हो गया है. इसलिए कम्प्यूटर के बिना बिजनेस का काम नहीं चलता है.
आखिर में साबित हो ही जाता है कि कम्प्यूटर आज की जरूरत है और इसके ऊपर हम इंसानों का जीवन निर्भर हो गया है. इसलिए, कम्प्यूटर युग में सभी को कम्प्युटर चलाना आना अनिवार्य है. नहीं तो पिछड़ने में देर नहीं लगेगी.
कम्प्यूटर के इतिहास पर निबंध [शब्द सीमा 1000]
कम्प्यूटर की दुनिया ज्यादा पुरानी नहीं है. क्योंकि आधुनिक कम्प्यूटर जिसे आप और हम इस्तेमाल करते है. उसका आविष्कार 19वीं शताब्दी में ही हुआ है. इससे पहले तो बहुत सारे उपयोगी यंत्रों की खोजे हो चुकी थी. मगर, कम्प्यूटर के आविष्कार ने इन सभी उपकरणों को बोना साबित कर दिया है. और इनका नियंत्रण करने की शक्ति भी विकसित कर ली है.
इस दौरान कम्प्यूटर ने करीब 200 साल का सफर तय किया है. यह विकास यात्रा बहुत ही रोमांचित और कठिनाईयों से भरी रही है. जिसका अध्ययन करना हमारे लिए किसी बॉलिवुड फिल्म देखने के बराबर होगा.
चलिए तो कम्प्यूटर की विकास यात्रा का सफर शुरु करते है.
कम्प्यूटर की ऐतिहासिक यात्रा
कोई भी चीज एक दिन में नही बनती है. और ना ही इसका विचार यकायक आता है. इतिहास से साबित किया है कि नई चीजे बनाने की प्रेरणा हमेशा पहले से मौजूद चीजों से ही आती है. और यह बात कम्प्यूटर पर भी शत प्रतिशत लागु होती है.
कम्प्यूटर की शुरुआत ईसा पूर्व ही हो गई थी. जब चीनियों ने अबेकस का आविष्कार किया. इसके बाद विभिन्न प्रकार के स्वचालित उपकरण अस्तितव में आए. और माननीय चार्ल्स बैबेज द्वारा बनाया गया स्वचालित इंजन आधुनिक कम्प्यूटर का आधार बना. इसके बाद से लेकर और वर्तमान तक की संक्षिप्त विकास यात्रा इस प्रकार रही है.
- अबेकस दुनिया का पहला गणना यंत्र था, जिसका आविष्कार चीनियों द्वारा लगभग 2500 वर्ष पूर्व किया गया. 17वीं शताब्दी तक यह एक मात्र गणना यंत्र था.
- जॉन नेपियर ने अपनी किताब “Rabdology” में एक नए गणितीय उपकरण के बारे में वर्णन किया. जिसे “Napier’s Bones” के नाम से जाना जाता है. इसके द्वारा सामान्य गणितीय क्रियाएँ जैसे जोड़ना, घटाना, गुना एवं भाग की जा सकती थी.
- इसके बाद “Slide Rule” का आविष्कार हुआ.
- 1642 में एक फ्रेंच वैज्ञानिक और दार्शनिक नें पहला व्यवहारिक यांत्रिक कैलकुलेटर बना डाला. जिसका नाम “पास्कालिन” था. इसका एक उन्नत यंत्र “Step Reckoner” भी तैयार किया गया.
- 1804 में फ्रेंच के एक बुनकर ‘Joseph-Marie-Jacquard’ ने एक हथकरघा बनाया. जिसका नाम ‘Jacquard Loom’ था. इसे पहला ‘सूचना-संसाधित’ डिवाइस माना जाता है.
- मगर असली काम आधुनिक कम्प्यूटर के पितामह माननीय “चार्ल्स बैबेज” ने 1822 में “बहुपदीय फलन” का सारणीकरण करने के लिए एक स्वचालित यांत्रिक कैलकुलेटर बनाकर किया. जिसका नाम “Difference Engine” था.
- इस इंजन के लगभग एक दशक बाद 1833 में एक नए और उन्नत इंजन “Analytical Engine” बनाया गया. जो आधुनिक कम्प्युटर का आधार बना. इसलिए ही “चार्ल्स बैबेज” को कम्प्युटर का पितामह (Father of Computer) कहा जाता है.
- इसके बाद कम्प्यूटर ने तेजी से विकास किया और इंसान की मुट्ठी में समा गया. वर्तमान आपके सामने है.
इस वर्तमान समय को कम्प्यूटर की पीढ़ीयाँ कहा जाता है. जिनका वर्णन किए बगैर कम्प्यूटर की ऐतिहासिक यात्रा अधुरी होगी. इसलिए नीचे कम्प्यूटर की पीढ़ीयों के बारे में बताया जा रहा है.
कम्प्यूटर की पीढ़ीयाँ
इस टेबल में आप आधुनिक कम्प्यूटर के विकास-क्रम का संक्षिप्त वर्णन देख सकते है. और खुद अंदाजा लगा सकते है कि कम्प्यूटर को यहाँ तक पहुँचने के लिए कितने रुपों और हाथों से होकर गुजरना पड़ा है.
किसी एक व्यक्ति को श्रेय देना अन्य वैज्ञानिकों, दार्शनिकों के साथ नाइंसाफी होगी. लेकिन, इंसानों की फितरत ही कुछ ऐसी ही है कि ना चाहते हुए भी इन्हे भूल जाना पड़ता है. अगर, चार्ल्स बैबेज को अपने डिफरेंट इंजन बनाने से पहले अबेकस, पास्कालिन, जैकवार्ड लूम जैसे यंत्र नहीं बने मिलते तो शायद इतिहास कुछ अलग होता.
फिर भी, चार्ल्स बैबेज ने जो किया उसका श्रेय उन्हे कम्प्यूटर का पितामह बनाकर दे दिया गया है और दिया जाता रहेगा. कब तक यह समय बताएगा. तब तक आप अपनी यात्रा जारी रखिए…
कम्प्यूटर के लाभ-हानि पर निबंध [शब्द सीमा 1500]
आज कम्प्यूटर हमारी जिंदगी का अहम हिस्सा बन चुका है. इसके बिना जीवन की कल्पना भी नहीं की जा सकती है. घरों से लेकर दफ्तर तक, रेल्वे स्टेशन से लेकर पुलिस स्टेशन तक, किराना की दुकान से लेकर थोक विक्रेता तक, सरकार से लेकर निजी संस्थानों तक कम्प्युटर पहुँच चुका है.
सरकार द्वारा ई-गवर्नेस कार्यक्रम पेश करना और उसके क्रियान्वयन हेतु तत्परता दिखाना. कम्प्यूटर का महत्व बताता है. बहुत सारी योजनाओं और कार्यक्रमों को डिजिटल कर दिया गया है. तथा उनकी पहुँच ऑनलाइन सुनिश्चित की जा रही हैं.
यहीं हाल प्राइवेट सेक्टर का हो रहा है. स्वचालित मशीनों की संख्या दिन पे दिन बढ़ाई जा रही है. रोबोट्स द्वारा इंसानों को बदलने की प्रक्रिया धड़ल्ले से जारी है. विभिन्न बिल भुगतान, टिकट बुकिंग, एडमिशन प्रक्रिया सब कार्य डिजिटल हो गए है.
इस तारिफ को पढ़ने के बाद तो आपका मन कम्प्यूटर की तरफ आकर्षित हो गया होगा. एवं इसके ओर ज्यादा फायदों को जानने की इच्छा हो रही होगी.
चलिए, आपकी ये इच्छा भी पूरी कर देते है और जानते है कम्प्यूटर के क्या-क्या लाभ होते है.
कम्प्यूटर के लाभ
तेज गति से कार्य करता है
कम्प्यूटर की कार्य करने की गति हम इंसानों से बहुत ही तेज है. यह पलक झपकते ही अपना कार्य निपटा देता है. डेटा प्रोसेस करने की गति और क्षमता का मुकाबला इंसानों द्वारा नहीं किया जा सकता है. कम्प्यूटर की कार्य करने की गति को माइक्रोसैकण्ड्स, नैनोसैकण्ड्स तथा पिकोसैकण्ड्स में मापा जाता है. अब आप खुद अंदाजा लगा सकते है कि कम्प्यूटर की कितनी तेज गति से कार्य करता है और डेटा प्रोसेसिंग करता है?
आपकी सुविधा के लिए बतादूँ. एक सैकण्ड का दस लाखवाँ भाग एक माइक्रोसैकण्ड होता है.
भंडारण क्षमता अधिक
इंसान एक बात को वर्षों तक याद नहीं रख सकता है. क्योंकि मेमोरी बहुत ही कम होती है और उसे बढ़ाया भी नहीं जा सकता है. मगर, कम्प्यूटर इस मामले में भी इंसान को हरा देता है. क्योंकि इसकी भंडारण क्षमता बहुत ही ज्यादा होती है. और यह कई वर्षों तक डेटा को समान अवस्था में सुरक्षित रख सकता है. साथ ही मेमोरी को किसी दूसरे कम्प्यूटर में भी इस्तेमाल करना संभव है.
परिश्रमी और भरोसेमंद
कम्प्यूटर बहुत ही मेहनती और थकान मुक्त डिवाइस है. यह घंटों, कई दिनों तक लगातार बिना थके काम कर सकता है. हम इंसानों की तरह थकावट, ऊबाऊपन, ध्यान केंद्रण जैसी समस्याएँ कम्प्युटर को नहीं होती है.
चुंकि यह एक मशीन है इसलिए इसकी जीवन अवधी के बारे में इंसान को पता रहता है. जो भरोसा उत्पन करता है. यहीं कारण है आज इंसान इस मशीन पर खुद से ज्यादा भरोसा करने लगा है.
स्वचालितता यानि आटॉमेशन
कम्प्यूटर को आवश्यक निर्देश देन के बाद यह अपना कार्य स्वयं करता है. फिर इसे इंसान की जरूरत नहीं पड़ती है. ऑटोमोबाइल सेक्टर में रोबोट्स ने सारा काम संभाल रखा है. पैकेजिंग तथा माल गोदामों में भी इनका इस्तेमाल बखूबी किया जा रहा है. स्वचालितता से इसकी निर्भरता इंसानों पर नहीं रहती है.
बातचीत यानि कम्युनिकेशन करने की क्षमता
कम्प्यूटर एक-दूसरे से हम इंसानों की भांती आपस में बातचीत कर सकते है. और उपलब्ध जानकारी, डेटा का आदान-प्रदान भी कर सकते है. आधुनिक तकनीक ने हम इंसानों को भी कम्प्यूटर से बातचीत करने लायक बना दिया. अब हम वॉइस कमांड्स द्वारा कम्प्युटर से आसानी से अपनी बात साझा कर सकते है. कम्प्यूटर इस काम के लिए विभिन्न उपकरणों तथा तकनीक का इस्तेमाल करता है. जिसमें कम्प्युनिकेशन डिवाइस, लैन, वैन, मॉडम, वाई-फाई, ब्लुटूथ आदि शामिल है.
कार्य विविधता
कम्प्यूटर एक बहुमुखी डिवाइस है. यानि यह बहुत प्रकार के काम अकेला कर सकता है. और सभी अलग-अलग कार्य समान गति, शुद्धता और ऊबाऊपन बिना पूरे किए जा सकते है.
उदाहरण के लिए आप गाने सुनते समय चित्रकारी कर सकते है. डॉक्युमेंट पढ़ते समय चैटिंग का जवाब दे सकते है. यदि आप एक साथ दो सॉफ्टवेयर पर काम करना चाहते है तो उसकी सहुलियत भी आसानी से मिल जाती है. इसकी यहीं खासियत इसे अन्य उपकरणों से अलग बनाती है.
लागत में कमी
बिजनेस में कागज, स्टेशनरी, फाइलें, कर्मचारी तथा अन्य स्रोतों की जरूरत हमेशा रहती है. लेकिन, कम्प्यूटर अकेला इन सभी जरुरतों को पूरा देता है. जिसके कारण बहुत सारा पैसा मालिक बचाकर उसे कहीं ओर निवेश कर सकता है. क्योंकि अब फाईल पहुँचाने के लिए पियोन की जरूरत खत्म है. आप ईमेल भेजकर या फिर नेटवर्क पर भेजकर काम कर सकते है.
साथ ही आपको हस्ताक्षर करने के लिए पेन की आवश्यकता नही पड़ेगी. क्योंकि डिजिटल सिग्नेचर से आपका काम चल जाएगा. जिसका सीधा असर काम की लागत पर पड़ता है.
प्रकृति का दोस्त
कम्प्यूटर के कारण कार्य कागजरहित हो गया है. और न्यूज पढ़ने के लिए भी आप न्यूज वेबसाईट पर जाकर ऑनलाईन ही दुनियाभर की खबरें मिनटों में पढ़ सकते है. जिसके कारण कागज की खप्त कम हो रही है. जो सीधा-सीधा पेड़ों को बचाने का कार्य है. इसलिए कम्प्यूटर प्रकृति का रक्षक बन रहा है.
ऊपर बताए गए लाभों के अतिरिक्त आप अनगिनत लाभ कम्प्यूटर से ले रहे है. आप घर बैठे-बैठे पढ़ाई करने की सुविधा का लाभ लें सकते है. ऑनलाइन रिचार्ज, घर का नक्शा, एक शहर से दूसरे शहर की दूरी तथा आने-जाने का सुगम रास्ता ढूँढ़ने में इसकी मदद लेकर अंजान राही होने के डर को खत्म कर सकते है.
आप गिनते जाइए, यह सूची बढ़ती ही जाएगी. कभी खत्म नहीं होगी. लेकिन, शब्द सीमा होने के कारण कम्प्यूटर के लाभों का गुनगान यहीं बदं करते है और कम्प्यूटर की हानियाँ जानते है.
कम्प्यूटरकी हानियाँ
जिस तरह एक सिक्का के दो पहलू होते है. ठीक उसी तरह कम्प्यूटर के लाभ ही नहीं है. वरन कुछ हानियाँ यानि नुकसान भी सामने आ रहे है. जिनकी चर्चा नीचे की जा रही है.
मानव पर निर्भरता
आप ऊपर पढ़ चुके है कि कम्प्यूटर स्वचालित मशीन है. तो इसके लिए इंसानों की क्या जरूरत?
बात सच है मगर इस बात से भी इनकार नहीं किया जा सकता है. बिन इंसान कम्प्युटर विभिन्न यंत्रों से युक्त डब्बा मात्र है.
स्वचालितता इसकी एक विशेषता है. मगर, ये तभी कारगर है जब इसे इंसान ने कुछ निर्देश दे रखे हों. यदि निर्देश नहीं दिए जाएंगे तो कम्प्यूटर अपने आप कुछ भी नहीं कर पाएगा. इसलिए यह हमेशा निर्देश लेने के लिए इसकी निर्भरता इंसान पर बनी हुई है.
बुद्धि तथा भावनाओं का अभाव
कम्प्यूटर में अपनी कोई बुद्धि नहीं होती. इसलिए यह सोच नहीं सकता है. यह सिर्फ पहले से दिए गए निर्देशों तथा फंक्शन के आधार पर डेटा प्रोसेस कर सकता है.
रोबोट्स तथा अन्य स्वचालित मशीने इसका उदाहरण है. आप उन्हे निर्देश दीजिए. और वे उसी काम को करती रहेगी. चाहे उनके आगे कोई भी बाधा आ रही हो. यह खिलौने में चाबी भरकर छोड़ देने जैसा अहसास कराता है. मगर, कम्प्युटर कुछ एडवांस खिलौने है. जो कुछ कमी होने पर सुचित कर देने की क्षमता रखते है.
ना ही कम्प्यूटर में सुख-दुख को समझने और बयां करने की क्षमता होती है. क्योंकि, कम्प्यूट र्स आर इमोशनलेस यानि कम्प्यूटर में भावनाएं नही होती.
वातावरण
कम्प्यूटर को कार्य करने के लिए साफ-सुथरे और धूल रहित वातावरण की जरुरत पड़ती है. तभी यह सुचारू रूप से अपना कार्य अनवरत जारी रखता है. यदि इसे धूल और गंदगी भरी जगह पर काम करने के लिए लगाया जाएगा. को इसकी कार्य क्षमता बूरी तरह प्रभावित होगी और लम्बे समय तक कार्य करने अक्षम रहेगा.
साइबर खतरों का डर
कम्प्यूटर ने अपनी अलग ही दुनिया की रचना कर लि है. जिसे साइबर दुनिया के नाम से जाना जाता है. इस अंजान दुनिया में विभिन्न खतरों ने जन्म ले रखा है. जिनसे बचकर ही कम्प्यूटर अपना कार्य हमारी मर्जी के अनुसार कर सकता है. यदि उसे हैक कर लिया जाए तो कम्प्यूटर को निर्देश देन पर वह अपना काम नहीं करेगा. वरन हैकर जो कहेगा सिर्फ वही काम करेगा.
यह तो सिर्फ एक बानगी है. इसके जैसे सैकड़ों साइबर खतरे है. जिनसे समय रहते बचाव नहीं किया जाए तो कम्प्यूटर हमें बर्बाद भी कर सकता है.
- पासवर्ड की चोरी
- निजी डेटा की चोरी और सुरक्षित डेटा को क्षति पहुँचाना
- ऑनलाइन डिटैल्स को चुराकर उसे बेचना
- बैंक तथा डेबिट/क्रेडिट कार्ड की डिटैल्स चुराकर सैकण्ड़ों में बैंक अकाउट का सफाया करना
- फेसबुक, ट्वीटर, वाट्सएप, इंस्टाग्राम अकाउंट को हैक करके ऊल-जलूल पोस्ट्स करना जो आपको जेल की रोटी खिलाने के लिए पर्याप्त है.
कम्प्यूटर की लाभ-हानि का अध्ययन करने के बाद एक बात तो साबित हो गई है कि कम्प्यूटर के बिना हमारा काम चलने वाला नहीं है. साइबर खतरों की बढ़ती संख्या से इसके ऊपर कोई प्रभाव नहीं पड़ने वाला है. बल्कि दिन पे दिन निर्भरता का ग्राफ ऊपर की तरफ ही जा रहा है.
जिस तरह से डिजिटल सेवाओं का विस्तार हो रहा है. एजुकेशन, फ़िफेंस, ऑटोमोबाइल्स, टेलिकॉम, मेडिकल, इंजिनियरिंग आदि सैक्टर्स में कम्प्यूटर पर निर्भरता बढ़ ही रही है. साथ ही मशीन लर्निंग , आर्टिफिशियल इंटेलिजेंस , इंटरनेट ऑफ थिंग्स जैसे उन्नत तकनीक इसे भविष्य के लिए तैयार करने में लगी हुई है. इसलिए कम्प्यूटर का भविष्य भी सुनहरा है.
कम्प्यूटर की बहुरूपी दुनिया [शब्द सीमा 2000]
कम्प्यूटर से रोजाना वास्ता पड़ता है. क्योंकि रोजमर्रा के कार्यों का निपटान तथा दफ्तर के कार्य का निपटारा इसी बहुरूपीय इलेक्ट्रॉनिक डिवाइस से होता है. यह हमारी जिंदगी का साझेदार बन चुका है. यानि अब इसके साथ-साथ ही जीवन बिताना है.
इसकी आदत हो गई है. इसलिए सभी लोगों ने इसे नॉर्मल समझ लिया है. और इसके बारे में ज्यादा विचार नहीं करते है. अगर किसी से ये पूछ लिया जाए कि कम्प्यूटर क्या होता है?
तो मूँह पर ताला लग जाएगा. कोई जवाब नहीं निकलेगा. और उल्टे आपको ही डांट लगाकर कह दिया जाए कि ये भी कोई सवाल है? कम्प्यूटर तो कम्प्यूटर होता है. इसमें पूछने वाली बात ही क्या है?
लेकिन, कम्प्यूटर सिर्फ कम्प्यूटर नहीं रह गया है. यह तो अचूक बाण बन चुका है. जो हर किसी के लिए मददगार साबित हो रहा है. इसने अपने आप को जरूरत के अनुसार विभिन्न रुपों में विकसित कर लिया है. यहीं कारण है कि इसे बहुरुपीया नाम दिया गया है. नीचे इसके विभिन्न रूपों की चर्चा की जा रही है.
कम्प्यूटर एक टाइपराइटर
कम्प्यूटर को एक टाइपिस्ट की नजर से देखने पर पता चलता है कि उसके लिए यह सिर्फ एक टाइप करने की मशीन से ज्यादा कुछ नहीं है. वह तो उसे आधुनिक टाइपराइटर मानता है.
एक कम्प्यूटर की-बोर्ड की बनावट बिल्कुल टाइपराइटर के जैसी ही होती है. बस कुछ कुंजियों की संख्या तथा फंक्शन का अंतर होता है. इसलिए टाइपिस्ट के लिए तो इसके ऊपर काम करना आसान हो गया है और पुरानी तथा धीमी टाइपराइटर मशीनों को तेज और आसान कम्प्यूटर से बदल लिया है.
ऐसा करने पर उनका काम कम समय तथा अधिक शुद्धता के साथ पूरा होने लगा है. और उन्हे ज्यादा मुनाफा मिलने लगा है. जिसके कारण वे इसका उपयोग बढ़ाने लगे है. और उनके लिए तो यह सिर्फ एक नई तरह की टाइपराइटर मशीन बनकर रह गई है. इसके अतिरिक्त वे इसका इस्तेमाल करने से परहेज ही करते है.
कम्प्यूटर एक मनोरंजन मशीन
शुरुआत में कम्प्यूटर का इस्तेमाल केवल बड़े-बड़े बिजनेसेस में किया जाता है. या सिर्फ सरकार इन्हे खरीदने में सक्षम थी. लेकिन, समय के साथ टेक्नोलॉजी के विकास ने इसे आम आदमी की पहुँच में ला दिया. जिसके कारण घर-घर में कम्प्यूटर पहुँच गया.
घरो में कम्प्यूटर का उपयोग परिवार के सभी लोगों द्वारा अलग-अलग उद्देश्य के लिए इस्तेमाल किया जाता है. खासकर मनोरंजन के लिए तो इसे टीवी के बाद दूसरे नम्बर पर रखा जाए तो कोई गलती नही होगी.
कम्प्यूटर में मनोरंजन की पूरी व्यवस्था की गई है और एक इंसान को सभी आवश्यक मनोरंजन के प्रकार उपलब्ध करवाएं गए है. जिनमें फिल्म, गाने, फोटों, एनिमेशन के अलावा विडियो गेम भी शामिल है.
यदि आपको फिल्में देखने का शौक है तो आप अपनी पसंद की कोई भी मूवी ऑनलाईन देख सकते है या फिर सीडी/डीवीडी लगाकर भी बडे इतमिनान के साथ आनंद ले सकते है.
मम्मी और बहिन के लिए सीरियल्स तथा रेसिपी की क्लास भी उपलब्ध है. और छोटे भाई/बहिन के लिए कार्टून का बंदोबश्त भी रहता है. कम्प्यूटर एक टीवी और रेडियों के जैसी सुविधा मुहैया कराने में सक्षम है. इसलिए इसे मनोरंजन मशीन कहा जाता है.
कम्प्यूटर एक शिक्षक
इस बात से आप शायद ही सहमत हो. क्योंकि आप जानते है कि कम्प्यूटर को चलाने के लिए खुद प्रशिक्षण की जरूरत पड़ती है तो फिर यह कैसे हमें कुछ सिखा सकता है?
आपकी बात बिल्कुल जायज है और हम भी इसमें अपनी सहमती देते है. मगर, कम्प्यूटर की दुनिया इतनी उन्नत हो गई है कि कम्प्यूटर शिक्षक की भूमिका निभाने लगे है.
इसका एक उदाहरण ये निबंध है जिसे आप मोबाइल फोन (जो आधुनिक कम्प्यूटर का एक प्रकार है) के जरिए पढ़ रहे है. और इसे आप तक पहुँचाने के लिए कम्प्यूटर का ही इस्तेमाल हो रहा है.
इसके अलावा खान एकेडमी, कोर्सेरा, उडेमी, स्वयं पोर्टल जैसी ऑनलाइन लर्निंग सेवाएं इस कार्य को बखूबी निभा रही है. आपने भी इन सेवाओं का इस्तेमाल किया होगा. अगर नहीं किया है तो जल्द ही करेंगे. क्योंकि भविष्य ई-शिक्षा का सुनहरा है.
कम्प्यूटर के जरिए पढ़ाई करने के लिए आपके पास एक कम्प्यूटर या फिर स्मार्टफोन होना चाहिए. जिसमें एक्टिव इंटरनेट कनेक्शन जरूरी है. बिना इंटरनेट के आप कम्प्यूटर के द्वारा पढ़ाई नहीं कर पाएंगे. इंटरनेट के द्वारा ही ये सभी एजुकेशन पोर्टल आप और हम तक अपनी सेवाएं पहुँचाने में कामयाब हो रहे है.
ऑनलाइन पढ़ाई करने पर आपका कीमती समय बचता है जिसे आप अभ्यास करने तथा अन्य जरूरी कार्य करने में लगा सकते है. साथ ही आपको रेगुलर खर्चों की बचत भी होती है और फीस में भी काफी छूट का लाभ सीधा मिलता है.
आप जब चाहे तब पढ़ाई शुरु सकते है, खत्म कर सकते है, बीच में छोड़ सकते है और बंद करके आराम से नींद लें सकते है. आपको कोई परेशान नहीं करेगा.
आप पाठयक्रम (सिलेबस), कोर्स फीस, कीताबें, निर्देशक (अध्यापक), विद्यार्थी, पूर्व विद्यार्थीयों की राय आदि जानकारी किसी ऑनलाइन कोर्स में एंरॉल करने से पहले ही लें जान सकते है. इतनी जानकारी होने के बाद आपको सही फैंसला करने में मदद मिलती है.
बहुत सारे कॉलेज, विश्वविध्यालय तथा स्मार्टस्कुल्स में टीचर प्रेजेंदेशन द्वारा ही अध्यापन करा रहे है. और प्ले स्कुल्स में तो छोटे बच्चों को सिखाने के लिए विडियो लेसंस ही इस्तेमाल होते है. जो कम्प्यूटर को शिक्षक साबित करता है. और हम भी बड़े ही गर्व के साथ कह सकते है कि कम्प्यूटर एक शिक्षक भी है.
कम्प्यूटर एक डाकिया
कबुतर जा जा जा… कबुतर जा जा जा…
आपने सलमान खान की “मैने प्यार किया” फिल्म का ये गाना तो जरूर सुना होगा. क्या आप बता सकते है इस गाने में कबुतर को कहाँ जाने के लिए बोला गया था?
संदेश भेजने के लिए.
आपने सही पकड़ा. और ये बात सच है. आधुनिक डाक प्रणाली से पहले कुछ इस तरह ही एक-दूसरे के पास संदेशों का आदान-प्रदान होता था. जिसमें कबुतर का योगदान अतुल्नीय है.
डाकियों के जमाने में चिट्ठी ने इंसानों के सुख-दुख को ढोया है. इसके बाद टेलिफोन के तारों ने इंसानों को अपनी बात साझा करने के सरल और तेज माध्यम उपलब्ध करवाया.
मगर, आर्टीफिशियल इंटेलिजेंस के इस जमाने में कम्प्यूटर ने इन सभी माध्यमों को मात दे रखी है. क्योंकि, कम्प्यूटर के द्वारा बहुत ही तेजी से संदेश भेज तथा प्राप्त किए जा सकते है. और संदेश के साथ विडियों, आवाज, फोटू भी भेज सकते है.
ये सभी कार्य मुफ्त तथा आसान है. जिनका इस्तेमाल एक मिडिल स्कुल का विद्यार्थी भी आसानी से कर लेता है. चुंकि यह सेवा इंटरनेट आधारित है इसलिए आपको इंटरनेट कि जरुरत पड़ती है. इसके बिना अधुरे है.
इस आधुनिक डाक सेवा का नाम है ई-मेल यानी इलेक्ट्रॉनिक मेल. जिसके द्वारा आप बिना कागज और कलम की चिट्ठी लिख सकते है. आपको शब्द सीम का भी ध्यान नहीं रखना है. साथ में अपनी फोटू या आवाज भी रिकॉर्ड करके भेज सकते है.
आपकी चिट्ठी पलक झपकते ही पते पर पहुँच जाती है. और प्राप्तकर्ता उसे पढ़कर आपको वापस जवाब भी लिखकर भेज सकता है. यह चिट्ठी रास्ते में खोने या फटने के खतरे से मुक्त होती है. और किसी तीसरे व्यक्ति के हाथ लगने का डर भी नहीं रहता है.
ई-मेल के अलावा इंस्टैंट मैसेजिंग सेवा भी खूब प्रचलित है. जिसके द्वारा आप रियल टाइम में बातचीत कर सकते है. चाहे तो फेस टू फेस भी बात की जा सकती है. आपको एक-दूसरे का चेहरा दिखता रहेगा. इस सेवा का फायदा आज दुनियाभर में प्रचलित है. और अरबों लोग रोज इसका इस्तेमाल अपने सगे-संबंधियों से वार्तालाप करने के लिए कर रहे है.
फेसबुक, ट्वीटर, इंस्टाग्राम, वाट्सएप, वी चैट, टेलिग्राम जैसी सैंकड़ों सेवाएं इस सुविधा को मुफ्त उपलब्ध करवा रही है. सोशल मीडिया के जरिए वर्षों से बिछड़े लोग भी वापस मिल रहे है.
कम्युनिकेशन के क्षेत्र में कम्प्यूटर ने बहुत सारी सुविधाओं को मुफ्त उपलब्ध करवा दिया है. जिसके जरिए आज पूरी दुनिया हर पल एक-दूसरे से सिर्फ एक क्लिक की दूरी पर रह गई है. इसी कारण कम्प्यूटर को एक डाकिया की संज्ञा दी गई है.
कम्प्यूटर एक पत्रकार
रोज सुबह अखबार नहीं पढ़ा तो दिमाग में हमेशा इस काम का पछतावा रहता है. अरे! यार आज तो अखबार भी पढ़ा. इसलिए चाय की चुस्कियों के साथ दिन भर की खबरें पढने का आनंद हर कोई लेना चाहता है.
लेकिन, इस काम के दिन भी लद गए है. और धीरे-धीरे बासी खबर पढ़ने की आदत छूटती जा रही है. अब तो ताजा पकाना और तुरंत खाना वाली नई आदत विकसित हो रही है.
ई-पेपर के चलन के साथ अब अखबार पढ़ने में आलस आने लगा है. और खबरें ऊबाऊपन लगने लगी है. क्योंकि, सूचना तकनीक ने दुनिया को हथेली में सिमटा दिया है. आप ब्रिटेन में इस समय किस मुद्दे पर लोग आंदोलन कर रहे है. तुरंत लाइव खबर के साथ जानकारी जुटाई जा सकती है. और विडियों और फोटू भी प्राप्त किये जा सकते है.
अखबार, पत्रिकाएं ऑनलाईन हो रही है. साथ में सोशल मीडिया कम्प्यूटर को पत्रकार बनाने में सबसे बड़ी भूमिका निभा रही है. क्योंकि इसके जरिए लाइव और तथ्यात्मक खबरें बड़ी ही आसानी से मिल पा रही है. जिन खबरों को पाने के लिए सूरज निकलेन का इंतजार करना पड़ता था. आज वहीं खबरें सिर्फ कुछ ही क्लिक्स की दूरी पर उपलब्ध है.
लोग खुद मौके पर पहुँचकर खबरें रिकॉर्ड कर रहे है. और सोशल मीडिया के जरिए उन्हे लोगों तक पहुँचाने का काम कर रहे है. यूट्यूब पत्रकारिता (YouTube Journalism) का चलन दिन पे दिन एक फैशन के तौर पर बढ़ रहा है. लोग अखबारों, पत्रिकाओं, टीवी चैनलों पर भरोसा ना करते हुए. इस नई पत्रकारिता की तरफ आकर्षित हो रहे है.
आपका स्मार्टफोन ही न्युज स्टुडियों बन रहा है. और एक न्युज रिकॉर्ड करने के लिए जरूरी सुविधाएँ उपलब्ध करवा रहा है. शेष काम इंसान अपनी सूझबूझ से निपटा रहा है. इस प्रकार कम्प्यूटर के दौर में एक नई पत्रकारिता की शुरुआत कम्प्युटर ने पत्रकार बनकर शुरु कर दी हैं.
कम्प्यूटर एक मार्गदर्शक
आपने कम्प्यूटर ऑन किया और “ कम्प्यूटर पर निबंध कैसे लिखते है ” लिखकर सर्च कर दिया. आपके सामने लाखों परिणाम इससे संबंधित आ जाएंगे. आप किसी एक को चुनकर खुद कम्प्यूटर पर निबंध लिखना सीख लेंगे.
ऐसा ही काम आप लगभग हर विषय, टॉपिक, वस्तु के बारे में जानकारी जुटाने के लिए कर सकते है. क्योंकि कम्प्यूटर आपको हर चीज का जवाब देगा. यह ज्ञान का भंडार है. एक असीमित सागर है. जो ज्ञान के मोतियों से अटा पड़ा है.
आप बस टॉपिक चुनिए उसे इंटरनेट पर लिखिए आपको उत्तर मिल जाएगा. फैशन से लेकर, मेडिकल तक, एजुकेशन से लेकर नौकरी ढूँढ़ने तक, देश से लेकर विदेश तक, फाइनेंस से लेकर एग्रीकल्चर तक सभी विषयों पर पेशेवर सलाह प्राप्त करने की सहुलियत देता है.
यदि आप नया कम्प्युटर खरिदना चाहते है, या फिर कम्प्यूटर से संबंधित कोई उपकरण खरिदने के बारे में सोच रहे है तो कम्प्युटर इस काम में आपकी मदद कर देगा. आप बस “नया कम्प्यूटर कैसे खरिदे” या फिर “बेस्ट कम्प्यूटर फॉर स्टुडेंट्स” लिखकर सर्च कीजिए. आपके सामने सैंकड़ों कम्प्यूटर बाइंग गाइड खुलकर सामने आ जाएगी.
साथ में बाजार में उपलब्ध लैटेस्ट वर्जन, डिस्काउंट, कीमत, उसके फीचर आदि की जानकारी भी दुकान पर जाए बगैर मिल जाएगी. और यूट्यूब रिव्यु तथा पेशेवर की रेटिंग के आधार आप अपने लिए सही कम्प्युटर कैसे खरिदें की उलझन को सुलझा पाएंगे.
कम्प्यूटर द्वारा उपलब्ध करवाई जा रही इन सेवाओं का निष्कर्ष हमें इसे मार्गदर्शक कहने पर मजबूर करता है. और इसे सलहाकार कहने में भी कोई बुराई नहीं है.
कम्प्यूटर का बहुरुपीयापन का यह तो बस एक बानगीभर है. यहाँ इसके अनगिनत रूपों की चर्चा कर पाना पर्याप्त नहीं है. और ना ही की जा सकती है. क्योंकि, कम्प्यूटर में युजर की जरूरत और कार्य के अनुसार खुद को ढालने का गुण उसके कुछ रुपों को छिपा देता है.
फिर भी उपरोक्त रुपों का अध्ययन करने पर हम विश्वास के साथ कह सकते है कि कम्प्यूटर एक बहुगुणी, बहुरूपी मशीन है. जो जरूरत के अनुसार किसी भी काम को करने में सक्षम है.
आपने क्या सीखा ?
इस लेख में हमने आपको कम्प्यूटर पर निबंध लिखने के बारे में पूरी जानकारी दी है. आपने कम्प्यूटर से संबंधित विभिन्न टॉपिक्स पर कम्प्यूटर पर छोटा एवं बड़ा निबंध लिखना सीखा है.
उदाहरण के लिए, कम्प्यूटर आज की आवश्यकता, कम्प्यूटर का महत्व, कम्प्यूटर की आत्मकथा पर निबंध, कम्प्यूटर एक वरदान या अभिशाप आदि विषयों पर निबंध उपलब्ध करवाया है.
साथ ही कम्प्यूटर पर निबंध कैसे लिखें? इस सवाल का जवाब भी इस लेख में दिया गया है. हमें उम्मीद है कि यह लेख आपके लिए उपयोगी साबित होगा.
यदि आपका निबंध लिखने से संबंधित कोई भी सवाल है. आप कुछ पूछना चाहते है या फिर हमें कुछ बताना चाहते है. तो कमेंट के माध्यम से अपने कीमती विचारों से जरूर अवगत कराएं. हमें आपसे बात करके बहुत खुशी होगी.
और ट्युटोरियल एवं लेख:

Leave a Comment Cancel reply
Save my name, email, and website in this browser for the next time I comment.
TutorialPandit.com
TutorialPandit एक Online Tutorial Portal (OTP) है, यहाँ पर आप कहीं भी, कैसे भी और कभी भी अपनी भाषा में सीख एवं सिखा सकतें है. अभी TutorialPandit पर हम Computer fundamentals, Windows, MS Office, MS Word, Excel, PowerPoint, Notepad, WordPad, Paint, Android, WordPress, Blogger आदि के Tutorials आपकी भाषा (हिंदी) में मुफ्त ऑनलाईन उपलब्ध करवाते है. आप, कुछ वेब संबंधित तकनीक जैसे HTML तथा CSS भी अपनी भाषा में सीख सकते है
Top Tutorials
- Privacy Policy
- Advertising and Sponsorship
Website Designed by BirmInfotech.com WordPress Hosting by Appuhost.com
© tutorialpandit.com | all rights reserved.
Join WhatsApp Channel
Help | Advanced Search
Computer Science > Computation and Language
Title: retrieval-enhanced knowledge editing for multi-hop question answering in language models.
Abstract: Large Language Models (LLMs) have shown proficiency in question-answering tasks but often struggle to integrate real-time knowledge updates, leading to potentially outdated or inaccurate responses. This problem becomes even more challenging when dealing with multi-hop questions since they require LLMs to update and integrate multiple knowledge pieces relevant to the questions. To tackle the problem, we propose the Retrieval-Augmented model Editing (RAE) framework tailored for multi-hop question answering. RAE first retrieves edited facts and then refines the language model through in-context learning. Specifically, our retrieval approach, based on mutual information maximization, leverages the reasoning abilities of LLMs to identify chain facts that naïve similarity-based searches might miss. Additionally, our framework incorporates a pruning strategy to eliminate redundant information from the retrieved facts, which enhances the editing accuracy and mitigates the hallucination problem. Our framework is supported by theoretical justification for its fact retrieval efficacy. Finally, comprehensive evaluation across various LLMs validates RAE's ability in providing accurate answers with updated knowledge.
Submission history
Access paper:.
- HTML (experimental)
- Other Formats
References & Citations
- Google Scholar
- Semantic Scholar
BibTeX formatted citation
Bibliographic and Citation Tools
Code, data and media associated with this article, recommenders and search tools.
- Institution
arXivLabs: experimental projects with community collaborators
arXivLabs is a framework that allows collaborators to develop and share new arXiv features directly on our website.
Both individuals and organizations that work with arXivLabs have embraced and accepted our values of openness, community, excellence, and user data privacy. arXiv is committed to these values and only works with partners that adhere to them.
Have an idea for a project that will add value for arXiv's community? Learn more about arXivLabs .
Exclusive: Behind the plot to break Nvidia's grip on AI by targeting software

NEARLY 100 STARTUPS
The Technology Roundup newsletter brings the latest news and trends straight to your inbox. Sign up here.
Reporting by Max A. Cherney in San Francisco Editing by Kenneth Li and Matthew Lewis
Our Standards: The Thomson Reuters Trust Principles. , opens new tab

Cybersecurity platform Rubrik plans to list in the United States, the company said in a filing on Monday.

Private equity firm Advent International has agreed to buy Canada's Nuvei in an all-cash deal that values the Ryan Reynolds-backed payments technology firm at $6.3 billion.
- Mobile Site
- Staff Directory
- Advertise with Ars
Filter by topic
- Biz & IT
- Gaming & Culture
Front page layout
image processing —
Playboy image from 1972 gets ban from ieee computer journals, use of "lenna" image in computer image processing research stretches back to the 1970s..
Benj Edwards - Mar 29, 2024 9:16 pm UTC

On Wednesday, the IEEE Computer Society announced to members that, after April 1, it would no longer accept papers that include a frequently used image of a 1972 Playboy model named Lena Forsén. The so-called " Lenna image ," (Forsén added an extra "n" to her name in her Playboy appearance to aid pronunciation) has been used in image processing research since 1973 and has attracted criticism for making some women feel unwelcome in the field.
Further Reading
In an email from the IEEE Computer Society sent to members on Wednesday, Technical & Conference Activities Vice President Terry Benzel wrote , "IEEE's diversity statement and supporting policies such as the IEEE Code of Ethics speak to IEEE's commitment to promoting an including and equitable culture that welcomes all. In alignment with this culture and with respect to the wishes of the subject of the image, Lena Forsén, IEEE will no longer accept submitted papers which include the 'Lena image.'"
An uncropped version of the 512×512-pixel test image originally appeared as the centerfold picture for the December 1972 issue of Playboy Magazine. Usage of the Lenna image in image processing began in June or July 1973 when an assistant professor named Alexander Sawchuck and a graduate student at the University of Southern California Signal and Image Processing Institute scanned a square portion of the centerfold image with a primitive drum scanner, omitting nudity present in the original image. They scanned it for a colleague's conference paper, and after that, others began to use the image as well.

The image's use spread in other papers throughout the 1970s, '80s, and '90s , and it caught Playboy's attention, but the company decided to overlook the copyright violations. In 1997, Playboy helped track down Forsén, who appeared at the 50th Annual Conference of the Society for Imaging Science in Technology, signing autographs for fans. "They must be so tired of me... looking at the same picture for all these years!" she said at the time. VP of new media at Playboy Eileen Kent told Wired , "We decided we should exploit this, because it is a phenomenon."
The image, which features Forsén's face and bare shoulder as she wears a hat with a purple feather, was reportedly ideal for testing image processing systems in the early years of digital image technology due to its high contrast and varied detail. It is also a sexually suggestive photo of an attractive woman, and its use by men in the computer field has garnered criticism over the decades, especially from female scientists and engineers who felt that the image (especially related to its association with the Playboy brand) objectified women and created an academic climate where they did not feel entirely welcome.
Due to some of this criticism, which dates back to at least 1996 , the journal Nature banned the use of the Lena image in paper submissions in 2018.
The comp.compression Usenet newsgroup FAQ document claims that in 1988, a Swedish publication asked Forsén if she minded her image being used in computer science, and she was reportedly pleasantly amused. In a 2019 Wired article , Linda Kinstler wrote that Forsén did not harbor resentment about the image, but she regretted that she wasn't paid better for it originally. "I’m really proud of that picture," she told Kinstler at the time.
Since then, Forsén has apparently changed her mind. In 2019, Creatable and Code Like a Girl created an advertising documentary titled Losing Lena , which was part of a promotional campaign aimed at removing the Lena image from use in tech and the image processing field. In a press release for the campaign and film, Forsén is quoted as saying, "I retired from modelling a long time ago. It’s time I retired from tech, too. We can make a simple change today that creates a lasting change for tomorrow. Let’s commit to losing me."
It seems like that commitment is now being granted. The ban in IEEE publications, which have been historically important journals for computer imaging development, will likely further set a precedent toward removing the Lenna image from common use. In the email, IEEE's Benzel recommended wider sensitivity about the issue, writing, "In order to raise awareness of and increase author compliance with this new policy, program committee members and reviewers should look for inclusion of this image, and if present, should ask authors to replace the Lena image with an alternative."
reader comments
Channel ars technica.
- Share full article
Advertisement
Supported by
Guest Essay
How the SAT Changed My Life

By Emi Nietfeld
Ms. Nietfeld is the author of the memoir “Acceptance.”
This month, the University of Texas, Austin, joined the wave of selective schools reversing Covid-era test-optional admissions policies, once again requiring applicants to submit ACT or SAT scores.
Many colleges have embraced the test-optional rule under the assumption that it bolsters equity and diversity, since higher scores are correlated with privilege. But it turns out that these policies harmed the teenagers they were supposed to help. Many low-income and minority applicants withheld scores that could have gotten them in, wrongly assuming that their scores were too low, according to an analysis by Dartmouth. More top universities are sure to join the reversal. This is a good thing.
I was one of the disadvantaged youths who are often failed by test-optional policies, striving to get into college while in foster care and homeless. We hear a lot about the efforts of these elite schools to attract diverse student bodies and about debates around the best way to assemble a class. What these conversations overlook is the hope these tests offer students who are in difficult situations.
For many of us, standardized tests provided our one shot to prove our potential, despite the obstacles in our lives or the untidy pasts we had. We found solace in the objectivity of a hard number and a process that — unlike many things in our lives — we could control. I will always feel tenderness toward the Scantron sheets that unlocked higher education and a better life.
Growing up, I fantasized about escaping the chaos of my family for the peace of a grassy quad. Both my parents had mental health issues. My adolescence was its own mess. Over two years I took a dozen psychiatric drugs while attending four different high school programs. At 14, I was sent to a locked facility where my education consisted of work sheets and reading aloud in an on-site classroom. In a life skills class, we learned how to get our G.E.D.s. My college dreams began to seem like delusions.
Then one afternoon a staff member handed me a library copy of “Barron’s Guide to the ACT .” I leafed through the onionskin pages and felt a thunderclap of possibility. I couldn’t go to the bathroom without permission, let alone take Advanced Placement Latin or play water polo or do something else that would impress elite colleges. But I could teach myself the years of math I’d missed while switching schools and improve my life in this one specific way.
After nine months in the institution, I entered foster care. I started my sophomore year at yet another high school, only to have my foster parents shuffle my course load at midyear, when they decided Advanced Placement classes were bad for me. In part because of academic instability like this, only 3 percent to 4 percent of former foster youth get a four-year college degree.
Later I bounced between friends’ sofas and the back seat of my rusty Corolla, using my new-to-me SAT prep book as a pillow. I had no idea when I’d next shower, but I could crack open practice problems and dip into a meditative trance. For those moments, everything was still, the terror of my daily life softened by the fantasy that my efforts might land me in a dorm room of my own, with endless hot water and an extra-long twin bed.
Standardized tests allowed me to look forward, even as every other part of college applications focused on the past. The song and dance of personal statements required me to demonstrate all the obstacles I’d overcome while I was still in the middle of them. When shilling my trauma left me gutted and raw, researching answer elimination strategies was a balm. I could focus on equations and readings, like the scholar I wanted to be, rather than the desperate teenager that I was.
Test-optional policies would have confounded me, but in the 2009-10 admissions cycle, I had to submit my scores; my fellow hopefuls and I were all in this together, slogging through multiple-choice questions until our backs ached and our eyes crossed.
The hope these exams instilled in me wasn’t abstract: It manifested in hundreds of glossy brochures. After I took the PSAT in my junior year, universities that had received my score flooded me with letters urging me to apply. For once, I felt wanted. These marketing materials informed me that the top universities offered generous financial aid that would allow me to attend free. I set my sights higher, despite my guidance counselor’s lack of faith.
When I took the actual SAT, I was ashamed of my score. Had submitting it been optional, I most likely wouldn’t have done it, because I suspected my score was lower than the prep-school applicants I was up against (exactly what Dartmouth found in the analysis that led it to reinstate testing requirements). When you grow up the way I did, it’s difficult to believe that you are ever good enough.
When I got into Harvard, it felt like a miracle splitting my life into a before and after. My exam preparation paid off on campus — it was the only reason I knew geometry or grammar — and it motivated me to tackle new, difficult topics. I majored in computer science, having never written a line of code. Though a career as a software engineer seemed far-fetched, I used my SAT study strategies to prepare for technical interviews (in which you’re given one or more problems to solve) that landed me the stable, lucrative Google job that catapulted me out of financial insecurity.
I’m not the only one who feels affection for these tests. At Harvard, I met other students who saw these exams as the one door they could unlock that opened into a new future. I was lucky that the tests offered me hope all along, that I could cling to the promise that one day I could bubble in a test form and find myself transported into a better life — the one I lead today.
Emi Nietfeld is the author of the memoir “ Acceptance .” Previously, she was a software engineer at Google and Facebook.
The Times is committed to publishing a diversity of letters to the editor. We’d like to hear what you think about this or any of our articles. Here are some tips . And here’s our email: [email protected] .
Follow The New York Times Opinion section on Facebook , Instagram , TikTok , WhatsApp , X and Threads .
IMAGES
VIDEO
COMMENTS
कंप्यूटर पर निबंध (Computer Essay in Hindi) By अर्चना सिंह / July 21, 2023. कम्प्यूटर आधुनिक तकनीक की एक महान खोज है। ये एक सामान्य मशीन है जो अपनी मेमोरी में ...
कंप्यूटर का महत्व - Essay on Computer in hindi वर्तमान में कंप्यूटर का महत्व में इतनी वृद्धि हो चुकी है कि अगर अब यह काम करना बंद कर दे तो सभी कार्य ठप ...
Essay on Computer in Hindi: आज की टेक्नोलॉजी की दुनिया में डिजिटल लिट्रेसी के लिए कंप्यूटर को समझना महत्वपूर्ण है। कंप्यूटर में डिजिटल उपकरणों, सॉफ्टवेयर और ऑनलाइन ...
कंप्यूटर पर लघु निबंध (Short essay on computer in Hindi) Essay On Computer - यह विज्ञान का युग है। विज्ञान ने हमें कई महत्वपूर्ण चीजें दी हैं जिससे हमारा जीवन आरामदायक हो जाता है ...
आने वाला समय इसके विस्तृत फैलाव का संकेत दे रहा है प्रश्न उठता है कि क्या कंप्यूटर आज की जरूरत है? इसका उत्तर है- कंप्यूटर जीवन की ...
कंप्यूटर पर छोटे तथा बड़े निबंध : Long & Short Essay on Computer in Hindi [Computer Par Nibandh Hindi Mein] यह युग बहुत अधिक तेज व आधुनिक हो गया है। आज पहले के मुकाबले सभी काम बहुत ...
कंप्यूटर पर निबंध 250 शब्द (Computer Essay in Hindi 250 Words) यहां 250 शब्दों में कंप्यूटर पर निबंध लिख के समझाया गिया है, आप अपनी परीक्षा के लिए इस प्रकार का ...
Computer Essay in Hindi : आधुनिक समय में कंप्यूटर एक आवश्यक तकनीक है, इसमें व्यापक डेटा संग्रहीत किया जा सकता है। यह एक महान आविष्कार है। और इसे इसतेमान करना भी आसान है ...
Essay on Computer in Hindi. Essay on Computer in Hindi (कंप्यूटर पर निबंध) कंप्यूटर एक ऐसा मशीन है जो कि आज कि दुनिया में एक बहुत ही महत्वपूर्ण भूमिका निभाता है। इसका इस्तेमाल करना आज के ...
Essay on Computer in Hindi - कंप्यूटर पर निबंध: Short Essay on Importance of Computer in Hindi Language for students of all Classes in 100, 150, 200, 300 & 500 words. Learn about computer in Hindi Language.
Computer Essay in Hindi : अगर आप कंप्यूटर पर निबंध जानने के लिए इस लेख पर आये है तो आप बिलकुल सही जगह पर है यहाँ आपको Computer Par Essay 400 Words, 1000
आज hindiamrit.com आपको निबंध की श्रृंखला में कम्प्यूटर का महत्व पर निबंध | कम्प्यूटर पर निबंध | essay on importance of computer in hindi प्रस्तुत करता है।
Essay on Computer in Hindi- कंप्यूटर पर निबंध. भूमिका-मनुष्य के जीवन में विज्ञान का प्रवेश और योगदान इस सीमा तक बढ़ गया है कि आज मानव जीवन और इतिहास की विज्ञान के बिना ...
कंप्यूटर पर निबंध हिंदी में (Essay On Computer In Hindi ) आज के समय में कंप्यूटर की उपयोगिता को कौन नहीं जानता कौन नहीं जानता के हर क्षेत्र में कंप्यूटर के
कंप्यूटर पर निबंध 10 लाइन | Essay on Computer in Hindi for Class 3,4,5. इसके द्वारा जानकारी दो संग्रह, व्यवस्थित और ढूंढ सकता है. आज के समय को हम कंप्यूटर का युग ...
यदि आप भी कंप्यूटर पर निबंध (Computer Essay in Hindi) पढ़ना चाहते हैं, तब ये आर्टिकल को ज़रूर से पूरा पढ़ें।
अन्य सम्भावित अथवा सम्बन्धित शीर्षक — कंप्यूटर का महत्व पर निबंध (Essay on Importance of Computer in Hindi) कंप्यूटर की परिभाषा सत्यजीत मजूमदार जी के शब्दों ...
Computer Essay in Hindi Computer Meaning in Hindi "कंप्यूटर" को हिंदी में संगणक कहा जाता है। वैसे आमतौर पर लोग इसे कंप्यूटर ही बोलते है। कंप्यूटर इसकी समझ पूरी दुनिया मे 90 प्रतिशत से ...
Essay On Computer In Hindi: कंप्यूटर, जिन्हें हम आजकल अपने जीवन का महत्वपूर्ण हिस्सा मानते हैं, एक ऐसा उपकरण है जिसने आधुनिक दुनिया को परिवर्तित कर दिया है।
Computer Essay in Hindi 150 Words. कंप्यूटर एक जटिल मशीन है। जिसने मानव के काम आसान कर दिए हैं। शुरुआत में यह केवल गणना का ही काम करता था। लेकिन आज विज्ञान ...
Computer ka mahatva/ importance of computer in Hindi language will help you computer education in Hindi. How to write computer in hindi is our basic focus and you give you computer information in Hindi. Essay on computer in Hindi for class 5 was asked in many competitive exams. Read an essay on computer in Hindi/ computer par nibandh to get ...
Computer essay in hindi कंप्यूटर पर निबंध : नमस्कार विद्यार्थी मित्रों ! आज कि इस पोस्ट में हमने आपके लिए कंप्यूटर की महत्वता पर निबंध, कम्यूटर पर निबंध
कम्प्यूटर का महत्व पर निबंध (Essay on Computer Importance in Hindi) [शब्द सीमा 300] कम्प्यूटर का आविष्कार माननीय चार्ल्स बैबेज ने किया था.
Large Language Models (LLMs) have shown proficiency in question-answering tasks but often struggle to integrate real-time knowledge updates, leading to potentially outdated or inaccurate responses. This problem becomes even more challenging when dealing with multi-hop questions since they require LLMs to update and integrate multiple knowledge pieces relevant to the questions. To tackle the ...
The open-source project aims to make computer code run on any machine, regardless of what chip and hardware powers it. "It's about specifically - in the context of machine learning frameworks ...
304. On Wednesday, the IEEE Computer Society announced to members that, after April 1, it would no longer accept papers that include a frequently used image of a 1972 Playboy model named Lena ...
The wave of unnecessary layoffs sweeping Silicon Valley is the latest evidence of corporate America's addiction to change for change's sake.
How the SAT Changed My Life. Ms. Nietfeld is the author of the memoir "Acceptance.". This month, the University of Texas, Austin, joined the wave of selective schools reversing Covid-era test ...