- Starting out with T e X...
- CTAN Background
- T e X user groups
- Upload basics
- Upload addendum
- T e X Directory Structure
- T e X Archive
- Contributors

Announcements
- Extended search
- File search
minted – Highlighted source code for L a T e X
The package that facilitates expressive syntax highlighting in L a T e X using the powerful Pygments library. The package also provides options to customize the highlighted source code output using fancyvrb .
Download the contents of this package in one zip archive (881.6k).
Community Comments
- 2022-12-13 CTAN update: minted
- 2021-12-25 CTAN update: minted
- 2017-07-21 CTAN update: minted
Suggestions
Maybe you are interested in the following packages as well.
- sclang-prettifier: Prettyprinting SuperCollider source code
- codebox: Highlighted source code in a fancy box
- qsharp: Syntax highlighting for the Q# language
- newvbtm: Define your own verbatim-like environment
Package Links
LaTeX-Tutorial.com
Create beautiful code listings with minted, learn how to make code listings in latex look very aesthetic using minted package.
- Getting started with Minted package
Code Highlighting in LaTeX
- Minted environment options
- Floating Lists in LaTeX
- Code highlight styles in LaTeX
It is very common having to write code listings in LaTeX, in order to illustrate a given algorithm., especially with computer science-related manuals. For this purpose, LaTeX offers the environment verbatim that lets you write code listings like this:

which is obtained by the following code:
which are literal and therefore insensible to control sequences, environments, etc. It also has an in-line equivalent \verb , which lets you enclose in any kind of delimiters the text inside.

Installation
In this section, we are going to see quickly how to install minted . Please note If you can load minted package via \usepackage{minted} and compile without any errors, then you should skip to the next section. The main difference between minted and similar packages is that the former makes use of the additional software Pygments , which provides much better syntax highlighting.
minted also requires a series of LaTeX packages to be installed and up to date in your system: keyval, ifthen, kvoptions, calc, fancyvrb, ifplatform, fvextra, pdftexcmds, upquote, etoolbox, float, xstring 2.3, xcolor lineno, framed, shellesc (for luatex 0.87+) .
All of them come with the usual LaTeX distributions, so probably you don’t have to worry about it. Once you have all of this, you can install minted as any other package, from you LaTeX package manager or from CTAN .
Since minted needs to call Pygments, which is an external program, you need to allow the LaTeX processor to do so by passing it the -shell-escape option. So you need to call the processor like this:
The same is true for other compilers if you are using them.
This is an example of minted basic usage. We use the minted environment to write some Python code:
Compiling the first code yields the following result:
So we see that the use of minted package is straightforward: we only have to start a minted environment and put inside braces the language highlighting we want.
Code listing of a File in LaTeX
Instead of going smaller, we can go bigger, printing and highlighting whole files. For this purpose there is the \inputminted{tex}{filename.tex} command, where you pass the language highlighting and the file you want to input, and this file is written as a block of minted code.
where ex1.tex file contains the following code:
Compiling the previous code, we get the following result:
Inline Code listing in LaTeX
To typeset code inline, the command \mintinline{c}|int i| is provided. Again, the delimiters can be changed, according the listed code. Here is an example:
Compiling this code yields:

Minted command and environment options
All the above mentioned minted code highlighting commands accept the same set of options, as a comma-separated list of key=value pairs. Here is a list of the most remarkable ones:
- autogobble (boolean): Automatically remove all common leading whitespace from code. If you don’t like the work done, you can always use gobble (integer) and pass an integer to it, so that the amount of characters passed is deleted from the start of all lines.
- bgcolor (string): Sets the background color of the listing. The string must be the name of a previously-defined color.
- codetagify (list of strings): Highlight special code tags in comments and docstrings. The default list of code tags is: XXX, TODO, BUG, and NOTE .
- curlyquotes (boolean): When your keyboard doesn’t have left and right quotes, the backtick ` and the single quotation mark ‘ are used as left and right quotes in most places (for example, in LaTeX). minted writes them literally by default, but if this option is set to true, they are substituted by the curly left and right quotes.
- escapeinside (string): This makes minted escape to LaTeX between the two characters specified in the string. All code between the two characters will be interpreted as LaTeX and typeset accordingly. The escape characters need not be identical. This has a few exceptions, however: escaping does not work inside strings and comments (in the later case, you may want to use the texcomments option).
- fontfamily, fontseries, fontsize, fontshape : These self-descriptive options let you customize the font used inside the minted environment.
- linenos (boolean): Enables line numbers. It can be accompanied with numberblanklines (boolean), which enables or disables the numbering of blank lines.
- mathescape (boolean): Enables the usual math mode inside comments.
- samepage (boolean): Forces the whole listing to appear in the same page, even if it doesn’t fit.
- showspaces (boolean): Enables visible spaces with a small horizontal line . You can redefine the invisible space character passing a new macro to the option space (macro); by default, the \textvisiblespace macro is passed.
- stripall (boolean): This option strips all leading and trailing whitespace from the input.
- tabsize (integer): This is the number of spaces a tab will be converted to, unless obeytabs (boolean) is active, in which case tabs will be preserved. If you are decided to use tabs, similar options for showing tabs and setting the invisible tabs character are available.
In every boolean option, you can omit the =true part, and just write the option name.
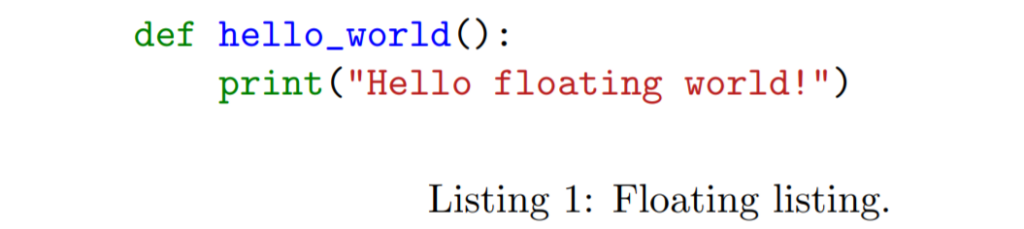
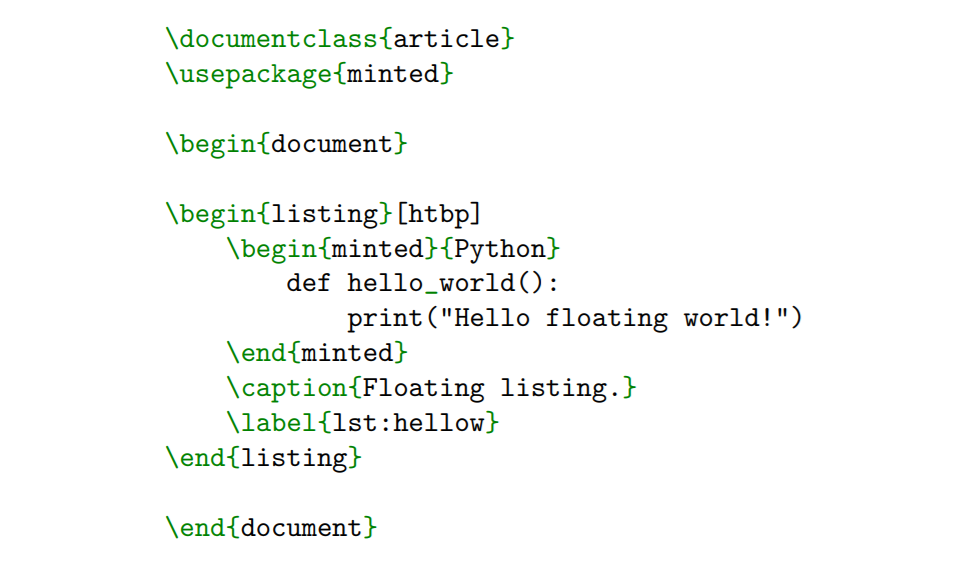
Floating listings
In certain situations, or for certain tastes, it is better to treat the code listings as floating objects. For this matter, minted provides the listing environment that you can wrap around any source code block. As it is usual for floating objects, you can provide a \label{} and a \caption{} , and also the usual placement specifiers, check the first example.
As happens with figures and tables, you can create an index of all of the floating listings in the document using \listoflistings . In case you are going to use floating listings and reference them within the text, you may want to change how \LaTeX counts them: you can choose whether the chapter or the section should be used. In order to do that, you have to load the package with the chapter or section option:
Customizing the syntax highlight
If you are reading this you probably like programming, and in that case you almost sure like to customize the color schemes of your code editors, and the appearance of the minted listings shouldn’t be less.
And that’s all for the minted package. I’m sure from now on your listings in LaTeX will look very aesthetic, which will make reading your documents even more pleasing.
Recent Posts
Typesetting Multiple Choice Questions in LaTeX
n this tutorial, we will see how to write a multiple-choice exam in LaTeX, using the exam document class. This document class provides multiple tools to easily typeset exams in LaTeX, and we have...
How to Write a Minimalistic CV in LaTeX: Step-by-step Guide
In this step by step tutorial, we will learn how to typeset a professional CV, and gain some more insight into how LaTeX works with a practical example.
Personal blog of Felix Hoffmann on computational neuroscience, mathematics, open science and the tools he uses keep organizes his thoughts and ideas.
3 Diagrams per Page
Template for code highlighting with minted in latex beamer.
Syntax highlighting can be achieved in LaTeX via listings or more recently with minted . The latter package uses Pygments to create beautiful code highlighting and includes fantastic additional features such as line numbering.
Minted's compatibility with the Latex beamer class, however, is restricted and some workarounds (as laid out by Tristan Ravitch in his blog post are needed to assure full functionality of both the beamer class and minted.

Here's a template I made for anyone who wants to present code with the beamer class and the minted package, like in the image above:
Related Posts
Installing paprika on ubuntu 16.04 using wine 07 may 2020, open computational research study - a proof of concept 08 mar 2018, local line spacing in latex beamer 08 nov 2017.
Syntax Highlighting in LaTeX with minted
This post serves as an introduction to minted, a pygments-based syntax highlighter for LaTeX. The post provides a few examples of things you can do with minted, details the installation process, and covers some basic security.

Read more posts by this author.
This post serves as an introduction to minted , a pygments -based syntax highlighter for LaTeX. Adding pygments to LaTeX streamlines so many things. The post provides a few examples of things you can do with minted , details the installation process, and covers some basic security.
TeX Dependencies
-shell-escape, useful features, what's next.
You can view the code related to this post under the post-01-overview tag .
The easiest way to present code in LaTeX is to use the verbatim environment . It's quick, it preserves formatting, and it requires no set up. It's also very bland. Its ease of use comes at the cost of basically all the context clues well-formatted and styled code can provide.
The next step up (or rather many steps up) is the listings package . Out the box, it supports a broad range of languages. It's eminently configurable. You can define new languages yourself, add different keywords, and style to your heart's content. It's very good at being straightforward. Moving beyond its predefined scopes (or easily discoverable internet styles ) is a challenge, though, because parsing and tokenizing code in LaTeX is just about as hard and ridiculous as it sounds.
minted has become a solid competitor . It uses the pygments project to parse and highlight. You've probably seen pygments in action already . It's a beast of an application that can do just about anything you want re: syntax highlighting. minted isn't quite as flexible, but it does have access to most of the pygments features. Recognizable styles, a massive library of lexers, and simple customization through Python make minted , by way of pygments , a veritable utility knife.

There's a bit more to the listings vs. minted debate . Essentially it boils down to where you want to customize. Personally, I feel like a general-purpose scripting language used in all areas of tech is a stronger contender than a typesetting system many of my peers have struggled to learn. I don't know, though (and if I'm wrong, I'd love to hear about it). At its core, TeX tokenizes everything. I'm just not sure that it can achieve the same level of regex wizardry that goes into some of the pygments code.
minted requires a few things to get up and running.
You'll need Python to get started. Pygments needs >=2.6 or >=3.3 , depending on your version of Python. You can lazily install both with any trouble. For example, via dnf ,
Next you'll need pip , a wonderful package manager for Python. It's ridiculously easy to install . Rather than install it globally (i.e. to /usr/bin ), we're going to install it locally via the --user flag.
However, this doesn't put pip on our path.
The --user flag installed pip to our user site packages . We can check the base directory, which should have the desired bin , via
Since we have an easy way to discover the directory, we have an easy way to add it to our .whateverrc :
You can also manually add it, which might be a good idea if you're doing other PATH manipulations.
With pip installed, we can quickly install pygments .
minted provides a list of its dependencies . If you've got access to something like tlmgr , it should be pretty easy to update them.
If you don't (e.g. modern RHEL derivatives, I think), you'll have to get creative. This is the easiest route:
If, like me, you're running an SSD on a budget, the easiest isn't very convenient. Maybe you just don't feel like warehousing all of TeX Live to snag 16 dependencies. If you're not going to install everything, you need to figure out what you have to install. dnf / yum makes this somewhat trivial. If you're stuck with dpkg / dpkg-query , the discovery will be much more involved (but also I think you can run tlmgr so there's that).
Convoluted dependency resolution aside, minted itself is a breeze to install (like pygments ; we've already done all the hard work).
Because minted relies on an external application ( pygments ) to highlight, it can't just run in a tiny, neatly contained environment. TeX essentially exposes streams but, by default, access to the operating system is locked down. -shell-escape neatly sidesteps those restrictions, but it doesn't come without risk. Just like anything else, it's probably not a great idea to provide shell access until you understand what's going on. Don't download random things off the internet and execute them blindly. Don't run in superuser mode all the time. You know, basic stuff.
This is what happens when you try to run minted without -shell-escape . Notice at the beginning that external actions are limited ( restricted \write18 enabled ). The document will not compile (even without -halt-on-error ).
With -shell-escape , any external action is available ( \write18 enabled ) and the document compiles.
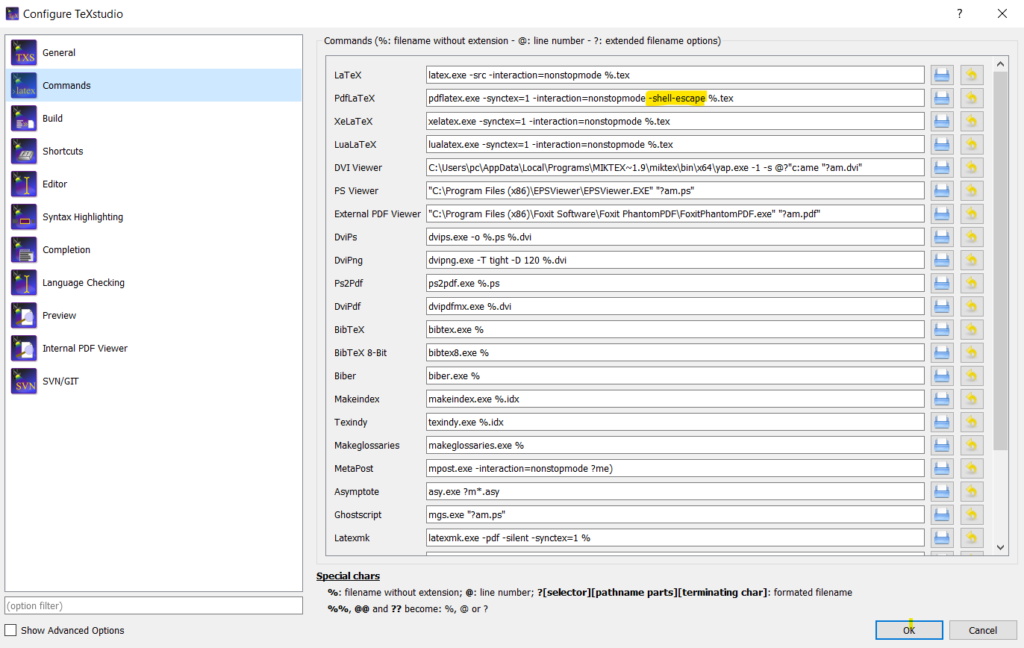
Chances are you're not actually building from the CLI every time. You've probably got an editor with some build commands stored. Don't add -shell-escape to all of your build profiles. It's a pain to toggle custom builds off and on, but having to rebuild your system after an attack is worse. Look for something like User Builds, Custom Commands, or the like.
For example, in TeXstudio , you can add custom builds via Configure TeXstudio > Builds > User Commands. In Texmaker , the same menu is available via User > User Commands > Edit User Commands.
Similarly, in Sublime via the LaTeXTools package , you can add custom builds to your project file (or anywhere else, for that matter).
You've already seen how simple it is to add code to a tex file. minted also makes it easy to include external source code without worrying about getting it to play well with your editor. The \inputminted macro lets you load any file while specifying the lexer.

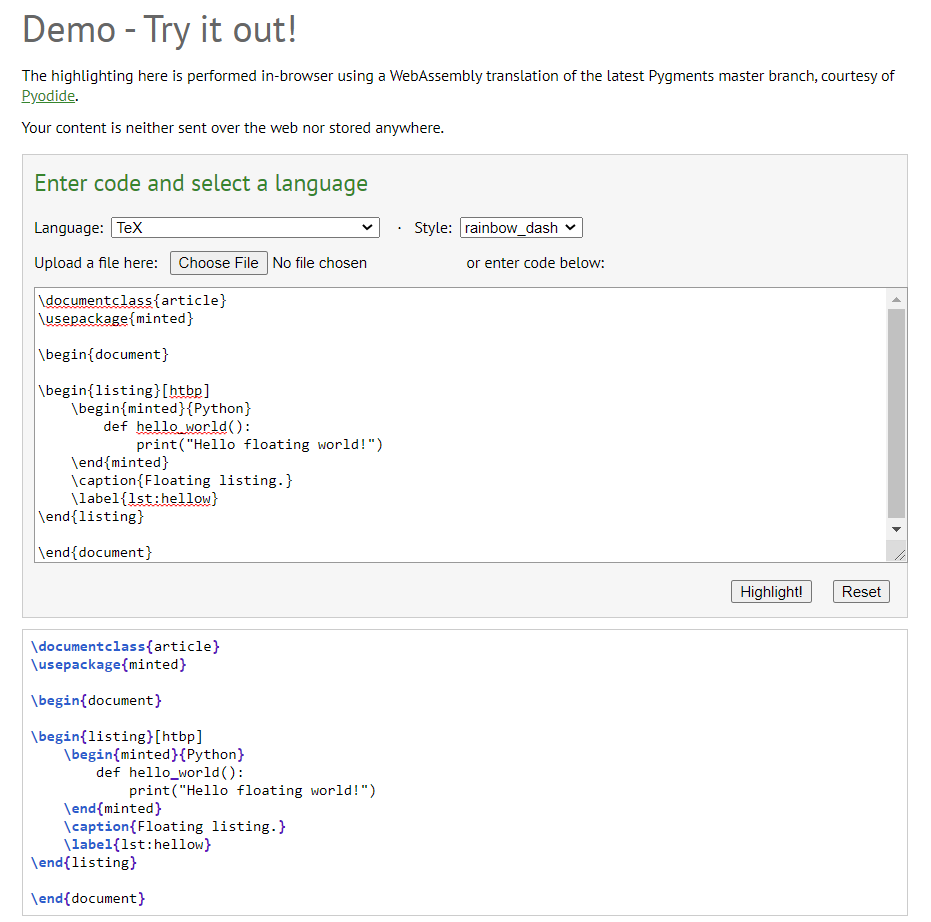
The default style is one of many available to minted . You can check the styles available on your system via
You can preview any of the styles by visiting the pygments demo and trying out a highlighter. Once pygments has parsed the code, you'll be able to change the style at whim.
The default styles alone add a tremendous amount of utility to minted . There are many other settings that may be tweaked . Sharing style changes is an easy way to underscore minted 's versatility.

If you want to use the same style throughout your document, minted makes that simple too. The \newminted macro defines a configuration for a specific language, e.g. python . It can then be used as an environment in place of minted by appending code to the end, e.g. pythoncode .

You can use the same logic with \inputminted via \newmintedfile . Rather than defining a new environment, \newmintedfile creates a new macro. It has an optional name parameter to make things easier (otherwise the macro is called \<language>file ).

Sometime very soon I hope to look explore minted in combination with some other tools to build on its features. I've got some examples in use right now but I need to break them out and annotate them.
Source Code Highlighting with Minted in LaTeX
The minted package provides automatic syntax highlighting for source code listings. It uses the excellent pygments highlighter, which provides very high quality highlighting for a wide range of languages.
This example also shows how you can use minted to typeset LaTeX math embedded in your source code.

Have you checked our knowledge base ?
Message sent! Our team will review it and reply by email.
Keine Suchergebnisse
- Code Highlighting with minted
- 1 Introduction
- 2 Basic usage
- 3 Including code from a file
- 4 One-line code
- 5 Custom lexers
- 6 Colours and stylesheets
- 7 Captions, labels and the list of listings
- 8 Reference guide
- 9 Further reading
Introduction
This article shows how to use the minted package to format and highlight programming language source code within a L a T e X document, starting with an example:
Open this example in Overleaf
This example produces the following output:

There are two important commands here. In the preamble the package is imported by writing
then the tags \begin{minted}{python} and \end{minted} delimit an environment that print the text verbatim in monospaced fonts and also apply colour to comments, keywords and functions. The parameter python is the programming language the source code is written in. minted supports over 150 programming and markup languages as well as configuration files, see the reference guide for a list of supported languages.
Note : For minted to work with your local LaTeX distribution, an additional program called Pygments must be installed. Overleaf can save you the trouble of installing it and having to run special commands to compile your document—on Overleaf, documents that use minted will work "out of the box".
Basic usage
As demonstrated in the following example, the minted environment can be configured to modify visual presentation of the typeset code. Here, the minted environment uses several comma-separated parameters of the form key=value :

The parameters used in this example are:
- frame=lines : draws two lines, one on top and one at the bottom of the code to frame it. Other possible values are leftline , topline , bottomline and single .
- framesep=2mm : the frame separation is set to 2mm. Other length units can be used.
- baselinestretch=1.2 : the line spacing of the code set to 1.2.
- bgcolor=LightGray : background colour set to LightGray . You need to import the xcolor package for this to work. See Using colours in LaTeX to learn more about colour manipulation.
- fontsize=\footnotesize : font size set to footnotesize . Any other font size can be set.
- linenos : enables line numbers.
Other options that may be useful are:
- mathescape : enables math mode in code comments.
- rulecolor : changes the colour of the frame.
- showspaces : enables a special character to make spaces visible.
Including code from a file
Code is usually stored in a source file, therefore a command which automatically imports code from a file is very convenient, as demonstrated in the following example:

The command \inputminted{octave}{BitXorMatrix.m} imports the code from the file BitXorMatrix.m , the parameter octave tells L a T e X the programming language of the code. This command can take two extra parameters to import only part of the file; for instance, to import code from the line 2 to the line 12, the command becomes:
One-line code
If you need to input only a line of code, the command \mint , whose syntax is presented in the next example, will do the trick.

The parameter between braces sets the programming language ( html markup language in this case) with the actual text to be formatted being delimited by the '|' character.
Custom lexers
By default, minted supports only languages with lexers that are already installed or registered with pygmentize . If you have written a custom lexer, or want to use a lexer for a language that's not yet been installed on Overleaf, you can still use it in your own Overleaf project using the approach mentioned here .
Suppose you have defined a lexer in the file nl-lexer.py , containing the class NetLogoLexer for the NetLogo language. Upload nl-lexer.py to your Overleaf project, and then specify nl-lexer.py:NetLogoLexer as the "language name" when using minted . For example:
Here's another example for the ImageJ Macro language.
Colours and stylesheets
The colour schemes used for code highlighting are saved in stylesheets. You can create your own or use one already available in your L a T e X distribution. See the reference guide for a list of stylesheets included in Overleaf .
Using the borland stylesheet produces the following output:

The syntax to set a colouring style is easy, the command \usemintedstyle{borland} uses the colour theme borland to format the source code. You can find more colour schemes in the reference guide .
Captions, labels and the list of listings
Code listings formatted with minted can be included in a float element, just like figures and tables . Captions and labels can be assigned to code listings, and then later be referenced and included in a "List of listings".
The first page of this example contains the following output:

To print the list with all "listing" elements use \listoflistings . In the example above, the default title List of listings is changed to List of source codes by writing
The second page produced by the example above contains the following listing:

Reference guide
Colour styles for minted
Some colour schemes need a dark background to be readable.
Main supported programming languages and configuration files
Further reading
For more information see:
- Lengths in LaTeX
- Code listing
- Using colours in LaTeX
- Font sizes, families, and styles
- Font typefaces
- Management in a large project
- Multi-file LaTeX projects
- Table of contents
- Single sided and double sided documents
- The minted package documentation
- Documentation Home
- Learn LaTeX in 30 minutes
Overleaf guides
- Creating a document in Overleaf
- Uploading a project
- Copying a project
- Creating a project from a template
- Using the Overleaf project menu
- Including images in Overleaf
- Exporting your work from Overleaf
- Working offline in Overleaf
- Using Track Changes in Overleaf
- Using bibliographies in Overleaf
- Sharing your work with others
- Using the History feature
- Debugging Compilation timeout errors
- How-to guides
- Guide to Overleaf’s premium features
LaTeX Basics
- Creating your first LaTeX document
- Choosing a LaTeX Compiler
- Paragraphs and new lines
- Bold, italics and underlining
Mathematics
- Mathematical expressions
- Subscripts and superscripts
- Brackets and Parentheses
- Fractions and Binomials
- Aligning equations
- Spacing in math mode
- Integrals, sums and limits
- Display style in math mode
- List of Greek letters and math symbols
- Mathematical fonts
- Using the Symbol Palette in Overleaf
Figures and tables
- Inserting Images
- Positioning Images and Tables
- Lists of Tables and Figures
- Drawing Diagrams Directly in LaTeX
- TikZ package
References and Citations
- Bibliography management with bibtex
- Bibliography management with natbib
- Bibliography management with biblatex
- Bibtex bibliography styles
- Natbib bibliography styles
- Natbib citation styles
- Biblatex bibliography styles
- Biblatex citation styles
- Multilingual typesetting on Overleaf using polyglossia and fontspec
- Multilingual typesetting on Overleaf using babel and fontspec
- International language support
- Quotations and quotation marks
Document structure
- Sections and chapters
- Cross referencing sections, equations and floats
- Nomenclatures
- Lengths in L a T e X
- Headers and footers
- Page numbering
- Paragraph formatting
- Line breaks and blank spaces
- Text alignment
- Page size and margins
- Multiple columns
- Margin notes
- Supporting modern fonts with X Ǝ L a T e X
Presentations
- Environments
Field specific
- Theorems and proofs
- Chemistry formulae
- Feynman diagrams
- Molecular orbital diagrams
- Chess notation
- Knitting patterns
- CircuiTikz package
- Pgfplots package
- Typesetting exams in LaTeX
- Attribute Value Matrices
Class files
- Understanding packages and class files
- List of packages and class files
- Writing your own package
- Writing your own class
Advanced TeX/LaTeX
- In-depth technical articles on TeX/LaTeX
Kontaktiere uns
Hast du dir schon Wissensdatenbank angeschaut?
Anforderung gesendet, danke.
Search code, repositories, users, issues, pull requests...
Provide feedback.
We read every piece of feedback, and take your input very seriously.
Saved searches
Use saved searches to filter your results more quickly.
To see all available qualifiers, see our documentation .
- Notifications
LaTeX template for a Beamer presentation with code syntax highlighting provided by minted
fx-latex/template_beamer-minted
Folders and files, repository files navigation.
LaTeX Beamer template for code highlighting with minted. Since minted is used remember to compile with the --shell-escape option. For more details see: http://felix11h.github.io/blog/latex-beamer-minted
- Shell 21.8%
IMAGES
VIDEO
COMMENTS
then the tags \begin{minted}{python} and \end{minted} delimit an environment that print the text verbatim in monospaced fonts and also apply colour to comments, keywords and functions. The parameter python is the programming language the source code is written in. minted supports over 150 programming and markup languages as well as configuration files, see the reference guide for a list of ...
1 Introduction mintedisapackagethatallowsformattingsourcecodeinLATEX.Forexample: \begin{minted}{<language>} <code> \end{minted} will highlight a piece of code in a ...
This is the easiest with XeLaTeX or LuaLaTeX where you can set the monospaced font (i.e., the font used for minted, and also for \texttt, \verb etc) with the fontspec package. For pdfLaTeX there are various packages to set the document font (or sometimes only the mono font) but there the choices are much more limited.
minted - Highlighted source code for. L. a. T. X. The package that facilitates expressive syntax highlighting in LaTX using the powerful Pygments library. The package also provides options to customize the highlighted source code output using fancyvrb . Sources.
1 Introduction mintedisapackagethatallowsformattingsourcecodeinLATEX.Forexample: \begin{minted}{<language>} <code> \end{minted} will highlight a piece of code in a ...
Code listing of a File in LaTeX. Instead of going smaller, we can go bigger, printing and highlighting whole files. For this purpose there is the \inputminted {tex} {filename.tex} command, where you pass the language highlighting and the file you want to input, and this file is written as a block of minted code.
26 Oct 2013. Syntax highlighting can be achieved in LaTeX via listings or more recently with minted. The latter package uses Pygments to create beautiful code highlighting and includes fantastic additional features such as line numbering. Minted's compatibility with the Latex beamer class, however, is restricted and some workarounds (as laid ...
Abstract. The minted package provides automatic syntax highlighting for source code listings. It uses the excellent pygments highlighter, which provides very high quality highlighting for a wide range of languages. This example also shows how you can use minted to typeset LaTeX math embedded in your source code.
minted version 3.0 is now under development, thanks to a TeX Development Fund grant from the TeX Users Group.This will bring a new Python executable that replaces pygmentize.The new executable will be compatible with restricted shell escape, so no more -shell-escape with associated security vulnerabilities. The new executable will also make it possible to extend minted using Python, not just ...
This five-part series of articles uses a combination of video and textual descriptions to teach the basics of creating a presentation using the LaTeX beamer package. These tutorials were first published on the original ShareLateX blog site during August 2013; consequently, today's editor interface (Overleaf) has changed considerably due to the ...
CJ Harries. 26 Mar 2018 • 10 min read. This post serves as an introduction to minted, a pygments -based syntax highlighter for LaTeX. Adding pygments to LaTeX streamlines so many things. The post provides a few examples of things you can do with minted, details the installation process, and covers some basic security. Code. Overview. Installing.
Im using the Pygments for a lot of things, and I'd like to also use this in my latex report. I found the package Minted which interacts with Pygments, but some of the comments and some of the code overflows the right margin. I have used lstlistings' breaklines=true in the past, but I don't see a way to get that functionality using the Minted package, any ideas?
The minted package provides automatic syntax highlighting for source code listings. It uses the excellent pygments highlighter, which provides very high quality highlighting for a wide range of languages.. This example also shows how you can use minted to typeset LaTeX math embedded in your source code.
Note: For minted to work with your local LaTeX distribution, ... As demonstrated in the following example, the minted environment can be configured to modify visual presentation of the typeset code. Here, the minted environment uses several comma-separated parameters of the form key=value:
LaTeX template for a Beamer presentation with code syntax highlighting provided by minted - fx-latex/template_beamer-minted
A rude solution is put a color NAME in LaTeX (minted) in order to avoid a limmitation of minted (not CODE color for background, tes color NAME ) color; tcolorbox; minted; Share. Improve this question. Follow edited Jul 19, 2023 at 22:45. Mika Ike. asked Jul 19, 2023 at 21:47.
A popular option for creating presentations with LaTeX is the beamer package, which is widely supported through additional themes and add-on packages. To get started with beamer you can try one of these: Overleaf's introduction to beamer; part 3 of our free online LaTeX course; a presentation template listed in our Gallery. powerdot package
The minted package provides automatic syntax highlighting for source code listings—here's an example showing how to use it. minted uses the excellent pygments highlighter, which provides very high-quality syntax highlighting for a wide range of languages . An online LaTeX editor that's easy to use. No installation, real-time collaboration ...