Blog > All about notes in PowerPoint Presentations

All about notes in PowerPoint Presentations
08.06.21 • #powerpoint #tips.
Not only is a well-prepared PowerPoint presentation essential, but also a red thread and a fluent presentation. With the help of notes in PowerPoint, this is no longer a problem! In this blog post, we will not only explain how you can add powerpoint notes, but also how you can edit them and make good use of them during a presentation. We will also show you how to print out the notes and how to delete them again.
Inserting and editing notes in PowerPoint
- First open your presentation.

There are two ways you can print out the notes. With the slides or without.

Print notes with the slides

Print notes without the slides
Using notes during a presentation.

If you want to share your PowerPoint on Zoom without showing the audience your notes, there are several options. A very simple and straightforward option would be to simply print out your notes. If you have two monitors, PowerPoint will automatically set up the Presenter View for you. If you do not have a second screen, you only have to go to the three dots at the very bottom left during the presentation, there you can easily display the speaker view under "Speaker view".
Now, turn the tables! - Let your attendees take private notes
With the help of SlideLizard (a cool software for live audience interaction in PowerPoint), your participants can make private notes directly on their own smartphones during the presentation. These notes remain linked to the slides and at the end of the presentation, all participants receive their own notes via email. In addition, your audience can mark the most important slides with a star to make them easier to find again later. Moreover, with SlideLizard you can add live polls & quizzes directly in your PowerPoint. You can try SlideLizard for free today !

Deleting notes in PowerPoint
Of course, there is also the option of deleting the notes. You can delete them directly on the respective slides or you can delete them all at once. Proceed as follows:

Keyboard shortcuts for notes in PowerPoint
How can I add notes in PowerPoint?
To add notes in PowerPoint, go to "Notes" in the "View" tab or you can also insert notes via the status bar at the bottom right with just one click.
How do I print notes in PowerPoint?
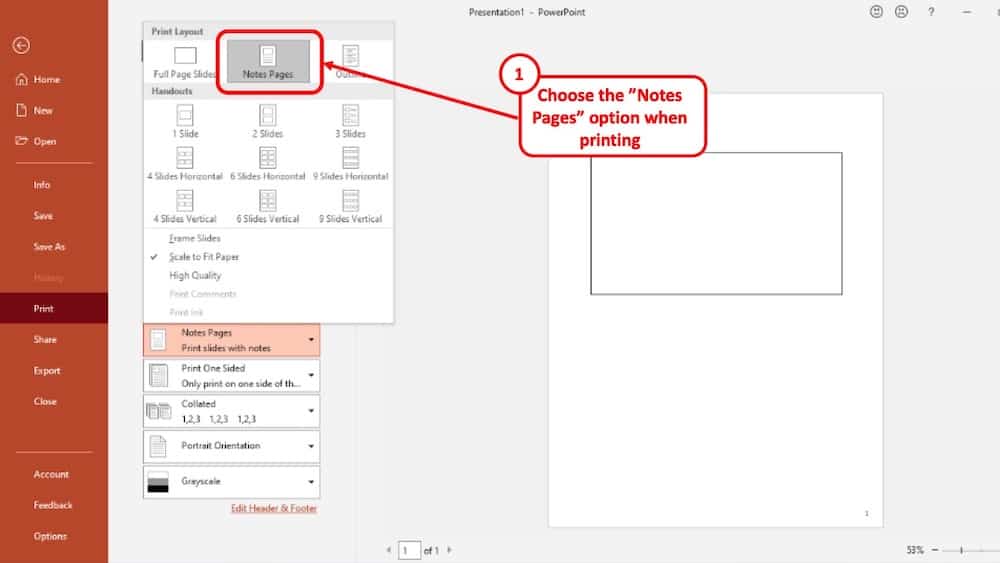
Go to "Print" in the "File" tab. Then select "Notes pages" in the print layout instead of "Full page slides".
How can I use the notes in PowerPoint during my presentation?
In order to see your PowerPoint notes during your presentation, you must check the box "Use Presenter View" in the tab "Slide Show" beforehand. They will then be displayed automatically during your presentation.
Related articles
About the author.

Miriam Rapberger
Miriam supports SlideLizard in the area of marketing and design. There she uses her creativity for blog posts, among other things.

Get 1 Month for free!
Do you want to make your presentations more interactive.
With SlideLizard you can engage your audience with live polls, questions and feedback . Directly within your PowerPoint Presentation. Learn more
Top blog articles More posts

Free Christmas PowerPoint Template

Editable Country & world map templates for PowerPoint Presentations

Get started with Live Polls, Q&A and slides
for your PowerPoint Presentations
The big SlideLizard presentation glossary
Effect options.
In the effect options in PowerPoint, further details can be specified for the selected effect.
Extemporaneous Speech
An extemporaneous speech is a speech that involves little preparation, as the speaker may use notes or cards to give his talk. It is important that speakers will still use their own words and talk naturally. .
Recall Questions
With recall questions, you have to remember something or something has to be recalled. Example: A teacher asks his students a question so that they remember the material from the last lesson.
B2B means Business to Business. B2B events are between at least two companys. They help to build interpersonal relationships, which are important for a successful company.
Be the first to know!
The latest SlideLizard news, articles, and resources, sent straight to your inbox.
- or follow us on -
We use cookies to personalize content and analyze traffic to our website. You can choose to accept only cookies that are necessary for the website to function or to also allow tracking cookies. For more information, please see our privacy policy .
Cookie Settings
Necessary cookies are required for the proper functioning of the website. These cookies ensure basic functionalities and security features of the website.
Analytical cookies are used to understand how visitors interact with the website. These cookies help provide information about the number of visitors, etc.
- GTA 5 Cheats
- What is Discord?
- Find a Lost Phone
- Upcoming Movies
- Nintendo Switch 2
- Best YouTube TV Alternatives
- How to Recall an Email in Outlook
How to add notes to your Microsoft PowerPoint slides

When you present a slideshow, it’s likely that you have more to say than what displays on the slides. You may want to expand on the text you’ve included, or if the slide only contains visuals, explain them further.
Add speaker notes to a slide in PowerPoint
Hide notes while editing a slideshow, view speaker notes during a slideshow.
Luckily, Microsoft PowerPoint provides a built-in feature for speaker notes. This allows you to add notes to each slide and then see them in Presenter View when you start the show.
What You Need
Microsoft PowerPoint
Open your PowerPoint presentation and select the first slide where you want to add notes.
Step 1: Go to the View tab and choose either Normal or Outline View . This allows you to see your slide along with the note you plan to add.
If you’re wondering how to add a note in PowerPoint without changing the view, the short answer is: You can’t. But if you prefer not to use Normal or Outline View, you can check out the Notes Page view in the same section of the ribbon.
While still technically a “view,” this displays your slide and a text box for your note as a printed page, as shown below.
Step 2: Display the Notes panel below the slide if it’s not visible using one of the following:
- Click the Notes button in the Status Bar at the bottom.
- Move your cursor to the bottom of the window. When you see the two-sided arrow, drag up until the panel displays.
- How to add audio or video to Google Slides
- How to change your background in Microsoft Teams
- How to embed a YouTube video in PowerPoint
Step 3: When the panel is empty, you’ll see “Click to Add Notes” within it. Place your cursor in the box and type your note.
Step 4: You can apply simple formatting to your note using the tools on the Home tab or in the floating toolbar. This is handy if you want to add bullet points or emphasize the font with bold, italics, or an underline.
Step 5: If you have a lengthy note within the panel, you’ll see a scrollbar appear on the right so that you can move down and see the entire note. You can also drag up on the panel to enlarge it.
If you want your slide in full view as you're assembling or editing your slideshow, you can hide the presenter notes. This does not delete them; it merely moves the notes panel out of view.
Do one of the following to hide your notes:
- Drag the notes panel downward until it no longer displays.
When it’s time to present your slideshow, you can use Presenter View to see your speaker notes. This allows you to view the notes for each slide on your monitor while presenting the slideshow on another. Your audience will not see your notes.
Step 1: Go to the Slide Show tab. On Windows, check the box for Use Presenter View in the Monitors section of the ribbon. On Mac, click the Presenter View button in the Start Slide Show section.
If you’ve already started the slideshow, you can still turn on Presenter View. Click the Three Dots in the Presenter Toolbar and choose Show Presenter View (Windows) or Use Presenter View (Mac).
Step 2: You’ll then see your notes display on the right side of the screen, with your slide on the left. As you advance each slide, the notes will display accordingly.
Step 3: The text for your note wraps automatically to the next line, and you have a scrollbar to move through those lengthy notes.
To adjust the font size for the notes, use the buttons below the notes panel.
Whether you want to add notes to PowerPoint to talk through your slideshow or simply as references while you assemble your slides, be sure to take advantage of this built-in feature.
For additional ways to work in Microsoft PowerPoint, check out how A.I. can help you create your slideshows .
Editors' Recommendations
- Best Microsoft Office deals: Get Word, PowerPoint, and Excel for free
- How to convert Google Slides to PDF
- How to buy Microsoft Office: all methods, explained
- How to convert a PowerPoint to Google Slides
- How to create a new team in Microsoft Teams
- How-To Guides

PowerPoint makes it easy to give a great presentation thanks to intuitive software that lets anyone craft an eye-catching deck. What's even better, however, is the option to use Presenter View. This lets you leave notes for yourself that can be viewed on your computer screen while everyone else is only seeing your presentation.
Do you have any clue how much power your PC consumes when you’re playing video games? Or how about when it’s just sitting idly? Whether you’re trying to figure out how to cut down on energy costs, or simply want to know how much toil your PC endures when running Abode Creative Suite, you’ll want to learn how to measure your PC’s power draw.
Fortunately, there are several different tools you can use to monitor this important statistic. Some are built right into your operating system, while others will require a separate download. You can also purchase certain external devices to keep tabs on your desktop’s energy output.
Choosing the right font for your presentation is important. While Google Slides has a good selection of fonts, you may want something different. Even though you cannot upload or use a font from your computer in Google Slides, there are ways to get more font choices.
Here's how to get and add fonts in Google Slides:
How to Add Notes to PowerPoint Presentations: A Comprehensive Guide

Sara Wanasek

Presenting a slideshow can be a daunting task, especially when you’re speaking to a large audience. Thankfully, most presentation software comes equipped with the ability to add notes to your slides, making it easier for you to stay on track and deliver a seamless presentation – no full memorization needed.
In this blog, we will explore two different ways that you can to add notes to PowerPoint:
- Presentation notes that you prepare in advance and only you can see or
- Adding live notes to your presentation for your audience to see
By leveraging these techniques, you’ll be able to engage your audience effectively and deliver memorable presentations. Let’s dive in.
How to Add Presenter Notes in PowerPoint
Presenter Notes in PowerPoint are notes that you can view on your screen while you are presenting. Your audience will not see these notes, just you, so you can stay on track, remember important points, and deliver your information clearly and easily. Presenters, here’s everything you need to know to add notes to PowerPoint.
Add Notes in Edit Mode
Notes can be added to any slide in PowerPoint. Follow these steps:
- Start by clicking on the Notes button located beneath each slide. If you don’t see it, click on the View tab at the top of the screen and then click on Notes Page.
- Begin typing your notes for that slide, providing additional details, reminders, or cues to guide your presentation.
- Repeat the process for each slide you want to add notes to.
Once you’ve added your notes, you’re ready to deliver your presentation with confidence!

Present with Notes
Now that your notes are added to your presentation, let’s learn how to use them during the presentation. Do note that to present with the Presenter Notes, you will need to be connected to another screen or projector.
- First, select the Slide Show tab in the PowerPoint ribbon
- In the Set Up section, click the check box for Presenter View
- Enter Presentation Mode! You should see your presentation on one screen (such as your projector) and your notes displayed on the other screen (such as your laptop).
⚠️ If the Presenter view appears on the wrong screen, you can swap this by clicking on the Display Setting on top of the Presenter view screen.

As you move through your slides, your notes will automatically advance with the slides, keeping you right on track.
Print Notes
If you prefer a physical copy of your notes to present with or want to share it with your audience, you can print them from PowerPoint.
To do this go into File → Print → and under Settings , choose Notes Pages . Now, you can Print .
Presenting with notes in your PowerPoint presentation helps you stay on track, maintain confidence, engage your audience, adapt to unexpected situations, and appear professional and organized, ultimately leading to a smoother, more impactful delivery. But what if you want to further explain a concept with notes and annotations during your presentation? You can with annotation tools! →
Add Notes During a Presentation
Need to add notes to aid your presentation and help your audience understand, follow along, and stay engaged? Presenter tools such as annotations are great tools to help your presentation delivery and pace. By interacting with your slide information throughout your presentation, you can encourage active learning and audience participation in the presentation. There are a few ways you can add notes to PowerPoint:
Add Notes to Any Slide
During your presentation, you can add notes in two main ways:
1.You can use PowerPoint’s built-in simple pen and highlighter to add notes to your slide. This is found in the bottom left corner of the screen click on the pen and choose your color to begin drawing.
2. For sightly more advanced pen tools, text boxes, and shapes, you can use the free PowerPoint add-in ClassPoint, to add notes to PowerPoint sides . Once downloaded, ClassPoint , an audience engagement tool, will add a toolbar at the bottom of your presentation screen with these additional annotation & presentation tools .
This gives you different thickness options and color options for the pens , highlighters , shapes , and text boxes on your slide.
Insert Whiteboard Slides
Did you know you can even add a blank whiteboard slide into your PowerPoint presentation while you are presenting? With ClassPoint, it’s true!
Perfect for when you run out of space, want to brainstorm, or have fresh details to convey to the audience.
To add a whiteboard slide to your presentation, click on the Whiteboard icon on the ClassPoint toolbar. From there, choose a template provided, or add your own whiteboard background design . This slide will be opened & inserted right into your presentation and you can begin adding your notes. All annotations added will be saved once you exit out of the presentation mode.
Add disappearing laser ink
With ClassPoint’s presentation toolbar, you can also use the laser pointer to write with disappearing ink!
Although this will not save to your slide, it is a great way to help your audience follow along and make connections to your slide information.
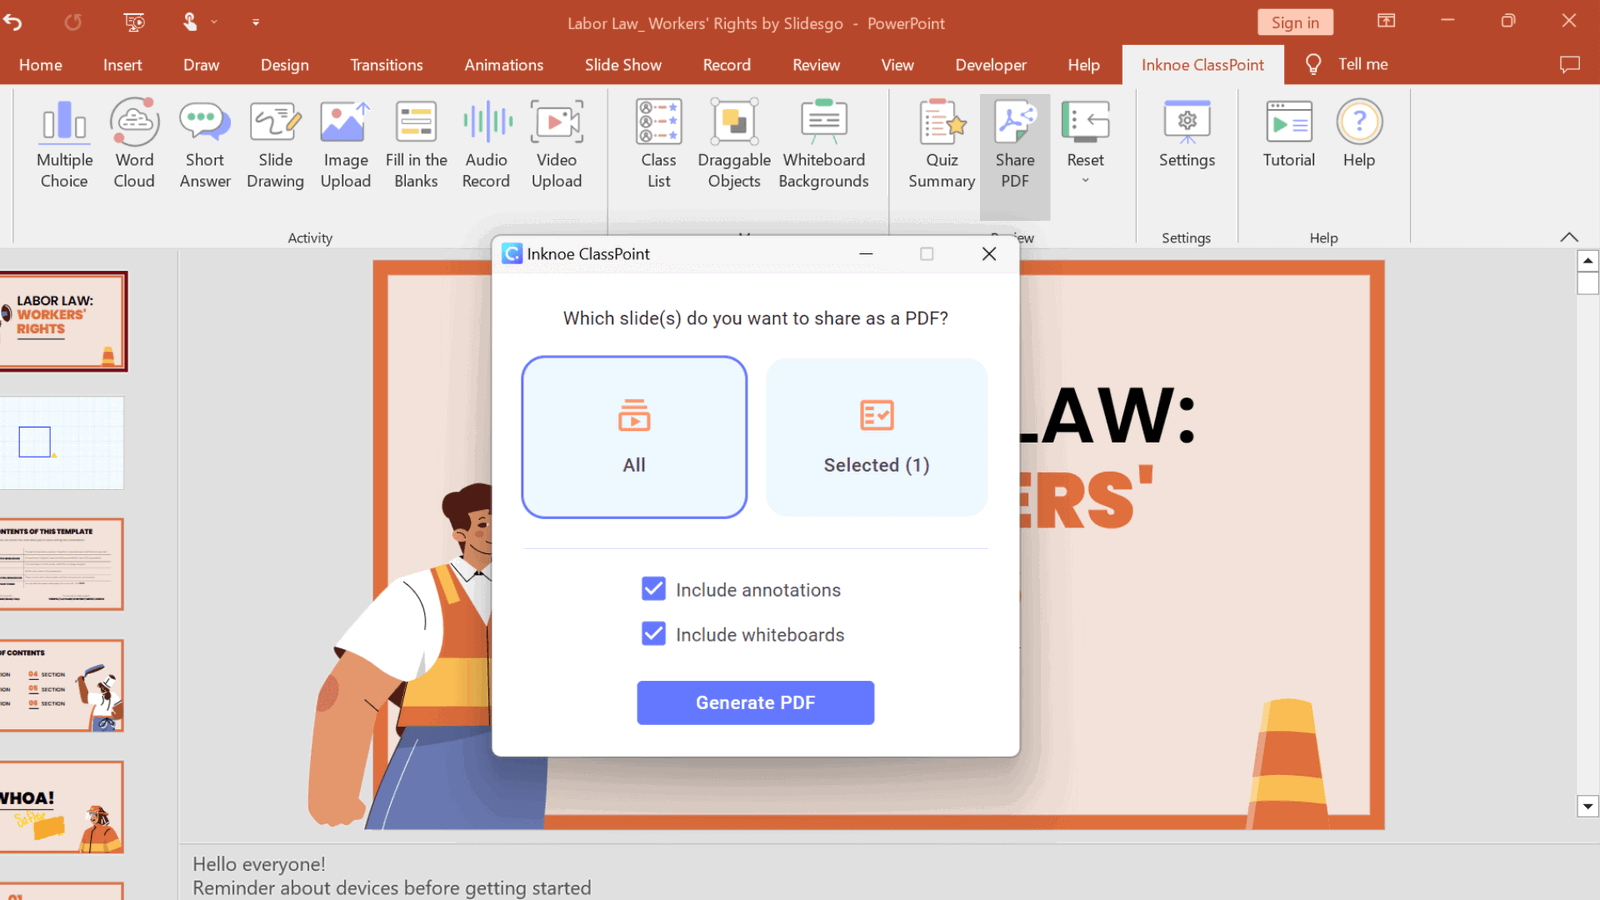
Share Notes
Just like when you printed your Speaker Notes above, you can also share all the notes you added to your PowerPoint slides. Print your presentation, or share it with your audience via a QR code.
Click on the Share PDF icon on the ClassPoint tab in the PowerPoint ribbon. Select to include the whiteboard and annotations that you made and click Generate . A QR code will appear that your audience can scan to access your PowerPoint slides and see all the notes you have added!
Overall, adding annotations to your PowerPoint presentation is a great way to enhance your message, engage your audience, and make your presentation more effective. So if you haven’t tried it before, why not give it a go and see the difference it can make to your next presentation?
Adding notes to your presentation is a simple but effective way to elevate your overall performance. Whether you’re adding notes in edit mode or during your presentation, PowerPoint offers a variety of tools to help make your presentation a success. Start implementing these strategies with ClassPoint, and watch as your presentations become more engaging and impactful than ever before!
About Sara Wanasek
Try classpoint for free.
All-in-one teaching and student engagement in PowerPoint.
Supercharge your PowerPoint. Start today.
500,000+ people like you use ClassPoint to boost student engagement in PowerPoint presentations.

Everything You Need to know About Notes in PowerPoint
- Post author: Jacob Stauttener
- Post published: October 11, 2021
- Post category: Presentations
- Post last modified: August 15, 2022
- Reading time: 23 mins read
Please Share This Share this content
- Opens in a new window
Do you have a presentation to make and find yourself wondering how to add notes to PowerPoint?
Adding notes to your PowerPoint Presentation is a simple and effective way to make presenting easier. In this article, we will go over how you can add notes to PowerPoint, tips on using those notes, and how to print some fancy PowerPoint notes.
Now, let’s get right into it!
Why Would I Want Notes in my PowerPoint?
PowerPoint Slides are not meant to be your script. They are meant to enhance your message and help guide the attention of your audience. Generally, you want the audience’s focus to be on you and your spoken word – not your slides.
The temptation for many first starting with PowerPoint is to place all of the information they need to discuss on the slides. The problem with this is that the audience begins to read your slides and lose concentration on the words from your mouth. When the audience reads your slides ahead of you, they often lose their interest fast and their attention is split between your words and what is on the slide.

PowerPoint gives you a simple way to add notes to your slides that your audience never sees. These notes are there to help you so you never have to use your presentation deck as your script. Instead, you the notes section.
So, how do we add notes to PowerPoint?
How to Add Notes to PowerPoint
Microsoft made adding notes to PowerPoint extremely easy. All you have to do is go down to the bottom of the screen where it says “Click to add notes”. Once you click there, you can add in your notes for the presentation.

I recommend that you use this for a point form. For my videos made from converted PowerPoint files, I like to write my full script there. I have also seen marketing, communications and presentation professionals use this space for stage and technical directions too.
What to do if you Don’t See the Notes Section
If you don’t see the notes section, there is a little tab at the bottom of the screen that you can click to make the notes appear.

I want to point out that the you can adjust the separating bars between sections. You can change the size of the notes area by hovering over the line and then clicking, holding and dragging that line to resize the area.

Different Views and Adding Notes
Speaking of different views, you don’t need to write out all your notes on the default slide design page (also known as the “Normal” View). You can also access these notes in the “Outline View” and the “Notes Page” too.

Personally, I like editing my notes in the “Normal View”. Remember that you can resize your notes window by hovering over the bar above it. When you see the two sided arrow, click and drag to resize the window. That will give you ample room to edit your notes while viewing your slides. The “Notes Page” is also a good view for editing your notes.
How Should I Write Up my Notes in PowerPoint?
How you write up your notes for your presentation is completely up to you. My opinion is that the best method is to write out a series of point form notes that remind you of your salient points and to act as a guide to keep you on track. This way, you don’t get off track, cover everything you want and maximize your potential interaction with the audience.
To me, so long as you know the content, this is the best way to present to your audience as it allows flexibility in your delivery to cater to the room. It his harder to adjust to your delivery if your presentation is fully scripted out.
- My opinion – point form notes are the best
- State only your salient points
- Use as a guide to stay on topic and to remember important points
- There are also plenty of reasons to fully type out your presentation script
While I prefer bullet point scripts when I present, your support crews would likely prefer that you stick to a fully written script with stage directions. This helps the show go smoothly for larger events where you have people helping the presenter in the delivery of their message. When the presenter follows a full script completely it helps everyone involved in that delivery stay on track and not miss queues such as when to change the slide, join in the conversation, or adjust an AV setting (like lighting).
As mentioned earlier, you could add stage directions in the PowerPoint notes section for the presenter or tech crew. Let’s talk a little bit about that now.
Use Your Notes for Stage Directions Too
Using the Notes section of PowerPoint, you can add in reminders for yourself (and anyone helping) about stage and technical directions. Perhaps you have an external video that you want queued up or a secondary source shown for a live demo. You can add this there to keep everyone on track. If you have multiple presenters delivering different parts of the presentation to your audience, you can also use the Notes section to direct who will be presenting each part.
[Square Brackets] are a common way to differentiate the spoken script words from the presentation directions. Italics also work well .
Highlights will show up in your handouts “Notes Page”, but they don’t generally show in other modes of PowerPoint. I advise sticking to Square Brackets, Italics or whatever you find already works with you and your support staff.
Again, how you choose to write your script in PowerPoint notes is up to you. As a presenter, I prefer bullet points. When I use PowerPoint to create hobby videos, I like to use a full written script. While supporting presenters as a media technician, I prefer a fully scripted notes section with stage directions.
You will have to find what works best for you. Now, let’s chat about how to actually use the notes section of PowerPoint when it comes to Presenting, Recording and printing Handouts.
How to use PowerPoint Notes – Presenting, Recording and Handouts
Now that we have the notes in our presentation, how do we use them? Microsoft gave us three effective ways to use these notes. You can use them as your speaker notes while you present to an audience, notes while you record a presentation, and as part of a handout for your audience. Let’s go through how to do all three of these uses for PowerPoint notes.
How to Present with Speaker Notes
Just like adding notes, presenting with speaker notes is extremely easy. All you have to do is present in Presenter view with two screens. This second screen could be your home monitor, a TV at the office or a projector at a convention center.
To make sure that your presentation is set up to take advantage of presenter view, go to “Slide Show”. From there, make sure that “Use Presenter View” is selected. When you go to show the presentation, the computer will automatically set up one screen with the presenter’s view and the other with the full screen slides.

You can change which screen the slides show on by changing the “Monitor”. The other will become your Presenter View screen.
A Quick Look at the Presenter View
This is a fantastic tool for both anyone who has to control a PowerPoint presentation in front of a live audience or anyone presenting to a virtual audience too. As a media technician I use this view all the time. It is great for following the scripts of the presenters and also works out great while running webcasts too. The only problem about this view is that you need two monitors to get the option to function.

The screen shot above shows a PowerPoint deck that I turned into a video for a YouTube channel. This is the presentation showing in “Presenter View”. The slide is on the left, the next slide is on the right and under it is my script (or the notes section).
When you go to record your slide deck, you can also still access your notes. Let me demonstrate below.
How to Record with Speaker Notes
To record a presentation, you go to “Slide Show” followed by “Record Slide Show”.

There you will find the notes on a toggle button near the top middle of your screen.

I find this one annoying to use because it is so small, but its location forces you to look almost directly into your laptop’s webcam (as most laptops have it located at the top of the computer screen). If you are recording video with you content in PowerPoint, this is a huge bonus! I can’t think of a better place to put the script other than right under the camera for giving the audience the impression that you are talking to them when you are reading your script.

How to Print Speaker Notes with Slides in PowerPoint
Even though we live in a paperless society, we still need to make printouts and hand outs. You can make them electronically (as PDFs) or physically on paper. One great way to access your notes is through the Notes Page. You can find this by clicking on “View” and then “Notes Page.”
If you have any presenters that want a printed copy of the notes for the podium (or technical or communications staff that also need the notes), I recommend that you print off the slide deck’s “Notes Page”.

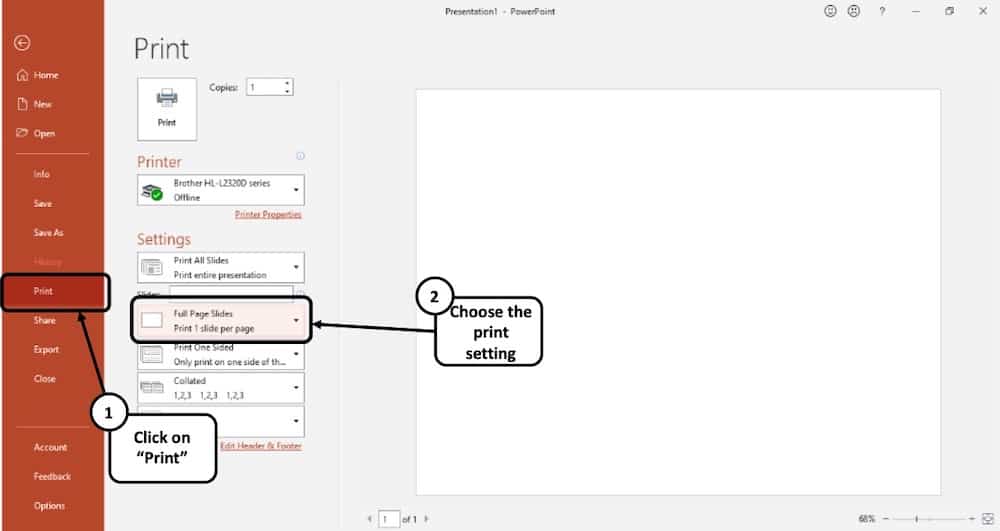
To print your notes, select “File” and then “Print”. Here you will find a drop down for the slide layout. It likely says “Full Page Slides” to start. Change this to “Notes Pages”. You will see an image of the printer page further down in the article when I show you how to make fancy handouts with this same view.
Below is how the printout will look by default. Personally I find this layout very straight forward to work with.

“But wait, you mentioned I can turn this view into good looking handouts. How do I do that?”
Creating Impressive Handouts with Notes – Altering the Layout of Handout Notes in PowerPoint
Now let’s look at how to take the notes (or script) of your presentation and turn that into a nice handout to give to your audience.
As a tip, I like to back up my files before I mess around with the layouts, but that is up to you on whether you do that or not.

To print, I went to “File” and then “Print”. On the print screen, I make sure that I choose the “Notes Pages” under the settings.

You can then print these handouts as PDF files or as physical copies.
Creating PowerPoint Handouts with Word
As with all things computers, there are usually multiple ways to doing things. Sometimes, those ways lead to different results but cover the same end goal. Here is another way to do handouts. This time, we utilize Microsoft Word.
You may want to back up your work before you go through with this just to be on the safe side.

As a note, the function to export PowerPoint to Word takes a lot of memory. If you run into problems or see the message “PowerPoint couldn’t write to Microsoft Word,” restart your computer. Then run the Export with all other programs closed. If that still does not work, split the PowerPoint into two separate presentations. One with the first half of the slides and the other with the second half. Export both of those presentations and then combine them in Word.
Relevant Links…
In this post, I made reference a few times to my hobby videos On top of Tech Presenters, I run another website focused on tabletop gaming. That website also has a YouTube channel connected to it. I made all of my early videos on that channel using PowerPoint. Now I use video editors instead, but it is surprising how much you can do with PowerPoint.
If you are interested in video editors, check out my article “ The Best Free Video Editors Out There For the PC” . You can also find more PowerPoint Tips right here on Tech Presenters. One article that I would like to direct your attention to is “ The Hottest PowerPoint HotKeys for Presenters “. Be sure to check that article out for some HotKeys that could help you present better in front of an audience.
Turning back to this article, the PowerPoint files that I screen captured are from the videos listed below. I made them using PowerPoint and even wrote my scripts into the notes section of the program.
- LED Lamp Review for Painting, Building and Photographing Miniatures – Lamp by GameCraft Miniatures
- 28mm WW2 Soviet Train Station Review – MDF Terrain by Things from the Basement soon on Kickstarter
- Monster Scenery Terrain Review – Broken Ground – Pre-painted terrain for miniature gaming and RPGs
On top of these videos, I also have a related Website called Must Contain Minis .
For those wondering, I am using Office 365 on Windows 10.
Now, let’s finish up this article.
Bringing it Together…
In this article, we went over how to add notes to PowerPoint. Not only that, but we went further and also discussed how to use the notes during presentations, for recording and for printing off handouts.
As a presentation support professional, I find coupling my slides with notes extremely handy. As a presenter, these notes help me stay on track and to make sure that I cover all of the important points that I wanted to make. Knowing how to use these notes, and how to get the most out of them, really helps in delivering the best presentations that you can.
Personally I like to keep back up files and older versions of my files in case I run into any problems. In general, I am pretty cautious in my approach and there is not harm in keeping multiple files. Just make sure that you name them well and work on the newest version. I figured I would leave that reminder here. If you are playing around with the layout of your notes page or messing around with what appears on them, it might be a good idea to keep a back up to go to in case things don’t work as intended.
Until next time, Happy Presenting Everyone!!!
You Might Also Like

How Do I Embed a Video in PowerPoint? Great Advice for 2023!

Final Tips for Online Meetings and Presentations

How to Record in PowerPoint – All You Need to Know
This post has one comment.
Pingback: How to Make Bullet Points Show 1 by 1 in PowerPoint - Tech Presenters
Comments are closed.
By continuing to use this website, you consent to the use of cookies in accordance with our Cookie Policy.

- PRESENTATION SKILLS
Managing your Presentation Notes
Search SkillsYouNeed:
Presentation Skills:
- A - Z List of Presentation Skills
- Top Tips for Effective Presentations
- General Presentation Skills
- What is a Presentation?
- Preparing for a Presentation
- Organising the Material
- Writing Your Presentation
- Deciding the Presentation Method
- Working with Visual Aids
- Presenting Data
- Managing the Event
- Coping with Presentation Nerves
- Dealing with Questions
- How to Build Presentations Like a Consultant
- 7 Qualities of Good Speakers That Can Help You Be More Successful
- Self-Presentation in Presentations
- Specific Presentation Events
- Remote Meetings and Presentations
- Giving a Speech
- Presentations in Interviews
- Presenting to Large Groups and Conferences
- Giving Lectures and Seminars
- Managing a Press Conference
- Attending Public Consultation Meetings
- Managing a Public Consultation Meeting
- Crisis Communications
- Elsewhere on Skills You Need:
- Communication Skills
- Facilitation Skills
- Teams, Groups and Meetings
- Effective Speaking
- Question Types
Subscribe to our FREE newsletter and start improving your life in just 5 minutes a day.
You'll get our 5 free 'One Minute Life Skills' and our weekly newsletter.
We'll never share your email address and you can unsubscribe at any time.
When you start to give presentations, you will realise that you also have to work out how to manage your text.
Whether you’re confident enough to speak with very brief notes, or you need a full text, you need to consider how you record it to remind you what you’re going to say.
There are various examples of ways you might choose to manage your text.
These include:
Full Text Notes
Notes on Cue Cards
Keywords on Cue Cards
Full text script.
The main advantage of this method is that the entire text is in front of you so you cannot forget what you want to say.
The disadvantage, however, is that you will pay less attention to the group or audience whilst reading the text. If you are speaking to a small group, this method might be overly formal, as written text sounds very formal when spoken out loud. If you read a prepared text, you should know what you are going to say very well so that you can maintain eye contact with your listeners whilst not losing your place.
Reading the text is not always an easy option as it can sound stilted and rather unnatural. Remember to engage with your audience as much as you can.
When reading from a full-text script it is also much harder to change what you’re going to say halfway through, if you see that your audience is starting to fidget.
To help, you can use big bold headings to guide your eyes through the text so that you can skip sections if you want.
Notes Pages from a Slide Package
Most presentation packages, including PowerPoint, have an option to create a page of ‘Slide Notes’.
You can use these to write out more or less detailed points about what you plan to say in relation to every slide that you use.
The advantage is that everything that you want to say is tailored to your slides. However, the packages are not very sophisticated: you cannot, for instance, highlight sections, or play with the font size very easily. This means that it can be hard to identify quickly and visually the most important points to make.
You will also end up with a sheaf of papers, which can get a bit flappy and hard to handle. This can come across as somewhat unprofessional.
To use cue cards, write your main points on separate index cards and, underneath each point, write the supporting material in a concise way.
When using Cue Cards...
Use only one side of the card and number the cards so that you can easily reorder them if you drop them.
On the bottom of each cue card, write a link statement to lead you into the next point.
The advantage of using cue cards is that you are speaking directly to the audience, which increases your rapport with them.
Small index cards also look more professional than large sheets of paper which may prove difficult to handle. The disadvantage is that you have to write them by hand since PowerPoint and similar packages don’t offer an option for ‘keycards’, only ‘Notes pages’.
To avoid losing your thread, ensure that you are familiar with the main points of your argument and the links between one idea and the next so that you become less reliant on the cards.
Further simplify the information on the cue cards by drawing out keywords that will remind you of the key points that you wish to convey.
The advantages of using keywords on cue cards are the same as above but their use increases spontaneity and rapport with the audience even further.
However, if you become side-tracked, it is easy to lose the thread and possibly miss key points. It’s best only to use this method if you are very familiar with your subject and feel confident in making the presentation.
Mind maps are diagrams used to represent words, ideas, tasks, or other items linked to and arranged around a central key word or idea. Mind maps are used to generate, visualize, structure, and classify ideas, and can be used as notes to aid a presentation.
The advantages of using a mind map are similar to those of using keywords on cue words but it is easier to illustrate complex relationships than with keywords.
However, again, using mind maps as a presentation aid requires you to be familiar with the subject material and a confident speaker. When presenting it can be difficult to keep track of your progress through a mind map, but it can be very helpful if you want to interact with your audience, as you can just reorder your points to fit the session.
It’s up to you!
When you’re giving a presentation, it’s up to you to choose a method of handling your notes that works for you.
Whatever you do, someone is sure to judge you on it, so you simply have to make sure that you’re comfortable, and don’t worry what anyone else says.
The important thing is to get your points across confidently and competently, and not to show off.
Continue to: Working with Visual Aids Deciding the Presentation Method
See also: Preparing for a Presentation Writing Your Presentation Coping with Presentation Nerves Dealing with Questions

How to Print a PowerPoint Presentation with Notes

Print PowerPoint Presentations with Speaker Notes
by Avantix Learning Team | Updated May 30, 2022
Applies to: Microsoft ® PowerPoint ® 2010, 2013, 2016, 2019, 2021 and 365 (Windows)
You can print PowerPoint presentations with notes with or without slide thumbnails. You can control the way notes or speaker notes are printed in three ways – by editing the Notes Master which affects all slides, by editing single notes pages in Notes Page view or by changing formatting in the Notes pane in Normal View.
In Notes Master View, you can control the position and formatting of all notes pages and add or edit headers, footers, dates, page numbers and even company logos. In Notes Page View, you can control the position and formatting of single notes pages and you can also add other objects such as shapes, pictures, tables, charts and SmartArt. You can't draw shapes or insert pictures in the Notes pane in Normal View but you can draw shapes or add pictures in Notes Page View. Pictures and other objects that you add in Notes Page View appear on printed notes pages but not in Normal View.
Recommended article: How to Export PowerPoint Speaker Notes to Microsoft Word
Do you want to learn more about PowerPoint? Check out our virtual classroom or in-person PowerPoint courses >
Formatting changes made in different views in PowerPoint will appear in the preview area when you click the File tab in the Ribbon, select Print and then choose the option to print Notes Pages.
To move between different views, use the View tab in the Ribbon as shown below:

Print a PowerPoint presentation with notes and slide thumbnails
To print a PowerPoint presentation with notes and slide thumbnails (one per page):
- Click the File tab in the Ribbon and then click Print.
- Under Settings, click the arrow next to Full Page Slides and then in the Print Layout area, click Notes Pages. The preview on the right will display the current notes page. If you've inserted headers, footers, page numbers and a company logo, they will display in the preview. Formatting and any objects you've added in Notes Page view will also appear.
- To specify the page orientation, click the arrow next to Portrait Orientation and then click Portrait Orientation or Landscape Orientation.
- If you want to print your notes and slide thumbnails in color, select a color printer, click the arrow next to Color and then click Color.
- Select any other options you'd like in the Settings area.
- Click Print.
Below are the PowerPoint Print settings:

Print a PowerPoint presentation with notes but without slide thumbnails (notes only)
If you want to print the presentation without the default slide thumbnails, you will need to delete the thumbnail for each slide in its Notes Page. Before proceeding, you may want to make a copy of your presentation and work in the copy.
To print a PowerPoint presentation with notes but without slide thumbnails:
- In Normal View, display the slide with the thumbnail you want to delete.
- Click the View tab in the Ribbon and in the Presentation Views group, click Notes Page.
- To delete the slide thumbnail on the notes page, click the slide thumbnail and then press Delete.
- Repeat for each slide.
Resize the notes area of a single notes page
A default notes page consists of a slide thumbnail on the top half of the page and a section of the same size for notes on the bottom of the page. If you'd like to increase the space for your notes, you can resize these areas.
To increase the space for notes for a single notes page:
- In Normal View, display the slide to which you want to increase the space for notes.
- If you want to increase or decrease the size of the slide thumbnail or notes placeholder on the notes page, drag a sizing handle on the slide thumbnail or notes placeholder in the same way that you would resize other PowerPoint objects. Use a corner handle when resizing the slide thumbnail so you do not distort it. You do not need to use a corner sizing handle for the notes placeholder.
- If you need to move the slide thumbnail or notes placeholder, click the border (not a handle) of the thumbnail or placeholder and drag or press the arrow keys on your keyboard.
- If you want to delete the slide thumbnail on the notes page, click the slide thumbnail and then press Delete.
Below is a default notes page in Notes Page View:

Add objects on a single notes page
You can add objects on a single notes page (which will print but will not appear in Normal View).
To add an object on a single notes page:
- Click the Insert tab in the Ribbon and add the desired shape, picture, table, chart or SmartArt.
- Resize and format the object as necessary.
- Move the object to the desired location.
Resize the notes area of all notes pages
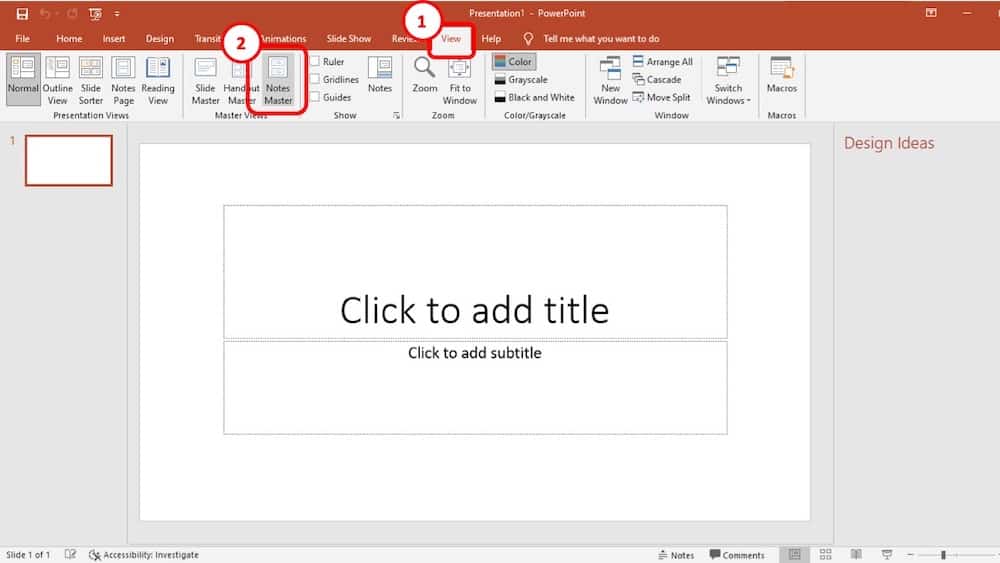
You can also resize the notes area of all notes page using the Notes Master:
- Click the View tab in the Ribbon and in the Master Views group, click Notes Master.
Do not delete the slide thumbnail in the Notes Master View as it has no effect and will still preview.
Below is the default notes page in Notes Master View:

Change font size for all notes pages
You can change font size in the Notes Pages View or in the Notes pane in Normal View. However, to change the font size for the notes for all notes pages:
- Select the desired level in the notes outline and change the font size. You can change the font size using the font size menu in the Home tab in the Ribbon or by right-clicking and selecting a font size in the mini toolbar that appears.
It's best to change the font by changing the font theme through the Design tab in the Ribbon (this is hidden in the Variants drop-down gallery in 2013 and later versions of PowerPoint). If you change the font theme, this will affect the entire presentation (both slides and notes) and is best set when you first create your presentation. Otherwise, users may manually apply fonts on each slide which would override the theme.
Print a logo on all notes pages
To add an object such as a logo to all the notes pages in your presentation (and print it), you will need to edit the Notes Master:
- Click the Insert tab in the Ribbon and click Picture(s).
- Navigate to the folder with the picture / logo you want to insert and double-click it.
- Resize the picture by dragging its handles.
- Position the picture by dragging it (usually by its middle area).
It's best not to delete placeholders (such as header and footer) to accommodate the logo. Instead, move the placeholders to an alternate location.
Print headers and footers on all notes pages
As long as placeholders appear in the Notes Master, you can insert slide numbers, a date and text using the Header & Footer command.
To print headers and footers on all notes pages (assuming you want to print notes only):
- Click the View tab in the Ribbon and click Notes Master in the Master Views group. Note the placeholders in this view. If necessary, move the placeholders to alternate locations by dragging their borders. It's best not to delete header, footer, date or page number placeholders.
- Click the Insert tab in the Ribbon and click Header & Footer in the Text group. A dialog box appears.
- If necessary, click the Notes and Handouts tab in the dialog box.
- Ensure the check box for Page number is checked. You can also check Header, Footer and Date if required. If you check Header and / or Footer, enter text you want to appear in the header or footer text boxes. This could include your company name, your name, your contact information and / or the name of the presentation.
- Click Apply to All.
Below is the Header & Footer dialog box:

You can also print PowerPoint speaker notes in a Microsoft Word document. If you'd like to explore this option, check out the article How to Export PowerPoint Speaker Notes to Microsoft Word .
Subscribe to get more articles like this one
Did you find this article helpful? If you would like to receive new articles, join our email list.
More resources
How to Add and Format Notes in PowerPoint
How to Export PowerPoint Speaker Notes to Microsoft Word
How to Hide and Unhide Slides in PowerPoint (with Shortcuts)
How to Quickly Remove All Speaker Notes in PowerPoint (PC or Mac)
3 Ways to Change the Font on All Slides in a PowerPoint Presentation
Related courses
Microsoft PowerPoint: Intermediate / Advanced
Microsoft PowerPoint: Design for Non-Designers
Microsoft PowerPoint: Animations Bootcamp
Microsoft Excel: Intermediate / Advanced
VIEW MORE COURSES >
Our instructor-led courses are delivered in virtual classroom format or at our downtown Toronto location at 18 King Street East, Suite 1400, Toronto, Ontario, Canada (some in-person classroom courses may also be delivered at an alternate downtown Toronto location). Contact us at [email protected] if you'd like to arrange custom instructor-led virtual classroom or onsite training on a date that's convenient for you.
Copyright 2024 Avantix ® Learning
You may also like

How to Insert or Type E with an Accent Mark in PowerPoint (È, É, Ê, Ë, è, é, ê, or ë)
You can insert or type e with an accent mark in PowerPoint using built-in tools or keyboard shortcuts (including Alt code shortcuts). The letter e can be inserted with an accent in both upper or lower case in text boxes or placeholders on slides, the slide master or layouts. The following are common accents in upper or lower case – È, É, Ê, Ë, è, é, ê, or ë.

How to Fade a Picture or Part of a Picture in PowerPoint (Using a Gradient)
You can fade a picture in PowerPoint by drawing a rectangle shape on top of the picture and then filling the rectangle with a gradient from opaque to transparent. This technique is often used to fade an image into the background of a slide. Since the rectangle is placed on top of the image and then text may be placed on top of the rectangle, you may need to reorder the objects.

How to Lock an Image, Shape or Other Object in PowerPoint
You can now lock an image, shape or other object in PowerPoint. Objects can be locked in Normal View or Slide Master View. Only PowerPoint 365 users can lock objects to prevent moving and resizing. This is helpful if you want to select and move other objects on the slide or prevent others from moving or resizing an object. You can lock items using the context menu or the Selection Pane.
MORE POWERPOINT ARTICLES >
Microsoft, the Microsoft logo, Microsoft Office and related Microsoft applications and logos are registered trademarks of Microsoft Corporation in Canada, US and other countries. All other trademarks are the property of the registered owners.
Avantix Learning |18 King Street East, Suite 1400, Toronto, Ontario, Canada M5C 1C4 | Contact us at [email protected]
Our Courses
Avantix Learning courses are offered online in virtual classroom format or as in-person classroom training. Our hands-on, instructor-led courses are available both as public scheduled courses or on demand as a custom training solution.
All Avantix Learning courses include a comprehensive course manual including tips, tricks and shortcuts as well as sample and exercise files.
VIEW COURSES >
Contact us at [email protected] for more information about any of our courses or to arrange custom training.
Privacy Overview
Pin it on pinterest.
- Print Friendly
PowerPoint Tips Blog
Helping you with presenting, PowerPoint, and speaking
Create presentation handouts using Notes pages
July 8, 2018 by Ellen Finkelstein Leave a Comment

I’m not the slide police and I vary from this method sometimes, especially when doing technical training, but using the Tell ‘n’ Show SM method will help your audience understand and remember more of what you say.
I cover the Tell ‘n’ Show SM method and its benefits in more detail in my blog post, “ Increase understanding and retention with the Tell ‘n’ Show SM method .”
The handout problem

The handout solution
I believe that one of the best solutions is to use Notes pages. Notes pages are a configuration of each slide and the notes that you put in the Notes pane in Normal view.

(By the way, another solution is to send the presentation to Microsoft Word. This method gives you the choice of offering a handout with your notes or blank lines where people can write their own notes. I explain this solution in “ Making great PowerPoint handouts in Microsoft Word .”)
Notes in the Notes pane have another benefit–you can use them as presenter notes when you deliver your presentation if you display Presenter View on your computer (but Slide Show view on the screen that the audience sees). I explain Presenter View in my blog post, “ Presenter View: Your secret presentation tool .”

Configure your Notes pages
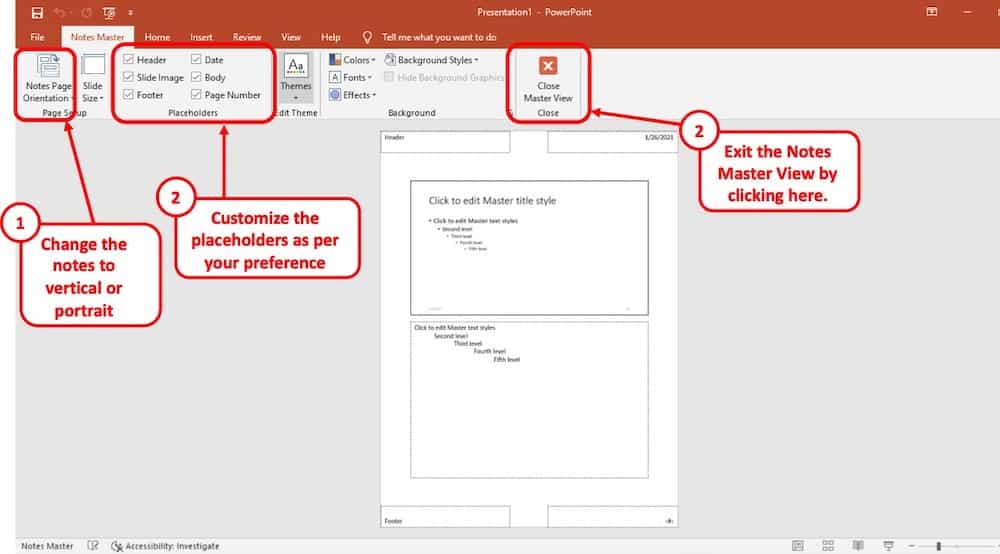
You can customize how your Notes pages look in the Notes Master. In PowerPoint, choose the View tab, Notes Master (not Notes Page). Here’s what you’ll see:
- At the top are the header and the date
- Below that is the slide
- Below that are your notes (from the Notes pane)
- At the bottom are the footer and the page number
There are a few secrets to getting your Notes pages just the way you want them, which I explain below.
Headers and footers

From within the Notes Master view, on the Notes Master tab, make sure the items you want are checked, as you see here. (“Body” refers to the notes.)
Then, click Close Master View to return to Normal view. I know it’s rather roundabout, but you have to configure the existence of the headers and footers from within Notes Master view, but configure their content from Normal view.
On the Insert tab, click Header & Footer, then click the Notes and Handouts tab. Here’s what you’ll see:

Here are the items you can configure:
- If you want the date, you can choose Update Automatically (always the current date) or Fixed (just enter the date you want).
- Check Page Number if you want page numbers.
- Check Header if you want one and type in the text.
- Check Footer if you want one and type in the text.
Click Apply to All.
You can move and resize the headers and footers. For example, you can move the headers to the bottom of the Notes page. You can also format the text–the font, font size, etc. Use the Home tab from within the Notes Master to access all the tools you usually find on the Home tab in Normal View.
Slide size and location
In the Notes Master, you can drag the slide image itself anywhere on the Notes page and resize it as well.
Tip: If you will use the Notes Pages in PDF format, consider moving the slide to the edge of the page.
Notes (“body”)
You can move and resize the Notes box. To format the text, use the Home tab from within the Notes Master.
Adding new content
You can add new content–any text or images you want. If you do, remember that it will be on every page of the Notes Pages.
Test and correct errors in the Notes Pages
To make sure that your Notes Pages look right, exit the Notes Master and choose View, Notes Page. Here you can scroll through your presentation to check each page. Make sure they look the way you set them up.
Warning: There’s a weird “gotcha” about Notes pages. If you change the Notes Master after you’ve created slides or if you have copied and pasted slides from another presentation, your notes pages may not take on the formatting you created in your Notes Master.
The solution is to re-apply the Notes Master. (Thanks to Sandy Johnson , Julie Terberg and other fellow PowerPoint MVPs who showed me this hard-to-find feature.) Here are the steps to follow if you see a slide that doesn’t adhere to the Notes Master:

- Check the Reapply Master checkbox.
Print or create PDFs of Notes Pages
The 2 main ways to use Notes Pages as handouts are to print them or create PDFs. Here are the steps:

- Save your presentation.
- Choose File, Print.
- To the right of Full Page Slides, click the down arrow and choose Notes Pages. You’ll see the Notes Pages to the right and can again scroll through them to check that they are correctly formatted.
- Under Printer, choose your printer or click the down arrow to choose a PDF driver. A PDF driver is a file that saves the result of printing to a PDF file. You can choose Microsoft Print to PDF or another PDF driver that you have installed. (Examples are Adobe PDF or PDF995.)
- Click the Print button.
- If you chose to print to a PDF, the Save Print Output As dialog box will open so you can name the file and choose a location.
- Click Save to create the PDF file.
Note: While you can create a PDF of slides only by choosing File, Export (or Save & Send or Publish in earlier versions of PowerPoint), you can’t create a PDF of Notes Pages that way. You need to use the Print feature as I just described.
Other resources for creating handouts
See these blog posts for more information on creating handouts…
“ Manage the presentation process from conception to rehearsal to handouts ”
“ Presentation handouts: Yes or no, what kind, and when? ”
“ Handouts for data-heavy presentations ”

How do you create handouts? Do you have any advice for successful handouts? Please leave a comment to share with other presenters. And if you found this helpful, please share on social media using the Share buttons so others can find this information.
Related posts:
- Making great PowerPoint handouts in Microsoft Word
- Manage the presentation process from conception to rehearsal to handouts
- Create an electronic PowerPoint handout with a PDF driver
- Creating a Compact List of Notes
Leave a Reply
Notes Master in PowerPoint (Everything You Need to Know!)
By: Author Shrot Katewa

There are times when I often forget to talk about every single point that I had planned for when giving a presentation. This is not an uncommon phenomenon. That is exactly when PowerPoint notes can come in handy! But, to leverage the power of notes in PowerPoint, you need to understand the notes master in PowerPoint thoroughly.
The notes master in PowerPoint is a feature that allows you to control the settings of the notes section of PowerPoint. It allows you to change layouts, font size, font type, font style, and much more. To enable the Notes Master in PowerPoint, click on the “View” ribbon and then on “Notes Master”.
Through this article, I am going to talk about how you can use the Notes Master for making presenter notes. I’m also going to share the type of problems you might face in the Notes Master and how you can solve them. Plus, I’ll also provide you with some ninja tips to make this tool helpful for you!
So, let’s get started!
What are Presenter Notes in PowerPoint?
When you are presenting in front of an audience, they will either look at the information written on the presentation slide or listen to what you are saying.
If there is too much information on the presentation slide, it will be hard for the audience to process all the information. This is why presentation design often follows a minimal design style.
But, keeping minimal text on the slide can also be a problem – now your audience needs to pay close attention to what you are saying in order to understand the context of the presentation. While that is great if you want to grab their attention, this also means you need to make sure that you don’t miss out on a point! This is where presenter notes can come in handy.
Presenter Notes, also known as speaker notes, are the key points, important messages, or information in a summarized format on an individual slide. Making the notes handy helps the presenter to deliver his or her message clearly to the audience.
Presenter Notes helps the presenter navigate each slide while providing relevant information for that particular slide.
Think of the presenter Notes as a scratch piece of paper, where you can put all the key messages or important stats so that the audience can understand what you are saying.
You can also use presenter Notes to add more information about your presentation slide’s animations or to add important links and how to navigate through your PowerPoint slides.
What is Notes Master in PowerPoint?
Notes Master is a powerful tool in the Microsoft PowerPoint application that allows you to create, edit, and customize your presenter Notes.
The note Master is located in the “View” tab inside the PowerPoint application. Select the “View” tab. Now choose “Notes Master” from the “Master Views” group. This will open the Notes Master menu.
What Can You Do with Notes Master?
You can use notes master to create, edit, and customize the settings and appearance of your presenter notes in the PowerPoint application.
The notes master also allows you to customize the appearance of your speaker notes when they are printed out.
For instance, you can change the page layout, text format, text color, page orientation of the presenter notes using the Notes Master tool. This truly is a powerful editing tool that gives you complete control over the appearance of your presenter note section.
How to Use Notes Master in PowerPoint?
To use the notes master for your presentation slide, first, you have to open the notes master tool. To do that, follow the steps given below –
Step 1 – Click on the View Tab
The first thing is to open your PowerPoint slides presentation. Once the slide is open in the PowerPoint application, click on the “ View ” tab located in the menu bar of your PowerPoint application.
Step 2 – Choose Notes Master
Clicking on the “ View ” tab will open a command window. From there, choose the “ Notes Master ” from the “ Master Views ” group. This will open the “Notes Master” menu.
Step 3 – Customize the Notes Master
From the notes master editor menu, you can customize your presenter notes.
To do that, first, check the placeholders that you want to use and uncheck those that you don’t want in your presenter Notes. There are several parameters included in the “Placeholder” group. These are- date, slide image, body, header, page number, and footer.
You can view the changes that you make in the Notes Master preview section (the white section displayed).
You can also change the presenter note page orientation into either landscape or portrait mode. There are also some additional editing tools like text font size, text color, background style, and much more that you can mess around with to make your Notes much more attractive.
Once you are done customizing your presenter notes pages you can close the “Notes Master” menu. To do that, just simply click on the “Close Master View” button located on the Notes Master menu.
How to Print PowerPoint Presentation Notes?
Now that you know how to customize your notes in a PowerPoint presentation, it is time for you to add notes to your slides.
Once you have created your notes in the PowerPoint presentation slides, you can easily print them along with the slides and prepare for giving the presentation even when you are not in front of a computer.
Step 1 – Click on the File Option
To print notes in PowerPoint, click on the “File” tab located in the top left corner of your screen.
Step 2 – Click on Print from the Options on the Left
When the file option is clicked from the menu bar, a new window will be presented. From there, select “Print”. Another window will open as a result.
Step 3 – Choose the “Notes Pages” Print Layout Option
From the new window, choose the “Full Page Slides” located in the “Settings” menu. From there, select “Note Pages” as your print layout. You will see a preview of how your presenter note pages will look like.
Step 4 – Click on Print
If you want to make changes to any other print settings, you can do that too. Once you are done, all you have to do is to click on the “Print” button. And your Notes will be printed.
How to Apply Notes Master to All Slides?
Like other Master tools in the PowerPoint, any changes in the Notes Master command menu will be applied to all the slides in the presentation file. But the Notes Master tool is still undergoing some development and it is still missing some features.
When you are using this tool, sometimes many random things can happen to your note pages. For example, if you change anything in the Notes Master menu, it may not be applied to all slides. And Notes Master has no feature that you can use to apply the changes to all the slides at once. In such a case, you will need to apply Notes Master to individual slides.
This can be quite bothersome and time consuming if there are a lot of slides in the presentation file and you need to check each slide and apply the changes individually. But there is an alternative method that you can use to apply Notes Master to all slides using a Microsoft Visual Basic script.
To use this method, follow the step-by-step guide given below:
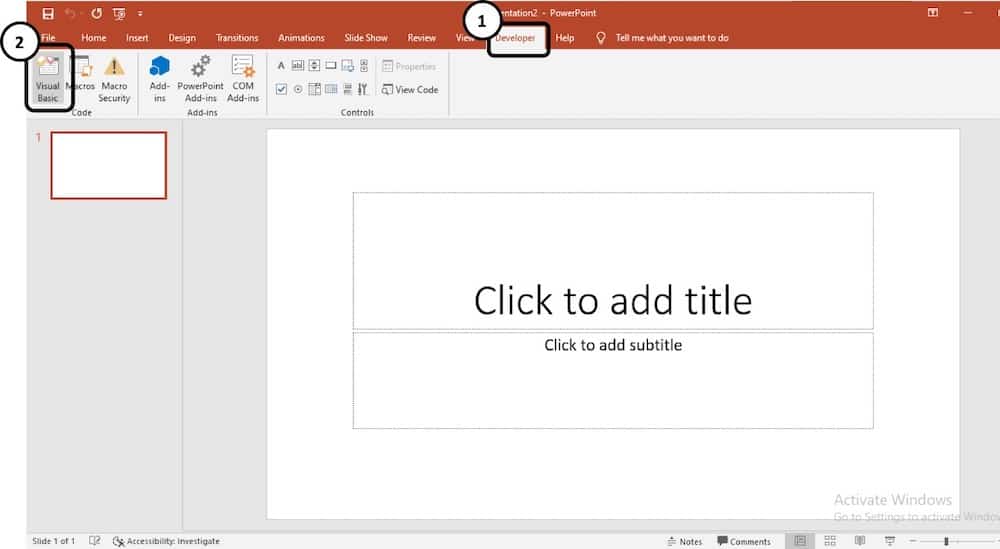
First, go to the “ Developer ” tab located on the top of your screen. The developer menu will open.
From the developer menu, click on the “ Visual Basic ” option. A new window will open.
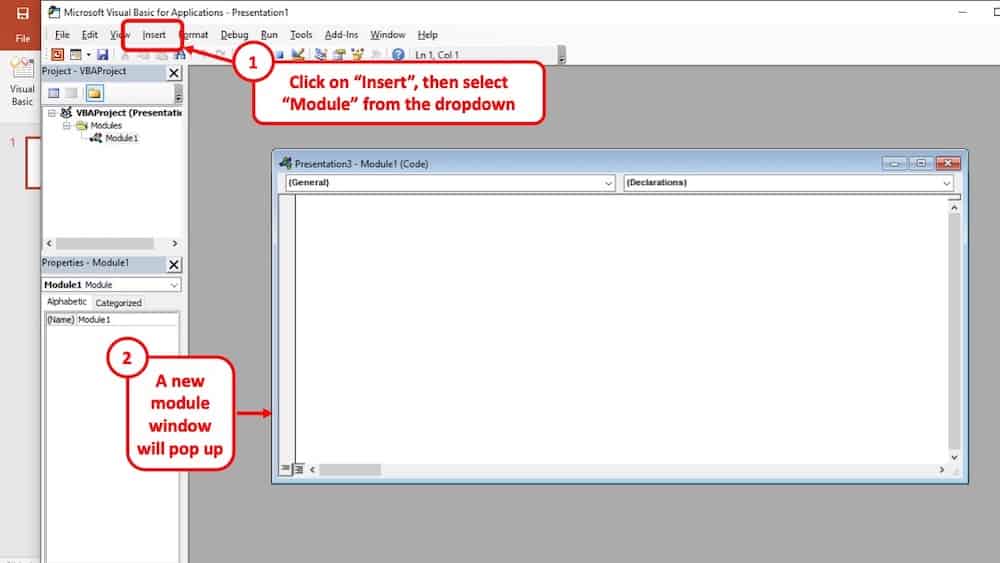
From the new window, click on “ Insert ” located on the top left corner of the screen. From the dropdown menu, select “ Module ”. An editor window will open.
In the editor window, paste the following Microsoft Visual Basic script:
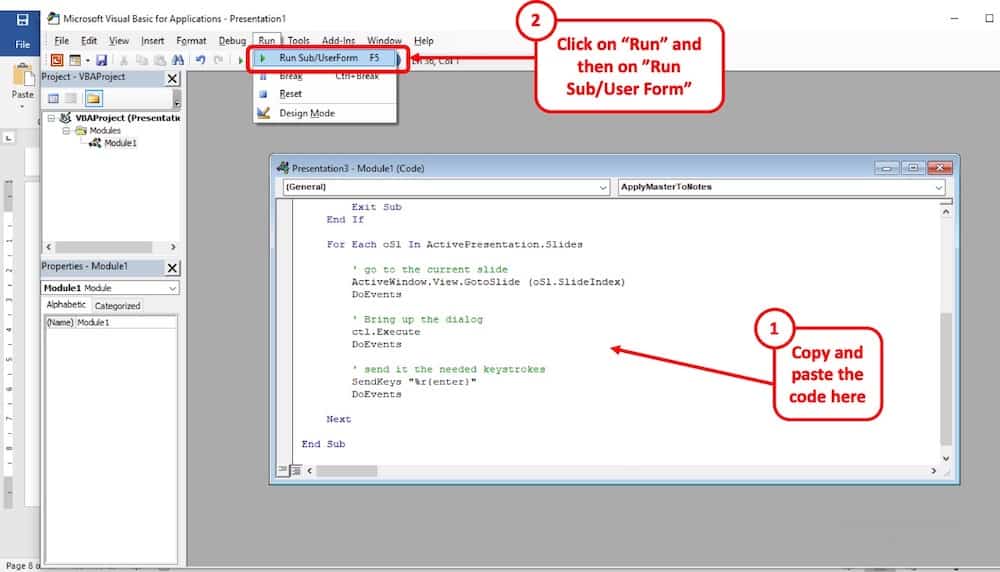
After pasting the script to the editor window, press “ F5 ” or click on “ Run>Run Sub/UserForm ” It will take some time to reapply Notes Master to all the slides depending on the number of slides in the presentation file. Once the reapply process is done, you will see that your problem is solved.
Note: This method works on Microsoft PowerPoint version 2007 or above. For some of you, you might notice that the “Developer” tab is missing in your PowerPoint application. In this case, read the following section to enable the developer tab in PowerPoint.
How to Enable the Developer Tab in PowerPoint?
In order to expedite certain processes in PowerPoint, you can always use the visual basic codes through the developer tab just as we showcased in the previous example. But, you often don’t get to see the “Developer” tab by default in PowerPoint.
In fact, I covered this topic of Enabling Developer Tab in PowerPoint in thorough detail a little while ago. Please go through this article as it also includes the process for PowerPoint on Mac!
[Tutorial!] How to Enable Developer Tab in PowerPoint?
In case you prefer reading on this page, below is a summarized version of the steps that you need to take to enable the developer tab in PowerPoint.
Step 1: First, click on the “File” tab located in the top left corner of the application. A new window will open.
Step 2: From there, select “Options” located in the bottom left corner of the application.
Step 3: Now from the newly opened window, select the “customize ribbon” option. From there, locate “Customize the ribbon” and under that select “Main Tab.”
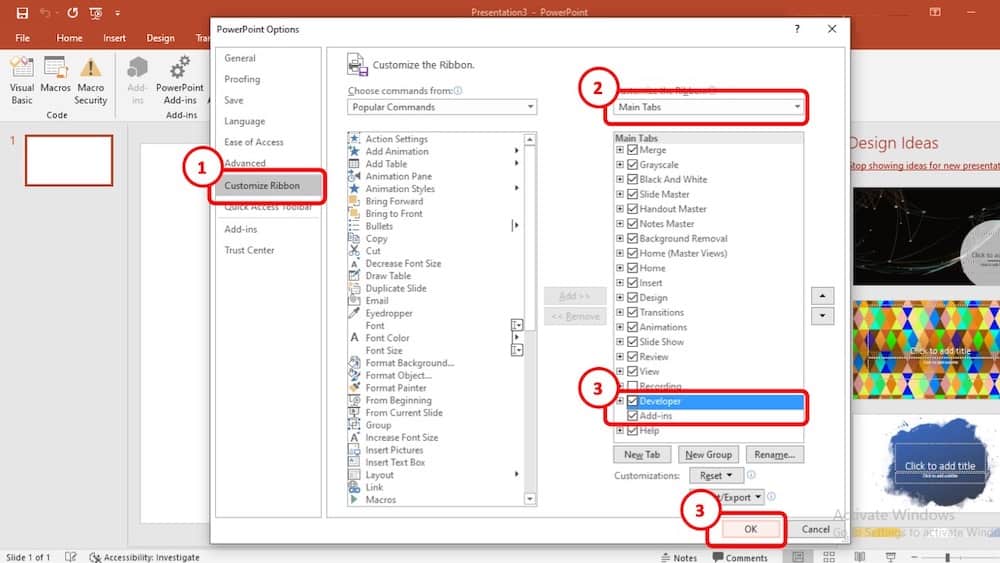
Step 4: Now locate the “Developer” tab and make sure that there is a checkmark beside it. Now press “Ok”. Now if you return to your presentation slide, you will notice that the “Developer” tab has been added to your PowerPoint application’s ribbon.
How to Reset Notes Master in PowerPoint?
As mentioned before, Notes Master is still a bit buggy. Sometimes you might see that the size of your note page is not what you set earlier or some texts or graphics in the slide might appear in some weird spots in your presenter Notes. In these circumstances, resetting the Notes Master can solve these problems.
Here’s how to reset notes master in PowerPoint –
- Go to the “View” Ribbon.
- Select “Notes Master”
- Uncheck all options under “Placeholders”
- Then, recheck all options under “Placeholders”
- Set the “Notes Page Orientation” as Portrait
In case you need visual aids, here’s the step-by-step process with pictures.
Open the presentation slide, go to the “ View ” tab located on the main ribbon of your PowerPoint application. Select “ Notes Master ” from there.
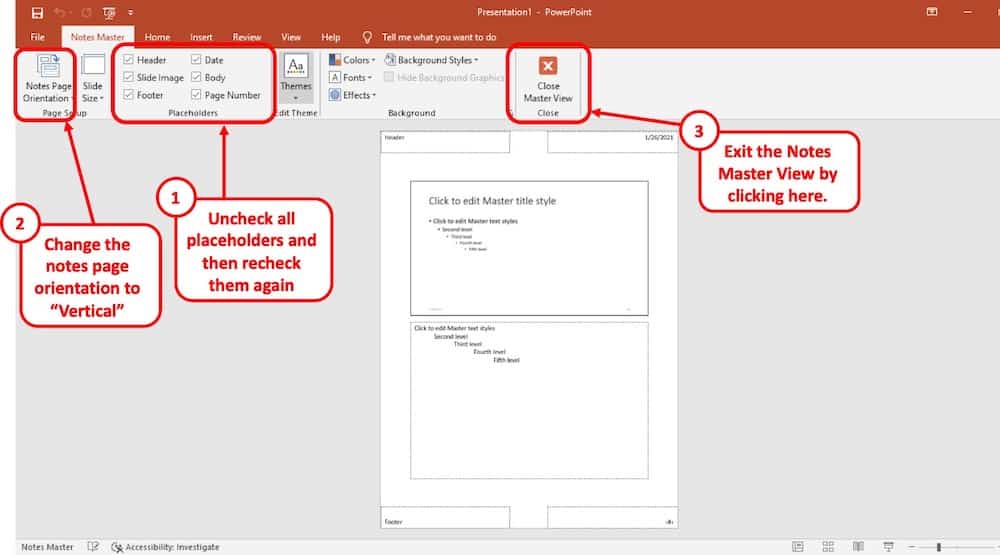
Uncheck all the options that are grouped under “Placeholder” and make sure that you check them again. This should reset the Notes Master in the PowerPoint application.
Make sure that the “Notes Page Orientation” of the “Notes Master” is set to “ Portrait ” as that is the default orientation of the notes master in PowerPoint.
How to Present PowerPoint without Showing Notes?
Presenter Notes will allow you to keep track of the key points and important stats of your presentation. But you need to make sure that your Notes remain hidden while you are presenting in front of an audience. And to do that, follow the steps given below:
Step 1: First, you will need to connect the projector screen or a second display to your computer. The second display or projector screen will be the one that your audience will be able to see.
Step 2: Now Open the “Display settings” from the control panel. From there, make your computer monitor your primary display by simply checking the “Make this my main display” option.
Step 3: Now choose “Extend These Displays” from the display settings window and close it.
Step 4: Now open your PowerPoint presentation slide and click on the “Slide Show” tab located on the main ribbon of the application.
From there, checkmark the “Use Presenter View” located in the “Monitors” cluster. You will see that the monitors are added on the “Monitors” option.
From there, select the secondary monitor or projector screen as your presentation display.
Step 5: Now press the slide show icon located on the taskbar of the PowerPoint application.
As a result, the presentation display will only show the slides whereas you will be able to see both the slides and Notes on your computer monitor.
Notes Master vs. Handout Master – What’s the Difference?
Notes Master and handout Master in the Microsoft PowerPoint application are more or less similar when it comes to customization and formatting Notes. However, there are some key differences present between them.
How does Notes Master Compare to Handout Master?
Notes Master tool is designed to create, edit, and customize presenter Notes. The Notes created in the presentation slide can help the speaker to keep track of key points while presenting his or her slides in front of an audience. Typically, each note page contains only one slide.
On the other hand, “Handout Master” is a tool created to make audience handouts. These handouts contain key points from the presentation slide which can help the audience to understand the presenter’s message much more clearly. Handouts usually contain more than one slide per page.
Notes Master or Handout Master – which is better?
The editing options are somewhat similar for both handout Master and Notes Master. However, Notes Master offers more placeholder options to format note pages. And Notes are typically helpful to only the presenter. In this regard, Notes Master is better compared to handout Master.
However, you should use handout Master if and only if you need to include texts and graphics for the audience handouts. But the features and functionality are almost similar for both Notes Master and handout Master. So, even if you only know how to use Notes Master, you will face no problem using the handout Master.
How to Fix Notes Master in PowerPoint?
Notes Master has a lot of bugs. They can be quite bothersome. These bugs can occur randomly. Some of these bugs include changing the note page layout or changing the page size and orientation. In such a case, you will need to troubleshoot Notes Master in PowerPoint.
To fix the page size, follow the steps given below:
Step 1: Frist, go to the “File” tab and select “Print>Print Properties.” From there, change the paper size to anything other than the “Letter” size. Now click “Ok” and return to your presentation slides.
Step 2: Follow the same methods explained in step 1 to change the page size. But this time set the page size to “Letter” and press “Ok.”
Step 3: Now go to the “View” tab and select “Notes Master.”
Step 4: When you are using the Notes Master, right-click on an empty space of your note page, and from the context menu click on “Notes Master Layout.” A dialogue box will open.
Step 5: From the dialogue box, uncheck everything and press “Ok.”
Step 6: Now repeat the process explained in step 4 and step 5. But this time, check all the options in the dialogue box and click “Ok.”
Then close the Notes Master view.
This should fix your problem with note page size problem. But your page layout will still appear a bit messy.
In order to fix the note page layout, follow these steps:
Step 1: Click on the “View” tab and select “Notes Master.”
Step 2: Now right-click on an empty space on the note page. This will open a context menu. From there select “Notes Layout>Reapply Master.”
Make sure that you check the “Body” and the “Slide image.” Otherwise, you will lose the note that you made previously in the presentation file. If they are checked by default, leave them as they were and proceed to the next step.
Step 3: Now press “Ok.” This will fix your note page layout.
Important Note: You will need to apply this method to the note pages individually. Because PowerPoint still doesn’t have the feature to apply Notes Master to all the slides at the same time.
Final Thoughts
After going through the entire article, I hope that you have learned everything there is about making speaker Notes using the Notes Master tool in the PowerPoint application. Put a lot of thoughts into how you can prepare your presenter Notes. This will make the presentation seem much more professional and you will be able to deliver your message clearly.
Image Credit for Featured Image
- SUGGESTED TOPICS
- The Magazine
- Newsletters
- Managing Yourself
- Managing Teams
- Work-life Balance
- The Big Idea
- Data & Visuals
- Reading Lists
- Case Selections
- HBR Learning
- Topic Feeds
- Account Settings
- Email Preferences
What It Takes to Give a Great Presentation
- Carmine Gallo

Five tips to set yourself apart.
Never underestimate the power of great communication. It can help you land the job of your dreams, attract investors to back your idea, or elevate your stature within your organization. But while there are plenty of good speakers in the world, you can set yourself apart out by being the person who can deliver something great over and over. Here are a few tips for business professionals who want to move from being good speakers to great ones: be concise (the fewer words, the better); never use bullet points (photos and images paired together are more memorable); don’t underestimate the power of your voice (raise and lower it for emphasis); give your audience something extra (unexpected moments will grab their attention); rehearse (the best speakers are the best because they practice — a lot).
I was sitting across the table from a Silicon Valley CEO who had pioneered a technology that touches many of our lives — the flash memory that stores data on smartphones, digital cameras, and computers. He was a frequent guest on CNBC and had been delivering business presentations for at least 20 years before we met. And yet, the CEO wanted to sharpen his public speaking skills.
- Carmine Gallo is a Harvard University instructor, keynote speaker, and author of 10 books translated into 40 languages. Gallo is the author of The Bezos Blueprint: Communication Secrets of the World’s Greatest Salesman (St. Martin’s Press).
Partner Center
How to Print Notes Pages in PowerPoint

Printing Notes Pages in PowerPoint is an important feature for users who want to create handouts, reference materials, or speaker notes. In this article, we will explore why you may want to print notes pages, how to prepare your PowerPoint presentation for printing, and the step-by-step guide on how to print notes pages. We will also discuss the various customization options available, common troubleshooting issues, tips and tricks, and advanced techniques for printing multiple copies of notes pages.
Table of Contents
Why Print Notes Pages in PowerPoint?
Before we dive into the technicalities of printing notes pages in PowerPoint, let’s explore why you may want to print them. One of the main benefits of printing notes pages is to provide your audience with a hard-copy reference material to follow along with your presentation – this is particularly useful for training sessions or lectures. Many presenters may also use notes pages as speaker notes – they can print them out and use them to remind themselves of key points, tips, or facts that they want to mention during their presentation without relying on their memory.
Another reason to print notes pages is to create handouts or study aids for your audience. By printing your presentation with notes, you are essentially creating a document that summarizes your entire presentation in a reader-friendly format, which your audience can refer back to after the event. Moreover, printing notes pages will save you valuable time, as you won’t have to create a separate document for distribution – you can simply print your presentation with notes.
Printing notes pages can also be helpful for accessibility purposes. Not all audience members may be able to follow along with your presentation on a screen, and providing them with printed notes can ensure that they don’t miss any important information. Additionally, printing notes pages can be a useful tool for collaboration – if you are working on a group project or presentation, printing notes pages can help ensure that everyone is on the same page and has access to the same information.
Finally, printing notes pages can be a great way to review and reflect on your own presentation. By having a hard copy of your notes, you can easily go back and review what you covered, what worked well, and what you might want to improve for future presentations. This can be especially helpful if you are a frequent presenter or if you are using your presentation as part of a larger project or initiative.
Understanding Notes Pages in PowerPoint
But before we get to the printing process, let’s take a closer look at what notes pages are and how they work in PowerPoint. Notes pages are part of PowerPoint’s Handout Master feature, which allows you to create different formats for printing your presentation. The Handout Master allows you to customize the layout, header, footer, and other options for your notes pages. Notes pages are similar to slides but are scaled-down and are designed to hold notes, comments or speaker notes. You can type text into the “Notes” pane, located below each slide in Normal view, or copy and paste notes into this area from an external document.
One of the benefits of using notes pages is that they can help you stay organized during your presentation. By having your notes in front of you, you can easily refer to them without having to switch back and forth between your presentation and a separate document. Additionally, notes pages can be a helpful tool for your audience. If you choose to distribute your presentation as a handout, including notes pages can provide additional context and information that may not be included on the slides themselves.
Another feature of notes pages is the ability to add images or diagrams to your notes. This can be especially useful if you are presenting complex information or data. By including visual aids in your notes, you can help your audience better understand the information you are presenting and make your presentation more engaging overall.
Preparing to Print Notes Pages in PowerPoint
Now that you understand what notes pages are and their benefits, let’s go through the preparation steps before you print. The first step is to navigate to the “Print” settings in PowerPoint. You can do this by clicking on the “File” tab in the top left corner and selecting “Print” in the menu on the left-hand side.
Once you are in the “Print” settings, you can select the printer you wish to use to print your presentation, set the number of copies required, and choose the pages or slides you want to print. You can also select the layout for your notes pages and customize the options in the “Settings” section.
Another important step to consider before printing your notes pages is to review the content and formatting of your notes. Make sure that the font size and style are easy to read and that the content is concise and relevant. You can also add images or diagrams to your notes pages to enhance the visual appeal and understanding of your presentation.
It is also recommended to preview your notes pages before printing to ensure that they appear as intended. You can do this by selecting the “Print Preview” option in the “Print” settings and scrolling through the pages to check for any errors or formatting issues. Once you are satisfied with the preview, you can proceed to print your notes pages and use them as a helpful reference during your presentation.
Printing Notes Pages: Step-by-Step Guide
Printing notes pages is straightforward. Here is a step-by-step guide to begin:
- Open your PowerPoint presentation and go to “File” and then “Print”.
- Select the printer you want to use from the “Printer” dropdown list.
- Under “Settings,” choose “Notes Pages” in the “Print Layout” section. You can also customize the header, footer, and other options if desired.
- Select the number of copies you require.
- Click on “Print” to begin the print process.
However, there are a few things to keep in mind when printing notes pages. Firstly, notes pages can take up a lot of paper, especially if you have a lot of slides with notes. Make sure you have enough paper in your printer and consider printing double-sided to save paper. Secondly, notes pages can be quite small and difficult to read if you have a lot of text on them. Consider adjusting the font size or formatting your notes to make them more readable.
Lastly, if you want to save paper altogether, you can also consider saving your notes pages as a PDF and sharing them electronically. This is a great option if you want to share your presentation with others but don’t want to print out physical copies.
Customizing Printed Notes Pages in PowerPoint
One of the benefits of printing notes pages is the ability to customize the layout for your specific needs. In the “Settings” section of the print dialog, you can choose various options such as “Color” or “Grayscale,” “Notes Next To Slides,” or “Notes Below Slides.” You can also add headers and footers to your presentation to personalize your notes pages.
Another way to customize your printed notes pages is by adjusting the font size and style of your notes. This can be done by going to the “View” tab and selecting “Notes Master.” From there, you can make changes to the font, size, and color of your notes text. Additionally, you can add shapes, images, or other graphics to your notes pages to make them more visually appealing and easier to read.
Troubleshooting Common Issues When Printing Notes Pages in PowerPoint
As with any printing job, there may be some common issues or errors that you may encounter while printing notes pages in PowerPoint. Some common troubleshooting tips are:
- Check the printer settings and ensure the printer is online and working correctly.
- Ensure you have selected the correct printer.
- Check that the printer has enough ink and paper and that the paper tray is correctly loaded.
- Check that you have selected the “Notes Pages” option in the print settings.
Another common issue that may arise when printing notes pages in PowerPoint is that the notes may not be aligned properly on the page. To fix this, you can adjust the layout settings in the print settings. You can also try adjusting the margins or scaling the page to fit the notes properly. Additionally, if you are printing multiple slides per page, make sure that the notes are not overlapping with other slides or images on the page.
Tips and Tricks for Printing Notes Pages Efficiently
Finally, we have some useful tips and tricks to help you print notes pages more efficiently. Some of these are:
- Print your notes pages double-sided to save paper.
- Set a default printer to help speed up printing.
- Create custom print layouts for different types of presentations.
- Use the “Print Preview” feature to check the layout and formatting before printing.
- Save your notes pages as a PDF to distribute them via email or file sharing services.
Comparing Different Printing Options for Notes Pages in PowerPoint
Finally, let’s compare some of the different printing options available for notes pages in PowerPoint. These are:
- Notes Only: This option prints only the notes section for each slide.
- Notes Next to Slides: This option prints the slide on the top half of the page and the notes section on the bottom half.
- Notes Below Slides: This option prints the slide at the top of the page with the notes section directly below it.
Advanced Techniques for Printing Multiple Copies of Notes Pages
If you need to print multiple copies of your notes pages, there are several advanced techniques you can use. One option is to use a script or macro that automates the printing process, allowing you to print multiple copies quickly. You can also use the “Print Range” feature to print specific pages or slides in batch mode, reducing the time and effort required for printing multiple copies.
These are just a few examples of the advanced techniques you can use for printing multiple copies of notes pages in PowerPoint. By exploring some of these advanced techniques, you can save time, effort, and resources, and create compelling notes pages that are tailored to your specific needs.
Printing notes pages in PowerPoint is a useful and powerful feature that can help you create handouts, study guides, and speaker notes quickly and efficiently. By following the step-by-step guide in this article and exploring some of the customization options, troubleshooting tips, and advanced techniques available, you can optimize your notes page printing process and create professional-quality notes pages for your audience.
By humans, for humans - Best rated articles:
Excel report templates: build better reports faster, top 9 power bi dashboard examples, excel waterfall charts: how to create one that doesn't suck, beyond ai - discover our handpicked bi resources.
Explore Zebra BI's expert-selected resources combining technology and insight for practical, in-depth BI strategies.

We’ve been experimenting with AI-generated content, and sometimes it gets carried away. Give us a feedback and help us learn and improve! 🤍
Note: This is an experimental AI-generated article. Your help is welcome. Share your feedback with us and help us improve.

Google Slides
How to Print Google Slides with Notes?

Table of Contents
Printing Google Slides with speaker notes can be a helpful tool for both presenters and their audience members. Whether you want to give more context to your presentation, create handouts, or simply have a physical copy of your notes for offline use, knowing how to print Google Slides with notes is important. In this guide, we’ll cover various methods and step-by-step instructions to help you print your Google Slides presentations with notes, ensuring your next presentation is informative and polished.
How to Print Google Slides with Speaker Notes
Step 1: open your google slides presentation:.
Access Google Slides through your web browser and open the presentation you want to print.
Step 2: Access the File menu:
Click on the “File” menu located at the top-left corner of the screen.
Step 3: Choose “Print Preview”:
Select the option “Print Preview” from the File menu.
Step 4: Select “1 Slide With Notes”:
In the print preview, you’ll see a dropdown menu (probably saying “1 Slide Without Notes”). Click this and select “1 Slide With Notes.” Your preview should update!
Step 5: Adjust Print Settings (Optional):
While optional, consider:
- Color vs. Grayscale: Choose based on your needs and printer.
- Slide Ranges: Print all slides or a specific selection.
Step 6: Click “Print”:
Once you’ve configured all print options, click the “Print” button to initiate printing.
Your Google Slides presentation will now be printed with speaker notes included, ready to be used for offline practice or sharing with others.
Freqently Asked Questions
1. can i adjust the size of the speaker notes on my printed slides.
Yes, but with some limitations. Here’s how:
- Before Printing: Increase/decrease the font size of your notes within the Google Slides editor itself.
- Notes Master: For advanced control, go to View > Notes Master. Here, you can adjust the default styles and placement of notes for the entire presentation.
2. How do I print multiple google slides presentations with notes at once?
Unfortunately, Google Slides doesn’t have a built-in feature for batch printing presentations with notes. Here are some workarounds:
- Merge presentations: Combine several presentations into a single one and then print the whole thing.
- Specialized Add-ons: Explore the Google Workspace Marketplace for add-ons that support batch printing or advanced print management.
- External Tools: Some PDF merging tools might allow you to combine PDFs created from individual presentations.
3. When I print my slides with notes, the formatting gets messed up. What can I do?
Try these troubleshooting tips:
- Simplify: Reduce complex formatting elements on your slides (lots of images, unusual fonts, etc.)
- Preview: Carefully check the “Print Settings and Preview” before hitting print.
- Download as PDF: Printing the PDF version may prevent certain formatting glitches.
4. Is there a way to print only the speaker notes without the slides?
Not directly within Google Slides. Here are a couple of options:
- Copy and Paste: Manually copy your speaker notes into a text document (Google Docs, Word) and print that.
- Notes Master: Go to View > Notes Master. Temporarily delete the slide placeholders, then print. However, this might alter the formatting.
5. How do I save a Google slide as a PDF with notes?
Save your Google Slides with speaker notes as a PDF by going to “File > Print settings and preview,” choosing “1 slide with notes,” and clicking “Download as PDF.”
6. How many slides can I print on one page?
You can fit nine slides per page when you select “Full Page Slides” in “Settings.”
Save Time and Effortlessly Create Presentations with SlidesAI

How-To Geek
How to print google slides with notes.
Practice your presentations offline!
Quick Links
Print a google slides presentation with speaker notes, key takeaways.
To print your Google Slides presentation with speaker notes, launch your presentation, select File > Print Preview, click "1 Slide Without Notes," change the option to "1 Slide With Notes," and select "Print." You can then print or save your slideshow as a PDF.
Do you want to practice your presentation offline? Or maybe you need to share your presentation notes with your audience? Either way, Google Slides lets you print your presentations with your speaker notes included. We'll show you how to do that or simply save it as a sharable PDF file .
Related: How to Insert a PDF in Google Slides
When you print your presentation with notes included, Slides prints one slide on each page with your notes.
Related: How to Make Slides Vertical in Google Slides
To do that, first, open your preferred web browser and access Google Slides . Sign in to your account on the site, then launch your presentation.
On your presentation screen, in Google Slides' menu bar, select File > Print Preview.
You'll see your presentation's print preview. On this page, in the toolbar at the top, click "1 Slide Without Notes" and choose "1 Slide With Notes."
Slides will refresh your print preview, allowing you to see the new preview that includes your speaker notes. If you're happy with how it looks, then in the toolbar at the top, click "Print."
Your web browser's standard print window will launch. Here, select your printer and other options like what pages to print, the number of copies to print, and so on.
If you'd like to save your presentation as a PDF to attach in an email or print using a different device, then in the printer menu, choose your PDF printer. In Google Chrome, this printer is labeled as "Save as PDF."
Then, at the bottom of the print window, click "Print" to begin printing your presentation (you'll click "Save" if you've chosen to save your slides in a PDF file).
And that's it. You now have a physical (or PDF) copy of your presentation with your speaker notes included. Take a look at other useful Google Slides features to make the most of this free service.
- Study Guides
- Homework Questions
WWI+Project+Presentation+Template (1)
- Global (EN)
- Albania (en)
- Algeria (fr)
- Argentina (es)
- Armenia (en)
- Australia (en)
- Austria (de)
- Austria (en)
- Azerbaijan (en)
- Bahamas (en)
- Bahrain (en)
- Bangladesh (en)
- Barbados (en)
- Belgium (en)
- Belgium (nl)
- Bermuda (en)
- Bosnia and Herzegovina (en)
- Brasil (pt)
- Brazil (en)
- British Virgin Islands (en)
- Bulgaria (en)
- Cambodia (en)
- Cameroon (fr)
- Canada (en)
- Canada (fr)
- Cayman Islands (en)
- Channel Islands (en)
- Colombia (es)
- Costa Rica (es)
- Croatia (en)
- Cyprus (en)
- Czech Republic (cs)
- Czech Republic (en)
- DR Congo (fr)
- Denmark (da)
- Denmark (en)
- Ecuador (es)
- Estonia (en)
- Estonia (et)
- Finland (fi)
- France (fr)
- Georgia (en)
- Germany (de)
- Germany (en)
- Gibraltar (en)
- Greece (el)
- Greece (en)
- Hong Kong SAR (en)
- Hungary (en)
- Hungary (hu)
- Iceland (is)
- Indonesia (en)
- Ireland (en)
- Isle of Man (en)
- Israel (en)
- Ivory Coast (fr)
- Jamaica (en)
- Jordan (en)
- Kazakhstan (en)
- Kazakhstan (kk)
- Kazakhstan (ru)
- Kuwait (en)
- Latvia (en)
- Latvia (lv)
- Lebanon (en)
- Lithuania (en)
- Lithuania (lt)
- Luxembourg (en)
- Macau SAR (en)
- Malaysia (en)
- Mauritius (en)
- Mexico (es)
- Moldova (en)
- Monaco (en)
- Monaco (fr)
- Mongolia (en)
- Montenegro (en)
- Mozambique (en)
- Myanmar (en)
- Namibia (en)
- Netherlands (en)
- Netherlands (nl)
- New Zealand (en)
- Nigeria (en)
- North Macedonia (en)
- Norway (nb)
- Pakistan (en)
- Panama (es)
- Philippines (en)
- Poland (en)
- Poland (pl)
- Portugal (en)
- Portugal (pt)
- Romania (en)
- Romania (ro)
- Saudi Arabia (en)
- Serbia (en)
- Singapore (en)
- Slovakia (en)
- Slovakia (sk)
- Slovenia (en)
- South Africa (en)
- Sri Lanka (en)
- Sweden (sv)
- Switzerland (de)
- Switzerland (en)
- Switzerland (fr)
- Taiwan (en)
- Taiwan (zh)
- Thailand (en)
- Trinidad and Tobago (en)
- Tunisia (en)
- Tunisia (fr)
- Turkey (en)
- Turkey (tr)
- Ukraine (en)
- Ukraine (ru)
- Ukraine (uk)
- United Arab Emirates (en)
- United Kingdom (en)
- United States (en)
- Uruguay (es)
- Uzbekistan (en)
- Uzbekistan (ru)
- Venezuela (es)
- Vietnam (en)
- Vietnam (vi)
- Zambia (en)
- Zimbabwe (en)
- Financial Reporting View
- Women's Leadership
- Corporate Finance
- Board Leadership
- Executive Education
Fresh thinking and actionable insights that address critical issues your organization faces.
- Insights by Industry
- Insights by Topic
KPMG's multi-disciplinary approach and deep, practical industry knowledge help clients meet challenges and respond to opportunities.
- Advisory Services
- Audit Services
- Tax Services
Services to meet your business goals
Technology Alliances
KPMG has market-leading alliances with many of the world's leading software and services vendors.
Helping clients meet their business challenges begins with an in-depth understanding of the industries in which they work. That’s why KPMG LLP established its industry-driven structure. In fact, KPMG LLP was the first of the Big Four firms to organize itself along the same industry lines as clients.
- Our Industries
How We Work
We bring together passionate problem-solvers, innovative technologies, and full-service capabilities to create opportunity with every insight.
- What sets us apart
Careers & Culture
What is culture? Culture is how we do things around here. It is the combination of a predominant mindset, actions (both big and small) that we all commit to every day, and the underlying processes, programs and systems supporting how work gets done.
Relevant Results
Sorry, there are no results matching your search..
- Topic Areas
- Reference Library
Handbook: Financial statement presentation
Handbook | November 2023
Latest edition: In-depth guide on presentation and disclosure requirements, plus considerations under SEC regulations.

Using detailed Q&As and examples, we explain various presentation and general disclosure requirements included in the Codification (i.e. ASC 205 to ASC 280), other broad topics (e.g. related parties under ASC 850 and subsequent events under ASC 855) and SEC regulations. This November 2023 edition incorporates updated guidance and interpretations.
Applicability
- All entities
Relevant dates
- Effective immediately
Key impacts
In the financial statement process, considerable time is devoted to determining what items get recorded and how to account for them, but the critical final mile is determining how they need to appear – i.e. how they are presented and disclosed.
Once the debits and credits have been settled, presentation and disclosure is how that information is conveyed to financial statement users in a transparent, understandable and consistent manner. Disclosure goes ‘behind the numbers’ and is necessary to fully understand the financial statements.
ASC 205 to 280 in the FASB’s Accounting Standards Codification® are dedicated to presentation and disclosure and provide the baseline requirements. Other ASCs address more detailed requirements, specific to certain transactions or industries. For SEC registrants, there is yet more guidance that contains many additional requirements, and which has helped shape practices over the years for all other entities.
In this Handbook, we pull together many of the general requirements and practices to provide you with a fuller picture of how the different financial statements are constructed and how they interact with one another.
Report Contents
- Financial statements: general principles
- Balance sheet
- Income statement
- Comprehensive income
- Notes to the financial statements
- Risks and uncertainties
- Related parties
- Subsequent events
Download the documents:
Financial statement presentation
Executive Summary
Explore more

Handbook: Statement of cash flows
Latest edition: Our comprehensive guide to the statement of cash flows, with Q&As and examples to explain key concepts.

Handbook: Segment reporting
Latest edition: Our comprehensive guide to ASC 280 – with analysis, Q&As and examples.

Handbook: Earnings per share
Latest edition: Our comprehensive guide to EPS, with new and updated interpretive guidance on forward purchase/sale contracts and unit structures.
Meet our team

Subscribe to stay informed
Receive the latest financial reporting and accounting updates with our newsletters and more delivered to your inbox.
Choose your subscription (select all that apply)
By submitting, you agree that KPMG LLP may process any personal information you provide pursuant to KPMG LLP's Privacy Statement .
Accounting Research Online
Access our accounting research website for additional resources for your financial reporting needs.
Thank you for contacting KPMG. We will respond to you as soon as possible.
Contact KPMG
Job seekers
Visit our careers section or search our jobs database.
Use the RFP submission form to detail the services KPMG can help assist you with.
Office locations
International hotline
You can confidentially report concerns to the KPMG International hotline
Press contacts
Do you need to speak with our Press Office? Here's how to get in touch.
- Start the presentation and see your notes in Presenter view Article
- Add speaker notes to your slides Article
- Rehearse and time the delivery of a presentation Article
- Record a slide show with narration and slide timings Article
- Print your PowerPoint slides, handouts, or notes Article
- Create a self-running presentation Article

Print your PowerPoint slides, handouts, or notes
In PowerPoint, you can print your slides, your speaker notes, and create handouts for your audience.

Print your presentation
Select File > Print .
For Printer , select the printer you want to print to.
For Settings , select the options you want:
Print All Slides : To print each slide on a single sheet or change to just print a range of slides.
Slides : From the drop-down, choose to print all slides, selected slides, or the current slide. Or, in the Slides box, type which slide numbers to print, separated by a comma.
Print Layout : Choose to print just the slides, just the speaker notes, an outline, or handouts. The number of slides per page is also an option, an effective way to save paper.
The Outline prints only the text in the slides, without images. The Notes of a presentation show the slide and the related speaker notes below it. If you choose to print Handouts, you can print several slides on one page using a variety of layouts, some with space for note-taking.
Color : Choose whether you want color, grayscale, or pure black and white.
Edit Header & Footer : Select to edit the header and footer before printing.
For Copies , select how many copies you want to print.
Select Print .
Printed handouts: Add or remove slide numbering
By default, in PowerPoint for Microsoft 365 (beginning with version 1810), printed handouts include a slide number below each slide image.
You can turn off this option in the Print dialog box on the same menu where you chose to print Handouts. At the bottom of the menu are several toggle options with check marks. Clear the check mark next to Print slide numbers on handouts :

The following procedures cover printing in PowerPoint 2016 for Mac and newer versions.
Select a heading below to open it and see the detailed instructions.
Print slides
On the File menu select Print .
Select Show Details at the bottom of the dialog box.

In the Layout box, select Slides .

Set the other printing options you want, and select Print .
Print slides with speaker notes
In the Layout box, select Notes .

Print an outline
In the Layout box, select Outline .

Print handouts (with or without slide numbering)
In the Layout box, select one of the Handout options, depending on how many slides per page you want.

By default, in PowerPoint for Microsoft 365 for Mac (beginning with version 16.30), printed handouts include a slide number below each slide image.

Select Print .
Add speaker notes to you slides
For files stored on OneDrive, OneDrive for work or school, or SharePoint in Microsoft 365, you can print slides, notes, or handouts.
To get more advanced printing layout options, use a desktop version of PowerPoint.
Important: If you use an add-in in your presentation, any content added to a slide via the add-in will not be printed successfully in PowerPoint for the web. In order to print such content, you would need to switch to the PowerPoint desktop app on Windows or macOS and print the slide from there.
Print in Chrome
From your PowerPoint for the web slide show, select File > Print and then choose the kind of sheets you want to print:

Wait for the Print panel to open.

Next to Destination , click Change to choose a printer. Set any other print layout options you want, such as which slides to print and one-sided versus two-sided printing. (Available options vary by printer.)

Click Print .

Print in Microsoft Edge
From your PowerPoint for the web slide show, click File > Print and then choose the kind of sheets you want to print:
Wait for the Print dialog box to open.

Under Orientation , choose the option that matches the orientation of your slides. Set any other print layout options you want, such as which slides to print and one-sided versus two-sided printing. (Available options vary by printer.)

Under Printer , choose a printer.

Click Print to print your slide show (you might have to scroll to find Print on the print panel).

Print in Firefox
Click Open PDF .

Click the printer icon in the upper right above the slide show.

In the Print dialog box that appears, under Printer , choose a printer.

Click OK to print your slide show.

When you are finished printing, close the PDF file that was opened for printing in step 2.
Print in Safari
From your PowerPoint for the web slide show, click File > Print and then choose the kind of sheets you want to print: .
From the open presentation hover your pointer over the bottom of the presentation and click this image.

In the Print dialog box, under Orientation , click Landscape . Set any other print layout options you want.

In the Printer box, choose a printer.
Click Print to print your slide show.

Need more help?
Want more options.
Explore subscription benefits, browse training courses, learn how to secure your device, and more.

Microsoft 365 subscription benefits

Microsoft 365 training

Microsoft security

Accessibility center
Communities help you ask and answer questions, give feedback, and hear from experts with rich knowledge.

Ask the Microsoft Community

Microsoft Tech Community

Windows Insiders
Microsoft 365 Insiders
Was this information helpful?
Thank you for your feedback.
- Getting Started
Using Deep Links to Presentations Pages
Deep links allow external applications that are integrated with OPERA Cloud to launch and display a presentation page directly by passing values in the OPERA Cloud URL.
The following are the deep links for Profile Presentation and Reservation Presentation pages with examples:
EXAMPLE: To display the Profile Presentation for Profile ID 345356, the URL is: https://xxxxx.hospitality.oracleindustry.com/OPERA9/opera/operacloud/bookmarks/profile?nameId=345356
URL: [https://%OPERACLOUDURL%/bookmarks/profile?subscriptionId=<parameter-value>&externaldatabase=<parameter-value>
EXAMPLE : To display the Profile Presentation for Subscription ID 270027 and External Database CRMEXT, the URL is: https://xxxxx.hospitality.oracleindustry.com/OPERA9/opera/operacloud/bookmarks/profile?subscriptionId=270027&externalDatabase=CRMEXT
Reservations
EXAMPLE : To display the Reservation Presentation page for reservation ID 755850 at property xxx, the URL is: https://xxxxxx.hospitality.oracleindustry.com/OPERA9/opera/operacloud/bookmarks/reservation?resvId=755850&TPRESORT=xxx
EXAMPLE : To display the Reservation Presentation page for external reference E-9685745201 with leg number 2 for external system xcrs at property xxx, the URL is:
https://xxxxxx.hospitality.oracleindustry.com/OPERA9/opera/operacloud/bookmarks/reservation?{}externalSystem= xcrs= E-9685745201 externalRefLegNo=2=xxx
https://xxxxx.hospitality.oracleindustry.com/OPERA9/opera/operacloud/bookmarks/billing?externalRef=FINGEN002345&TPRESORT=FINGENVA&externalSystem=FIN-GLOBAL&externalRefLegNo=1
Parent topic: Getting Started
IMAGES
VIDEO
COMMENTS
Add notes while creating your presentation. The Notes pane is a box that appears below each slide. (It is outlined in magenta in the picture below.) An empty Notes pane will prompt you with text that says, Click to add notes. Type your speaker notes there. If you don't see the Notes pane or it is completely minimized, click Notes on the task ...
Here's how to add notes in PowerPoint: Select a slide you want to add notes to. View the Notes pane located beneath each slide. If it's not visible, you can make it appear by clicking Notes on the bottom taskbar. You will see a blank space with the prompt "Click to add notes."
Start presenting. On the Slide Show tab, in the Start Slide Show group, select From Beginning. Now, if you are working with PowerPoint on a single monitor and you want to display Presenter view, in Slide Show view, on the control bar at the bottom left, select , and then Show Presenter View.
Each notes page shows a slide thumbnail, together with the notes that accompany that slide. In Notes Page view, you can embellish your notes with charts, pictures, tables, or other illustrations. (The following numbers correspond to the numbers in the illustration.) Notes pages include your notes and each slide in the presentation.
Inserting and editing notes in PowerPoint. First open your presentation. There are two ways to add the notes. The first option is via the "View" tab and then "Notes". The second option is via the status bar, where you can display the notes with just one click at the bottom right. Now a field appears under the slides where you can add your notes.
Next, in the pane on left, select the slide where you'd like to add speaker notes. Next, click the "Notes" button at the bottom of the window. A small box reading "Tap to Add Notes" will appear beneath the slide. For Mac users, this will say "Click to Add Notes.". Now, simply type the speaker notes for that slide.
Click the Notes button in the Status Bar at the bottom. Move your cursor to the bottom of the window. When you see the two-sided arrow, drag up until the panel displays. Step 3: When the panel is ...
During your presentation, you can add notes in two main ways: 1.You can use PowerPoint's built-in simple pen and highlighter to add notes to your slide. This is found in the bottom left corner of the screen click on the pen and choose your color to begin drawing. 2. For sightly more advanced pen tools, text boxes, and shapes, you can use the ...
To print your notes, select "File" and then "Print". Here you will find a drop down for the slide layout. It likely says "Full Page Slides" to start. Change this to "Notes Pages". You will see an image of the printer page further down in the article when I show you how to make fancy handouts with this same view.
Notes Pages from a Slide Package. Most presentation packages, including PowerPoint, have an option to create a page of 'Slide Notes'. ... Mind maps are used to generate, visualize, structure, and classify ideas, and can be used as notes to aid a presentation. The advantages of using a mind map are similar to those of using keywords on cue ...
When you're creating a presentation in PowerPoint, you can add speaker notes to refer to later while delivering the slide show in front of an audience. Learn...
Double-click the three dots at the bottom of the Google Slides window. Drag up using the three dots at the bottom to resize the Speaker Notes section as you please. Click View > Show Speaker Notes in the menu to select it. Once you have the Speaker Notes area displayed below your slide, you can simply click inside the section to add your notes.
To print a PowerPoint presentation with notes and slide thumbnails (one per page): Click the File tab in the Ribbon and then click Print. Under Settings, click the arrow next to Full Page Slides and then in the Print Layout area, click Notes Pages. The preview on the right will display the current notes page.
To see the full course that this video came from, go here: ️https://www.simonsezit.com/courses/microsoft/powerpoint-2021-online-course/In this Microsoft Pow...
The 2 main ways to use Notes Pages as handouts are to print them or create PDFs. Here are the steps: Save your presentation. Choose File, Print. To the right of Full Page Slides, click the down arrow and choose Notes Pages. You'll see the Notes Pages to the right and can again scroll through them to check that they are correctly formatted.
4. Distribute Your Handout Notes at the Beginning of Your Presentation. Don't wait until the end of your presentation to distribute your presentation handout notes. Waiting until the end defeats the purpose of creating the handout notes for note taking. So, make sure you pass out the notes at the beginning of your presentation.
Step 1 - Click on the View Tab. The first thing is to open your PowerPoint slides presentation. Once the slide is open in the PowerPoint application, click on the " View " tab located in the menu bar of your PowerPoint application. Step 2 - Choose Notes Master. Clicking on the " View " tab will open a command window.
Here are a few tips for business professionals who want to move from being good speakers to great ones: be concise (the fewer words, the better); never use bullet points (photos and images paired ...
Open your PowerPoint presentation and go to "File" and then "Print". Select the printer you want to use from the "Printer" dropdown list. Under "Settings," choose "Notes Pages" in the "Print Layout" section. You can also customize the header, footer, and other options if desired. Select the number of copies you require.
Click on the "File" menu located at the top-left corner of the screen. Step 3: Choose "Print Preview": Select the option "Print Preview" from the File menu. Step 4: Select "1 Slide With Notes": In the print preview, you'll see a dropdown menu (probably saying "1 Slide Without Notes"). Click this and select "1 Slide With ...
On your presentation screen, in Google Slides' menu bar, select File > Print Preview. You'll see your presentation's print preview. On this page, in the toolbar at the top, click "1 Slide Without Notes" and choose "1 Slide With Notes." Slides will refresh your print preview, allowing you to see the new preview that includes your speaker notes.
Choose a design from our presentation templates or create your own from scratch. Customize your presentation with colors, fonts, and key information. Add animations, videos, images, illustrations. Use assets and other media content from your Brand Kit (Pro) to stay consistent with your business or school brand.
History document from Liberty University Online Academy, 10 pages, World War I Project CALEB SHERWOOD Image 1 A group of Soldiers stand during the war. PRESENTATION TITLE 2 Image 2 Two soldiers run into a cloud of smoke carrying gear. PRESENTATION TITLE 3 Image 3 Many soldiers stand in a trench wearing masks and holdi
Once the debits and credits have been settled, presentation and disclosure is how that information is conveyed to financial statement users in a transparent, understandable and consistent manner. Disclosure goes 'behind the numbers' and is necessary to fully understand the financial statements. ASC 205 to 280 in the FASB's Accounting ...
Print Layout: Choose to print just the slides, just the speaker notes, an outline, or handouts. The number of slides per page is also an option, an effective way to save paper. The Outline prints only the text in the slides, without images. The Notes of a presentation show the slide and the related speaker notes below it.
Page 3—Value and wellness: It's all yours with EyeMed . Our vision plans are focused on value and wellness. By enrolling in the vision plan, we can save you money on your eyewear needs. You can save on average 71% on eye exams and glasses. You have access to a large network of vision providers with more than 100,000 network provider access ...
Deep links allow external applications that are integrated with OPERA Cloud to launch and display a presentation page directly by passing values in the OPERA Cloud URL. Note: You must be an authenticated user with the required access to OPERA Cloud and the specific screens to access the URLs.
World Health Day 2024 is 'My health, my right'. This year's theme was chosen to champion the right of everyone, everywhere to have access to quality health services, education, and information, as well as safe drinking water, clean air, good nutrition, quality housing, decent working and environmental conditions, and freedom from discrimination.
Careful not to be the fool (today). March 2024 was a great month for pages, docs, lists, tasks, and more -- and we ain't foolin'. March 2024 brought some great new offerings: SharePoint: New section backgrounds, Answers in Viva content in Microsoft Search, SharePoint Premium: Enable/disable Unstructured, Structured, and Prebuilt Document Processing, Manage SharePoint Embedded containers ...
WBB NCAA F4: Game Notes vs. 3-Seed UConn. 1-Seed Iowa will face 3-Seed UConn in the National Semifinal of the NCAA Tournament on Friday. Tip-off is set for 8:30 p.m. (CT) inside Rocket Mortgage Fieldhouse in Cleve- land, Ohio. » Friday's contest will air nationally on ESPN, the Hawkeye Radio Network, and Sirius XM Channel 84.